Apidog

All-in-one Collaborative API Development Platform

API Design

API Documentation

API Debugging

API Mocking

API Automated Testing

OpenHands: The Open Source Devin AI Alternative

Mark Ponomarev

Mark Ponomarev

Updated on April 25, 2025

The world of software development is undergoing a seismic shift, driven by the rapid advancements in artificial intelligence. We've seen AI tools evolve from simple code completion aids to sophisticated systems capable of understanding complex requirements and generating functional applications. In this exciting landscape, a new player has emerged, capturing the imagination of developers worldwide: OpenHands. Positioned as a powerful, open-source alternative to proprietary AI developers like Devin AI, OpenHands offers a platform where AI agents can perform tasks previously exclusive to human developers.

Developed by All-Hands-AI, OpenHands (formerly known as OpenDevin) isn't just another coding assistant. It's conceived as a versatile platform for AI agents designed to tackle the full spectrum of software development tasks. Imagine an AI that can not only write code but also modify existing codebases, execute terminal commands, browse the web for information (yes, even scouring Stack Overflow for solutions), interact with APIs, and manage complex development workflows. This is the promise of OpenHands – to "Code Less, Make More."

What truly sets OpenHands apart is its commitment to open source. Built under the permissive MIT License, it invites collaboration, transparency, and community-driven innovation. This contrasts sharply with closed-source models, offering developers unparalleled control, customization, and insight into the inner workings of their AI development partner. For teams and individuals wary of vendor lock-in or seeking to tailor AI capabilities to specific needs, OpenHands presents a compelling proposition.

💡
Want a great API Testing tool that generates beautiful API Documentation?

Want an integrated, All-in-One platform for your Developer Team to work together with maximum productivity?

Apidog delivers all your demans, and replaces Postman at a much more affordable price!
button

What Does OpenHands (Formerly Open Devin) Do?

Understanding the core functionalities of OpenHands is key to appreciating its potential as an AI development platform. It endows AI agents with a comprehensive set of capabilities:

Intelligent Code Modification

OpenHands agents possess the ability to read, comprehend, and alter code within the context of an existing project. Leveraging the chosen Large Language Model (LLM), the agent analyzes the codebase, understands interdependencies between files and functions, and implements targeted modifications based on user prompts. This includes tasks such as refactoring functions for clarity, adding new API endpoints, or updating project dependencies as instructed.

Secure Command Execution

A cornerstone of OpenHands is its capacity to execute shell commands (like npm install, python manage.py runserver, git commit, ls, grep, and others) within a protected, isolated sandbox environment. This sandbox, usually implemented as a Docker container, isolates the agent's actions, preventing any unintended impact on the host system. This allows the agent to perform essential development operations like setting up project environments, executing test suites, installing necessary libraries, running build scripts, and managing version control.

Integrated Web Browsing

Effective software development frequently necessitates external information gathering, such as consulting documentation, finding solutions on platforms like Stack Overflow, or researching libraries. OpenHands agents are equipped to browse the web autonomously, retrieving the information required to fulfill their assigned tasks. This capability enables them to stay current with best practices and devise solutions for novel problems without relying solely on pre-fed information.

API Interaction

Modern software architecture often involves integrating multiple services via APIs. OpenHands agents can be directed to interact with these external APIs. This might involve fetching data from a third-party source, sending updates to another system, or orchestrating workflows that span across different tools, thereby automating more complex development processes.

File System Management

Agents require the ability to interact with project files. OpenHands grants them the permissions to create, read, write, and delete files and directories within their designated workspace (typically a volume mapped from the local system into the agent's sandbox). This enables them to structure projects logically, add new modules or components, manage configuration files, and store output results.

These diverse capabilities, orchestrated by a user-selected LLM backend, empower OpenHands agents to autonomously handle intricate, multi-step development tasks, moving significantly beyond basic code generation towards genuine AI-driven software engineering support.

How to Install OpenHands on Mac, Linux, Windows

Using Docker is the recommended and most robust method for running OpenHands locally. It ensures environmental consistency and provides the necessary isolation for the agent's operations. Below is a detailed guide for installing OpenHands across different operating systems.

System Requirements

Ensure your system meets the following prerequisites:

  • Operating System:
  • macOS (with Docker Desktop support)
  • Linux (Ubuntu 22.04 tested, other modern distributions likely compatible)
  • Windows (with WSL 2 and Docker Desktop support)
  • Hardware: A system with a modern processor and at least 4GB RAM is advised. Tasks involving complex operations or running larger local LLMs will significantly benefit from increased RAM and CPU/GPU resources.

Prerequisites Installation Steps

Follow these steps carefully to set up the necessary prerequisites.

Step 1: Install Docker Desktop

Download and install Docker Desktop tailored for your operating system directly from the official Docker website (https://www.docker.com/products/docker-desktop/). Follow the installation wizard provided by Docker. After installation, confirm that the Docker daemon is active; its icon should be visible in your system tray or menu bar.

Step 2: Configure Docker Based on OS

Specific configurations are needed depending on your operating system.

macOS Configuration
  1. Launch Docker Desktop.
  2. Access Settings (typically through the gear icon).
  3. Navigate to the Advanced section.
  4. Verify that the option Allow the default Docker socket to be used is checked (enabled). This permission is essential for the OpenHands container to manage other Docker containers (like the sandbox).
Linux Configuration
  1. Install Docker Desktop for Linux by following the official Docker documentation.
  2. Ensure the Docker service is running post-installation.
    (Note: While tested on Ubuntu 22.04, compatibility with other Linux distributions is expected but not guaranteed.)
Windows Configuration
  1. Install WSL (Windows Subsystem for Linux): If WSL 2 is not already installed, open PowerShell as Administrator and execute wsl --install. This command installs WSL and a default Linux distribution (often Ubuntu). A system restart might be required.
  2. Verify WSL Version: Open a standard PowerShell or Command Prompt window and type wsl --version. Confirm the output indicates WSL version 2 or higher. If version 1 is shown, update WSL or set version 2 as default using wsl --set-default-version 2.
  3. Install Docker Desktop for Windows: Proceed with the Docker Desktop installation if not already done.
  4. Configure Docker Desktop WSL Integration: Launch Docker Desktop, go to Settings. Under General, ensure Use the WSL 2 based engine is enabled. Under Resources > WSL Integration, confirm Enable integration with my default WSL distro is enabled. Apply changes and restart Docker if prompted.
  5. Critical Note: For Windows users, all subsequent docker commands related to OpenHands must be executed from within the WSL terminal environment (e.g., Ubuntu terminal), not directly from PowerShell or Command Prompt.

Starting the OpenHands Application

With the prerequisites met, you can now start the OpenHands application.

Step 1: Open Your Terminal
  • On macOS or Linux, open your default Terminal application.
  • On Windows, launch your installed WSL distribution terminal (e.g., Ubuntu).
Step 2: Pull Runtime Image (Optional)

OpenHands utilizes a separate Docker image for the agent's sandboxed execution environment. Pre-pulling this image can sometimes accelerate the initial startup. Use the tag recommended in the official documentation:

docker pull docker.all-hands.dev/all-hands-ai/runtime:0.34-nikolaik

(Always verify the latest recommended tag from the OpenHands GitHub repository or official documentation, as tags may change.)

Step 3: Run the OpenHands Container

Execute the following comprehensive command within your terminal (use the WSL terminal on Windows):

docker run -it --rm --pull=always \
    -e SANDBOX_RUNTIME_CONTAINER_IMAGE=docker.all-hands.dev/all-hands-ai/runtime:0.34-nikolaik \
    -e LOG_ALL_EVENTS=true \
    -v /var/run/docker.sock:/var/run/docker.sock \
    -v ~/.openhands-state:/.openhands-state \
    -p 3000:3000 \
    --add-host host.docker.internal:host-gateway \
    --name openhands-app \
    docker.all-hands.dev/all-hands-ai/openhands:0.34
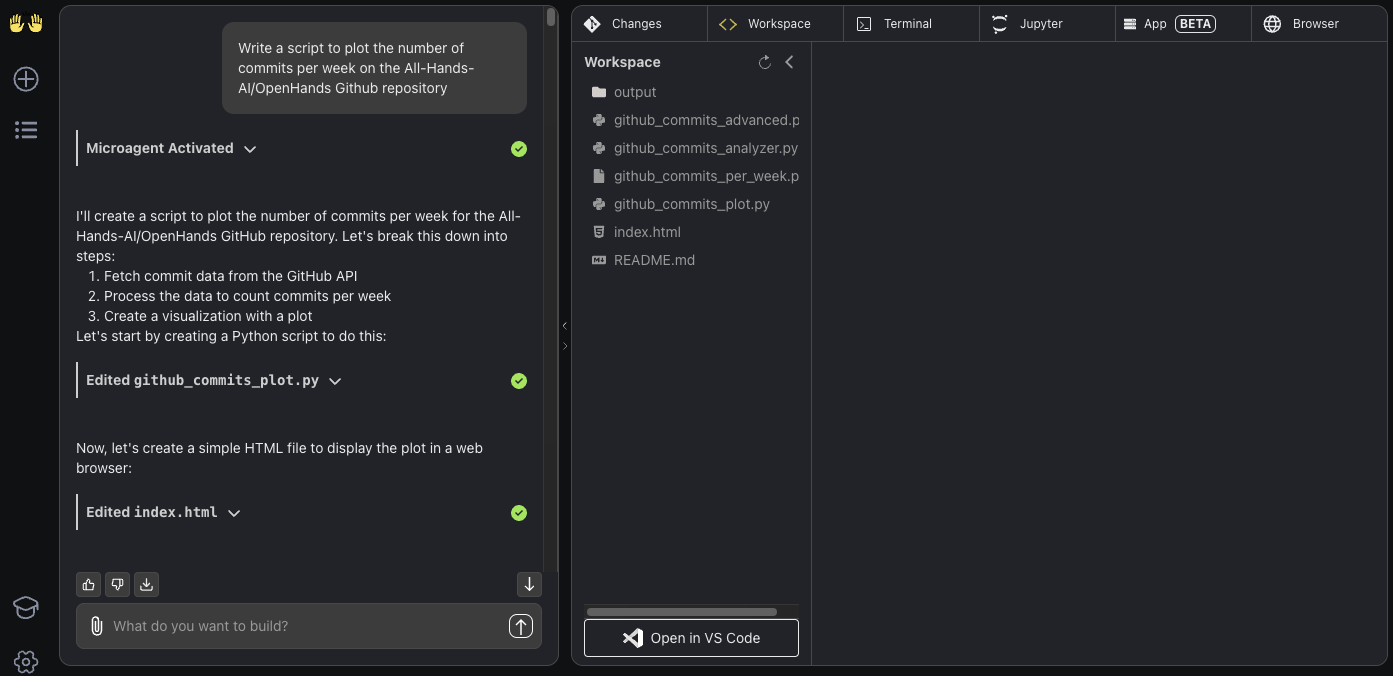
Step 4: Access the Web User Interface

Once the docker run command is executed, monitor the log output in your terminal. When the application startup sequence completes, open your preferred web browser and navigate to http://localhost:3000.

With these steps completed, OpenHands is successfully installed and running locally. The immediate next step involves configuring a Large Language Model to power the agent.

Getting Started with Open Hands

With OpenHands operational, the next vital stage is connecting it to an LLM, which serves as the agent's cognitive engine. Following LLM setup, you can begin assigning development tasks. This section details the initial configuration and provides illustrative interaction examples.

Initial LLM Configuration

This is a mandatory first step upon launching the UI.

  • First Launch: When accessing http://localhost:3000 for the first time, a settings modal will automatically appear.
  • Mandatory Fields: You are required to select an LLM Provider (e.g., OpenAI, Anthropic, Google, OpenRouter, local options like Ollama), choose a specific LLM Model offered by that provider, and input your corresponding API Key.
  • Accessing Settings Later: If the initial modal is closed or if you need to modify the configuration subsequently, click the gear icon (⚙️) present in the user interface (often located near the chat input area or in a sidebar).

(Detailed instructions for configuring specific LLM providers are provided in the subsequent section.)

Your First Interaction: "Hello World" Task

Initiate interaction with a fundamental task to observe the agent's process.

Step 1: Prompt the Agent

Enter the following instruction into the chat input field and press Enter:

Write a bash script hello.sh that prints "hello world!"
Step 2: Observe Planning Phase

OpenHands relays the request to the configured LLM, which then formulates a strategic plan. Typically, the agent will outline its intended actions in the UI, such as:

  1. Create a new file named hello.sh.
  2. Insert the bash command echo "hello world!" into this file.
  3. Grant execute permissions to the script using chmod +x hello.sh.
  4. Execute the script via ./hello.sh to confirm the output matches expectations.
Step 3: Observe Execution Phase

The agent proceeds to execute the planned steps within its sandboxed Docker runtime environment. The UI log will display the commands being run and reflect file system modifications as they occur.

Step 4: Verify Outcome

Upon successful completion, the agent should report the execution outcome, including the expected output: "hello world!".

Step 5: Iterative Refinement

Now, let's modify the script with a follow-up instruction:

Modify hello.sh so that it accepts a name as the first argument, but defaults to "world"
Step 6: Observe Modification Process

The agent will again devise and execute a plan:

  1. Read the existing contents of hello.sh.
  2. Update the script's code to incorporate argument handling, potentially using bash parameter expansion like echo "hello ${1:-world}!".
  3. Optionally, run tests with and without arguments (e.g., ./hello.sh and ./hello.sh Developer) to validate the changes.
Step 7: Language Conversion Task

Demonstrate the agent's flexibility by requesting a language change:

Please convert hello.sh to a Ruby script, and run it
Step 8: Observe Environment Adaptation

If the sandbox environment lacks the necessary Ruby interpreter, the agent might first plan and execute installation commands (e.g., apt-get update && apt-get install -y ruby). Subsequently, it will translate the logic into Ruby code (e.g., puts "hello #{ARGV[0] || 'world'}!"), save it to hello.rb, make it executable, and run the new script.

This introductory example highlights the agent's core workflow: understanding instructions, planning execution steps, interacting with the file system and shell within a sandbox, and adapting based on iterative prompts.

Building From Scratch: TODO Application Example

Agents often demonstrate strong performance on "greenfield" projects, where they can establish the structure without needing extensive context from a pre-existing complex codebase.

Step 1: Provide Initial Project Prompt

Be precise regarding the desired features and the technology stack:

Build a frontend-only TODO app in React. All state should be stored in localStorage. Implement basic functionality to add new tasks and display the current list of tasks.
Step 2: Monitor Planning and Building

The agent might strategize as follows:

  1. Utilize create-react-app (if available/instructed) or manually scaffold basic HTML, CSS, and JavaScript/JSX files.
  2. Develop React components for the task input form and the task list display.
  3. Implement application state management using React hooks like useState and useEffect.
  4. Integrate localStorage.setItem() and localStorage.getItem() for data persistence between sessions.
  5. Write the necessary HTML structure and apply basic styling with CSS.
Step 3: Request Feature Enhancement

Once the foundational application is operational, request additional features:

Allow adding an optional due date to each task. Display this due date alongside the task description in the list.
Step 4: Observe Iterative Development

The agent will modify the existing React components to include a date input element, update the application's state structure to accommodate the due date information, and adjust the rendering logic to display the dates appropriately in the task list.

Step 5: Implement Version Control (Best Practice)

Regularly save the agent's progress using version control, just as you would in manual development. You can even instruct the agent to handle commits:

Commit the current changes with the commit message "feat: Add due date functionality to tasks" and push the commit to a new branch named "feature/due-dates" on the origin remote repository.

(Note: Successful execution of Git commands, especially pushing to remotes, requires Git to be installed and potentially configured with authentication credentials within the agent's workspace/sandbox environment.)

Adding New Code to Existing Projects

OpenHands is capable of integrating new code and features into established codebases.

Example 1: Adding a GitHub Action
  • Prompt:
Add a GitHub Action workflow to this repository that lints JavaScript code using ESLint whenever code is pushed to the main branch.
  • Agent Behavior: The agent might first inspect the project structure (e.g., ls .github/workflows) to see if workflows exist. It would then determine the appropriate linter (or use the one specified), create a new YAML file (e.g., .github/workflows/lint.yml), and populate it with the correct configuration for a GitHub Action triggered on pushes to main, running ESLint.
Example 2: Adding a Backend Route (Context is Key)
  • Prompt:
Modify the Express.js application file located at './backend/api/routes.js'. Add a new GET endpoint at '/api/tasks' that retrieves and returns all tasks by calling the asynchronous function 'getAllTasks' found in './db/queries.js'.
  • Agent Behavior: Providing the specific file path (./backend/api/routes.js) and relevant contextual information (like the existence and location of getAllTasks in ./db/queries.js) dramatically improves the agent's efficiency and accuracy. It will target the specified file and insert the necessary route handler code, including importing the required function.

Refactoring Code

Leverage OpenHands for targeted code refactoring efforts.

Example 1: Renaming Variables for Clarity
  • Prompt: In the file './utils/calculation.py', rename all single-letter variables within the 'process_data' function to be more descriptive of their purpose.
Example 2: Splitting Large Functions
  • Prompt: Refactor the 'process_and_upload_data' function in 'data_handler.java'. Split its logic into two distinct functions: 'process_data' and 'upload_data', maintaining the original overall functionality.
Example 3: Improving File Structure
  • Prompt: Break down the main route definitions in './api/routes.js' into separate files based on resource (e.g., 'userRoutes.js', 'productRoutes.js'). Update the primary server file ('server.js') to import and use these modular route files.

Fixing Bugs

While bug fixing can be intricate, OpenHands can assist, particularly when the issue is well-defined.

Example 1: Correcting Specific Logic
  • Prompt: The regular expression used for email validation in the '/subscribe' endpoint handler within 'server/handlers.js' incorrectly rejects valid '.co.uk' domain names. Please fix the regex pattern.
Example 2: Modifying Behavior
  • Prompt: The 'search_items' function implemented in 'search.php' currently performs a case-sensitive search. Modify this function to ensure the search is case-insensitive.
Example 3: Employing a Test-Driven Approach
  1. Prompt for Test Creation: The 'calculate_discount' function in 'pricing.js' crashes when the input quantity is zero. Write a new test case using Jest in the 'pricing.test.js' file that specifically reproduces this bug.
  2. Observe Test Execution: The agent generates the test code, executes the test suite (e.g., via npm test), and reports the expected failure.
  3. Prompt for Code Fix: Now, modify the 'calculate_discount' function in 'pricing.js' to correctly handle the zero quantity case, ensuring the previously written test passes.
  4. Observe Fix and Validation: The agent adjusts the function logic (perhaps adding a conditional check for zero quantity) and re-runs the test suite, reporting the successful outcome.

Core Usage Strategy: Begin with simple, specific requests. Provide necessary context like file paths and function names. Break complex goals into smaller, iterative steps. Commit changes frequently using version control.

How to Configure OpenHands with LLMs (OpenAI, OpenRouter, Google Gemini, Local)

Establishing the connection between OpenHands and a capable LLM is paramount. This configuration is managed through the OpenHands web user interface.

Accessing LLM Configuration Settings

  • During Initial Setup: A configuration modal automatically appears upon first loading the UI at http://localhost:3000.
  • For Subsequent Changes: Click the gear icon (⚙️) within the UI, usually situated near the chat input or in a settings panel.

General LLM Configuration Procedure

  1. Select LLM Provider: Choose your desired service (e.g., "OpenAI", "Anthropic", "Google", "OpenRouter", "Ollama") from the available dropdown menu.
  2. Enter API Key: Carefully paste the API key associated with your chosen provider into the designated input field. API keys should be treated with the same security as passwords.
  3. Specify LLM Model: Select the specific model you intend to use from the chosen provider (e.g., gpt-4o, claude-3-5-sonnet-20240620, gemini-1.5-pro-latest). The available models might populate dynamically based on the selected provider, or you may need to enter the model name manually.
  4. Explore Advanced Options (Optional): Toggle the advanced settings to reveal further configuration possibilities:
  • Custom Model: If your preferred model isn't listed, you can often input its precise identifier here (consult the provider's documentation for the correct model ID).
  • Base URL: This setting is critical when connecting to locally hosted LLMs or using proxy services. It defines the specific API endpoint URL that OpenHands should target for requests.

5. Save Configuration: Apply and save your chosen settings.

Provider-Specific Configuration Steps

Follow these detailed steps for popular LLM providers:

OpenAI Configuration
  1. Visit https://platform.openai.com/.
  2. Log in or create a new account.
  3. Navigate to the API keys section and generate a new secret key. Copy this key immediately as it may not be shown again.
  4. Ensure that billing information is properly set up under the Billing settings to enable API usage.
  5. Within the OpenHands UI settings:
  • Set Provider to OpenAI.
  • Paste your generated API key into the API Key field.
  • Select or type the desired OpenAI model (e.g., gpt-4o, gpt-4-turbo).
Anthropic (Claude) Configuration
  1. Go to https://console.anthropic.com/.
  2. Log in or sign up for an account.
  3. Access Account Settings > API Keys and create a new API key. Copy the generated key.
  4. Configure billing under Plans & Billing. Consider setting usage limits to manage costs effectively.
  5. In the OpenHands UI settings:
  • Set Provider to Anthropic.
  • Paste your copied API key.
  • Select or enter the specific Claude model (e.g., claude-3-5-sonnet-20240620, claude-3-opus-20240229).
Google Gemini Configuration
  1. Obtain an API key through either:

2. If using Google Cloud, ensure the necessary Vertex AI APIs are enabled and billing is configured for your project.

3. In the OpenHands UI settings:

  • Set Provider to Google.
  • Paste your obtained API key.
  • Select or input the desired Gemini model (e.g., gemini-1.5-pro-latest, gemini-1.5-flash-latest).
OpenRouter Configuration
  1. Navigate to https://openrouter.ai/.
  2. Log in or create an account.
  3. Go to the Keys section and generate a new API key. Copy it.
  4. Add credits to your account via the Billing section to enable usage.
  5. In the OpenHands UI settings:
  • Set Provider to OpenRouter.
  • Paste your generated OpenRouter API key.
  • Select or type the exact model identifier as used by OpenRouter (e.g., anthropic/claude-3.5-sonnet, google/gemini-pro-1.5, mistralai/mistral-7b-instruct). Refer to the OpenRouter Models documentation for a list of available identifiers.
Local LLMs Configuration (e.g., via Ollama)
  1. Install Ollama: Follow the installation guide at https://ollama.com/.
  2. Download Model: Use the Ollama CLI to download a desired model, e.g., ollama pull llama3 (or other models like codellama, mistral).
  3. Run Ollama Server: Ensure the Ollama background server is running (it usually starts automatically post-installation).
  4. In the OpenHands UI settings:
  • Set Provider to Ollama (or potentially LiteLLM if using it as an intermediary).
  • API Key: Typically not required for standard Ollama setups; you might leave it blank or enter NA or ollama.
  • Enable Advanced Options.
  • Set Base URL: This is essential. Since OpenHands runs inside Docker, localhost points to the container itself, not your host machine where Ollama is running. Use the special DNS name http://host.docker.internal:11434. host.docker.internal resolves to your host machine's IP from within the container, and 11434 is the default port for the Ollama API server.
  • Specify Model: Select or type the exact name of the Ollama model you downloaded (e.g., llama3, codellama) in the Model or Custom Model field.

How to Configure OpenHands Docker Runtime

The term "runtime" within OpenHands designates the isolated Docker container environment wherein the agent executes commands and interacts with the file system. Configuration primarily involves specifying which runtime image to use when initiating the main OpenHands application container.

Purpose of the Runtime Environment

  • Isolation and Security: The runtime container operates separately from the main OpenHands application container. This segregation creates a secure sandbox, preventing actions performed by the agent (like software installation or code execution) from directly impacting the core application or the host system.
  • Execution Environment: The runtime image typically includes essential base tools (like a shell and common command-line utilities). Depending on the specific image chosen, it might also come pre-installed with development tools such as Python, Node.js, or Git. Furthermore, the agent often has the capability to install additional necessary tools within this sandbox environment using package managers (apt, npm, pip, etc.).

Configuration via docker run Command

The primary method for configuring the runtime is through the -e (environment variable) flag within the docker run command used to launch the OpenHands application:

-e SANDBOX_RUNTIME_CONTAINER_IMAGE=docker.all-hands.dev/all-hands-ai/runtime:0.34-nikolaik

This environment variable instructs the OpenHands application about the specific Docker image tag it should use whenever it needs to provision a new sandbox container for handling an agent's task execution.

Modifying or Updating the Runtime

  • Switching Runtime Versions: If a new version of the runtime image becomes available (e.g., 0.35-newfeature), you would first stop the currently running OpenHands container (e.g., docker stop openhands-app). Then, restart it using the docker run command, updating the image tag specified in the -e SANDBOX_RUNTIME_CONTAINER_IMAGE flag:
docker run ... -e SANDBOX_RUNTIME_CONTAINER_IMAGE=docker.all-hands.dev/all-hands-ai/runtime:0.35-newfeature ... docker.all-hands.dev/all-hands-ai/openhands:<corresponding_app_version>

(Note: It's generally advisable to update the main openhands application image tag concurrently to ensure compatibility between the application and the runtime environment.)

  • Using Development Builds: For testing the latest, potentially unstable, features, you can utilize the main tag for the runtime image:
-e SANDBOX_RUNTIME_CONTAINER_IMAGE=docker.all-hands.dev/all-hands-ai/runtime:main
  • Leveraging Semantic Versioning: The documentation suggests that version tags might support semantic versioning conventions (e.g., :0.9 potentially resolving to the latest 0.9.x patch release). This could offer a way to receive minor updates automatically if the image repository supports it.

In essence, managing the Docker runtime primarily involves selecting and specifying the appropriate runtime image tag within your docker run command, balancing stability requirements with the need for specific features or updates.

Best OpenHands Prompts

The effectiveness of the OpenHands agent is profoundly influenced by the quality of the prompts provided. Crafting prompts that are clear, specific, and appropriately scoped is essential for achieving accurate and useful results.

Characteristics of Effective Prompts

Good prompts generally exhibit the following qualities:

  • Concrete: They explicitly describe the desired functionality or the precise error that needs addressing. Ambiguous or vague requests should be avoided. For instance, instead of "Make the user profile better," use "Add a field to display the user's account creation date on the profile page located at frontend/src/components/UserProfile.tsx."
  • Location-specific: When the relevant files, directories, or code sections are known, specifying them directly significantly aids the agent. This reduces ambiguity and saves the agent from potentially time-consuming searches. Instead of "There's a login bug," use "User login fails when the username contains an underscore character. Please correct the validation logic in the validateUsername function within backend/auth/validation.py."
  • Appropriately Scoped: Each prompt should ideally focus on a single, manageable task or feature. Aim for changes that are reasonably contained, perhaps involving modifications up to roughly 100 lines of code. Break down larger objectives into a sequence of smaller, more focused prompts. Instead of "Build the entire e-commerce website," start with "Create a basic product listing page component in React that fetches and displays data from the /api/products endpoint." Subsequent prompts can then address the shopping cart, checkout process, etc.

Analyzing Good Prompt Examples

  • Prompt: Add a function named 'calculate_average' to the file 'utils/math_operations.py'. This function should accept a list of numbers as input and return their numerical average.
  • Effectiveness: This prompt is concrete (specifies function name, input type, output, behavior), location-specific (utils/math_operations.py), and appropriately scoped (involves creating a single, well-defined function).
  • Prompt: Resolve the TypeError occurring on line 42 in 'frontend/src/components/UserProfile.tsx'. The error message indicates an attempt to access a property of an undefined object. Please add a null check before accessing the 'address' property.
  • Effectiveness: It's concrete (identifies error type, line number, probable cause, suggested fix), location-specific (provides the file path), and appropriately scoped (focuses on a single, specific bug fix).
  • Prompt: Implement input validation for the email field within the user registration form. Update the component 'frontend/src/components/RegistrationForm.tsx' to verify if the entered email conforms to a standard email format using a regular expression before allowing form submission.
  • Effectiveness: This prompt is concrete (details the feature - validation, target field - email, suggested method - regex), location-specific (gives the component file path), and appropriately scoped (adds a single validation feature).

Analyzing Ineffective Prompt Examples

  • Prompt: Improve the codebase.
  • Ineffectiveness: Excessively vague and lacks concrete direction. "Improve" can mean many things (performance, readability, security, etc.). The agent needs specific goals.
  • Prompt: Migrate the entire backend system to use the Django framework instead of Node.js.
  • Ineffectiveness: Scope is far too large for a single prompt. This represents a major architectural change requiring numerous smaller, coordinated steps.
  • Prompt: The user authentication system has a bug somewhere. Find and fix it.
  • Ineffectiveness: Lacks essential specificity and location information. While a highly capable agent might eventually locate the bug through exhaustive searching, it's extremely inefficient. Providing details like error messages, steps to reproduce, or potentially affected files drastically improves the chances of success.

Checklist for Crafting Effective Prompts

  • Be Specific: Clearly articulate the desired action or outcome.
  • Provide Context: Include relevant file paths, function/class names, line numbers, or even short code snippets when available.
  • Break Down Complexity: Decompose large tasks or features into a series of smaller, logically sequenced prompts.
  • Include Error Details: When addressing bugs, paste the exact error message and any relevant log output into the prompt.
  • Specify Technology: Mention the programming language, framework, or key libraries involved if it's not immediately obvious from the context.
  • Iterate and Refine: Begin with a clear initial prompt, review the agent's response/actions, and provide follow-up prompts to guide, correct, or further refine the results.

Adhering to these prompting best practices will significantly enhance your ability to collaborate effectively with the OpenHands agent and achieve more accurate and desirable outcomes.

Conclusion

OpenHands establishes itself as a formidable and highly promising open-source platform within the dynamic domain of AI-enhanced software development. By presenting a transparent and customizable alternative to closed-source AI developers like Devin AI, it champions collaboration and community-driven advancement. Its core strength lies in empowering AI agents with essential development capabilities – including nuanced code modification, secure command execution, web research, API integration, and file system management – enabling them to tackle multifaceted software engineering challenges.

This guide has meticulously detailed the journey of adopting OpenHands, starting from cross-platform installation using Docker, proceeding through the critical steps of configuring various LLM backends (encompassing popular cloud services and local alternatives), and illustrating practical application through diverse coding examples covering initial development, refactoring, and debugging. We underscored the pivotal role of skillful prompting, emphasizing clarity, specificity, and appropriate task scoping as keys to unlocking the agent's full potential.

Opting for a local Docker deployment grants maximum control and customization, while the platform's inherent flexibility in LLM selection allows users to align their choice with specific requirements for performance, cost, and data privacy. OpenHands accommodates everything from leading commercial models to self-hosted open-source solutions.

The integration of AI into software development workflows is an ongoing evolution, and OpenHands is prominently positioned at the vanguard of the open-source contribution to this field. While the technology is still maturing and necessitates user guidance through thoughtful prompting and iterative refinement, its potential impact is substantial. By harnessing its capabilities and engaging with its vibrant community, developers can genuinely begin to "Code Less, Make More," leveraging AI not just as a tool, but as a powerful collaborator in shaping the future of software creation.

💡
Want a great API Testing tool that generates beautiful API Documentation?

Want an integrated, All-in-One platform for your Developer Team to work together with maximum productivity?

Apidog delivers all your demans, and replaces Postman at a much more affordable price!
button

Get Gemini 2.5 Pro Free Access: Here is HowViewpoint

Get Gemini 2.5 Pro Free Access: Here is How

Explore ways to interact with Gemini 2.5 Pro without cost using the web UI and Python libraries. Discover why Apidog is the essential API testing tool for developers, especially for advanced SSE debugging of LLM endpoints like Gemini.

Oliver Kingsley

April 25, 2025

Suna AI: the Open Source General AI AgentViewpoint

Suna AI: the Open Source General AI Agent

This article provides an overview of Suna's core capabilities and architecture, followed by a detailed, step-by-step tutorial on how to set up and run your own instance locally, empowering you to leverage this powerful AI agent within your own environment.

Medy Evrard

April 25, 2025

Howt to Deploy MCP Servers on AWS LambdaViewpoint

Howt to Deploy MCP Servers on AWS Lambda

This article explores how to leverage MCPEngine to build and deploy MCP servers on AWS Lambda, covering stateless tools, state management, and authentication.

INEZA FELIN-MICHEL

April 25, 2025