
The latest OpenAI API updates are transforming the way developers build intelligent, autonomous agents—making it easier to create systems that can reason, access real-time data, and automate digital tasks. Whether you're an API developer, backend engineer, or tech lead, understanding these new tools is key to building smarter applications.
Before we dive in, if you're looking for a way to streamline your API integration and testing workflow, consider [downloading Apidog for free](
). Apidog offers a fast, reliable interface for working with APIs like OpenAI’s—making your development process smoother and more efficient.
Why OpenAI's New Agent Tools Matter for API Developers
Recent updates to the OpenAI API now include integrated web search, the powerful Responses API, file search, computer-use features, and the open-source Agents SDK. Together, these unlock the ability to:
- Build agents that fetch real-time web data and cite sources
- Automate complex multi-step workflows
- Search internal files and databases securely
- Control computer actions programmatically
These advancements allow you to create AI-powered assistants, bots, and automation tools that are faster, safer, and more autonomous than ever—directly from your backend or API-driven application.
What Is an AI Agent? Quick Definition for Developers
In AI, an agent is an autonomous program that perceives its environment, makes decisions, and takes actions to achieve specific goals. Think digital assistants that answer questions, execute tasks, or automate business processes—all based on your rules and data.
With OpenAI's latest APIs, you can build and orchestrate these agents to interact with users, access information, and automate digital workflows.
Getting Started: Using the OpenAI Responses API
The new Responses API merges the best of the Chat Completions and Assistants APIs into a single, streamlined interface. It simplifies agent development by supporting:
- Text generation and conversation
- Image analysis (e.g., object detection, screenshot interpretation)
- Tool integrations (web search, file search, custom code)
- Real-time and streaming outputs
Example: Generating Text
import OpenAI from "openai";
const client = new OpenAI();

const response = await client.responses.create({
    model: "gpt-4o",
    input: "Write a one-sentence bedtime story about a unicorn."
});
console.log(response.output_text);
Example: Image Analysis
Scan receipts, analyze screenshots, or recognize objects:
const response = await client.responses.create({
    model: "gpt-4o",
    input: [
        { role: "user", content: "What two teams are playing in this photo?" },
        {
            role: "user",
            content: [
                {
                    type: "input_image",
                    image_url: "https://upload.wikimedia.org/wikipedia/commons/3/3b/LeBron_James_Layup_%28Cleveland_vs_Brooklyn_2018%29.jpg",
                }
            ],
        },
    ],
});
console.log(response.output_text);
Example: Extending Models with Tools
Give your agent access to real-time web search:
const response = await client.responses.create({
    model: "gpt-4o",
    tools: [ { type: "web_search_preview" } ],
    input: "What was a positive news story from today?",
});
console.log(response.output_text);
Real-Time Streaming
Build low-latency experiences with server-sent events:
import { OpenAI } from "openai";
const client = new OpenAI();

const stream = await client.responses.create({
    model: "gpt-4o",
    input: [
        {
            role: "user",
            content: "Say 'double bubble bath' ten times fast.",
        },
    ],
    stream: true,
});

for await (const event of stream) {
    console.log(event);
}
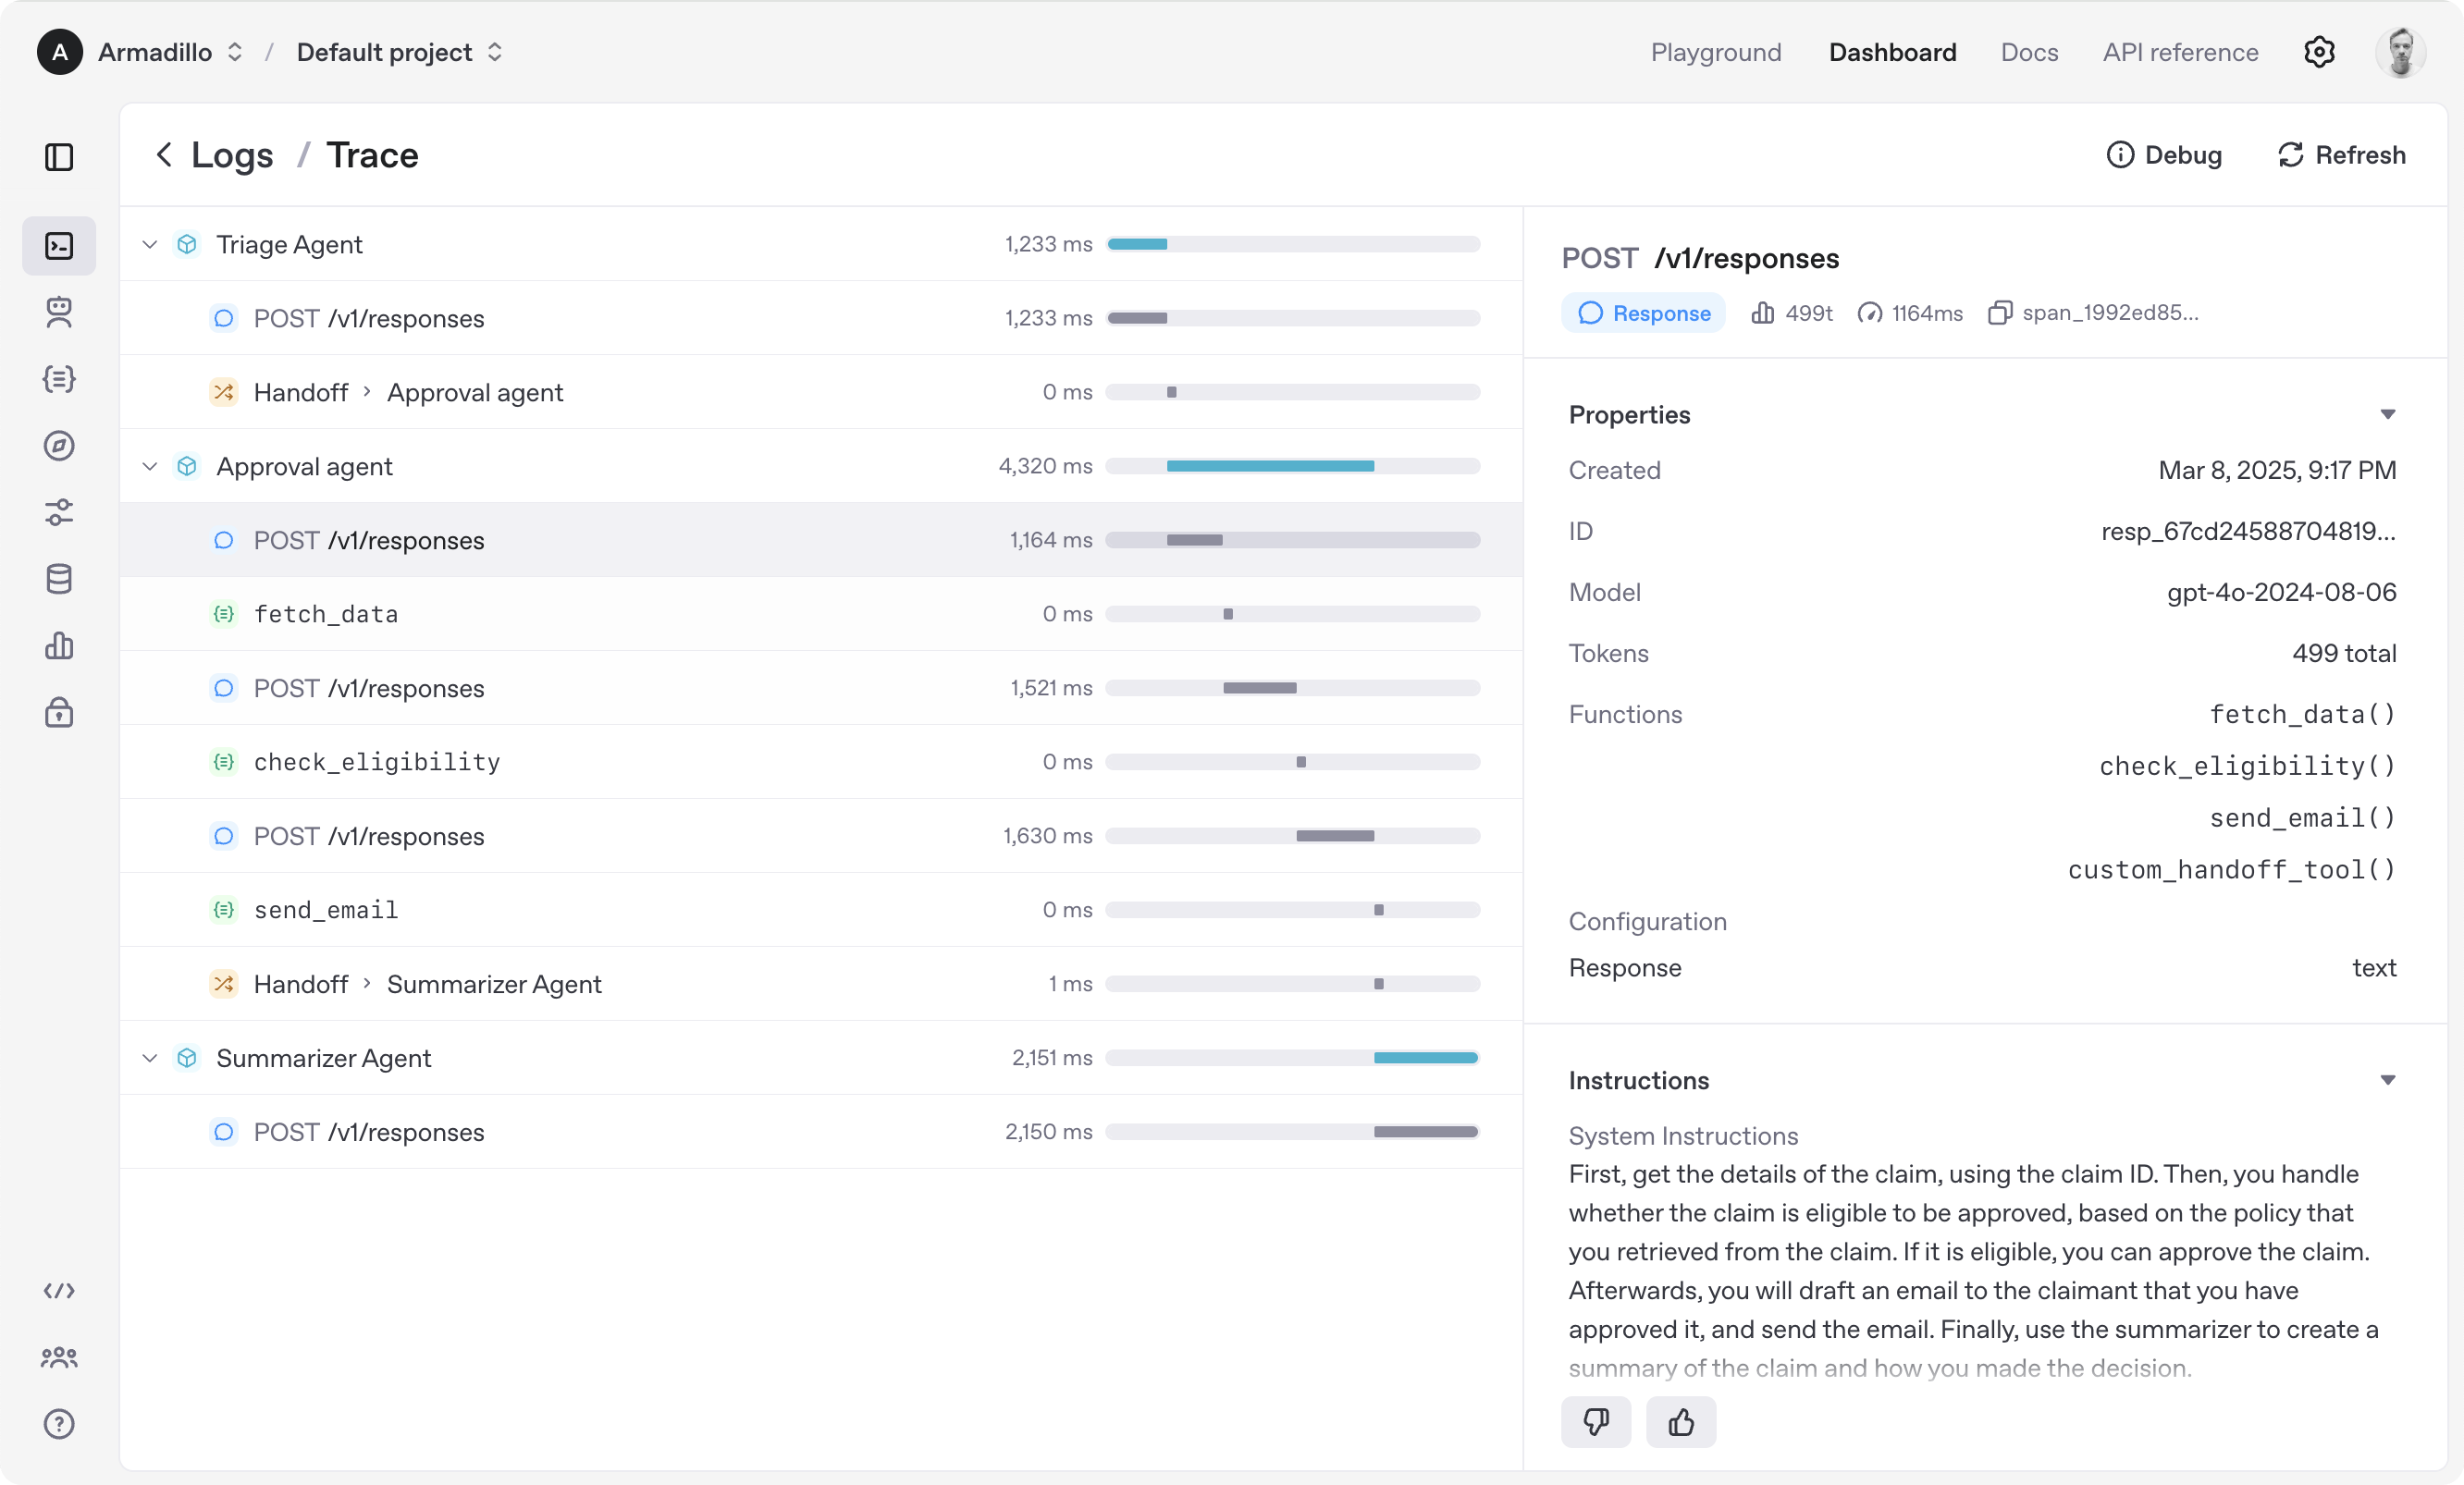
Building Advanced Agents with the Agent SDK
To go beyond simple Q&A, use the Agents SDK (Python) to orchestrate agent logic, delegate tasks, and implement handoffs between specialized sub-agents. This lets you build multi-agent systems for complex workflows.
from agents import Agent, Runner
import asyncio

spanish_agent = Agent(
    name="Spanish agent",
    instructions="You only speak Spanish.",
)

english_agent = Agent(
    name="English agent",
    instructions="You only speak English",
)

triage_agent = Agent(
    name="Triage agent",
    instructions="Handoff to the appropriate agent based on the language of the request.",
    handoffs=[spanish_agent, english_agent],
)

async def main():
    result = await Runner.run(triage_agent, input="Hola, ¿cómo estás?")
    print(result.final_output)

if __name__ == "__main__":
    asyncio.run(main())
This approach lets you create agents that can route requests, process language-specific tasks, and reliably hand off work—all within a safe, managed environment.
Integrating Web Search: Real-Time, Cited Information
OpenAI's web search tool enables your agents to fetch up-to-date information and cite original sources—critical for building assistants, customer bots, or research tools.
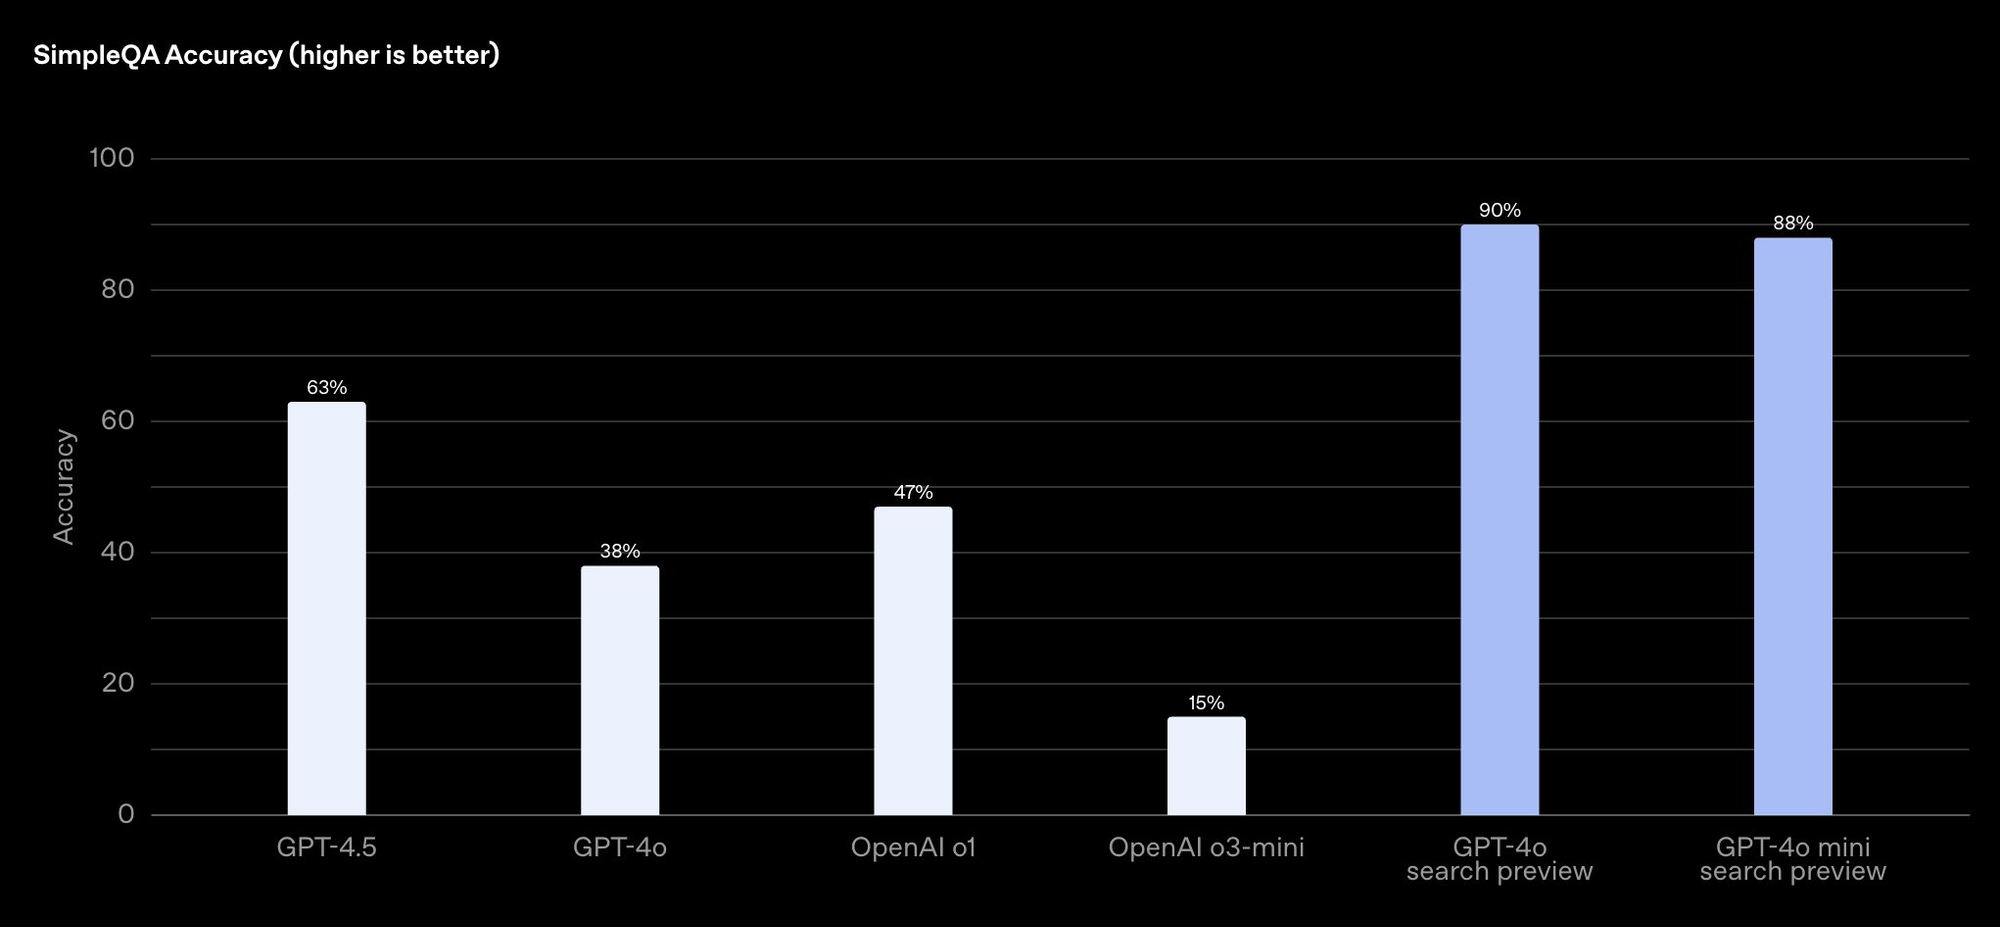
- High accuracy: On OpenAI’s SimpleQA benchmark, GPT-4o search scores 90%.
- Transparency: Users see links to original web sources.
How to integrate:
- Enable web search in the Responses API tool list
- Structure your queries for precise results
- Display sources for user trust
For customer support agents, this means instant, reliable answers with traceable references—improving both user satisfaction and compliance.
File Search: Secure Internal Data Access
Need to build agents that search private files, HR records, or company documentation? OpenAI's file search allows your AI agents to quickly retrieve information from uploaded files—without training the model on your private data.
Steps to use:
- Upload files via the OpenAI API
- Configure your agent to use file search within the Responses API
- Query and extract relevant data
This is ideal for enterprise automation—like building support bots, HR assistants, or business intelligence agents.
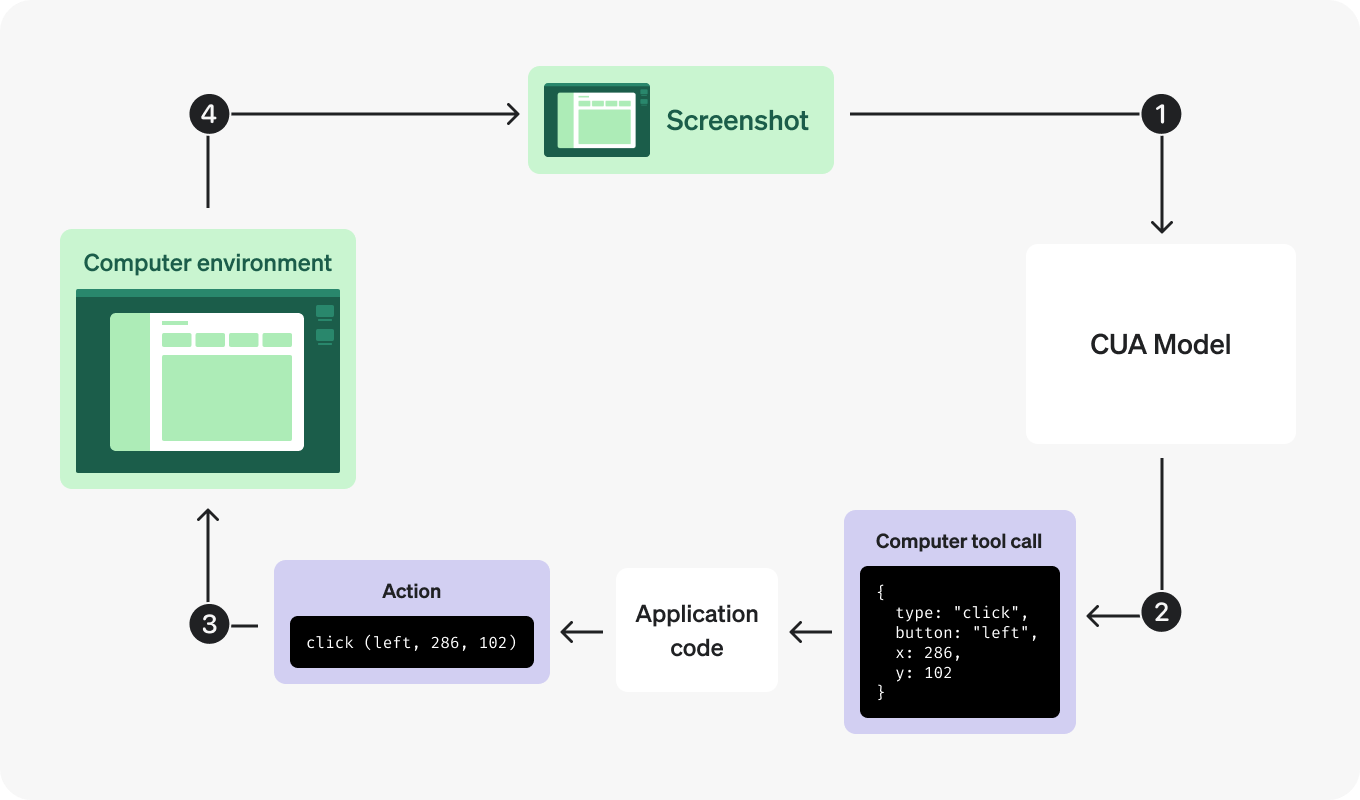
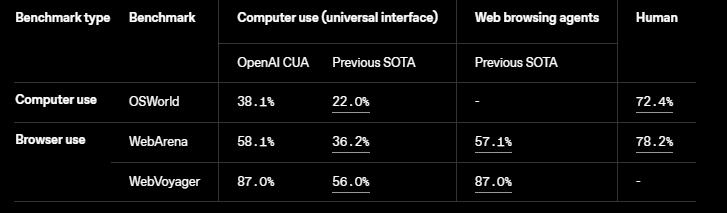
Automating Digital Tasks: Computer Use Capabilities
OpenAI’s Computer-Using Agent (CUA) lets agents generate mouse and keyboard actions—automating browser tasks, data entry, and more. The Operator product uses this tech for web-based automations, but you can also run it locally for wider use cases.
How to Get Started
- Access the research preview: Sign up for early testing
- Define tasks: Program specific actions (fill forms, click buttons, navigate sites)
- Monitor and debug: Use built-in tools to optimize automations
Example: Sending a Request
import openai
import os

openai.api_key = os.environ.get("OPENAI_API_KEY")
from openai import OpenAI
client = OpenAI()

response = client.responses.create(
    model="computer-use-preview",
    tools=[{
        "type": "computer_use_preview",
        "display_width": 1024,
        "display_height": 768,
        "environment": "browser"
    }],
    input=[
        {
            "role": "user",
            "content": "Check the latest OpenAI news on bing.com."
        }
    ],
    truncation="auto"
)
print(response.output)
Example: Handling Actions
The model may suggest actions like clicks, scrolls, key presses, or screenshots. You’ll map these to your automation framework (e.g., Playwright).
def handle_model_action(page, action):
    # Simplified action executor for Playwright
    # ... (see full code in original article)
Example: Automation Loop
After each action, capture a screenshot and send it back for the next step.
def computer_use_loop(instance, response):
    # Loop over computer_call actions and feedback screenshots
    # ... (see full code in original article)
This approach enables full digital workflow automation—from navigating dashboards to updating records.
Orchestrating Multi-Agent Systems with the Agents SDK
OpenAI’s open-source Agents SDK builds on Swarm to help you:
- Integrate multiple model agents in one workflow
- Add automated safety and reliability checks
- Monitor and manage agent activities
For example, you could create a virtual sales team: one agent handles research (web), another manages documents (file search), and a third automates repetitive digital tasks (CUA). The Agents SDK ties it all together for seamless orchestration.
Conclusion: Unlock Smarter API Automation with OpenAI and Apidog
OpenAI’s next-generation agent tools—Responses API, web search, file search, computer use, and the Agents SDK—equip developers to build powerful, autonomous systems that automate real business workflows.
By combining these tools with a robust API development environment like Apidog, you can prototype, test, and deploy AI-driven automations faster and with greater confidence.
Ready to build your own AI agent? Start exploring the OpenAI API, leverage these new features, and [download Apidog for free](
) to accelerate your API projects.


