Authentication is a fundamental aspect of securing web applications, ensuring users can access only the resources and data they are authorized to. In the Node.js ecosystem, Express is a popular framework simplifies authentication implementation. This blog will cover key authentication concepts, common methods used in Node.js and Express applications, and provide practical examples to help you get started.
Introduction to Node.js Express Authentication
Node.js Express authentication refers to the methods and practices used to verify the identity of users accessing a Node.js application built with the Express framework. Authentication ensures that only authorized users can access certain resources, providing security and protecting sensitive data.
Authentication vs. Authorization
- Authentication: The process of verifying the identity of a user. It answers the question, "Who are you?".
- Authorization: The process of determining what an authenticated user is allowed to do. It answers the question, "What can you do?".
Stateless vs. Stateful Authentication
- Stateless Authentication: The server does not maintain any session data. Each request is independent and must contain all the necessary information for authentication, typically through tokens (e.g., JWT).
- Stateful Authentication: The server maintains session data for authenticated users, often stored in a database or memory. The client holds a session ID to access the stored session data.
Common Node.js Express Authentication Methods
1. Basic Authentication
- Description: Users provide their username and password for each request.
- Use Case: Simple and quick to implement, suitable for basic applications or internal tools.
- Example Libraries: No specific library required, implemented using base64 encoding and decoding.
2. Token-Based Authentication (JWT)
- Description: Users authenticate by receiving a JSON Web Token (JWT) after logging in, which they include in the header of subsequent requests.
- Use Case: Stateless authentication, commonly used in modern web and mobile applications.
- Example Libraries:
jsonwebtoken,express-jwt
3. Session-Based Authentication
- Description: User credentials are stored in a session on the server after login. The session ID is stored in a cookie on the client side.
- Use Case: Traditional web applications where server-side sessions are manageable.
- Example Libraries:
express-session,connect-mongo
4. OAuth2
- Description: Delegated authorization framework that allows third-party services to exchange tokens on behalf of the user.
- Use Case: Integration with third-party services like Google, Facebook, and GitHub for authentication.
- Example Libraries:
passport,passport-google-oauth20,passport-facebook,passport-github
5. Social Login
- Description: Authentication through social media accounts like Google, Facebook, or Twitter.
- Use Case: Allows users to log in using their social media accounts, simplifying the login process.
- Example Libraries:
passport-google-oauth20,passport-facebook,passport-twitter
6. Multi-Factor Authentication (MFA)
- Description: Adds an extra layer of security by requiring multiple forms of verification (e.g., password + OTP).
- Use Case: High-security applications where additional authentication layers are necessary.
- Example Libraries:
speakeasy(for OTP generation),node-2fa
7. API Key Authentication
- Description: Users include an API key in the request header for each API call.
- Use Case: Commonly used for service-to-service communication or for public APIs.
- Example Libraries: No specific library required, implemented by checking the API key in the request header.
8. LDAP Authentication
- Description: Authenticates users against a directory service like Microsoft Active Directory.
- Use Case: Enterprise applications where centralized authentication is required.
- Example Libraries:
passport-ldapauth,ldapjs
9. SAML Authentication
- Description: Security Assertion Markup Language (SAML) is an XML-based protocol for exchanging authentication and authorization data between parties.
- Use Case: Enterprise single sign-on (SSO) solutions.
- Example Libraries:
passport-saml
How to Choose the Right Node.js Express Authentication Methods?
Choosing the right authentication method for your Node.js Express application depends on several factors, including the security requirements, user experience, and specific use cases of your application. Here’s a guide on when to use each authentication method:
1. Basic Authentication
When to Use:
- Internal Tools or Prototypes: Simple projects where security is not a major concern.
- Quick and Easy Setup: Scenarios that require minimal setup and complexity.
Pros:
- Simple to implement.
- No need for additional libraries.
Cons:
- Not secure for sensitive data (credentials are base64 encoded, not encrypted).
- Requires HTTPS to be somewhat secure.
2. Token-Based Authentication (JWT)
When to Use:
- Single Page Applications (SPAs): Modern web applications with front-end frameworks like React, Angular, or Vue.js.
- Mobile Applications: APIs for mobile apps where stateless authentication is beneficial.
- Microservices Architecture: Distributed systems where each service can independently verify the token.
Pros:
- Stateless, no server-side session storage required.
- Can be easily used across different domains.
Cons:
- Token storage on the client side can be challenging (localStorage, cookies, etc.).
- Revoking tokens can be complex.
3. Session-Based Authentication
When to Use:
- Traditional Web Applications: Websites where server-side rendering is used.
- Applications with Persistent Sessions: Where the user experience benefits from maintaining a session state.
Pros:
- Centralized session management.
- Easier to implement and manage with frameworks like Express.
Cons:
- Requires server-side storage (in-memory, database, etc.).
- Less scalable due to server-side state.
4. OAuth2
When to Use:
- Third-Party Integrations: Applications that need to access user data from services like Google, Facebook, GitHub, etc.
- Delegated Authorization: When you need users to grant access to their resources on another service.
Pros:
- Secure and widely adopted.
- Allows third-party access without sharing passwords.
Cons:
- Complex setup and implementation.
- Dependency on third-party providers.
5. Social Login
When to Use:
- Consumer-Facing Applications: Apps where simplifying the registration and login process enhances user experience.
- User Convenience: When you want to reduce friction for users by leveraging their existing social media accounts.
Pros:
- Simplifies login for users.
- Reduces the burden of password management.
Cons:
- Dependency on social media providers.
- Potential privacy concerns from users.
6. Multi-Factor Authentication (MFA)
When to Use:
- High-Security Applications: Banking, financial services, healthcare, and other applications where security is critical.
- Compliance Requirements: Industries with regulatory requirements for enhanced security.
Pros:
- Significantly increases security.
- Can be combined with other methods for robust authentication.
Cons:
- More complex to implement and manage.
- Can impact user experience due to additional steps.
7. API Key Authentication
When to Use:
- Service-to-Service Communication: Internal APIs where different services need to authenticate each other.
- Public APIs: When providing access to third-party developers.
Pros:
- Simple to implement and use.
- Easily revocable and manageable.
Cons:
- Less secure (API keys can be leaked).
- No user-specific context, just service-level authentication.
8. LDAP Authentication
When to Use:
- Enterprise Applications: Large organizations with centralized user directories like Active Directory.
- Internal Tools: Where employees’ credentials need to be verified against a corporate directory.
Pros:
- Centralized user management.
- Integrates well with existing corporate infrastructure.
Cons:
- Requires LDAP server setup and management.
- Can be complex to implement and debug.
9. SAML Authentication
When to Use:
- Enterprise Single Sign-On (SSO): When integrating with enterprise SSO solutions.
- Applications Requiring Federated Identity: Where user authentication needs to be federated across multiple domains.
Pros:
- Secure and standardized.
- Facilitates SSO across multiple applications.
Cons:
- Complex setup and configuration.
- Typically requires more infrastructure.
A Brief Summary of Choosing Authentication Methods
Choosing the right authentication method for your Node.js Express application involves understanding the different options available and evaluating them against your application's specific requirements.
Basic Authentication: Quick and simple for non-critical applications.
Token-Based Authentication (JWT): Ideal for SPAs, mobile apps, and microservices.
Session-Based Authentication: Suitable for traditional web applications.
OAuth2: Best for third-party integrations and delegated access.
Social Login: Great for consumer-facing applications to improve user experience.
Multi-Factor Authentication (MFA): Essential for high-security applications.
API Key Authentication: Useful for service-to-service communication and public APIs.
LDAP Authentication: Fit for enterprise applications with centralized user management.
SAML Authentication: Used for enterprise SSO and federated identity systems.
Choosing the right method depends on your application’s specific needs, security requirements, and user experience considerations.
Node.js Express Authentication Examples
Authentication is a critical part of any web application, ensuring that users can securely access resources. Let's explore various examples of how to implement authentication in a Node.js Express application. We'll cover some of the most common methods: JWT (JSON Web Tokens), session-based authentication, OAuth2, and API keys.
1. JWT (JSON Web Tokens) Authentication
JWT is a stateless authentication method that allows you to securely transmit information between parties as a JSON object. This information can be verified and trusted because it is digitally signed.
Implementation Steps:
Step 1: Set Up Your Project
First, create a new project and install the necessary dependencies:
mkdir jwt-auth-example
cd jwt-auth-example
npm init -y
npm install express jsonwebtoken body-parser bcryptjs
Step 2: Create the Express Server
Create an app.js file and set up a basic Express server:
const express = require('express');
const jwt = require('jsonwebtoken');
const bodyParser = require('body-parser');
const bcrypt = require('bcryptjs');

const app = express();
app.use(bodyParser.json());

const SECRET_KEY = 'your_jwt_secret';

// Mock User Data
const users = [{ id: 1, username: 'user1', password: bcrypt.hashSync('password1', 8) }];

app.post('/login', (req, res) => {
  const { username, password } = req.body;
  const user = users.find(u => u.username === username);
  if (user && bcrypt.compareSync(password, user.password)) {
    const token = jwt.sign({ id: user.id, username: user.username }, SECRET_KEY, { expiresIn: '1h' });
    res.json({ token });
  } else {
    res.status(401).send('Invalid credentials');
  }
});

const authenticateJWT = (req, res, next) => {
  const token = req.headers.authorization;
  if (token) {
    jwt.verify(token, SECRET_KEY, (err, user) => {
      if (err) {
        return res.sendStatus(403);
      }
      req.user = user;
      next();
    });
  } else {
    res.sendStatus(401);
  }
};

app.get('/protected', authenticateJWT, (req, res) => {
  res.send(`Hello ${req.user.username}, you have accessed a protected route!`);
});

const PORT = process.env.PORT || 3000;
app.listen(PORT, () => {
  console.log(`Server is running on port ${PORT}`);
});
2. Session-Based Authentication
Session-based authentication relies on storing session data on the server side. This method is stateful and is commonly used in traditional web applications.
Implementation Steps:
Step 1: Set Up Your Project
Create a new project and install the necessary dependencies:
mkdir session-auth-example
cd session-auth-example
npm init -y
npm install express express-session body-parser bcryptjs
Step 2: Create the Express Server
Create an app.js file and set up a basic Express server:
const express = require('express');
const session = require('express-session');
const bodyParser = require('body-parser');
const bcrypt = require('bcryptjs');

const app = express();
app.use(bodyParser.json());
app.use(session({ secret: 'your_session_secret', resave: false, saveUninitialized: true }));

const users = [{ id: 1, username: 'user1', password: bcrypt.hashSync('password1', 8) }];

app.post('/login', (req, res) => {
  const { username, password } = req.body;
  const user = users.find(u => u.username === username);
  if (user && bcrypt.compareSync(password, user.password)) {
    req.session.userId = user.id;
    res.send('Logged in');
  } else {
    res.status(401).send('Invalid credentials');
  }
});

const authenticateSession = (req, res, next) => {
  if (req.session.userId) {
    next();
  } else {
    res.sendStatus(401);
  }
};

app.get('/protected', authenticateSession, (req, res) => {
  const user = users.find(u => u.id === req.session.userId);
  res.send(`Hello ${user.username}, you have accessed a protected route!`);
});

const PORT = process.env.PORT || 3000;
app.listen(PORT, () => {
  console.log(`Server is running on port ${PORT}`);
});
3. OAuth2 Authentication
OAuth2 is a more complex authentication method that allows third-party applications to access user resources without exposing user credentials. It’s commonly used for social login and integrating with other services.
Implementation Steps:
Implementing OAuth2 usually involves using a library or framework that handles the OAuth2 flow. For simplicity, we’ll use the passport library with a strategy like passport-google-oauth20.
Step 1: Set Up Your Project
Create a new project and install the necessary dependencies:
mkdir oauth2-auth-example
cd oauth2-auth-example
npm init -y
npm install express passport passport-google-oauth20 express-session
Step 2: Create the Express Server
Create an app.js file and set up a basic Express server:
const express = require('express');
const passport = require('passport');
const GoogleStrategy = require('passport-google-oauth20').Strategy;
const session = require('express-session');

const app = express();

app.use(session({ secret: 'your_session_secret', resave: false, saveUninitialized: true }));
app.use(passport.initialize());
app.use(passport.session());

passport.use(new GoogleStrategy({
  clientID: 'YOUR_GOOGLE_CLIENT_ID',
  clientSecret: 'YOUR_GOOGLE_CLIENT_SECRET',
  callbackURL: 'http://localhost:3000/auth/google/callback'
}, (accessToken, refreshToken, profile, done) => {
  // In a real application, you would save the profile info to your database
  return done(null, profile);
}));

passport.serializeUser((user, done) => {
  done(null, user);
});

passport.deserializeUser((obj, done) => {
  done(null, obj);
});

app.get('/auth/google', passport.authenticate('google', { scope: ['https://www.googleapis.com/auth/plus.login'] }));

app.get('/auth/google/callback', passport.authenticate('google', { failureRedirect: '/' }), (req, res) => {
  res.redirect('/protected');
});

const ensureAuthenticated = (req, res, next) => {
  if (req.isAuthenticated()) {
    return next();
  }
  res.redirect('/');
};

app.get('/protected', ensureAuthenticated, (req, res) => {
  res.send(`Hello ${req.user.displayName}, you have accessed a protected route!`);
});

const PORT = process.env.PORT || 3000;
app.listen(PORT, () => {
  console.log(`Server is running on port ${PORT}`);
});
4. API Key Authentication
API key authentication is simple and often used for server-to-server communication. It involves passing a key with each request to verify the client.
Implementation Steps
Step 1: Set Up Your Project
Create a new project and install the necessary dependencies:
mkdir api-key-auth-example
cd api-key-auth-example
npm init -y
npm install express
Step 2: Create the Express Server
Create an app.js file and set up a basic Express server:
const express = require('express');
const app = express();

const API_KEY = 'your_api_key';

const authenticateApiKey = (req, res, next) => {
  const apiKey = req.headers['x-api-key'];
  if (apiKey && apiKey === API_KEY) {
    next();
  } else {
    res.sendStatus(401);
  }
};

app.get('/protected', authenticateApiKey, (req, res) => {
  res.send('Access granted to protected route');
});

const PORT = process.env.PORT || 3000;
app.listen(PORT, () => {
  console.log(`Server is running on port ${PORT}`);
});
From stateless JWT authentication to traditional session-based authentication and OAuth2 for third-party integrations, you have a variety of methods to choose from based on your application’s requirements. Understanding and correctly implementing these methods will help you build secure and scalable applications.
10 Best Practices for Nodejs Express Authentication
Implementing authentication in a Node.js Express application requires careful consideration to ensure security, scalability, and ease of use. Here are some best practices to follow when handling authentication in your Node.js Express applications:
1. Use Strong Password Hashing
- Hash Passwords: Always hash passwords before storing them in the database. Use a robust hashing algorithm like bcrypt.
- Salt Passwords: Add a unique salt to each password to prevent rainbow table attacks.
const bcrypt = require('bcryptjs');

const hashPassword = async (password) => {
    const salt = await bcrypt.genSalt(10);
    return await bcrypt.hash(password, salt);
};
2. Secure JWT Tokens
- Keep Secret Keys Secure: Store secret keys in environment variables and not in your source code.
- Set Expiry Time: Always set an expiration time for JWTs to limit their validity period.
- Use Strong Algorithms: Use a strong signing algorithm (e.g., HS256).
const jwt = require('jsonwebtoken');
const SECRET_KEY = process.env.SECRET_KEY;

const token = jwt.sign({ userId: user.id }, SECRET_KEY, { expiresIn: '1h' });
3. Use HTTPS
- Encrypt Traffic: Always use HTTPS to encrypt data transmitted between the client and server, protecting against man-in-the-middle attacks.
4. Validate Input
- Sanitize and Validate: Use libraries like Joi or express-validator to sanitize and validate user inputs to prevent injection attacks.
const { body, validationResult } = require('express-validator');

app.post('/register', [
    body('email').isEmail(),
    body('password').isLength({ min: 6 })
], (req, res) => {
    const errors = validationResult(req);
    if (!errors.isEmpty()) {
        return res.status(400).json({ errors: errors.array() });
    }
    // Proceed with registration
});
5. Implement Rate Limiting
- Prevent Brute Force Attacks: Use rate limiting to limit the number of requests a client can make to your authentication endpoints.
const rateLimit = require('express-rate-limit');

const limiter = rateLimit({
    windowMs: 15 * 60 * 1000, // 15 minutes
    max: 100 // limit each IP to 100 requests per windowMs
});

app.use('/login', limiter);
6. Store Tokens Securely
- Use Secure Cookies: Store JWTs in secure, HTTP-only cookies to prevent access from JavaScript (protect against XSS attacks).
- Refresh Tokens: Implement refresh tokens to allow users to obtain new access tokens without re-authenticating.
7. Implement Proper Session Management
- Invalidate Tokens: Implement token invalidation on logout to prevent reuse of tokens.
- Session Expiry: Ensure sessions expire after a certain period of inactivity.
8. Use Middleware for Protected Routes
- Centralize Authentication Logic: Use middleware to handle authentication logic for protected routes.
const authenticateJWT = (req, res, next) => {
    const token = req.headers.authorization;

    if (!token) {
        return res.sendStatus(401);
    }

    jwt.verify(token, SECRET_KEY, (err, user) => {
        if (err) {
            return res.sendStatus(403);
        }

        req.user = user;
        next();
    });
};

app.get('/protected', authenticateJWT, (req, res) => {
    res.send('This is a protected route');
});
9. Monitor and Log Authentication Events
- Log Suspicious Activity: Monitor and log authentication-related events to detect and respond to suspicious activities.
- Audit Logs: Maintain audit logs for user login attempts, account changes, and other critical actions.
10. Regularly Update Dependencies
- Keep Libraries Up to Date: Regularly update your dependencies to benefit from security patches and improvements.
- Audit Dependencies: Use tools like npm audit to identify and fix vulnerabilities in your dependencies.
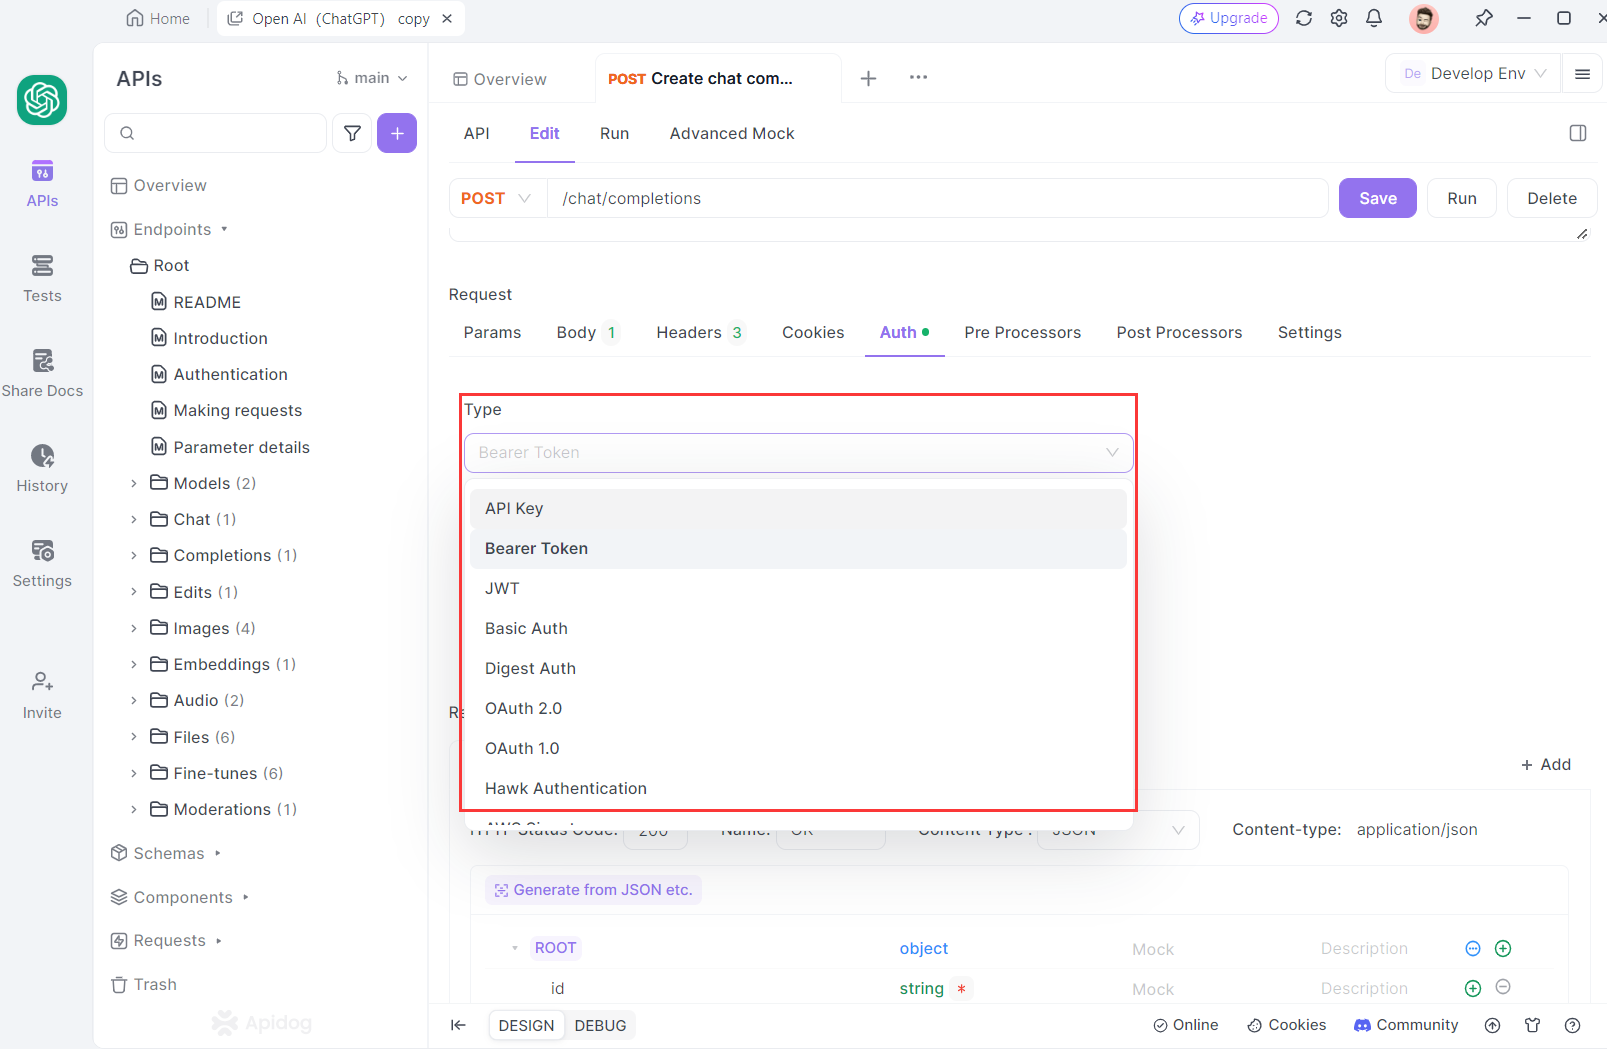
Leveraging Apidog to Test APIs with Nodejs Express Authentication Methods
Apidog is a comprehensive API development platform that streamlines the entire development process. It features robust built-in authentication options, allowing developers to test API endpoints with various methods including API Key, Bearer Token, JWT, Basic Auth, Digest Auth, OAuth 1.0, OAuth 2.0, Hawk Authentication, NTLM, and Akamai EdgeGrid. This enables API developers to thoroughly validate the authentication strategies implemented in their APIs.
Conclusion
Implementing authentication in a Node.js Express application is crucial for ensuring the security and integrity of your web application. By understanding the various authentication methods, from Basic Auth and JWT to OAuth2 and LDAP, and following best practices like using strong password hashing, securing JWT tokens, and validating input, you can create robust and secure authentication systems. Tools like Apidog further enhance your ability to test and validate these authentication methods, ensuring they work as intended. By carefully choosing and implementing the right authentication strategy for your application’s needs, you can provide a secure and seamless user experience, protecting sensitive data and resources effectively.


