In today's development landscape, automation is key to maintaining productivity and quality. Model Context Protocol (MCP) servers have emerged as powerful tools that connect AI assistants to specialized functionality, enabling developers to accomplish complex tasks with natural language instructions.
Mobile Next MCP Server provides a platform-agnostic interface for mobile automation, allowing AI assistants to interact with native iOS and Android applications through accessibility snapshots or coordinate-based interactions. Meanwhile, Apidog MCP Server connects your API specifications directly to AI assistants, ensuring generated code aligns perfectly with your API design.
By understanding how to implement these powerful tools, you'll be able to significantly enhance your development workflow, reduce manual testing efforts, and ensure consistency between API specifications and implementations. Let's dive into the setup and usage of these innovative MCP servers.
Mobile Next MCP Server: Revolutionizing Mobile Automation with AI-Driven Testing
Mobile Next MCP Server represents a significant advancement in mobile automation technology. This powerful tool enables AI assistants and Large Language Models (LLMs) to interact directly with mobile applications across both iOS and Android platforms, eliminating the need for platform-specific knowledge or complex automation frameworks.
The server works by providing a standardized interface through the Model Context Protocol, allowing AI systems to control mobile devices through either accessibility snapshots (preferred for reliability) or coordinate-based interactions using screenshots when accessibility data isn't available. This dual approach ensures maximum flexibility and reliability across different application types.
What sets Mobile Next MCP Server apart is its ability to provide deterministic tool application by relying on structured data whenever possible, reducing the ambiguity often found in purely screenshot-based approaches. This makes it particularly valuable for testing scenarios, data entry tasks, and automating multi-step user journeys driven by AI assistants.
Key Features of Mobile Next MCP Server for API-Driven Development
Mobile Next MCP Server offers several features that make it an essential tool for developers working on mobile applications:
- Platform Agnosticism: Works seamlessly across iOS and Android without requiring separate implementations
- Fast and Lightweight: Utilizes native accessibility trees for most interactions, minimizing resource usage
- LLM-Friendly Interface: Designed specifically for AI interaction without requiring computer vision models
- Visual Analysis: Evaluates what's actually rendered on screen to determine appropriate actions
- Structured Data Extraction: Enables pulling organized data from anything visible on screen
- Deterministic Interactions: Reduces ambiguity through structured data approaches
These capabilities make Mobile Next MCP Server particularly valuable for API developers who need to test mobile clients against their API implementations, ensuring consistent behavior across platforms and reducing the manual testing burden.
Setting Up Mobile Next MCP Server: A Step-by-Step Guide for API Developers
Implementing Mobile Next MCP Server in your development workflow is straightforward. Follow these steps to get started with mobile automation through AI assistance:
Prerequisites for Mobile Next MCP Server Installation
Before setting up Mobile Next MCP Server, ensure you have the following components installed:
- Xcode command line tools (for iOS testing)
- Android Platform Tools (for Android testing)
- Node.js (latest LTS version recommended)
- MCP-supported AI model or agent (Claude, OpenAI Agent SDK, or Copilot Studio)
Additionally, you'll need access to either:
- iOS Simulators (on macOS/Linux)
- Android Emulators (on Linux/Windows/macOS)
- Physical iOS or Android devices (with proper platform tools and drivers)
Installation Process for Mobile Next MCP Server
The installation process varies slightly depending on your AI assistant platform. Here's how to set it up with popular options:
For Claude Desktop Users:
- Locate your
claude_desktop_config.jsonfile - Add the following configuration to the file:
{
  "mcpServers": {
    "mobile-mcp": {
      "command": "npx",
      "args": ["-y", "@mobilenext/mobile-mcp@latest"]
    }
  }
}
For Claude Code Users:
Simply run the following command in your terminal:
claude mcp add mobile -- npx -y @mobilenext/mobile-mcp@latestConnecting to Mobile Devices or Simulators
Once installed, Mobile Next MCP Server can connect to various device types:
For iOS Simulators:
- List available simulators:
xcrun simctl list - Boot a simulator:
xcrun simctl boot "iPhone 16" - Run Mobile Next MCP with appropriate flags
For Android Emulators:
- Start an emulator using avdmanager or the emulator command
- Run Mobile Next MCP with desired configuration flags
For Physical Devices:
Ensure the device is connected to your machine and properly recognized by the platform tools before running Mobile Next MCP.
Leveraging Mobile Next MCP Server Commands
Mobile Next MCP Server provides a comprehensive set of commands that enable AI assistants to interact with mobile applications. These commands are particularly useful for API testing on mobile clients:
Essential Mobile Commands for API Testing
- mobile_list_apps: Lists all installed apps on the device
- mobile_launch_app: Launches a specified app using its bundle/package identifier
- mobile_terminate_app: Terminates a running application
- mobile_get_screen_size: Returns the device screen dimensions in pixels
- mobile_list_elements_on_screen: Lists UI elements with their coordinates and accessibility labels
- mobile_element_tap: Taps on a UI element identified by accessibility locator
- mobile_tap: Taps on specified screen coordinates
- mobile_type_text: Enters text into a focused UI element
- mobile_take_screenshot: Captures the current device screen
- mobile_get_source: Fetches the current device UI structure in XML format
These commands allow for comprehensive testing of mobile applications, ensuring that data is properly displayed and interactions work as expected across different platforms.
Apidog MCP Server: Enhancing API Development with Specification-Driven AI Assistance
While Mobile Next MCP Server excels at mobile automation, Apidog MCP Server addresses a different but complementary need: connecting AI assistants directly to your API specifications. This integration ensures that AI-generated code aligns perfectly with your API design, significantly improving development efficiency and reducing errors.
Apidog MCP Server allows developers to leverage AI assistants for various API-related tasks:
- Generating code based on API specifications
- Modifying existing code to match updated API requirements
- Searching through API specification content
- Creating comprehensive implementations that adhere to API contracts
The server works by reading and caching API specification data locally, making it available to AI assistants through the Model Context Protocol. This enables developers to simply instruct the AI on what they want to achieve with the API specification, such as generating DTOs, updating models, or implementing endpoints.
Key Benefits of Apidog MCP Server for API Development
Apidog MCP Server offers several advantages that make it an essential tool for API-driven development:
- Specification-Driven Development: Ensures all generated code aligns with API specifications
- Reduced Implementation Errors: Minimizes discrepancies between API design and implementation
- Accelerated Development: Automates repetitive coding tasks based on API specifications
- Improved Documentation: Generates code comments and documentation from API descriptions
- Flexible Data Sources: Works with Apidog projects, published documentation, or OpenAPI files
These capabilities make Apidog MCP Server particularly valuable for teams practicing API-first development, ensuring consistency between specifications and implementations throughout the development lifecycle.
Setting Up Apidog MCP Server: A Comprehensive Guide for API Developers
Implementing Apidog MCP Server in your development workflow is straightforward. The server supports three different data sources, allowing you to choose the most appropriate configuration for your needs:
Prerequisites for Apidog MCP Server
Before setting up Apidog MCP Server, ensure you have:
- Node.js (version 18 or higher, preferably the latest LTS version)
- An IDE that supports MCP, such as Cursor or VS Code with the Cline plugin
Configuration Options Based on Data Source
Apidog MCP Server offers three configuration methods depending on your data source:
Option 1: Using Apidog Project as Data Source
This option is ideal when you want to use AI to access API specifications within your Apidog team:
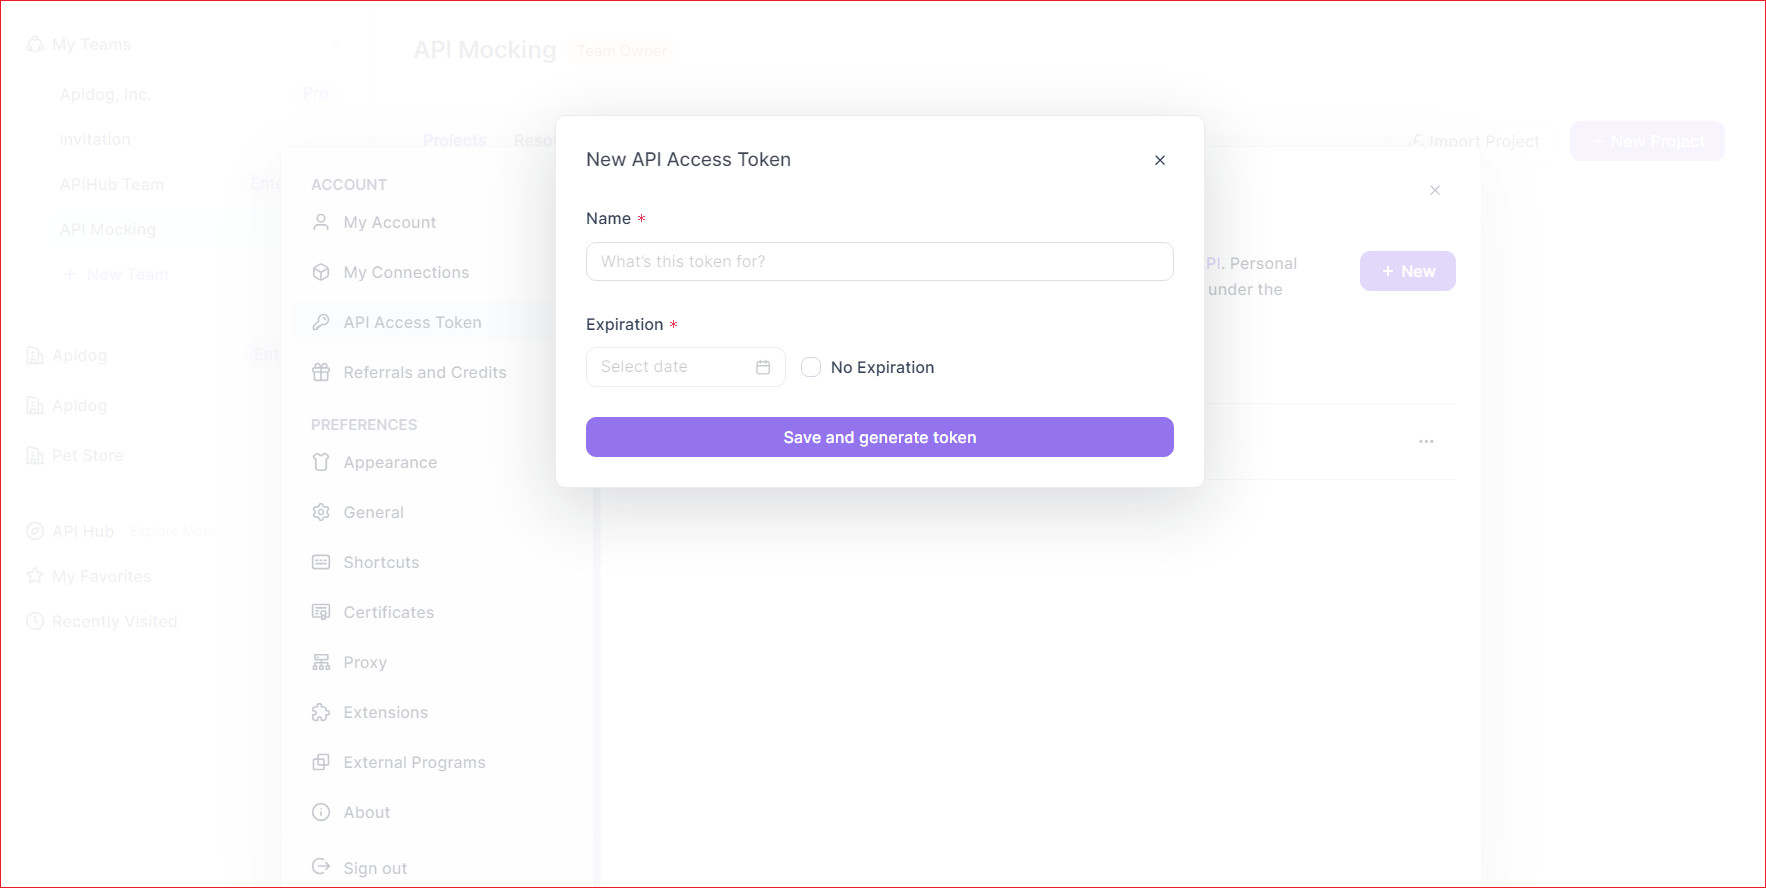
Generate API Access Token:
- Open Apidog, navigate to Account Settings → API Access Token
- Create a new API access token
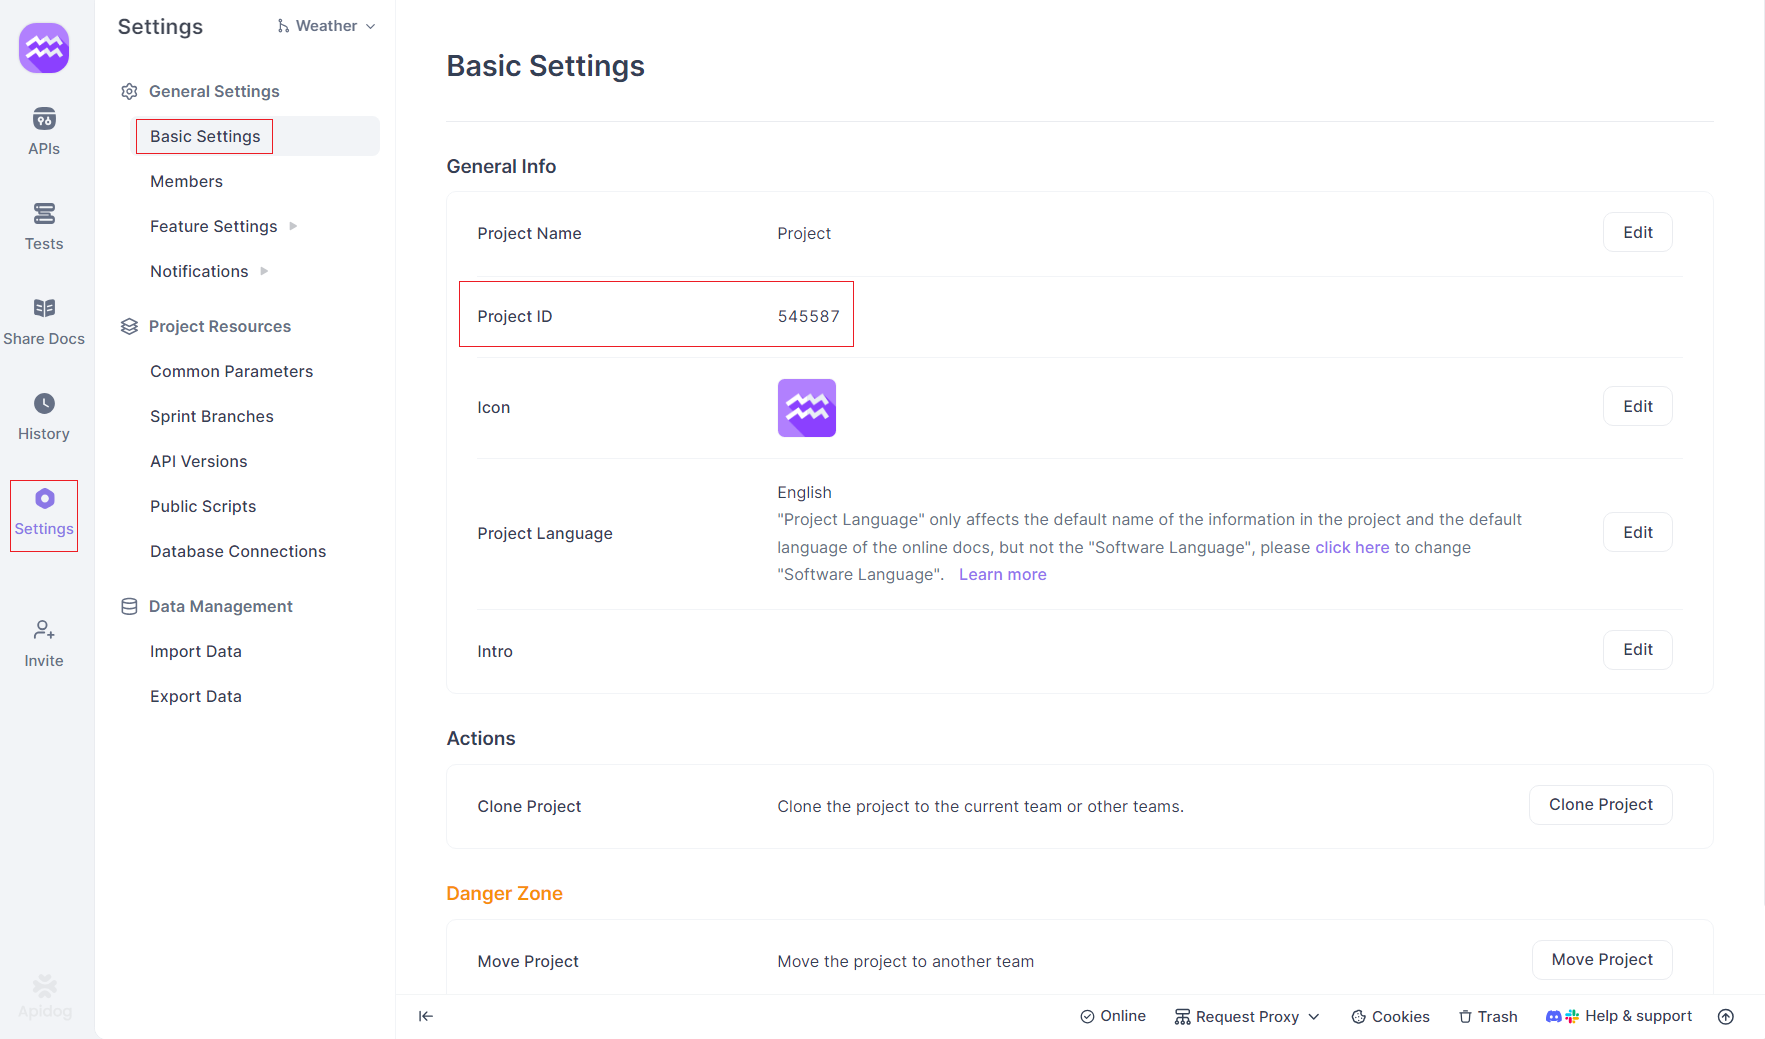
Get Apidog Project ID:
- Open your target project in Apidog
- Click "Project Settings" in the left sidebar
- Copy the Project ID from "Basic Settings"
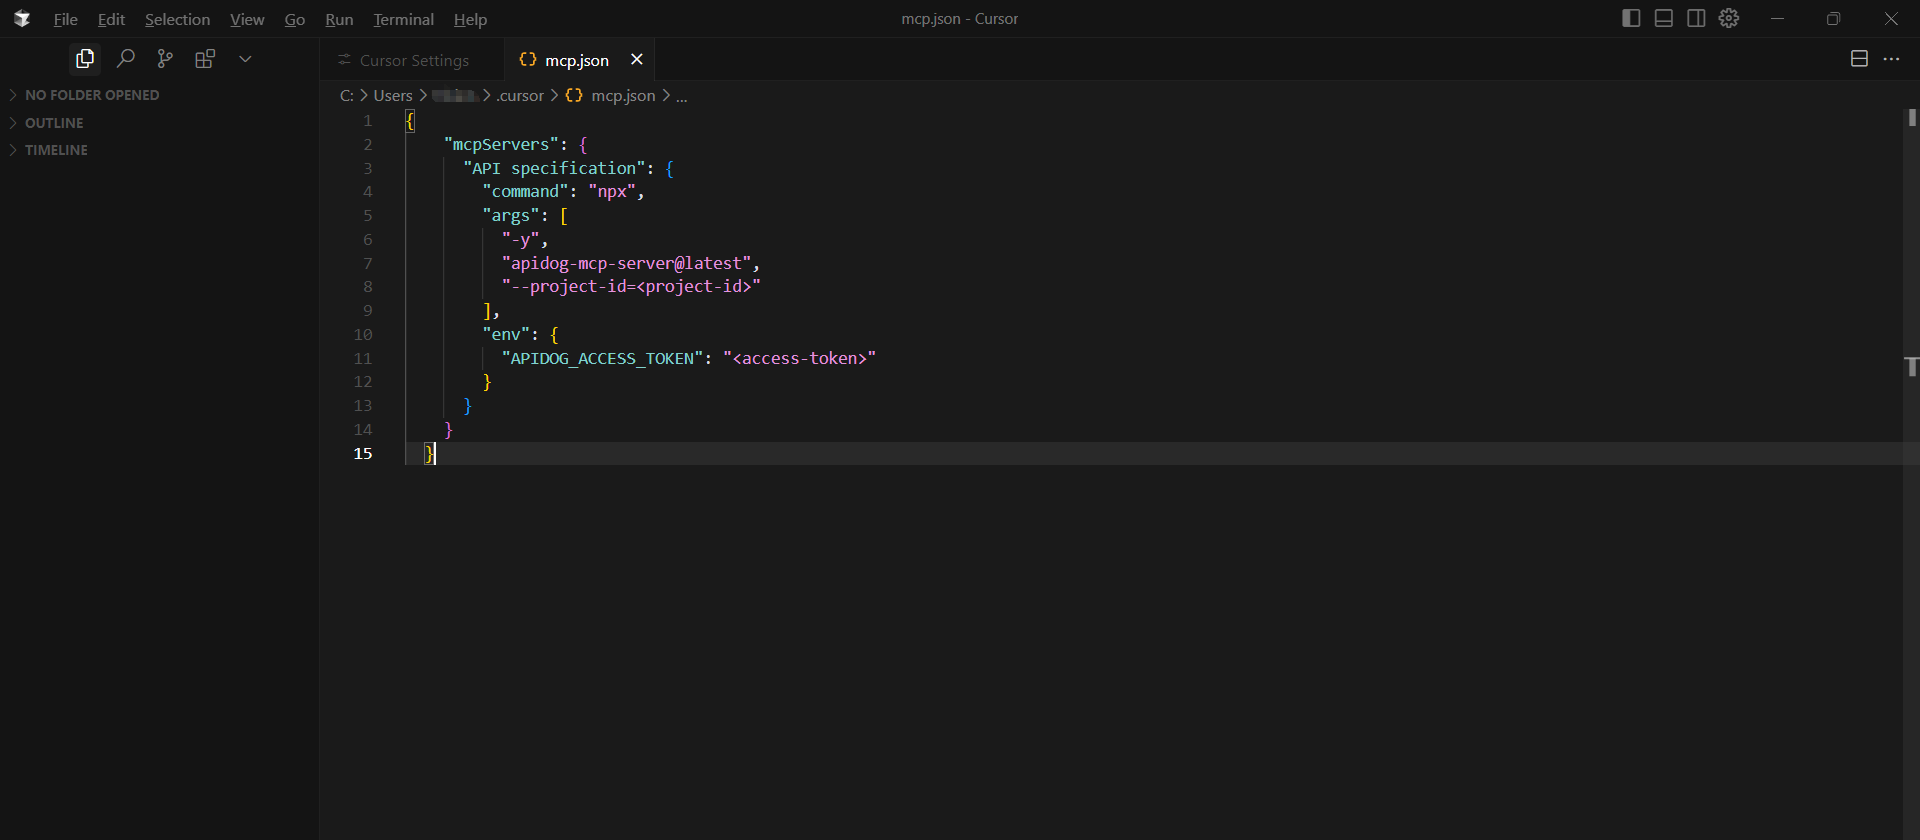
Configure MCP in Your IDE: Add the following configuration to your MCP settings (replacing placeholders with your values):
{
  "mcpServers": {
    "API specification": {
      "command": "npx",
      "args": [
        "-y",
        "apidog-mcp-server@latest",
        "--project=<project-id>"
      ],
      "env": {
        "APIDOG_ACCESS_TOKEN": "<access-token>"
      }
    }
  }
}
Option 2: Using Published API Documentation as Data Source
This option works well when you need to access publicly available API documentation:
Enable MCP Service:
- Navigate to your Apidog project
- Go to Share Docs → Publish Docs Sites → AI Features
- Enable the MCP service
Get Configuration File:
- Access your published documentation
- Click the "Vibe Coding(via MCP)" button
- Copy the provided configuration
Configure MCP in Your IDE: Add the copied configuration to your MCP settings:
{
  "mcpServers": {
    "apidog-site-123456": {
      "command": "npx",
      "args": [
        "-y",
        "apidog-mcp-server@latest",
        "--site-id=123456"
      ]
    }
  }
}
Option 3: Using OpenAPI Files as Data Source
This option is useful when working with local or online Swagger/OpenAPI files:
Prepare OpenAPI File:
- Ensure you have a URL or local path to a Swagger/OpenAPI file
- Supported formats include JSON and YAML
Configure MCP in Your IDE: Add the following configuration to your MCP settings (replacing the URL with your file path):
{
  "mcpServers": {
    "API specification": {
      "command": "npx",
      "args": [
        "-y",
        "apidog-mcp-server@latest",
        "--oas=https://petstore.swagger.io/v2/swagger.json"
      ]
    }
  }
}
Verifying Apidog MCP Server Configuration
After setting up Apidog MCP Server, verify the connection by asking your AI assistant:
Please fetch API specification via MCP and tell me how many endpoints exist in the projectIf the AI returns information about your API specification, the connection is successful.
Conclusion: Transforming Development Workflows with Mobile Next and Apidog MCP Servers
The integration of specialized MCP servers into modern development workflows represents a significant advancement in how teams approach mobile testing and API development. Mobile Next MCP Server eliminates the complexity of cross-platform mobile automation by providing a unified interface that works seamlessly across iOS and Android. By leveraging accessibility data and visual analysis, it enables AI assistants to interact with mobile applications reliably, making it an invaluable tool for testing API implementations on mobile clients.
Meanwhile, Apidog MCP Server ensures perfect alignment between API specifications and implementations by connecting AI assistants directly to your API design documents. This specification-driven approach significantly reduces development errors, accelerates coding tasks, and maintains consistency throughout the development lifecycle.