
Mistral AI has quickly made a name for itself with its high-performance language models. Whether you're looking to build a chatbot, generate creative text, analyze data, write code, or embed text for semantic search, the Mistral API provides the tools you need. But like any powerful tool, there's a gateway: the API key.
Think of an API key as your secret password or unique identifier. It tells Mistral, "Hey, it's me! I have permission to use your services." Without it, the API servers wouldn't know who is making the request or whether they're authorized.
This guide is your step-by-step companion to navigating the initial setup, understanding the landscape of Mistral models, making your first API calls, and even using tools like APidog to interact with the API. We'll break down everything conversationally, aiming to get you from zero to making successful API calls.
Estimated Time: Reading and following along might take 30-45 minutes.
Prerequisites: A basic understanding of what an API is helpful, but not strictly required. We'll explain concepts as we go. You'll also need an internet connection and a web browser.
Ready? Let's get that API key!
Want an integrated, All-in-One platform for your Developer Team to work together with maximum productivity?
Apidog delivers all your demands, and replaces Postman at a much more affordable price!

Step 1: Setting Up Your Mistral AI Account
First things first, you need an account on Mistral's platform, known as "La Plateforme".
- Navigate to the Console: Open your web browser and head over to console.mistral.ai.
- Sign Up or Sign In:
- If you're new, click the sign-up option. You'll likely need to provide an email address and create a password, or you might be able to sign up using an existing Google or GitHub account. Follow the on-screen prompts, which may include verifying your email address.
- If you already have an account, simply sign in with your credentials.
3. Billing Information (Important!): This is a crucial step that often trips people up. To actually use the API (even if you plan on using free tier models initially, the platform often requires billing details to activate keys), you need to set up billing.
- Once logged in, look for a section typically labelled "Workspace" or your account name in the sidebar or navigation menu.
- Within that section, find "Billing".
- Click on it and follow the instructions to add your payment information (usually a credit card). Don't worry, you're generally only charged for what you use, and many models might have free tiers or initial credits, but activating payments is often necessary to enable your API keys for general use. Mistral's pricing page (linked later) has the specifics.
- Ensure your payments are marked as "active" or "enabled". It might take a few moments after adding details for the status to update.
You now have a Mistral AI account ready to go! The next step is generating that all-important key.
Step 2: Generating Your Secret API Key
With your account set up and billing activated, let's create the key itself.
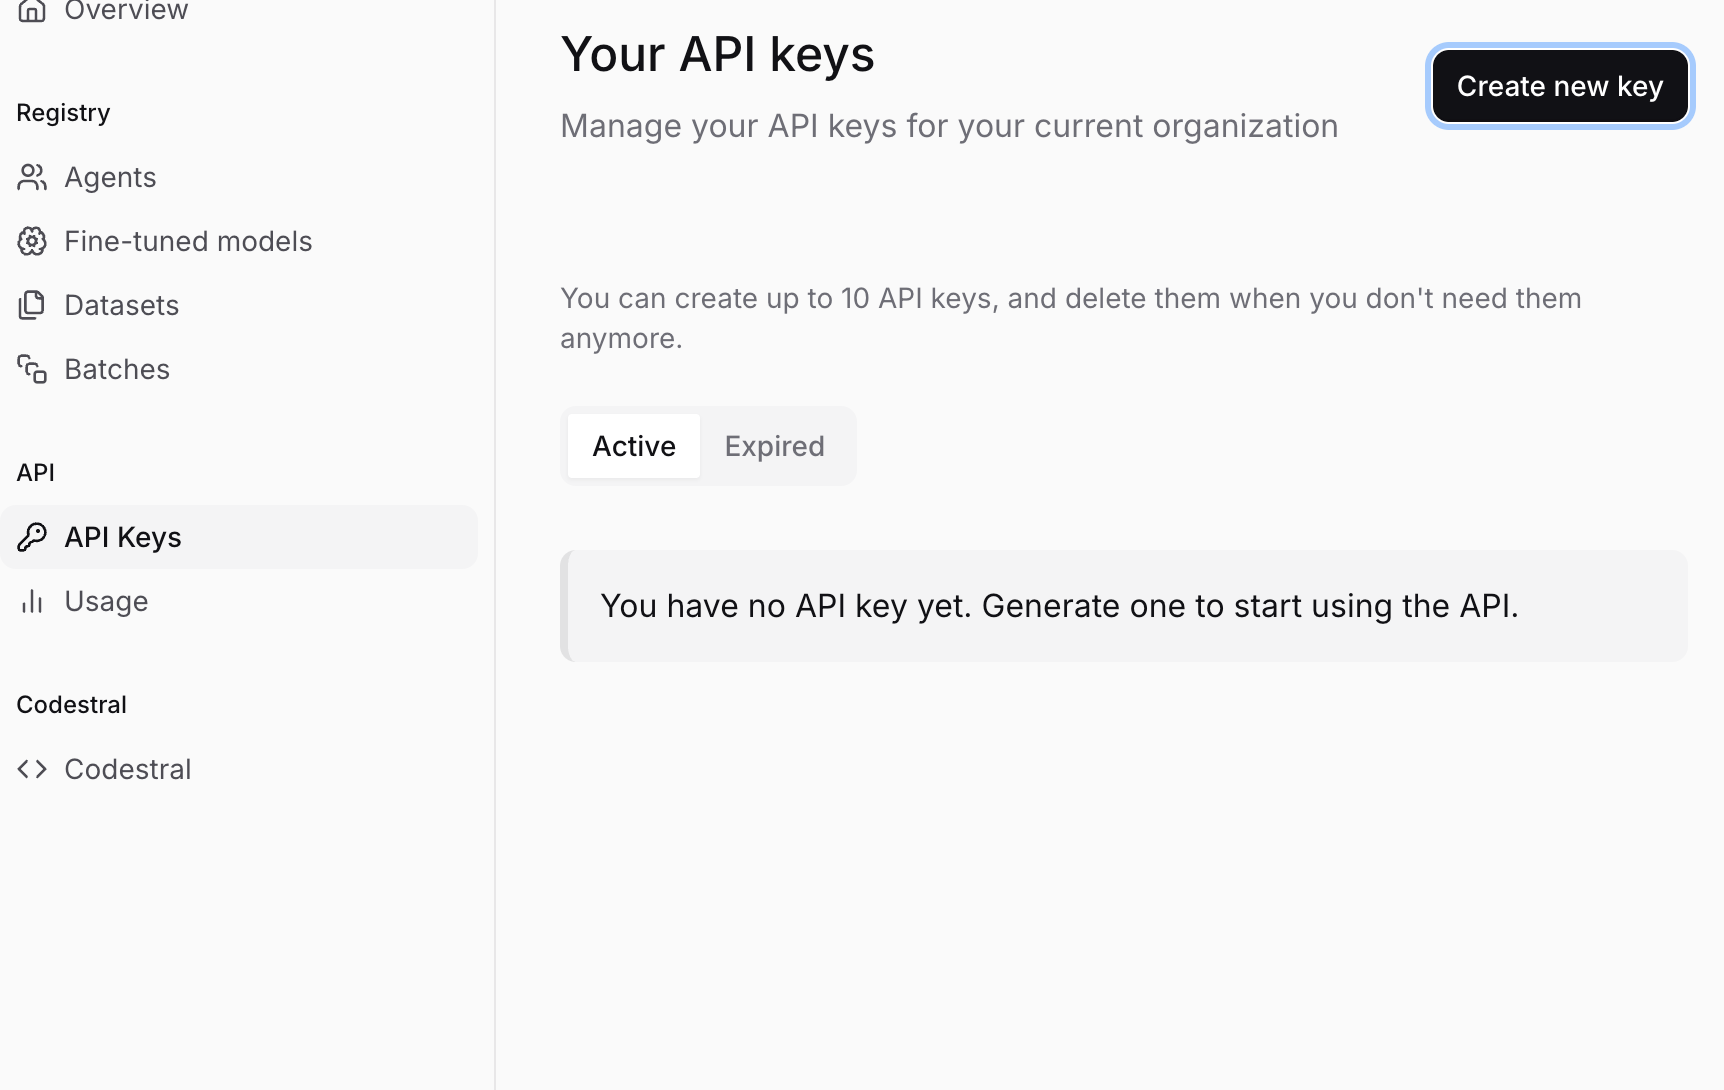
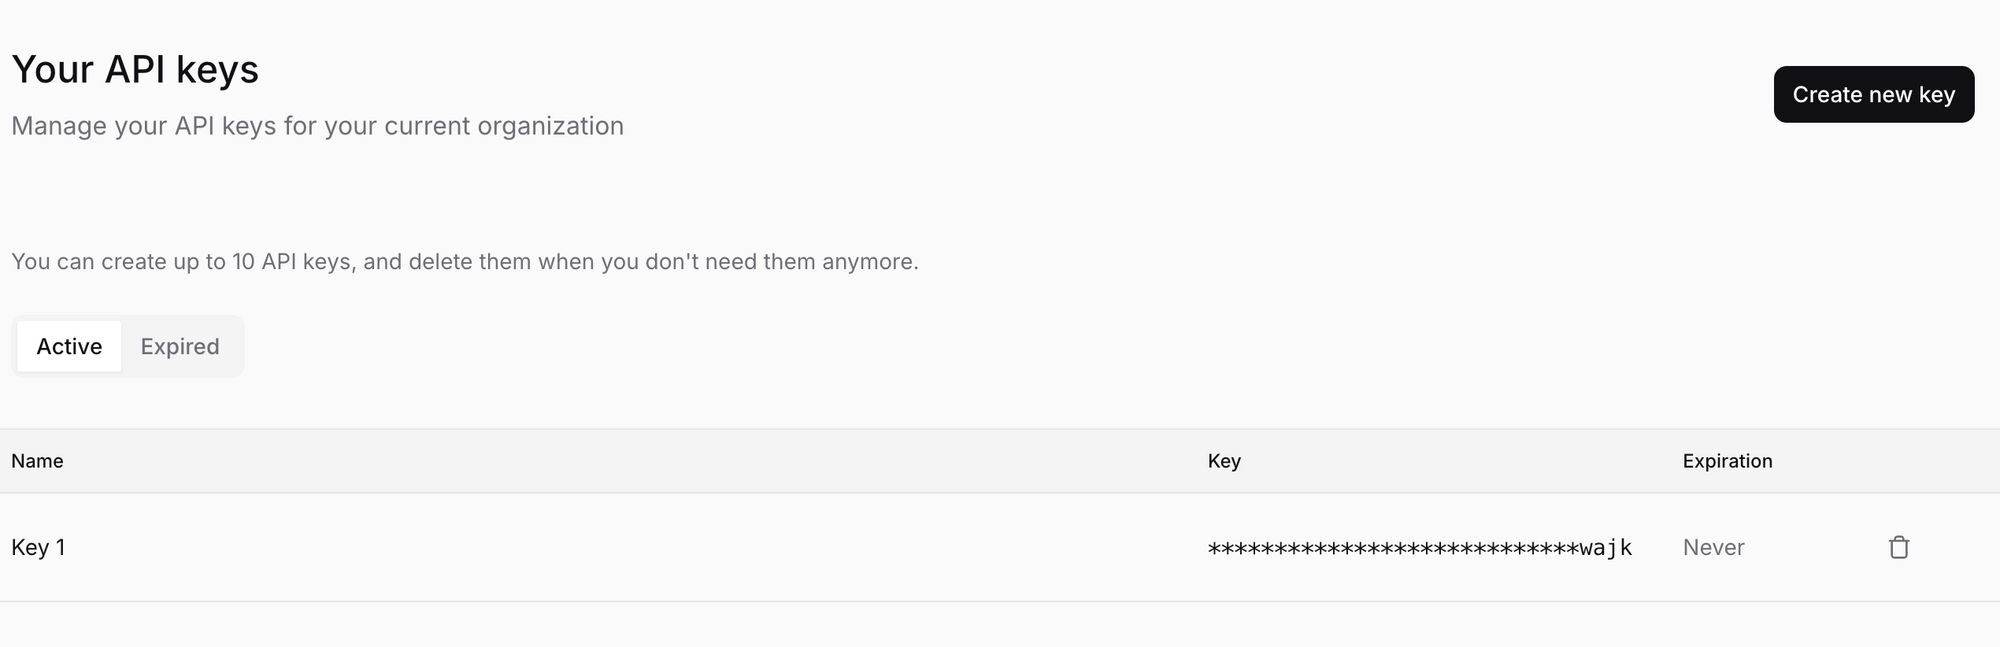
- Navigate to API Keys: While logged into the Mistral console (console.mistral.ai), look for a section named "API keys" in the sidebar or navigation menu. Click on it.
- Create a New Key: You should see a button like "Create new key" or "+ New Key". Click it.
- Name Your Key (Optional but Recommended): You might be prompted to give your key a name. This is super helpful for organization, especially if you plan on creating multiple keys later (e.g., one for "My Chatbot Project", another for "Data Analysis Script"). Choose a descriptive name.
- Generate and COPY Your Key: Click the final confirmation button (e.g., "Create", "Generate"). Mistral will now generate a unique API key for you. It will look like a long string of random characters, something like
sk-aBcDeFgHiJkLmNoPqRsTuVwXyZ1234567890....... - !!! CRITICAL STEP: SAVE YOUR KEY SECURELY !!!
- Mistral will only show you this key ONCE. If you close the window or navigate away without copying it, you will never see it again. You would have to generate a new key.
- Copy the key immediately. Click the copy icon or manually select and copy the entire string.
- Store it safely. Use a password manager (like 1Password, Bitwarden, Dashlane) or a secure note-taking application. DO NOT save it in a plain text file on your desktop, email it to yourself unsecured, or embed it directly in your code (more on that later). Treat this key like a password to your bank account – anyone who has it can make API calls billed to your account.
- Do not share it. Seriously.
You've done it! You now possess a Mistral AI API key. Keep it safe and let's figure out how to use it.
Step 3: Understanding the Mistral Model Landscape
Before making an API call, you need to tell Mistral which model you want to use. Mistral offers a variety of models tailored for different tasks, balancing performance, cost, and capabilities. Choosing the right one is key.
You can find a detailed overview of the models here: Mistral Models Overview
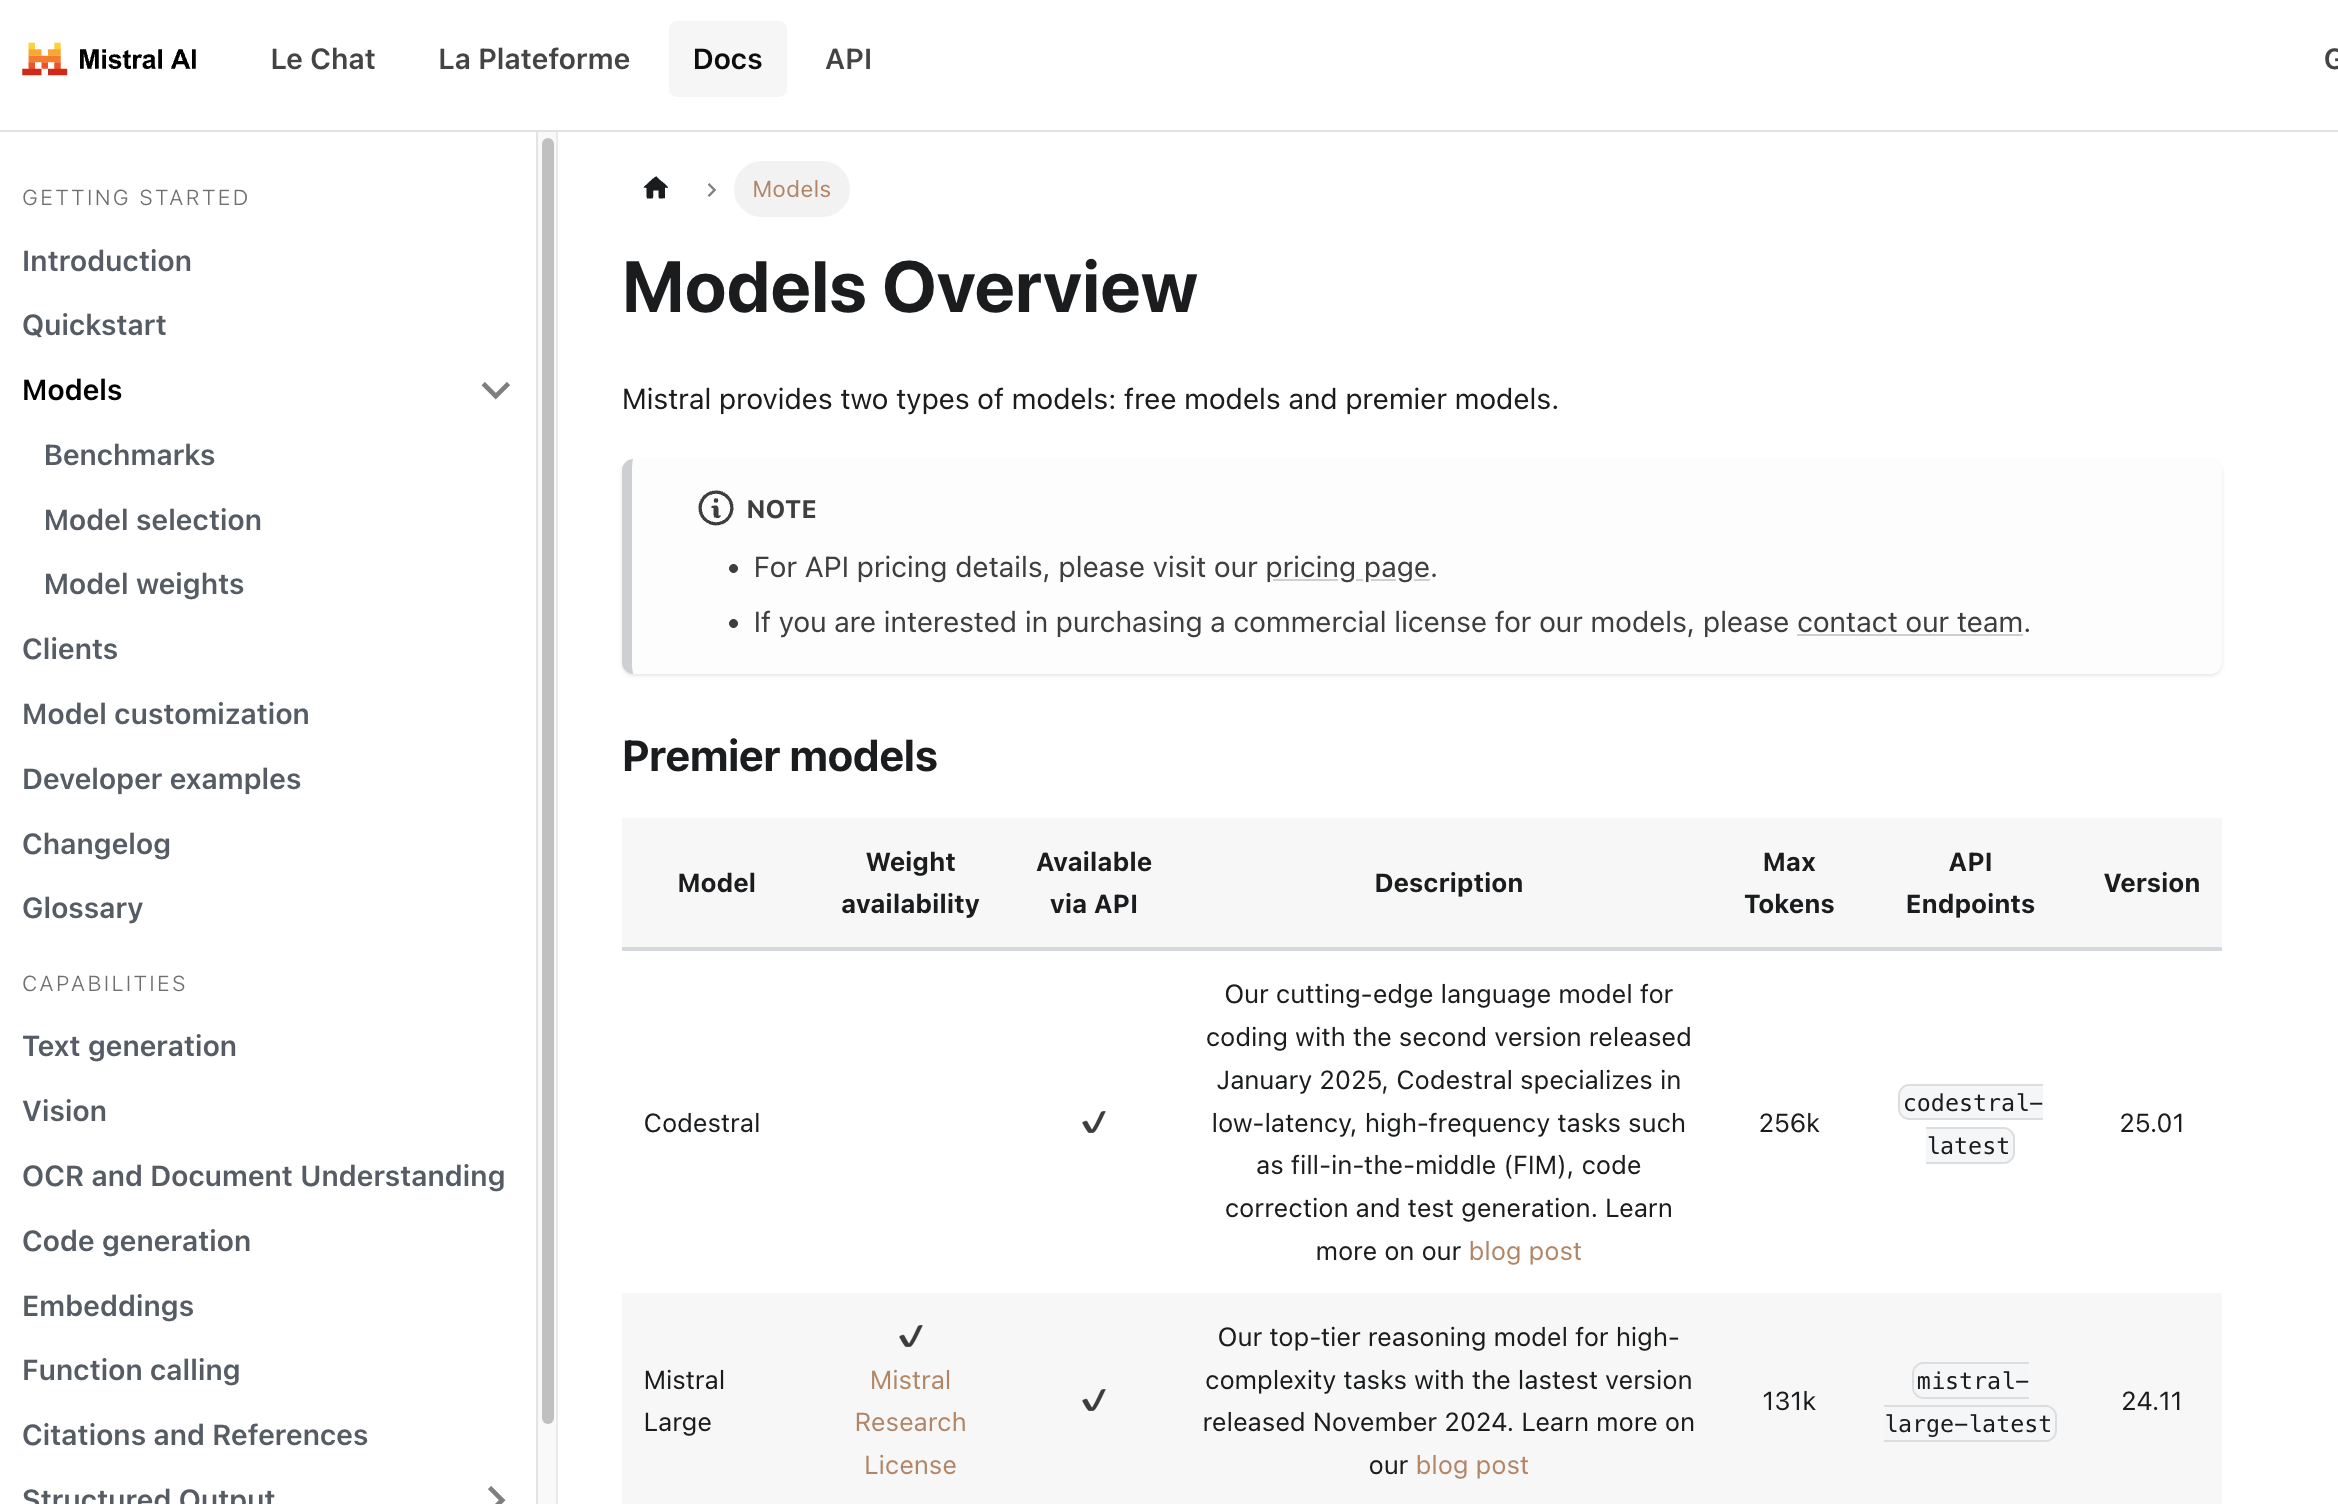
Here's a quick breakdown of the types of models you'll encounter:
Premier Models: These are Mistral's top-performing models, often requiring payment.
Mistral Large: Their flagship model, designed for complex reasoning tasks. It has a large context window (can handle lots of text) and strong performance across various benchmarks.Codestral: Specialized models fine-tuned for code generation, completion, and explanation tasks. Excellent for developers.Pixtral Large: A powerful multimodal model capable of understanding both text and images.Mistral Embed: A highly efficient model specifically designed to create numerical representations (embeddings) of text for tasks like semantic search, clustering, and classification.Mistral Moderation: A tool to detect harmful or unwanted content in text.Mistral OCR: Service to extract text interleaved with images from documents.- Specialized models like
Mistral Saba(for Middle Eastern/South Asian languages) orMinistral(efficient edge models).
Free Models (Often with Open Weights): These models might have weights available under permissive licenses (like Apache 2.0), meaning the AI community can study and build upon them. They are often available via the API as well, sometimes with more generous free tiers or lower costs.
Mistral Small: A highly capable smaller model, balancing performance and efficiency. Often a great starting point.- Older models like
Mistral 7BorMixtral 8x7Bmight still be listed but could be transitioning to legacy status (see below).
Model Versioning and latest Tags:
You'll notice models often have names like mistral-large-latest or mistral-large-2411.
*-latest: This tag always points to the most recent stable version of that model (e.g.,mistral-large-latestcurrently points tomistral-large-2411). Usinglatestis convenient for always having the newest features, but be aware that the underlying model can change, which might slightly alter behavior or outputs over time.*-YYYYMM(e.g.,mistral-large-2411): This refers to a specific, dated version of the model (released November 2024 in this example). Using a dated version ensures consistency. Your application will always hit the exact same model version, which is crucial for production environments where predictable behavior is paramount.
Recommendation: For development and exploration, latest is fine. For production applications, strongly consider using a dated version for stability.
Model Deprecation:
AI moves fast! Mistral continuously releases newer, better models. As part of this cycle, older models are eventually deprecated and retired. The Models Overview page includes a section on legacy models, showing their deprecation and retirement dates. Always check this if you rely on an older model, and plan your migration to newer alternatives well in advance.
Choosing a Model:
- Task: What do you need to do? (Chat, code, embeddings, image analysis?)
- Complexity: How difficult is the task? (Simple Q&A vs. nuanced reasoning?)
- Cost: Check the pricing page! Larger models usually cost more.
- Speed: Smaller models are typically faster.
Start with a smaller, cheaper model (like mistral-small-latest) and see if it meets your needs. If not, scale up to larger or more specialized models.
Step 4: Making Your First API Call (Chat Completion) with Python
Let's make something happen! The most common use case is chat completion – giving the model a prompt or a conversation history and getting a response. Mistral's primary endpoint for this is /v1/chat/completions.
We'll use the mistral-large-latest model for this example, but you can substitute any suitable chat model name.
Important Security Note: In the examples below, we often use os.environ["MISTRAL_API_KEY"] (Python) or process.env.MISTRAL_API_KEY (TypeScript). This assumes you have set your API key as an environment variable named MISTRAL_API_KEY. This is highly recommended over pasting the key directly into your code.
- How to set an environment variable (temporary for terminal session):
- Mac/Linux:
export MISTRAL_API_KEY='your_actual_api_key_here' - Windows (Command Prompt):
set MISTRAL_API_KEY=your_actual_api_key_here - Windows (PowerShell):
$env:MISTRAL_API_KEY='your_actual_api_key_here' - Replace
your_actual_api_key_herewith the key you saved. Remember to omit the quotes if using Windows Command Prompt. For more permanent setup, search for how to set environment variables persistently on your operating system.
Install the library:
pip install mistralai
Create a Python file (e.g., mistral_test.py):
import os
from mistralai.client import MistralClient
from mistralai.models.chat_completion import ChatMessage

# Load the API key from environment variables
api_key = os.environ.get("MISTRAL_API_KEY")
if not api_key:
    raise ValueError("MISTRAL_API_KEY environment variable not set!")

# Define the model you want to use
model_name = "mistral-large-latest" # Or choose another model

# Initialize the Mistral client
client = MistralClient(api_key=api_key)

print(f"Sending request to model: {model_name}")

# Define the conversation messages
# The 'messages' list contains chat history or a single user prompt
messages = [
    ChatMessage(role="user", content="What is the best French cheese?")
    # You can add more messages for conversation history:
    # ChatMessage(role="assistant", content="There are many wonderful French cheeses! It depends on your taste. Do you prefer soft, hard, or blue cheese?"),
    # ChatMessage(role="user", content="I prefer soft cheese.")
]

try:
    # Make the API call to the chat completions endpoint
    chat_response = client.chat(
        model=model_name,
        messages=messages,
        # Optional parameters:
        # temperature=0.7, # Controls randomness (0.0 = deterministic, 1.0 = more random)
        # max_tokens=150   # Limits the length of the response
    )

    # Print the response from the model
    if chat_response.choices:
        print("Model Response:")
        print(chat_response.choices[0].message.content)
    else:
        print("No response received.")

    # You can also print the full response object to see usage details, etc.
    # print("\nFull Response Object:")
    # print(chat_response)

except Exception as e:
    print(f"An error occurred: {e}")
Run the script:
python mistral_test.py
You should see the model's answer printed to your terminal!
Step 5: Testing Mistral AI Embeddings with API
Mistral isn't just about chat! Let's look at another key capability: Embeddings. Embeddings transform text into numerical vectors that capture semantic meaning. Texts with similar meanings will have vectors that are close together in vector space. This is fundamental for RAG (Retrieval-Augmented Generation), semantic search, recommendation systems, etc.
Mistral's embedding model is accessed via the /v1/embeddings endpoint, typically using the mistral-embed model identifier.
Let's see how to get embeddings for a couple of sentences with Python:
import os
from mistralai.client import MistralClient

api_key = os.environ.get("MISTRAL_API_KEY")
if not api_key:
    raise ValueError("MISTRAL_API_KEY environment variable not set!")

model_name = "mistral-embed"
client = MistralClient(api_key=api_key)

print(f"Requesting embeddings using model: {model_name}")

texts_to_embed = [
    "Mistral AI provides powerful language models.",
    "Embeddings are numerical representations of text.",
    "What is the weather like today?"
]

try:
    embeddings_response = client.embeddings(
        model=model_name,
        input=texts_to_embed
    )

    # The response contains a list of embedding objects, each with the vector
    print(f"Received {len(embeddings_response.data)} embeddings.")

    # Print the first few dimensions of the first embedding as an example
    if embeddings_response.data:
        first_embedding_vector = embeddings_response.data[0].embedding
        print(f"Dimensions of each embedding: {len(first_embedding_vector)}")
        print(f"First 5 dimensions of the first embedding: {first_embedding_vector[:5]}")

    # You would typically store these vectors for later use
    # print("\nFull Embeddings Response:")
    # print(embeddings_response)

except Exception as e:
    print(f"An error occurred: {e}")
Run this Python script, and you'll see the dimensions of the embeddings and a snippet of the first one.
Other Capabilities:
Mistral offers even more! While we won't detail the code here, be sure to explore the official documentation for:
- Completion (Legacy): While chat is often preferred, there might be simpler completion endpoints discussed here: Mistral Completion Capabilities
- Document Understanding (OCR): Extracting text from documents, potentially handling layouts and images: Mistral Document Capabilities
- Function Calling: Allowing models to interact with external tools and APIs.
- Fine-tuning: Customizing models on your own data (often an enterprise feature).
Always refer back to the official Mistral AI documentation for the most up-to-date information on endpoints, parameters, and capabilities.
Step 6: Understanding Pricing and Monitoring Usage
Using powerful AI models often comes at a cost. It's crucial to understand how Mistral prices its API usage.
- Pricing Varies by Model: Larger, more capable models generally cost more per token (input and output) than smaller models. Embedding models have their own pricing, usually based on the number of tokens processed.
- Tokens: AI models process text in chunks called tokens. A token isn't exactly a word; it can be a word, part of a word, or punctuation. Roughly, 1000 tokens are about 750 words, but this varies. Pricing is typically specified as "cost per 1 million input tokens" and "cost per 1 million output tokens".
- Check the Official Pricing Page: Pricing can change. Always refer to the official Mistral AI pricing page for the latest details. You can usually find a link to this on their main website or within the Models Overview documentation.
- Monitor Your Usage: The Mistral AI console (console.mistral.ai) usually has a section (often under "Billing" or "Usage") where you can track your API calls and associated costs. Regularly check this to avoid surprises.
- Set Budgets/Alerts: If the platform allows, set spending limits or alerts to notify you if your usage exceeds certain thresholds.
Be mindful of your usage, especially when developing applications that might make many calls. Optimize your prompts and choose the most cost-effective model that meets your needs.
Step 7: Making API Calls with APidog
While coding is common, sometimes you want a graphical interface to test API endpoints quickly. Tools like Postman, Insomnia, or APidog are excellent for this. Let's walk through using APidog to make the same chat completion call as before.
Download and Install APidog: If you haven't already, download APidog from their official website and install it on your computer.
Launch APidog: Open the application.
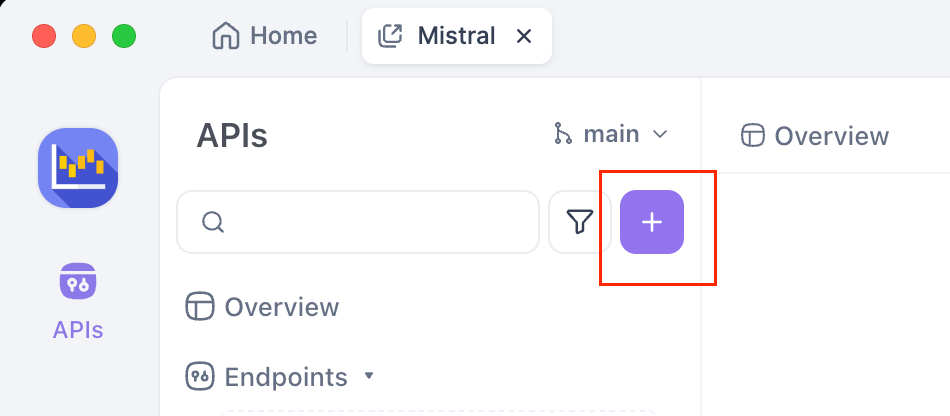
Create a New Request: You'll likely see a "+" button or an option to create a "New Request". Click it.
Set HTTP Method and URL:
- In the request area, find the dropdown for the HTTP method (it usually defaults to
GET). Change it toPOST. - In the URL input field next to it, enter the Mistral chat completions endpoint:
https://api.mistral.ai/v1/chat/completions
Configure Authorization:
- Look for tabs below the URL bar like "Params", "Authorization", "Headers", "Body". Click on the "Authorization" tab.
- In the "Type" dropdown within this tab, select "Bearer Token".
- A field labelled "Token" will appear to the right. Paste your saved Mistral API Key into this field.
Set Request Headers:
- Click on the "Headers" tab.
- You need to add two headers:
- In the first empty row under "Key", type
Content-Type. In the "Value" column next to it, typeapplication/json. - In the next empty row, type
Acceptfor the "Key", andapplication/jsonfor the "Value". - Also set
Authorization:Bearer $MISTRAL_API_KEY
Provide the Request Body:
- Click on the "Body" tab.
- Select the "raw" radio button.
- Just to the right of "raw", there's often a dropdown menu showing the format (e.g., "Text"). Change this dropdown to "JSON".
- In the large text area below, paste the JSON payload for your request:
{
    "model": "mistral-large-latest",
    "messages": [{"role": "user", "content": "Who is the most renowned French painter?"}]
}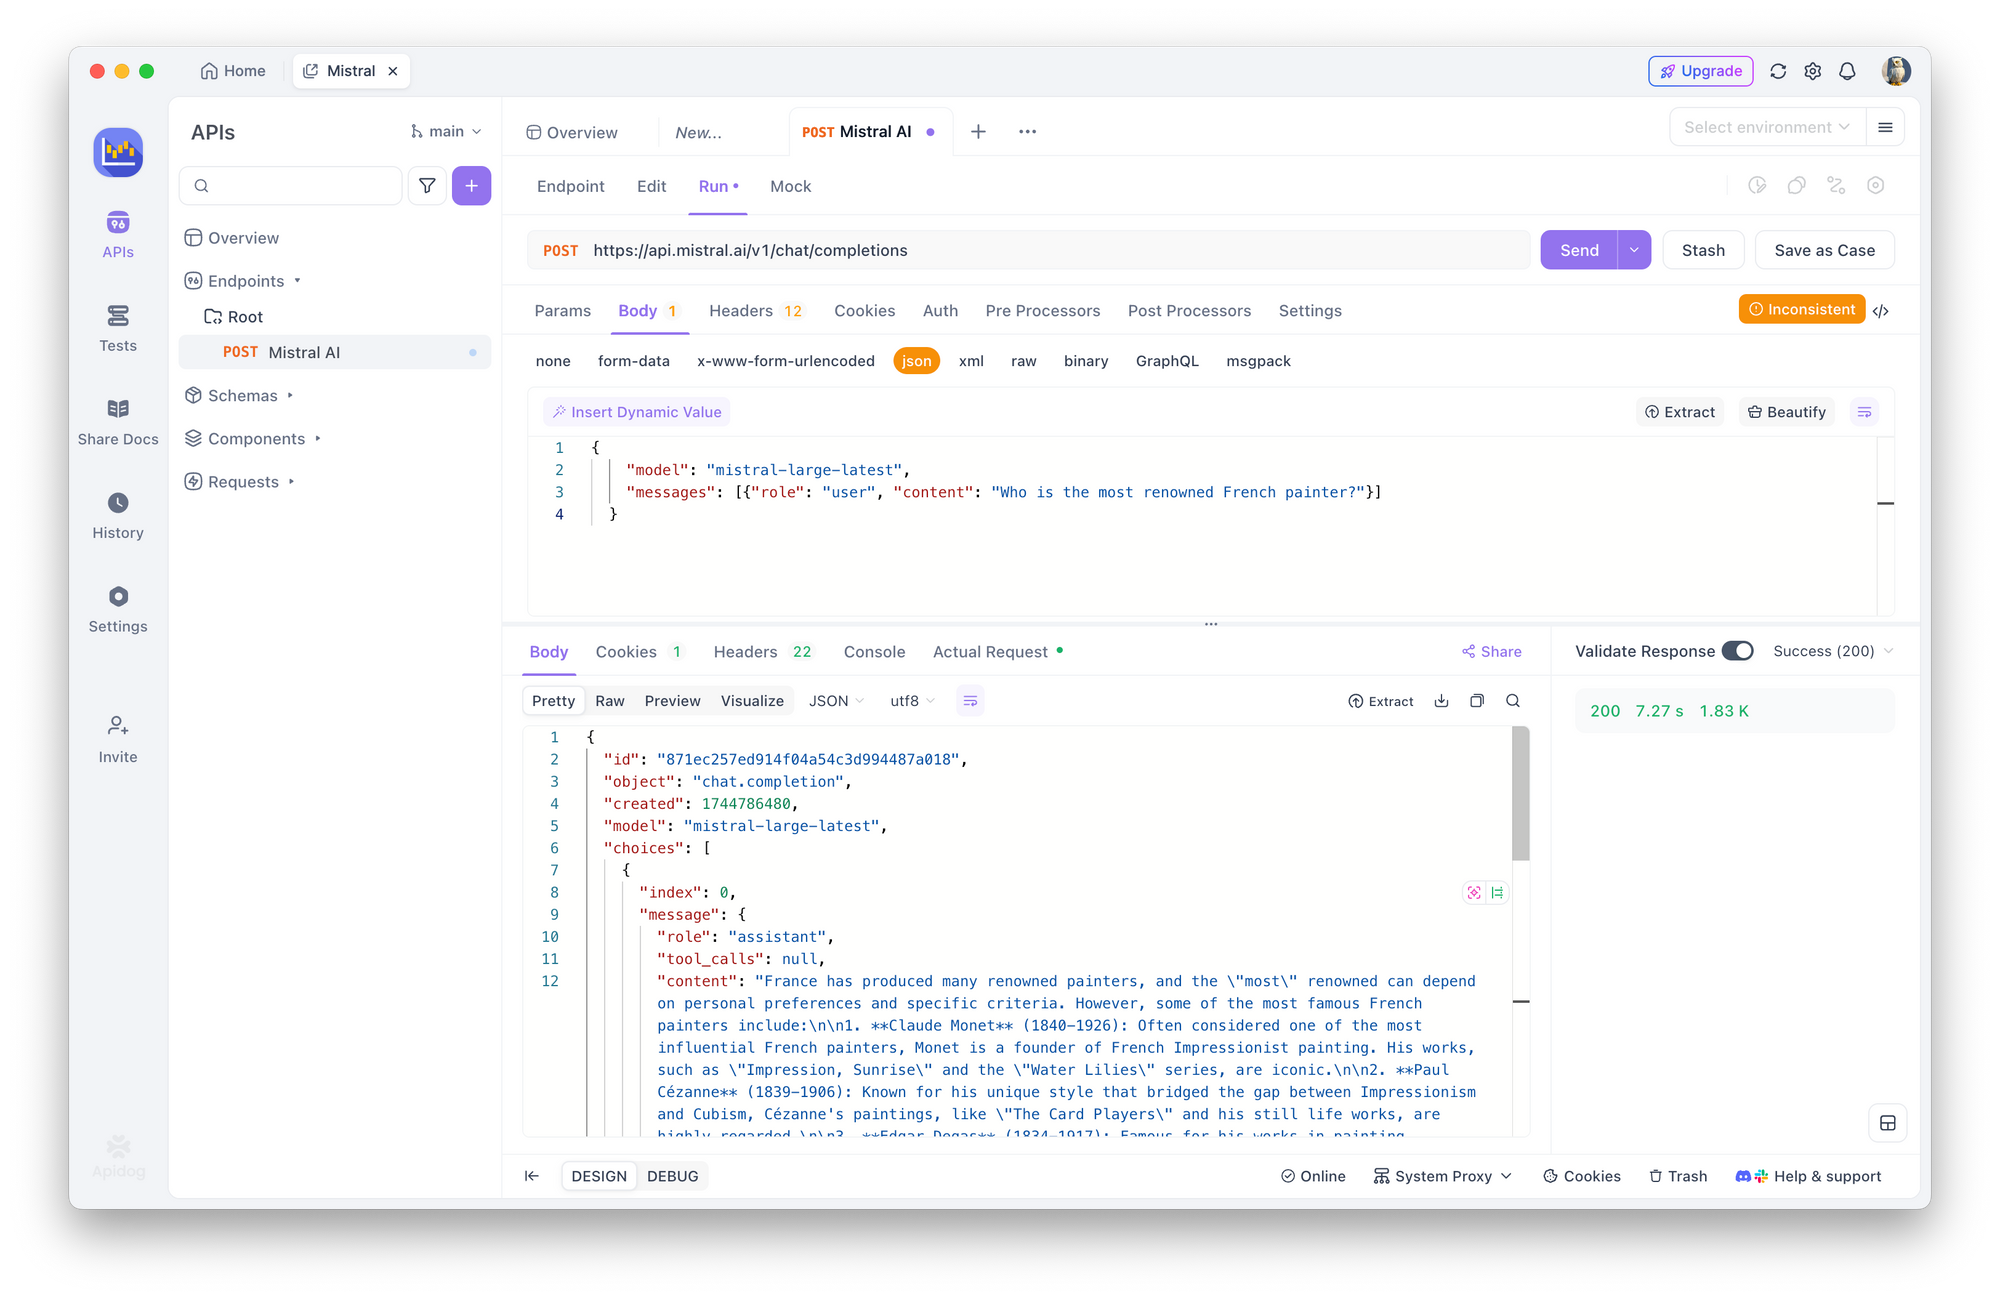
Send the Request: Find the "Send" button (usually prominently displayed near the URL bar) and click it.
View the Response: APidog will make the call to the Mistral API. The response from the server will appear in the lower section of the APidog window, usually under a "Response" or "Body" tab. You should see the JSON response, including the model's answer within choices[0].message.content. You can also inspect response headers and status codes (hopefully 200 OK!).
Using a tool like APidog is fantastic for experimenting with different models, prompts, and parameters without writing any code.
Step 8: Best Practices & Security (A Quick Recap)
Working with API keys requires responsibility. Let's reiterate some crucial points:
- NEVER Hardcode Keys: Do not paste your API key directly into your source code (
my_key = "sk-..."). If you commit this code to a public repository (like GitHub), your key will be exposed, and others could use it, racking up charges on your account. - Use Environment Variables: As shown in the code examples, loading keys from environment variables (
os.environ,process.env) is a much safer standard practice. - Secret Management Tools: For more robust applications, especially in team environments or cloud deployments, use dedicated secret management services (like AWS Secrets Manager, Google Secret Manager, HashiCorp Vault).
- Least Privilege: If Mistral allows creating keys with specific permissions (this isn't always available), create keys that only have the permissions needed for a particular application.
- Key Rotation: For enhanced security, consider periodically generating new keys and retiring old ones (e.g., every few months), though this requires updating your applications.
- Monitor Regularly: Keep an eye on your usage dashboard in the Mistral console. Unusual activity could indicate a compromised key.
Conclusion: Go Forth and Build!
You've successfully navigated the process of getting and using a Mistral AI API key! We've covered:
- Setting up your Mistral account and activating billing.
- Generating and securely storing your unique API key.
- Understanding the different Mistral models and how to choose one.
- Making API calls using Python, TypeScript, and cURL for chat completions and embeddings.
- Checking pricing and monitoring your usage.
- Using a GUI tool like APidog for easy API testing.
- Reinforcing essential security best practices.
The Mistral API is a gateway to incredibly powerful AI capabilities. Your API key is the literal key to unlocking that potential. By following the steps and best practices outlined here, you're well on your way to integrating state-of-the-art AI into your own projects.
Don't hesitate to explore the official Mistral documentation further – it's the ultimate source of truth for all available parameters, models, and advanced features.
Happy building!
Want an integrated, All-in-One platform for your Developer Team to work together with maximum productivity?
Apidog delivers all your demands, and replaces Postman at a much more affordable price!


