The OpenAI Agents SDK now supports MCP (Model Context Protocol), a game-changer for AI interoperability. This allows developers to connect AI models to external tools and data sources efficiently. In this technical guide, we’ll walk you through building MCP Servers with the OpenAI Agents SDK to enhance your AI applications.
What Are MCP Servers and Why Use Them with OpenAI Agents SDK?
MCP (Model Context Protocol) is an open protocol that standardizes how applications provide context to large language models (LLMs). Think of MCP like a USB-C port for AI applications - it acts as a universal connector that allows AI models to interface with different data sources and tools seamlessly.
The OpenAI Agents SDK integrates MCP Servers to enable agents to access external tools and data. Using MCP Servers ensures smooth interaction between your AI agent and both remote and local resources. This integration reduces complexity in tool calling and enhances agent functionality.
Here are some examples you can build with OpenAI + MCP Server combinations:
🕵️♂️ used gitingest to download all the docs from @OpenAIDevs Agents SDK
— Dan Mac (@daniel_mac8) March 23, 2025
excellent for providing to your AI Coding Agent as context if building with the OpenAI Agents SDK
download from the GitHub link below ⬇️ pic.twitter.com/0szZ43wMTv
Steps to Use OpenAI MCP Intergration
Prerequisites for Building MCP Servers with OpenAI Agents SDK
Before getting started, ensure you have:
- Python 3.8 or higher installed on your system
- OpenAI Agents SDK installed via pip:
pip install openai-agents - Node.js set up to run MCP server commands like
npxfor certain examples - A project directory with initialized virtual environment for dependency management
- Basic understanding of asynchronous programming in Python, as the SDK uses async/await
Step 1: Set Up Your Development Environment for MCP Servers
# Create a new directory for your project
mkdir mcp-agent-project && cd mcp-agent-project

# Initialize a Python virtual environment
python -m venv venv && source venv/bin/activate

# Install the required dependencies
pip install openai-agents pyyaml
Set up a configuration file named mcp_agent.config.yaml to define MCP Servers. This configuration points to a filesystem MCP server for accessing local files.
Step 2: Understand the Types of MCP Servers in OpenAI Agents SDK
MCP Servers come in two types as defined in the MCP specification:
- stdio servers: Run locally as a subprocess of your application
- HTTP over SSE servers: Operate remotely and connect via a URL
The OpenAI Agents SDK provides two classes to handle these servers:
MCPServerStdio: For local subprocess-based serversMCPServerSse: For remote HTTP over SSE servers
Choose the server type based on your application's architecture and latency requirements. Stdio servers are ideal for local development, while SSE servers are better suited for distributed systems.
Step 3: Connect an MCP Server to Your OpenAI Agent
Import the necessary classes from the OpenAI Agents SDK and define your MCP server:
from openai_agents import Agent, MCPServerStdio

# Define path to your sample files
samples_dir = "/path/to/your/files"

# Use async context manager to initialize the server
async with MCPServerStdio(
    params={
        "command": "npx",
        "args": ["-y", "@modelcontextprotocol/server-filesystem", samples_dir],
    }
) as server:
    # List tools provided by the MCP server
    tools = await server.list_tools()

    # Create an agent that uses the MCP server
    agent = Agent(
        name="Assistant",
        instructions="Use the filesystem tools to help the user with their tasks.",
        mcp_servers=[server]
    )

    # Run the agent
    result = await agent.run("List the files in the directory.")
This setup allows the agent to use filesystem tools dynamically during execution.
Step 4: Optimize Performance with Tool Caching
MCP Servers call list_tools() each time an agent runs, which can introduce latency, especially with remote servers. To reduce this overhead, you can enable tool caching:
# Enable caching when initializing the server
async with MCPServerStdio(
    params={
        "command": "npx",
        "args": ["-y", "@modelcontextprotocol/server-filesystem", samples_dir],
    },
    cache_tools_list=True  # Enable caching
) as server:
    # The tools list will be cached after the first call
    tools = await server.list_tools()
Important considerations for caching:
- Only use caching if you're certain the tool list won't change during runtime
- If tools need to be updated, invalidate the cache:
await server.invalidate_tools_cache() - Caching works for both stdio and SSE servers, with greater performance benefits for remote servers
Step 5: Implement MCP Server Integration with Your Agent's Workflow
To fully integrate MCP servers with your agent:
from openai_agents import Agent, MCPServerStdio, MCPServerSse

async def run_agent_with_mcp_servers():
    # Initialize local stdio MCP server
    local_server = MCPServerStdio(
        params={
            "command": "npx",
            "args": ["-y", "@modelcontextprotocol/server-filesystem", "./local_files"],
        },
        cache_tools_list=True
    )

    # Initialize remote SSE MCP server (if needed)
    remote_server = MCPServerSse(
        url="<https://your-remote-mcp-server.com/stream>",
        cache_tools_list=True
    )

    async with local_server, remote_server:
        # Create agent with both servers
        agent = Agent(
            name="MultiToolAgent",
            instructions="Use the available tools to accomplish tasks.",
            mcp_servers=[local_server, remote_server]
        )

        # Run the agent
        result = await agent.run("Complete the requested task using appropriate tools.")
        return result
This approach gives your agent access to both local and remote tools through standardized MCP interfaces.
Step 6: Debug and Monitor Your MCP Servers
Effective debugging and monitoring strategies include:
- Checking the MCP server logs for errors during tool execution
- Using the OpenAI Agents SDK's tracing dashboard to monitor tool calls
- Testing edge cases like invalid tool names or server downtime to ensure robustness
- Monitoring latency when using remote SSE servers and optimizing with caching if needed
- Leveraging the SDK's built-in tracing functionality, which automatically captures:
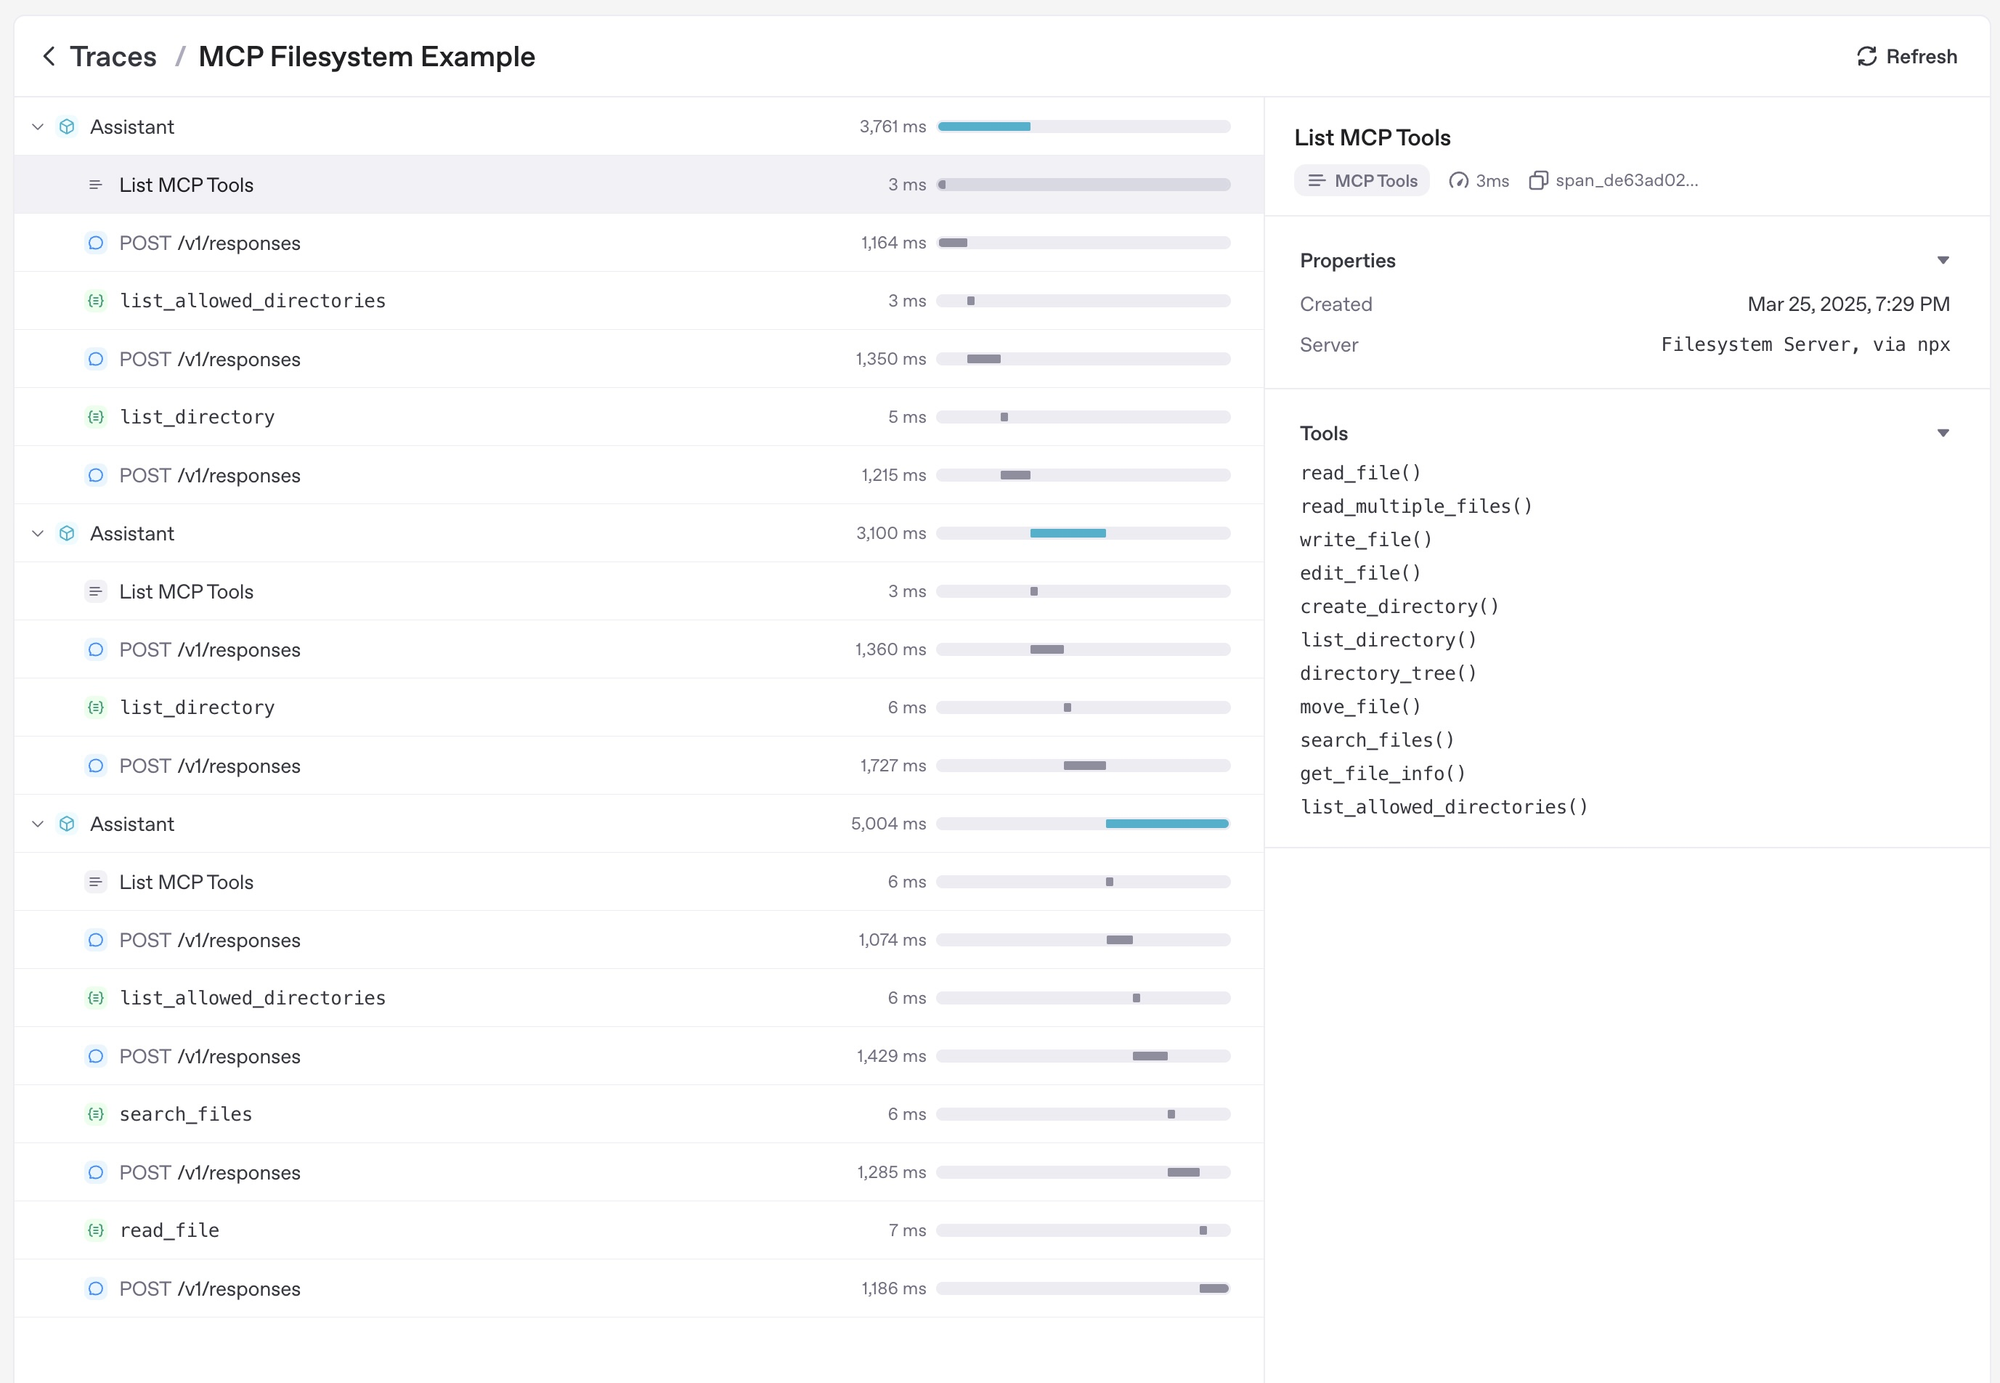
- Calls to MCP servers to list tools
- MCP-related information on function calls
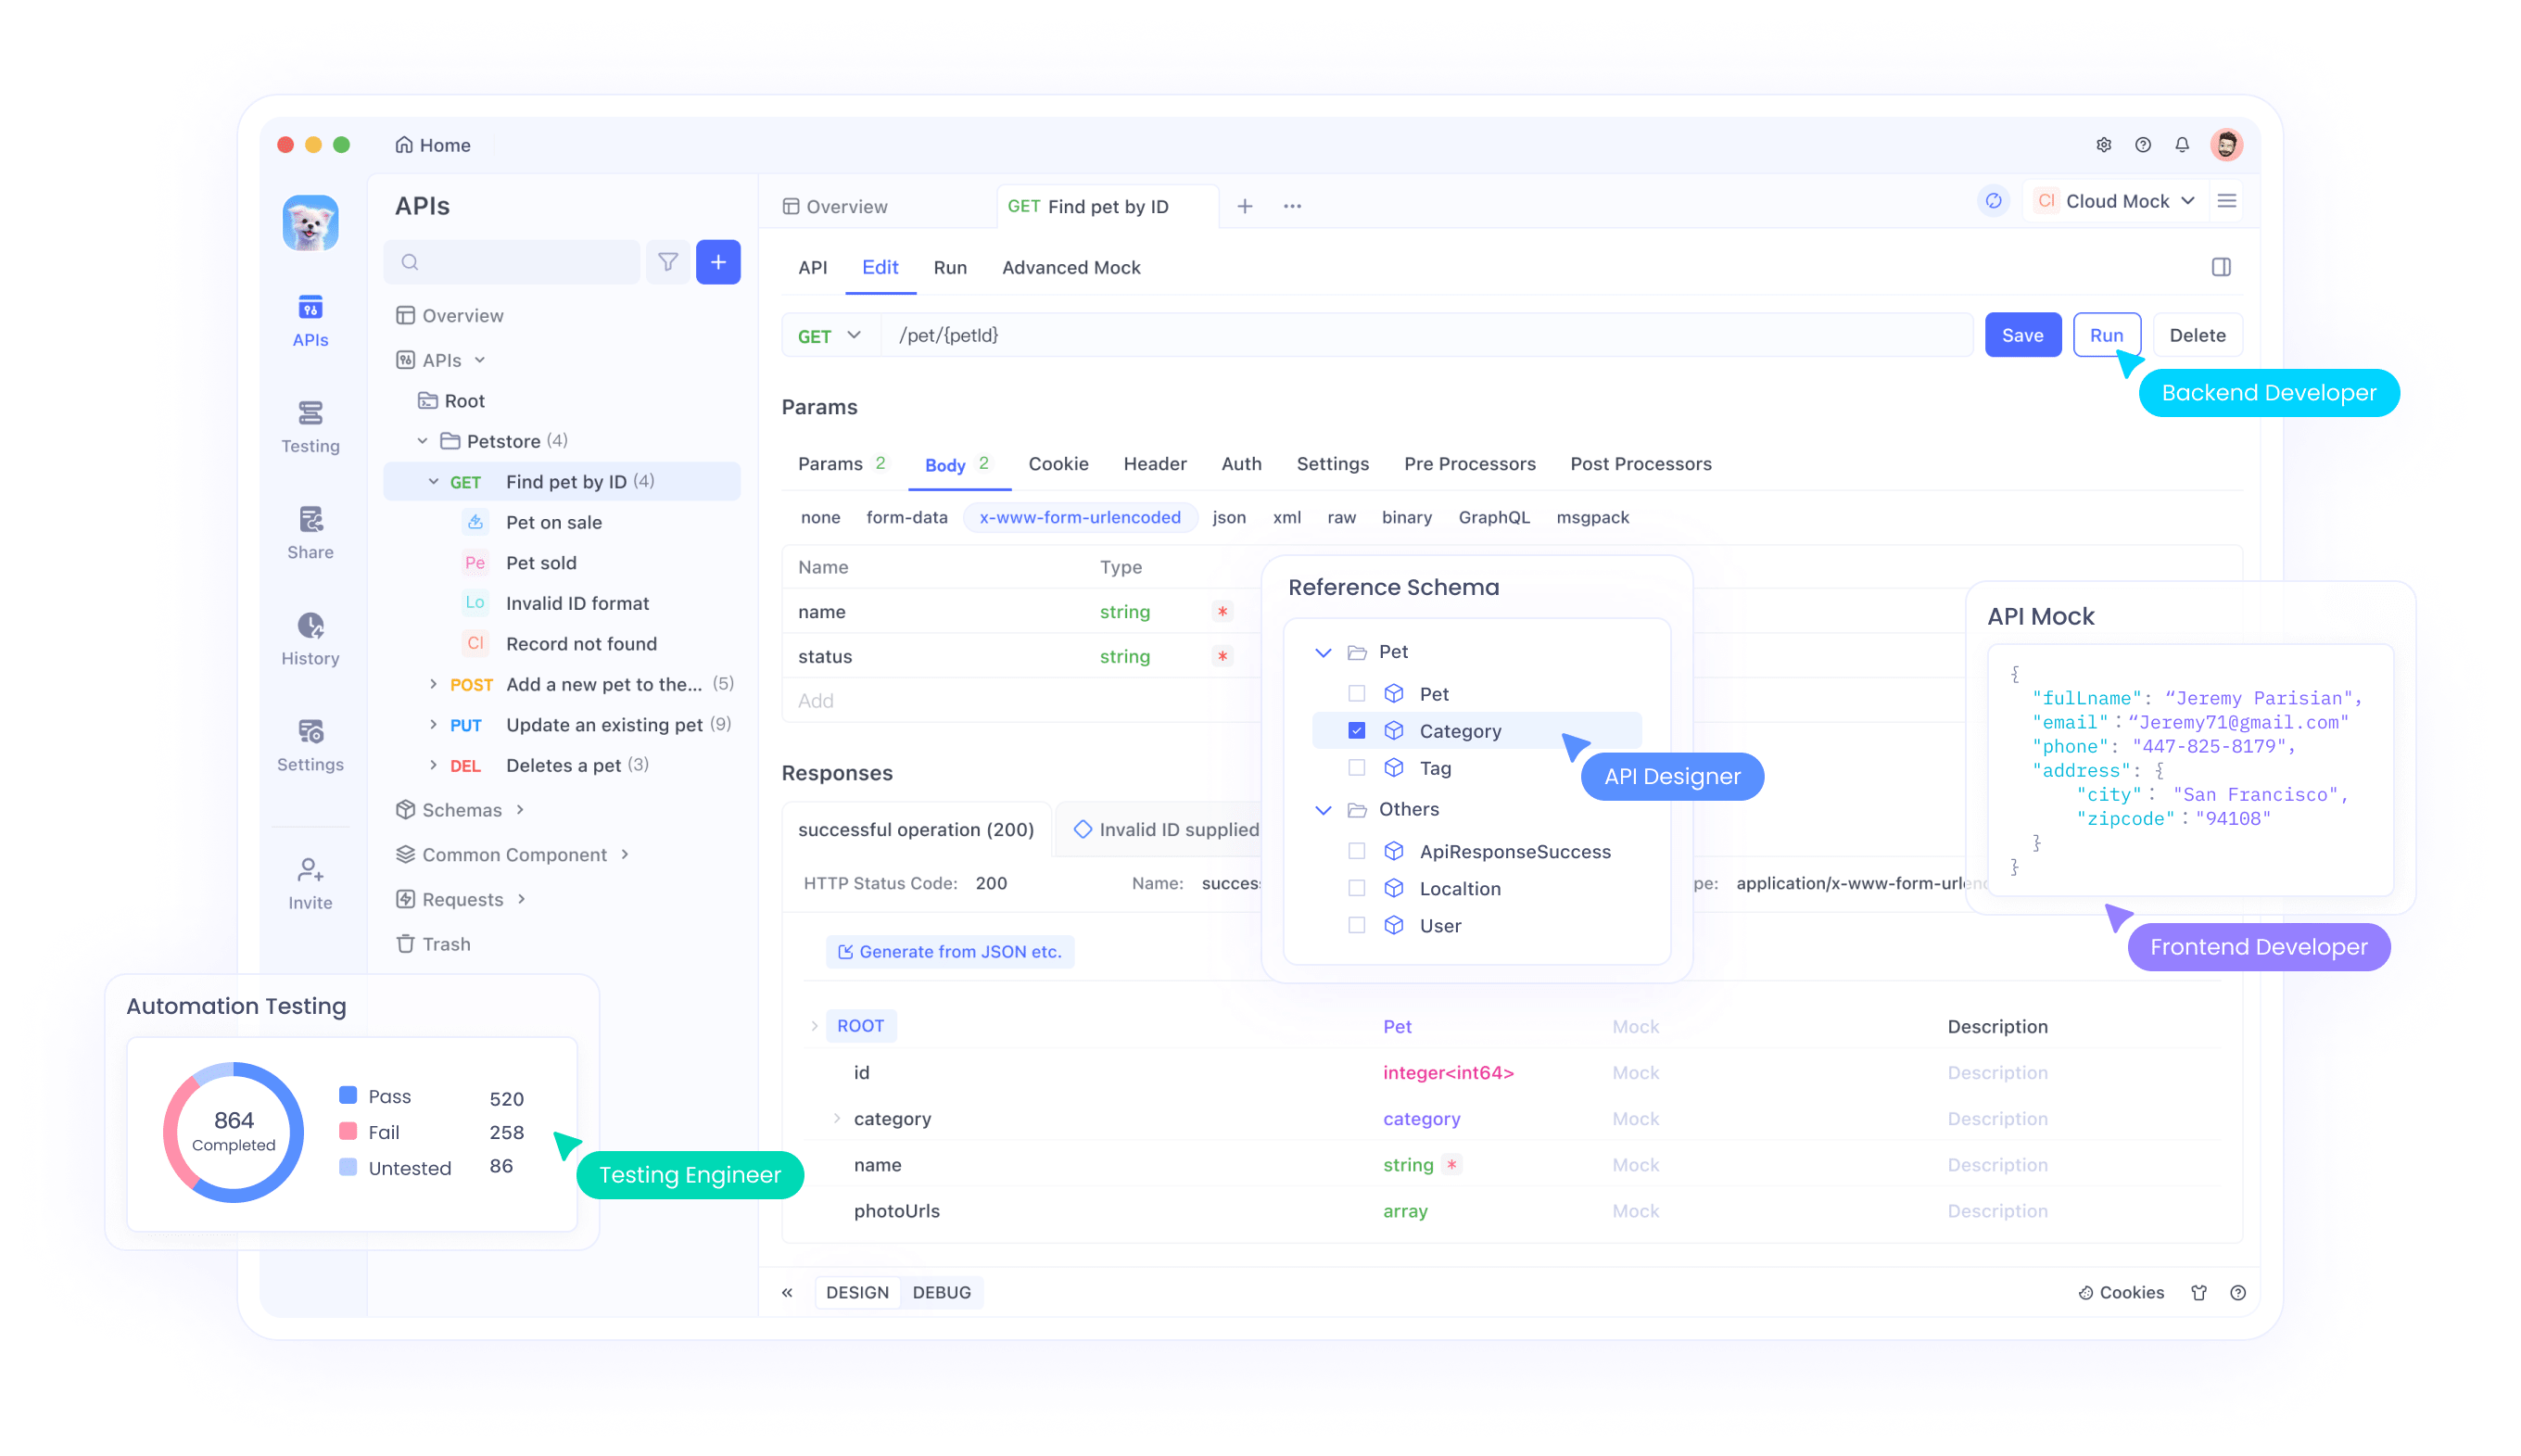
Additionally, you should also consider using an All-in-One API Testing tool to make your API Development cycle earsier.
Apidog is a powerful tool that simplifies API development, making it an excellent companion when building MCP Servers with OpenAI Agents SDK. Since MCP Servers often involve interacting with APIs—whether for remote HTTP over SSE servers or testing tool calls—Apidog can enhance your workflow.
Conclusion
Building MCP Servers with OpenAI Agents SDK opens up new possibilities for enhancing AI agents with external tools and data sources. The standardized MCP interface makes integration simpler and more reliable across different environments.
By following this guide, you can create powerful agents that leverage both local and remote resources through the Model Context Protocol. As the MCP ecosystem continues to grow, your agents will be able to access an ever-expanding set of tools and capabilities.
For more examples and detailed documentation, visit the official OpenAI Agents SDK MCP documentation. The SDK's support for MCP represents a significant step forward in making AI agents more capable and connected to the digital world.