
The Model Context Protocol (MCP), introduced by Anthropic on November 26, 2024, is an open standard aimed at bridging the gap between AI models and external data sources. This protocol addresses a critical challenge: even advanced Large Language Models (LLMs), while powerful in text generation, are often isolated from real-time data and tools, limiting their practical utility. MCP Servers, as integral components, enable AI assistants like Claude to access files, databases, APIs, and more, enhancing their ability to deliver relevant, actionable responses.
The significance of MCP lies in its potential to standardize integrations, reducing the fragmentation that has plagued AI development. By providing a universal protocol, it aims to help frontier models produce better, more relevant responses by breaking down information silos and legacy system barriers.
As of March 25, 2025, the ecosystem is rapidly growing, with community contributions and enterprise adoptions, such as early adopters like Block and Apollo integrating MCP into their systems.
Download Apidog for free today and discover how it can transform your workflow!
What Are MCP Servers?
MCP servers, part of the Model Context Protocol (MCP), are special programs that help AI models, like those from Anthropic, connect to and use external data and tools. Introduced in November 2024, they allow AI to do more than just generate text by accessing things like files on your computer, databases, or even services like GitHub, all in a secure and standardized way.
Think of MCP servers as bridges that let AI interact with the outside world, similar to how USB ports let you plug in different devices to your computer. For example, if you ask an AI to summarize a document, it can pull the file directly from your system. Or, if you need to create a GitHub issue, the AI can do that too, thanks to an MCP server. They can provide data (like files), tools (like API calls), or prompts (guides for interaction), making AI more useful for tasks like coding, research, or managing projects.
An unexpected detail is how quickly the community has grown, with over 250 servers already available, including both official integrations and community contributions, showing a vibrant ecosystem that's expanding fast.
How MCP Server Work (And How They Are Different from APIs)
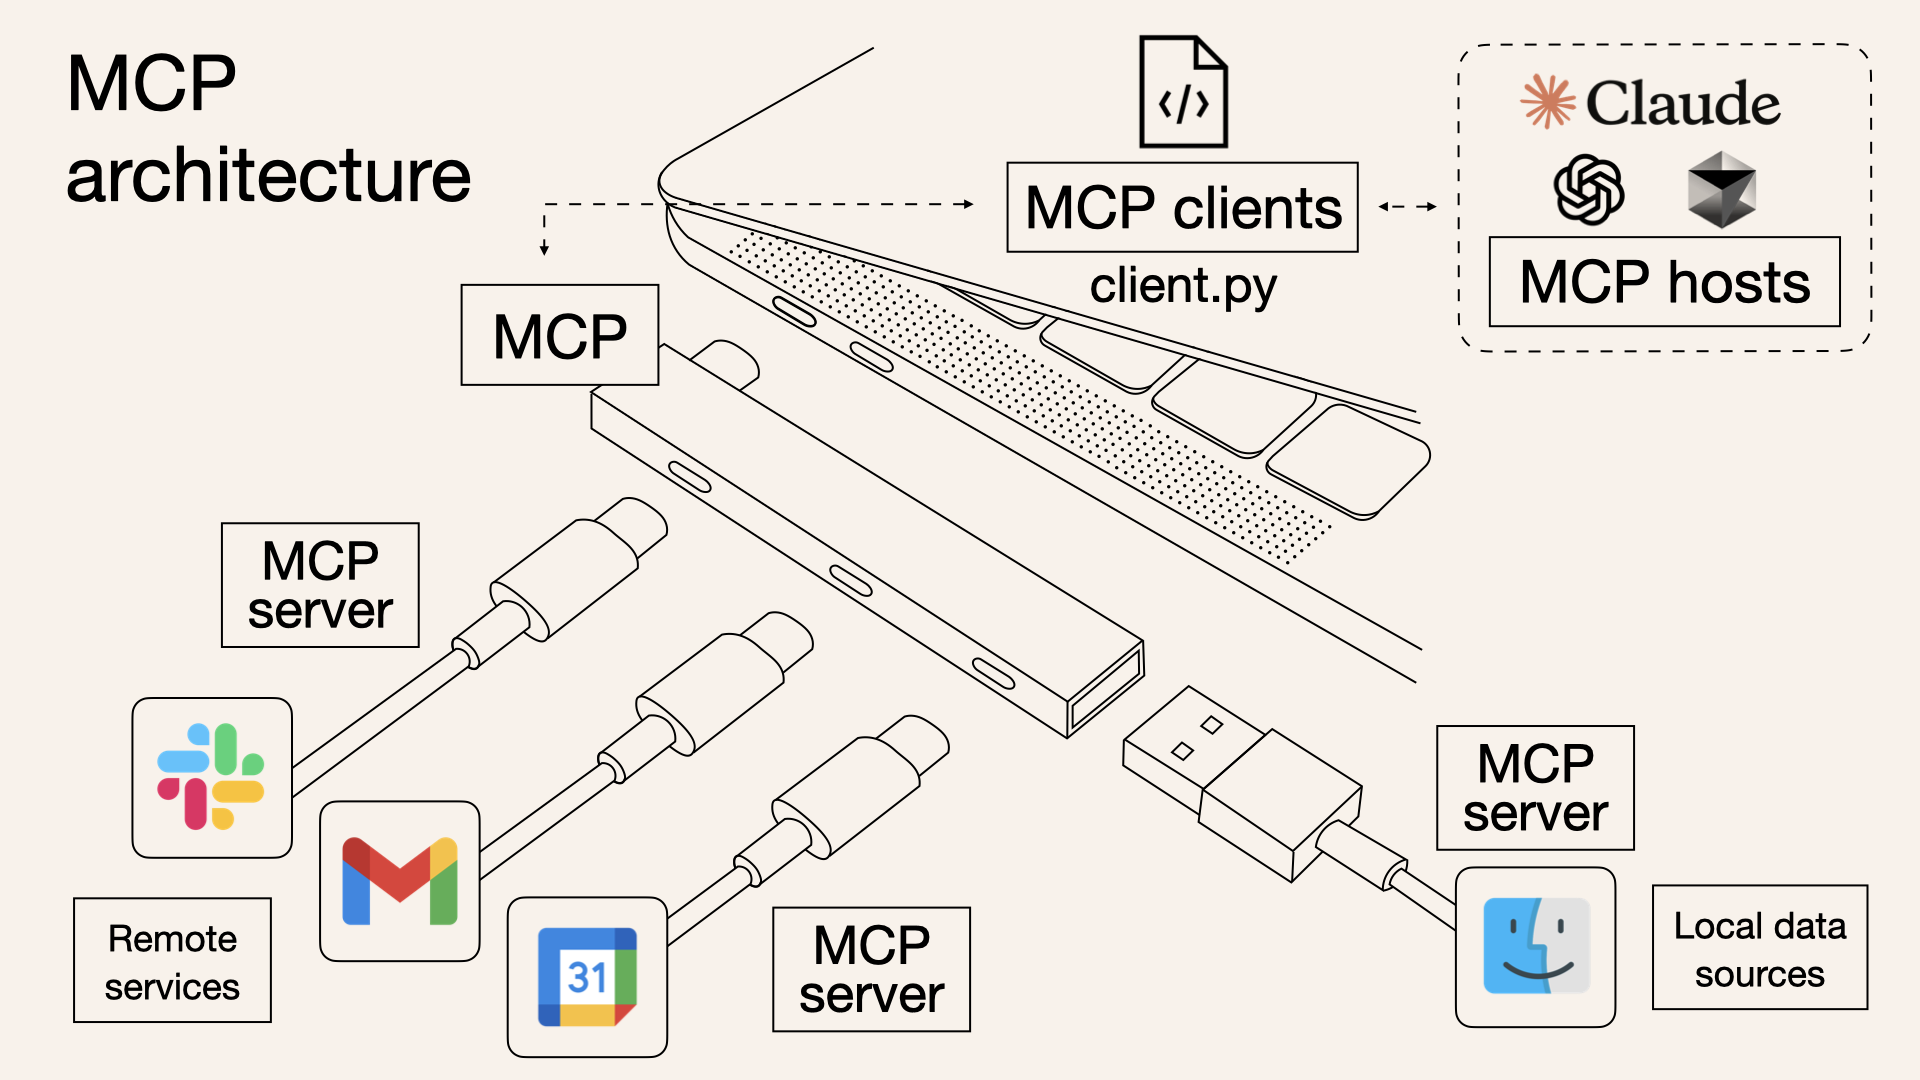
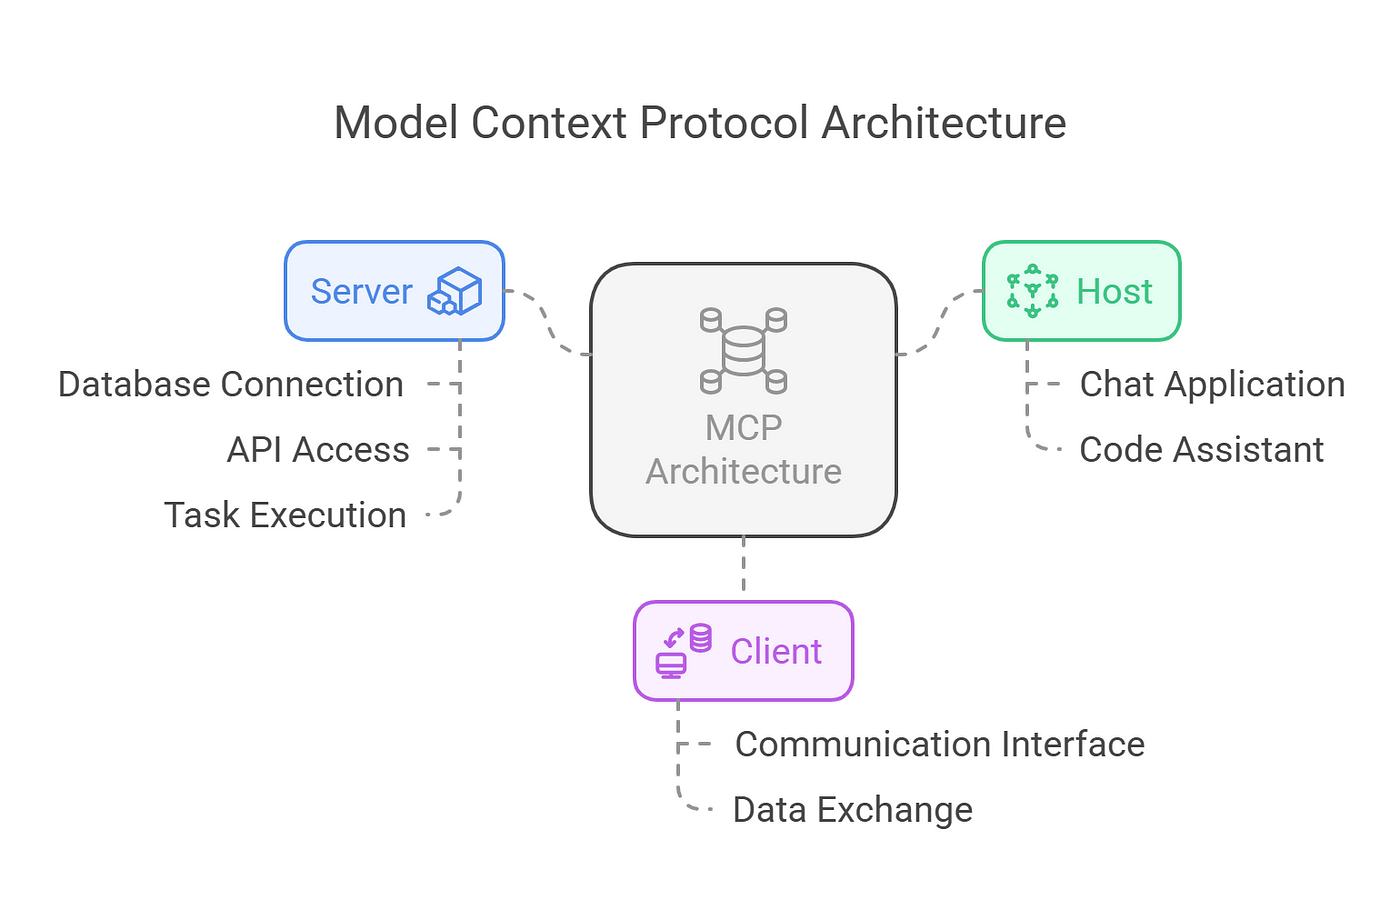
MCP operates on a client-server model, as outlined in the documentation. The architecture includes:
- MCP Hosts: Applications such as Claude Desktop, IDEs, or AI tools that seek to leverage external data.
- MCP Clients: Protocol clients that maintain secure, one-to-one connections with servers, ensuring efficient communication.
- MCP Servers: Lightweight programs that each expose specific capabilities through the standardized Model Context Protocol.This structure allows for seamless integration, with hosts using clients to connect to various servers, each offering unique functionalities. The protocol supports three main types of exposures:
- Resources: Data sources like files, documents, or database queries that the AI can load into its context. For instance, a file system server might allow access to local documents.
- Tools: Actions the AI can perform, such as making API calls or executing commands. An example is a GitHub server enabling repository management, detailed in the same repository.
- Prompts: Reusable templates for LLM interactions, guiding the AI’s behavior in specific scenarios.
The protocol is based on JSON-RPC 2.0, ensuring stateful connections and capability negotiation between clients and servers. This technical foundation allows for robust, secure communication, with features like progress tracking, cancellation, and error reporting enhancing reliability.
So, What Can MCPs Actual Do?
MCP servers are designed to be versatile, catering to a wide range of needs. They can be run locally or remotely, depending on the implementation, and are built with security-first principles. Each server controls its own resources, maintaining clear system boundaries to prevent unauthorized access.
This security is crucial, especially when dealing with sensitive data, ensuring that connections are secure and permissions are tightly managed.
Technically, servers expose their capabilities through JSON-RPC endpoints, allowing clients to query available resources, tools, and prompts.
For example, a server might expose a "readFile" resource that returns the content of a specified file, or a "createIssue" tool that interacts with GitHub’s API. The protocol also supports server-initiated behaviors like sampling, enabling agentic AI interactions, which can be recursive and dynamic, as described in the specification.
Interested in MCP Servers? You Can Try These Now
The ecosystem of MCP servers is rich and growing, with numerous examples illustrating their utility, as listed in the repository at GitHub - awesome-mcp-servers:
- File System MCP Server: Enables AI to read and write files, useful for accessing personal notes or scripts, as seen in the reference implementation at GitHub - filesystem.
- GitHub MCP Server: Facilitates interactions like creating issues or committing code, enhancing developer workflows, detailed in GitHub - github.
- Web Scraping MCP Server: Allows AI to search and extract web content, providing real-time data, as mentioned in community servers like tavily-ai/tavily-mcp.
- Database MCP Servers: Offer access to SQL or NoSQL databases, such as PostgreSQL or MongoDB, enabling data queries, as seen in GitHub - postgres.
- API Integration MCP Servers: Connect to services like Slack, Trello, or weather APIs, expanding AI’s knowledge base, with examples like GitHub - slack.These servers demonstrate the protocol’s flexibility, with community contributions like Kubernetes management servers adding to the ecosystem, as listed in third-party servers at GitHub - servers.
What's the Difference Between MCP Server and APIs?
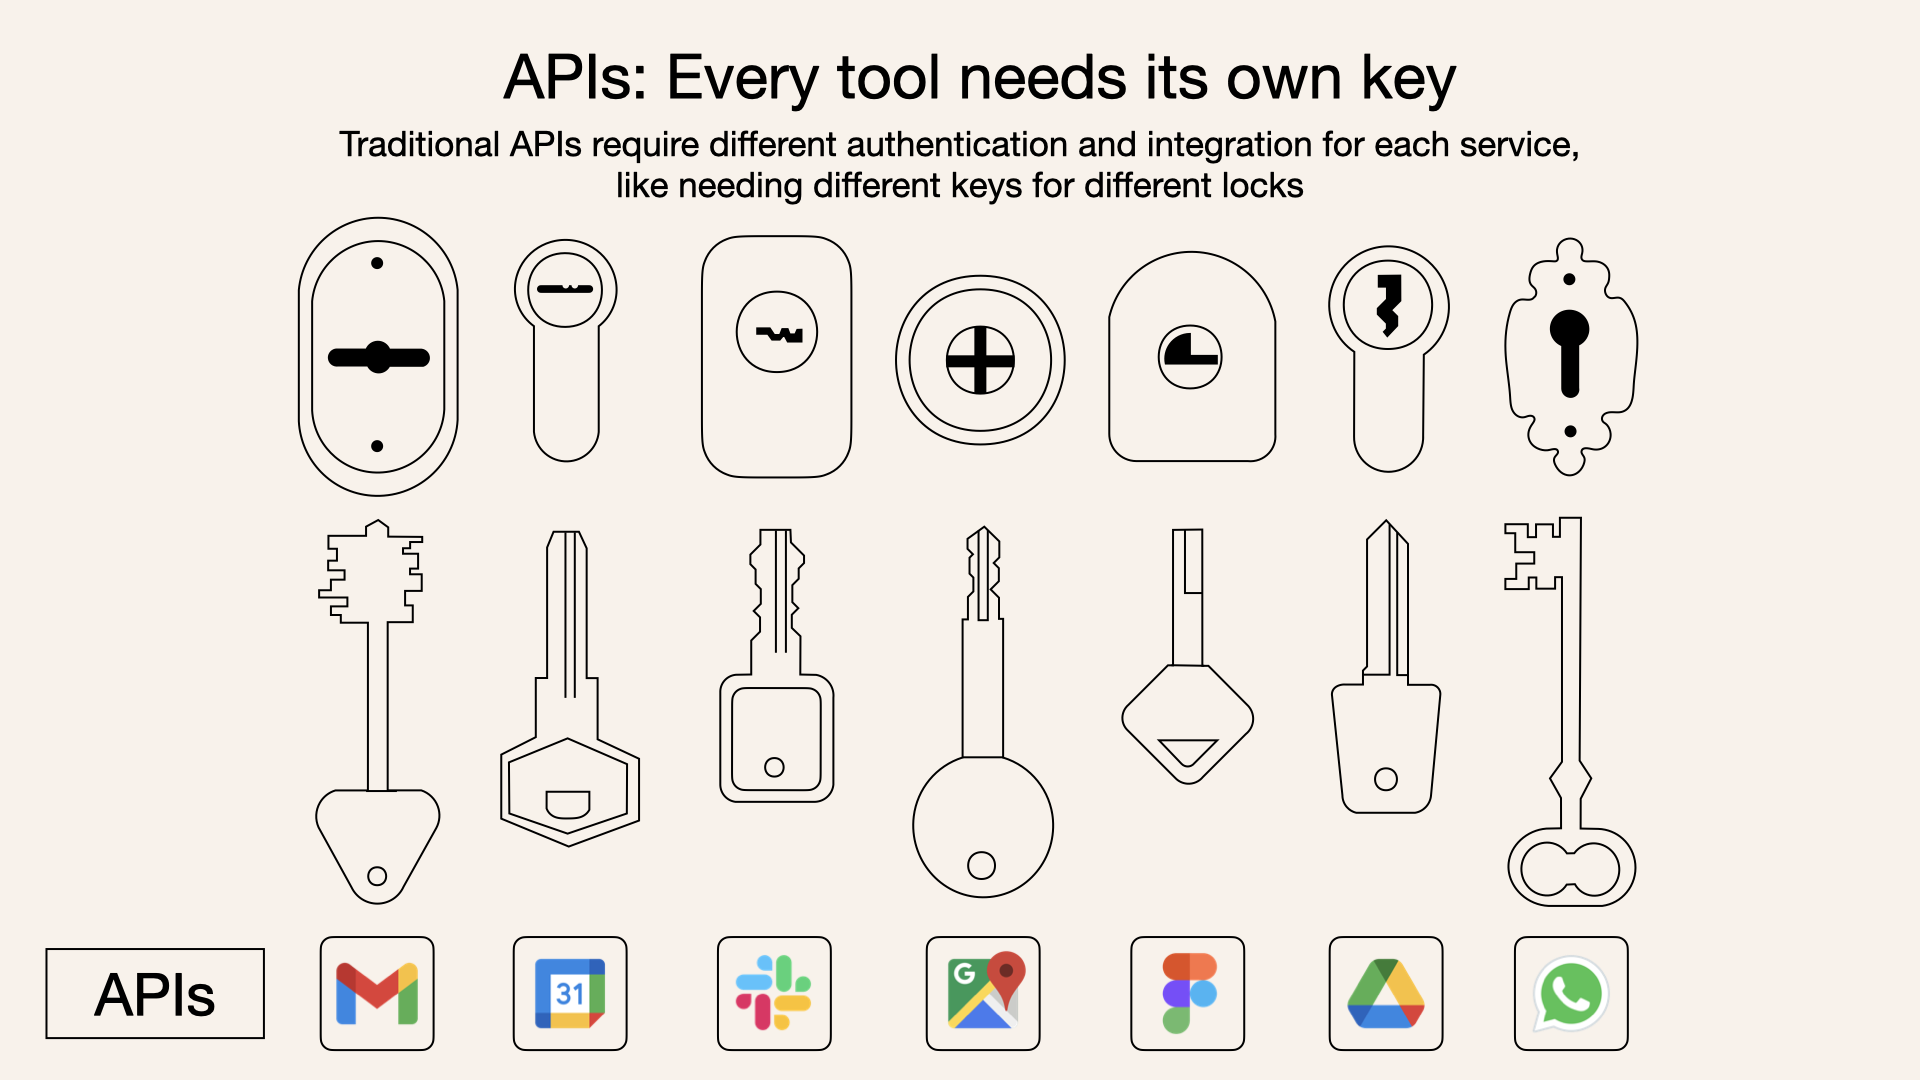
While both MCP servers and traditional APIs allow software to interact with external services, their purposes differ in the AI context:
- Purpose: Traditional APIs are general-purpose interfaces for software communication, often used to send queries to AI models or access external services. MCP servers are specifically designed to provide context to AI models, with a focus on data, tools, and prompts in a standardized format.
- Interaction: With a traditional API, the AI model needs to know how to call the API, parse its response, and integrate that information into its context. With an MCP server, the server handles the interaction with the data source or tool and presents the information in a way that the AI model can easily understand and use, without needing to know the specifics of the underlying data source.
- Standardization: MCP provides a standardized protocol, making it plug-and-play for various servers, whereas traditional APIs may require custom integration for each service.
- Security: MCP servers are optimized for security, with built-in authentication and access controls, while traditional APIs may require additional security measures depending on the implementation.
For example, in a traditional setup, the AI might need to call a REST API to get weather data, parsing JSON responses and integrating them into its context. With an MCP server, the server could expose a "get_weather" tool, and the AI simply calls it with parameters, receiving formatted data ready for use.
How to Setup MCP Servers (with Claude as Example)
Model Context Protocol (MCP) is a powerful framework that enables
MCP servers can provide three main types of capabilities:
- Resources: File-like data that can be read by clients (like API responses or file contents)
- Tools: Functions that can be called by the LLM (with user approval)
- Prompts: Pre-written templates that help users accomplish specific tasks
Setting Up Your Environment
Before getting started, ensure you have:
- Python 3.10 or higher installed
- Node.js (if using JavaScript/TypeScript implementations)
- Basic familiarity with Python or JavaScript programming
- Understanding of LLMs like Claude
Installing UV Package Manager
UV is the recommended package manager for Python MCP projects:
# MacOS/Linux
curl -LsSf <https://astral.sh/uv/install.sh> | sh

# Make sure to restart your terminal afterwards
Building an MCP Server
Let's build a simple weather server as an example.
This server will provide two tools: get-alerts and get-forecast.
Step 1: Set Up Project Structure
# Create a new directory for our project
uv init weather
cd weather

# Create virtual environment and activate it
uv venv
source .venv/bin/activate  # On Windows: .venv\\\\Scripts\\\\activate

# Install dependencies
uv add "mcp[cli]" httpx

# Create our server file
touch weather.py
Step 2: Implement the Server
Here's a complete implementation of our weather server (in weather.py):
from typing import Any
import httpx
from mcpserver.fastmcp import FastMCP

# Initialize FastMCP server
mcp = FastMCP("weather")

# Constants
NWS_API_BASE = "<https://api.weather.gov>"
USER_AGENT = "weather-app/1.0"

async def make_nws_request(url: str) -> dict[str, Any] | None:
    """Make a request to the NWS API with proper error handling."""
    headers = {
        "User-Agent": USER_AGENT,
        "Accept": "application/geo+json"
    }
    async with httpx.AsyncClient() as client:
        try:
            response = await client.get(url, headers=headers, timeout=30.0)
            response.raise_for_status()
            return response.json()
        except Exception:
            return None

def format_alert(feature: dict) -> str:
    """Format an alert feature into a readable string."""
    props = feature["properties"]
    return f"""
Event: {props.get('event', 'Unknown')}
Area: {props.get('areaDesc', 'Unknown')}
Severity: {props.get('severity', 'Unknown')}
Description: {props.get('description', 'No description available')}
Instructions: {props.get('instruction', 'No specific instructions provided')}
"""

@mcp.tool()
async def get_alerts(state: str) -> str:
    """Get weather alerts for a US state.

    Args:
        state: Two-letter US state code (e.g., CA, NY)
    """
    url = f"{NWS_API_BASE}/alerts/active/area/{state}"
    data = await make_nws_request(url)

    if not data or "features" not in data:
        return "Unable to fetch alerts or no alerts found."

    if not data["features"]:
        return "No active alerts for this state."

    alerts = [format_alert(feature) for feature in data["features"]]
    return "\\\\n---\\\\n".join(alerts)

@mcp.tool()
async def get_forecast(latitude: float, longitude: float) -> str:
    """Get weather forecast for a location.

    Args:
        latitude: Latitude of the location
        longitude: Longitude of the location
    """
    # First get the forecast grid endpoint
    points_url = f"{NWS_API_BASE}/points/{latitude},{longitude}"
    points_data = await make_nws_request(points_url)

    if not points_data:
        return "Unable to fetch forecast data for this location."

    # Get the forecast URL from the points response
    forecast_url = points_data["properties"]["forecast"]
    forecast_data = await make_nws_request(forecast_url)

    if not forecast_data:
        return "Unable to fetch detailed forecast."

    # Format the periods into a readable forecast
    periods = forecast_data["properties"]["periods"]
    forecasts = []
    for period in periods[:5]:  # Only show next 5 periods
        forecast = f"""
{period['name']}: Temperature: {period['temperature']}°{period['temperatureUnit']}
Wind: {period['windSpeed']} {period['windDirection']}
Forecast: {period['detailedForecast']}
"""
        forecasts.append(forecast)

    return "\\\\n---\\\\n".join(forecasts)

if __name__ == "__main__":
    # Initialize and run the server
    mcp.run(transport='stdio')
Step 3: Run Your Server
To test your server directly, run:
uv run weather.py
Connecting to Claude for Desktop
Claude for Desktop is a simple way to interact with your MCP servers.
Step 1: Install Claude for Desktop
Make sure you have Claude for Desktop installed and updated to the latest version.
Step 2: Configure Claude for Desktop
- Open your Claude for Desktop App configuration in a text editor:
# macOS
code ~/Library/Application\\\\ Support/Claude/claude_desktop_config.json
2. Add your server configuration:
{
  "mcpServers": {
    "weather": {
      "command": "uv",
      "args": [
        "--directory",
        "/ABSOLUTE/PATH/TO/PARENT/FOLDER/weather",
        "run",
        "weather.py"
      ]
    }
  }
}
Make sure to:
- Use the absolute path to your server directory
- Ensure the command matches your environment (e.g.,
uvor the full path touv)
Step 3: Restart Claude for Desktop
After saving the configuration, restart Claude for Desktop completely.
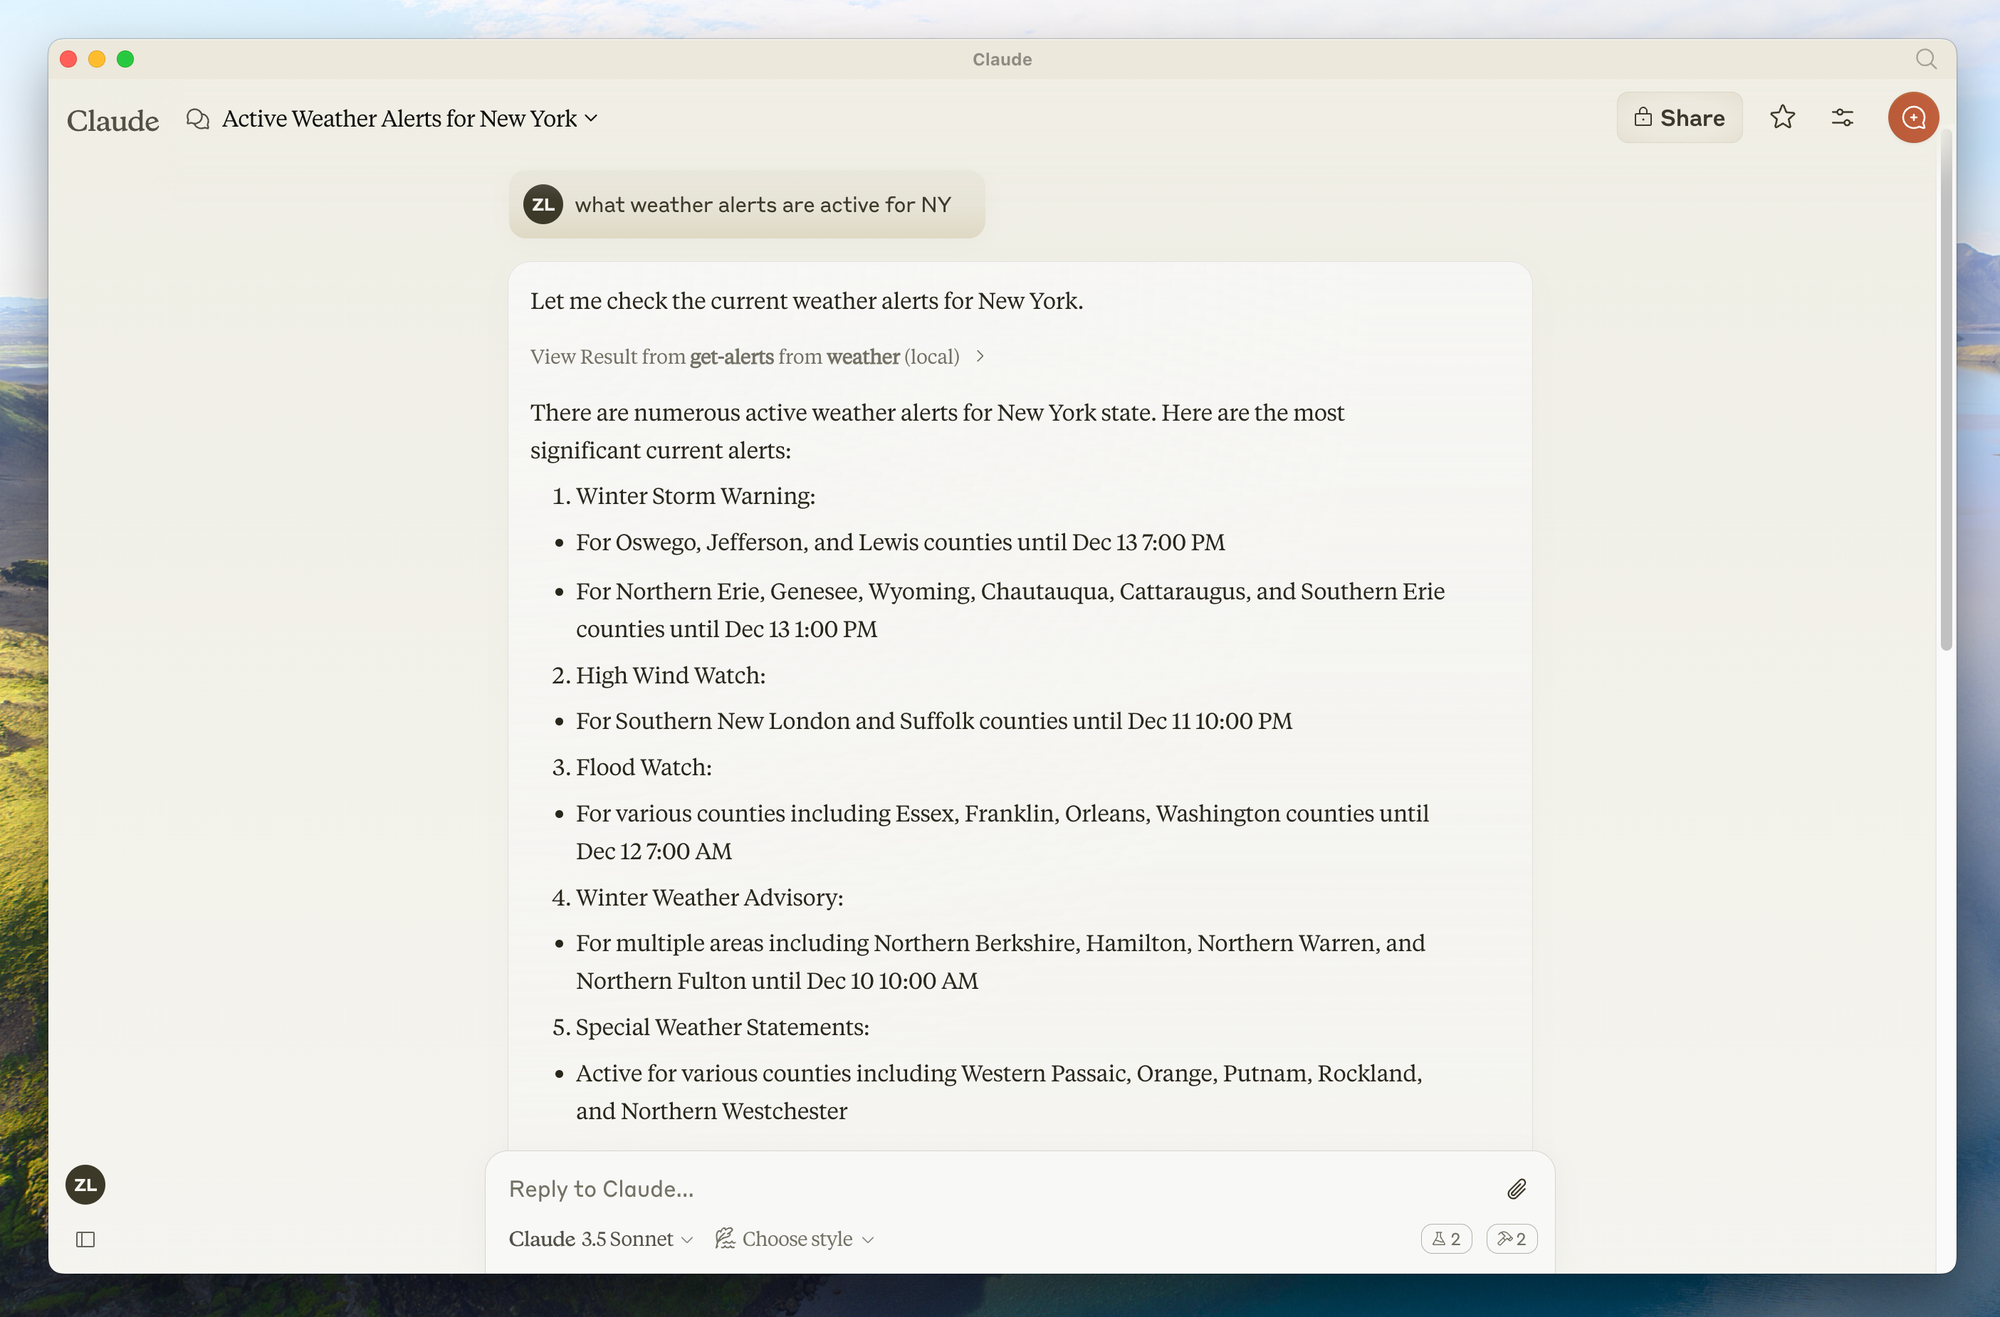
Step 4: Test Your Server
Look for the hammer icon in the bottom right corner of the Claude for Desktop input box. Clicking it should show your server's tools.
You can now ask Claude questions like:
- "What's the weather in Sacramento?"
- "What are the active weather alerts in Texas?"
Building a Custom MCP Client for Claude MCP Servers
Instead of using Claude for Desktop, you can build your own custom client.
Step 1: Set Up the Client Project
# Create project directory
uv init mcp-client
cd mcp-client

# Create virtual environment
uv venv
source .venv/bin/activate  # On Windows: .venv\\\\Scripts\\\\activate

# Install required packages
uv add mcp anthropic python-dotenv

# Create our main file
touch client.py
Step 2: Set Up Your API Key
Create a .env file with your Anthropic API key:
ANTHROPIC_API_KEY=<your key here>
Step 3: Implement the Client
Here's a basic client implementation (in client.py):
import asyncio
import sys
from typing import Optional
from contextlib import AsyncExitStack

from mcp.client.stdio import ClientSession, StdioServerParameters, stdio_client
from anthropic import Anthropic
from dotenv import load_dotenv

load_dotenv()  # load environment variables from .env

class MCPClient:
    def __init__(self):
        # Initialize session and client objects
        self.session: Optional[ClientSession] = None
        self.exit_stack = AsyncExitStack()
        self.anthropic = Anthropic()

    async def connect_to_server(self, server_script_path: str):
        """Connect to an MCP server

        Args:
            server_script_path: Path to the server script (py or js)
        """
        is_python = server_script_path.endswith('.py')
        is_js = server_script_path.endswith('.js')

        if not (is_python or is_js):
            raise ValueError("Server script must be a .py or .js file")

        command = "python" if is_python else "node"
        server_params = StdioServerParameters(command=command, args=[server_script_path], env=None)

        stdio_transport = await self.exit_stack.enter_async_context(stdio_client(server_params))
        self.stdio, self.write = stdio_transport
        self.session = await self.exit_stack.enter_async_context(ClientSession(self.stdio, self.write))
        await self.session.initialize()

        # List available tools
        response = await self.session.list_tools()
        tools = response.tools
        print("\\\\nConnected to server with tools:", [tool.name for tool in tools])

    async def process_query(self, query: str) -> str:
        """Process a query using Claude and available tools"""
        messages = [
            {
                "role": "user",
                "content": query
            }
        ]

        response = await self.session.list_tools()
        available_tools = [{
            "name": tool.name,
            "description": tool.description,
            "input_schema": tool.input_schema
        } for tool in response.tools]

        # Initial Claude API call
        response = self.anthropic.messages.create(
            model="claude-3-5-sonnet-20241022",
            max_tokens=1000,
            messages=messages,
            tools=available_tools
        )

        # Process response and handle tool calls
        final_text = []
        assistant_message_content = []

        for content in response.content:
            if content.type == 'text':
                final_text.append(content.text)
                assistant_message_content.append(content)
            elif content.type == 'tool_use':
                tool_name = content.name
                tool_args = content.input

                # Execute tool call
                result = await self.session.call_tool(tool_name, tool_args)
                final_text.append(f"[Calling tool {tool_name} with args {tool_args}]")
                assistant_message_content.append(content)

                messages.append({
                    "role": "assistant",
                    "content": assistant_message_content
                })

                messages.append({
                    "role": "user",
                    "content": [
                        {
                            "type": "tool_result",
                            "tool_use_id": content.id,
                            "content": result
                        }
                    ]
                })

                # Get next response from Claude
                response = self.anthropic.messages.create(
                    model="claude-3-5-sonnet-20241022",
                    max_tokens=1000,
                    messages=messages,
                    tools=available_tools
                )

                final_text.append(response.content[0].text)

        return "\\\\n".join(final_text)

    async def chat_loop(self):
        """Run an interactive chat loop"""
        print("\\\\nMCP Client Started!")
        print("Type your queries or 'quit' to exit.")

        while True:
            try:
                query = input("\\\\nQuery: ").strip()
                if query.lower() == 'quit':
                    break

                response = await self.process_query(query)
                print("\\\\n" + response)
            except Exception as e:
                print(f"\\\\nError: {str(e)}")

    async def cleanup(self):
        """Clean up resources"""
        await self.exit_stack.aclose()

async def main():
    if len(sys.argv) < 2:
        print("Usage: python client.py <path_to_server_script>")
        sys.exit(1)

    client = MCPClient()

    try:
        await client.connect_to_server(sys.argv[1])
        await client.chat_loop()
    finally:
        await client.cleanup()

if __name__ == "__main__":
    asyncio.run(main())
Step 4: Run the Client
To use your client with your weather server:
uv run client.py /path/to/weather.py
Using Pre-built MCP Servers with Claude for Desktop
Claude for Desktop supports a variety of pre-built MCP servers. Let's see how to use a filesystem server as an example.
Step 1: Configure the Filesystem Server
- Open the Claude for Desktop settings and click on "Edit Config"
- Update your configuration file with:
{
  "mcpServers": {
    "filesystem": {
      "command": "npx",
      "args": [
        "-y",
        "@modelcontextprotocol/server-filesystem",
        "/Users/username/Desktop",
        "/Users/username/Downloads"
      ]
    }
  }
}
Replace username with your actual username, and adjust the paths as needed.
Step 2: Restart and Test
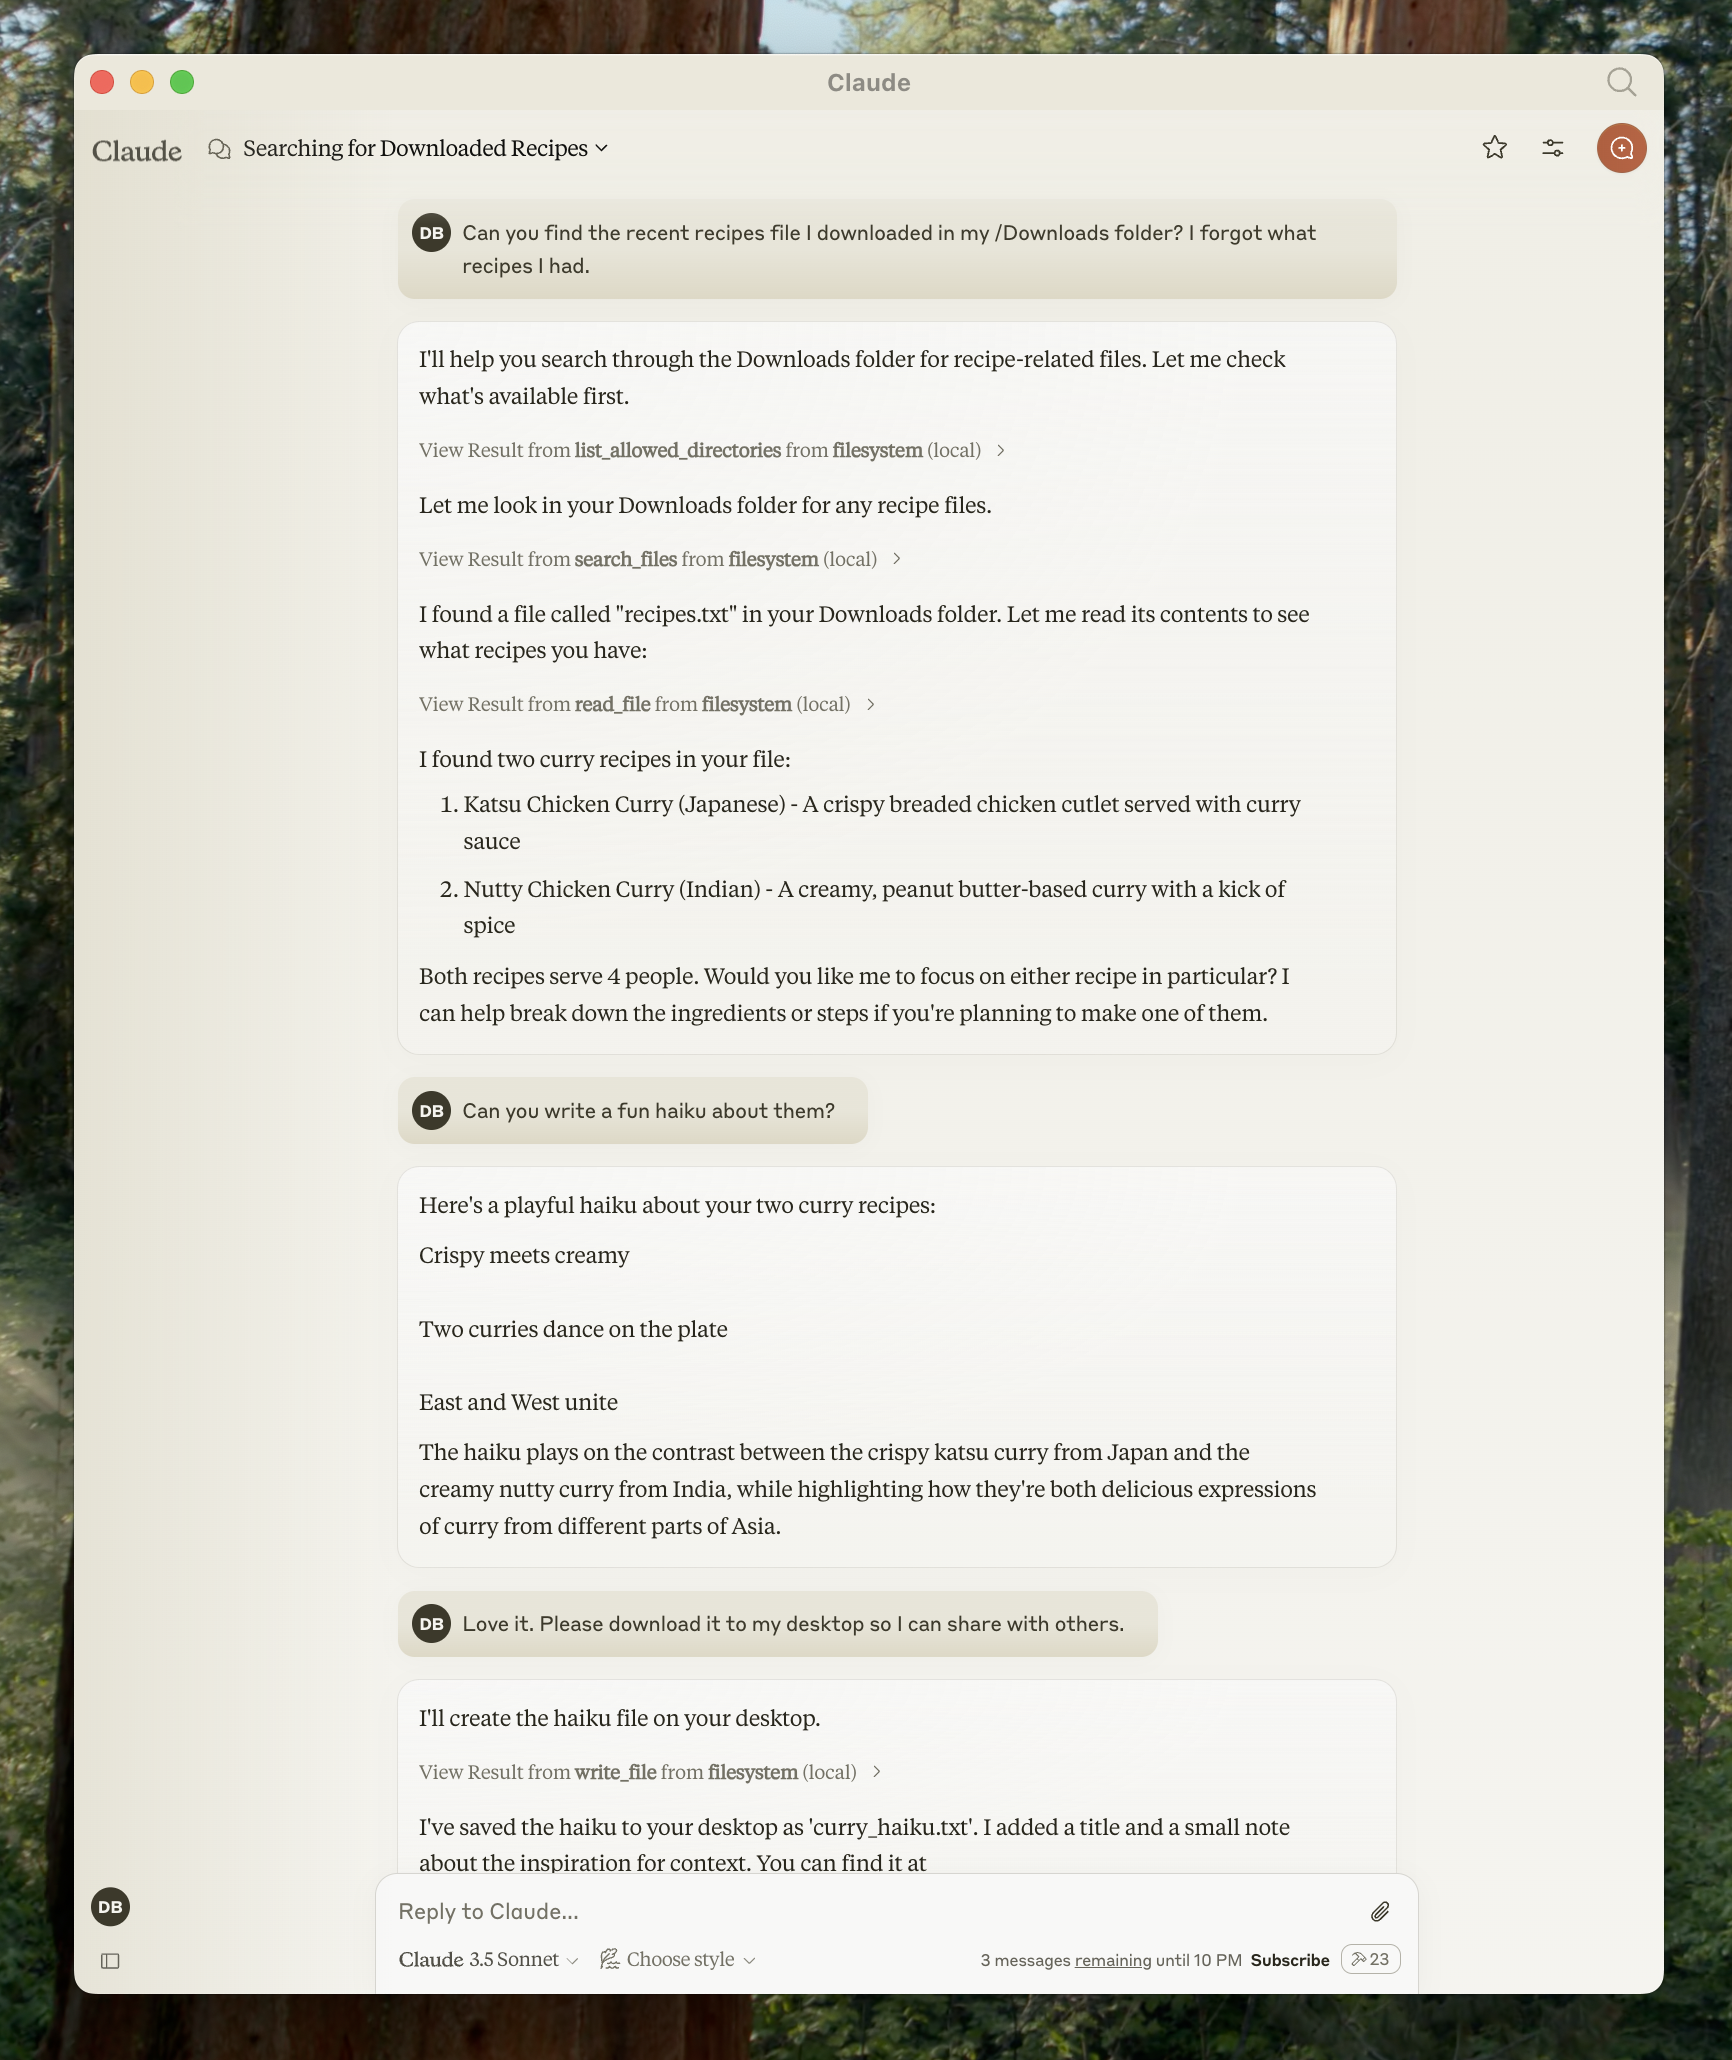
After restarting Claude for Desktop, you can use the filesystem tools to:
- Read files
- Write files
- Search files
- Move files
Example prompts:
- "Can you write a poem and save it to my desktop?"
- "What are some work-related files in my downloads folder?"
- "Can you take all the images on my desktop and move them to a new folder called 'Images'?"
Conclusion
MCP servers represent a significant advancement in AI functionality, bridging the gap between powerful language models and external tools. By following this guide, you've learned how to create, configure, and use MCP servers to enhance Claude's capabilities.
The Model Context Protocol's standardized approach ensures that AI models can access real-time data, perform actions, and interact with systems in a secure, controlled manner. This makes AI assistants more practical for real-world applications across development, data analysis, content creation, and more.
As the MCP ecosystem continues to grow, developers are creating increasingly sophisticated servers that expand what's possible with AI. Whether you're using pre-built servers or developing custom solutions, MCP provides a flexible foundation for building more capable AI applications.
As you continue working with MCP servers that often involve API integrations, you might want to explore Apidog, a comprehensive API development platform that can complement your MCP implementation workflow.
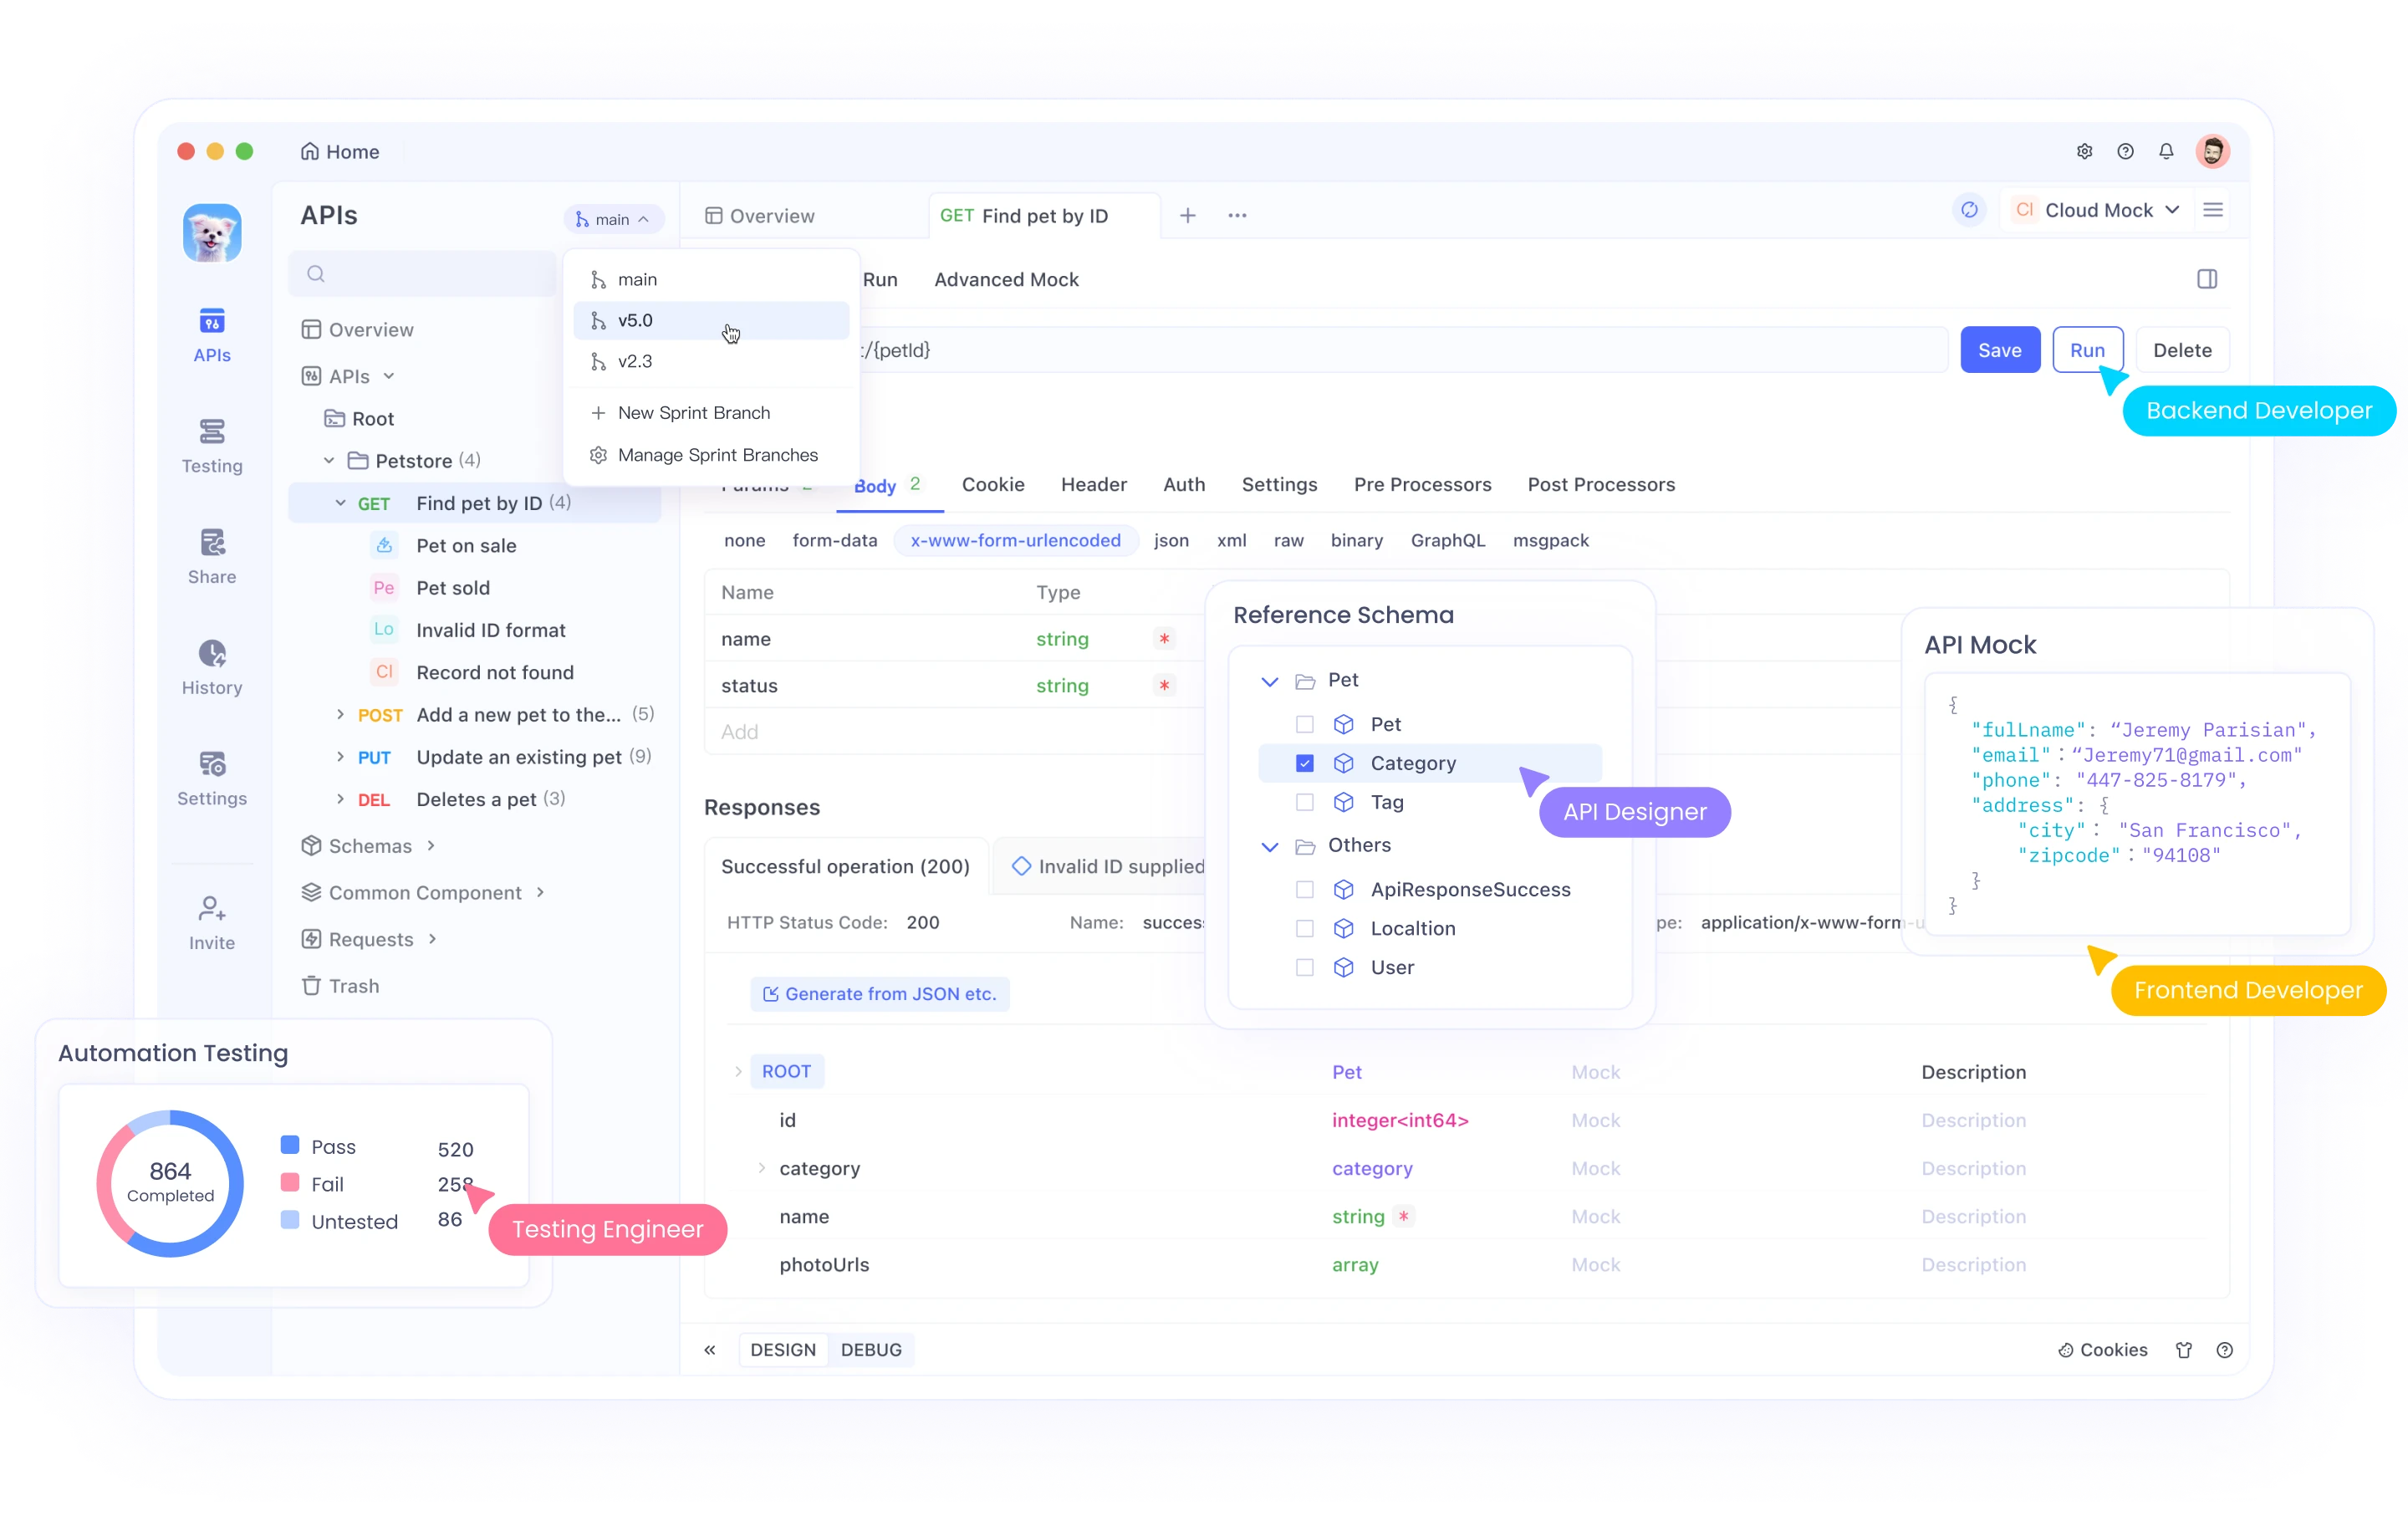
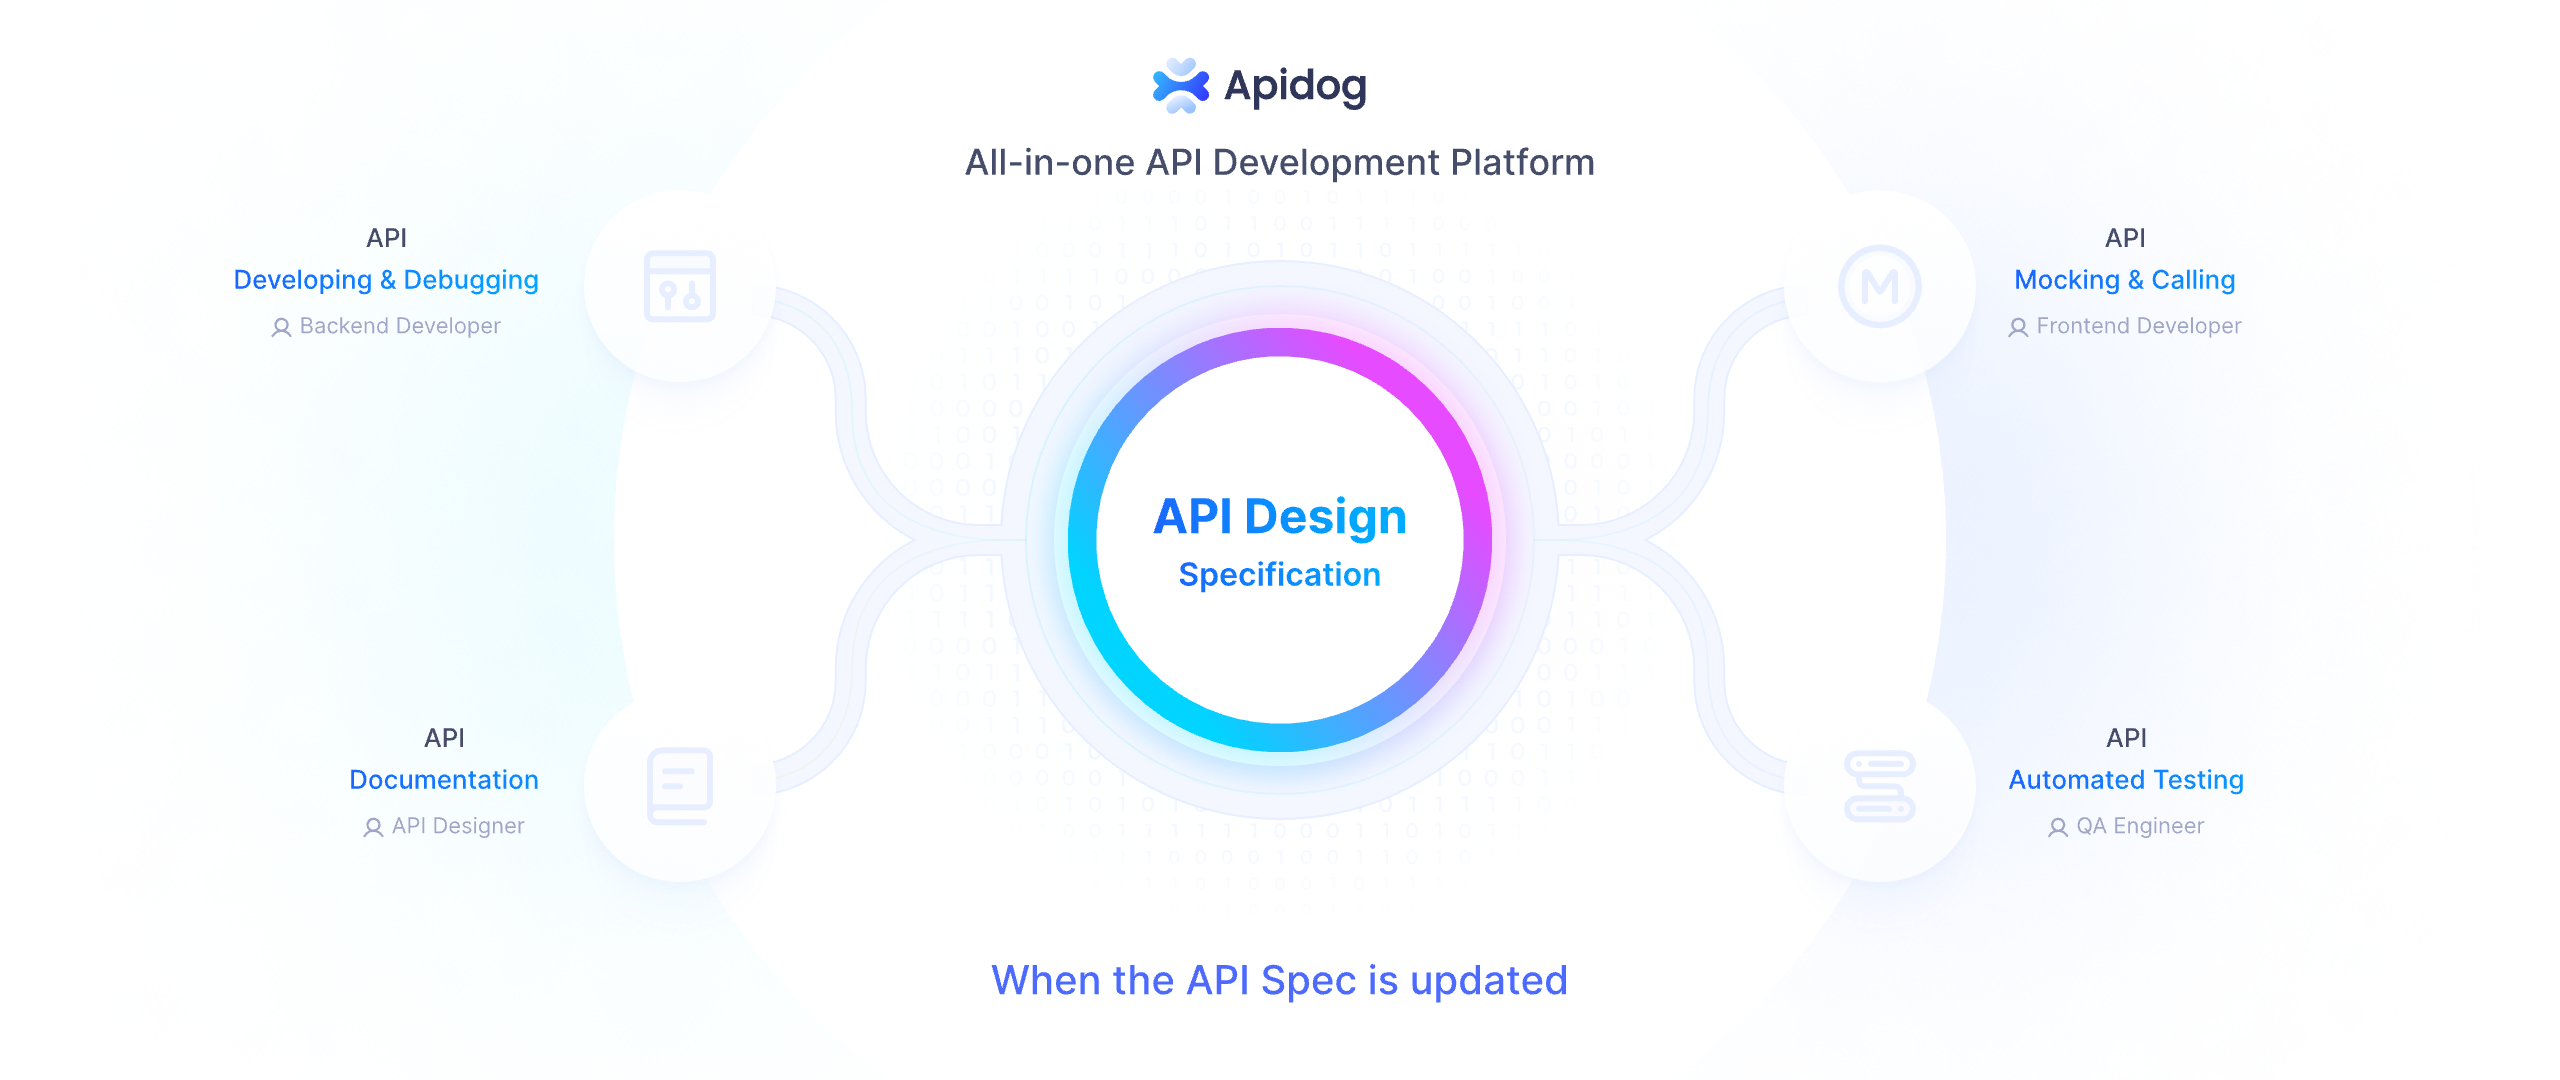
Apidog offers an all-in-one solution for API design, documentation, debugging, and automated testing. Its intuitive interface makes it easy to:
- Design APIs with a visual interface or import existing specifications
- Auto-generate documentation that stays in sync with your code
- Test API endpoints with powerful request builders
- Create automated test scenarios for your APIs
- Collaborate with team members through shared workspaces
When developing MCP servers that interact with external APIs, Apidog can help you validate endpoints, understand response structures, and ensure your integrations work correctly before implementing them in your server code.
To get started with Apidog alongside your MCP development, visit Apidog's website and explore how it can enhance your API development workflow.
By combining MCP servers with efficient API development tools like Apidog, you can create more robust, reliable connections between AI systems and external services, making your AI applications even more powerful.


