MCP Server (Model Context Protocol Server) and the Agent to Agent Protocol solve different problems in AI application design.
- MCP Server connects an AI assistant (inside an IDE or app) to a local or remote data source through a simple, trusted bridge. The most common data source is an API specification (OpenAPI or a live doc site). The AI can request the spec, search it, and reuse parts of it to write or modify code. This improves accuracy because the agent works with a single source of truth instead of guesswork.
- Agent to Agent Protocol focuses on agent‑to‑agent messaging and capability sharing. Think of it as a way for one agent to request help from another agent, or to delegate a task and get the result back. It is about routing intent and payloads across multiple agents, not about attaching a single agent to a local data source.
Both reduce friction, but in different layers:
- MCP Server = enrich a single agent with precise context from files, APIs, or tools
- Agent to Agent Protocol = let multiple agents cooperate and exchange results
Key concepts you will see:
- "Transport and handshake" (how sessions start and how messages are sent)
- "Tools and resources" (what an agent may call or read)
- "Auth and trust" (who can do what, and with which limits)
Common outcomes for teams:
- Faster code generation because the agent can read the exact API spec
- Fewer hallucinations because the agent works against verified content
- Cleaner reviews because the agent explains changes with links to the spec
If your goal is to make one assistant inside your IDE smarter about your API, use an MCP Server. If your goal is to connect multiple autonomous agents so they can pass tasks or data, look at an Agent to Agent Protocol.
MCP Server vs Agent to Agent Protocol: Differences and When to Use Each
You can think about the choice in terms of scope and trust boundaries.
- Scope: MCP Server improves a single agent’s view of the world by giving it safe, direct access to your API specification or docs. Agent to Agent Protocol coordinates across agents, which might be on different machines or owned by different teams.
- Trust: MCP Server runs inside your workstation or controlled runtime. It reads your spec and exposes read/search actions to the IDE agent. Agent to Agent Protocol often crosses service or team borders, so message signing, quotas, and error handling matter more.
A simple comparison to ground decisions:
Area | MCP Server | Agent to Agent Protocol |
Primary goal | Attach reliable context (API specs, files) to one agent | Let agents message each other and share work |
Typical host | IDEs like Cursor, VS Code (with Cline) | Agent platforms and services |
Best use case | Code generation from OpenAPI; spec‑driven refactors | Multi‑agent pipelines; cross‑team agent calls |
Security model | Local config, scoped tokens, read‑only by default | Networked peers, auth between agents |
Failure mode | Missing spec, stale cache | Message delivery, routing, retries |
When to choose which:
- Choose MCP Server if your top need is to let an IDE agent read and apply your API contract, generate DTOs, create clients, add comments from the spec, or keep controllers in sync.
- Choose Agent to Agent Protocol if you orchestrate several agents (plan, code, test, deploy), or if you need one agent to call another across systems.
They are not rivals. Many teams use both: MCP to ground a coding agent with exact API knowledge, and agent‑to‑agent messaging for automation chains.
Use Apidog as Your API Development Tool
Apidog is an API development platform that turns API work into a single, clear flow: design → mock → debug → test → document → publish. In AI projects, the most common failure is weak context. The agent cannot see the current API schema, or it uses an old copy. With Apidog, your API specification stays clean and current. With Apidog MCP Server, your IDE agent can read that same spec on demand.
How Apidog strengthens this setup:
- Visual API design: easy editors for paths, schemas, params, examples
- Import or build OpenAPI cleanly and keep changes tracked
- Mock servers so the frontend can move while the backend is not ready
- Automated testing with JSONPath extraction, chained flows, and performance runs
- Debug runner with environments and variables for quick checks
- Live docs with access control (Public, Password, IP allowlist, Email allowlist, Custom Login)
- LLM‑friendly docs (Markdown pages, llms.txt, MCP hints) so tools can read faster
Why Apidog helps an IDE agent in coding:
- The API specification is a single source of truth
- Apidog MCP Server exposes that spec to Cursor or VS Code in a safe way
- The agent can generate clients, adjust DTOs, or write controllers based on real fields and types
This is the core loop: keep the spec correct in Apidog, use Apidog MCP Server to let the agent read it, and review the suggested code with tests and docs next to it. The result is faster, safer code changes with less guesswork.
Step‑by‑step: Set up Apidog MCP Server for AI Coding in Cursor or VS Code
Follow these steps to give your IDE agent direct, safe access to your API specification.
Prerequisites:
Before you begin, ensure the following:
✅ Node.js is installed (version 18+; latest LTS recommended)
✅ You're using an IDE that supports MCP, such as: Cursor
Step 1: Prepare Your OpenAPI File
You'll need access to your API definition:
- A URL (e.g.,
https://petstore.swagger.io/v2/swagger.json) - Or a local file path (e.g.,
~/projects/api-docs/openapi.yaml) - Supported formats:
.jsonor.yaml(OpenAPI 3.x recommended)
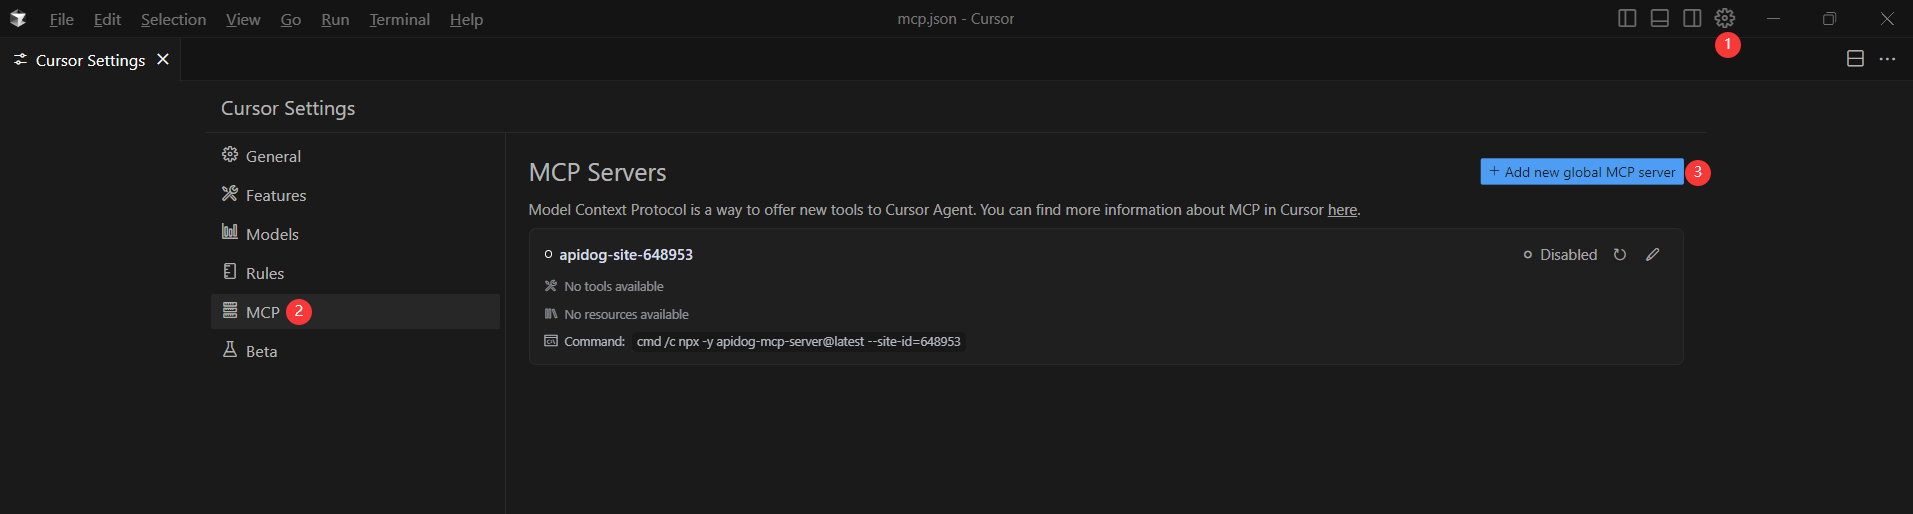
Step 2: Add MCP Configuration to Cursor
You'll now add the configuration to Cursor's mcp.json file.
Remember to Replace <oas-url-or-path> with your actual OpenAPI URL or local path.
- For MacOS/Linux:
{
  "mcpServers": {
    "API specification": {
      "command": "npx",
      "args": [
        "-y",
        "apidog-mcp-server@latest",
        "--oas=https://petstore.swagger.io/v2/swagger.json"
      ]
    }
  }
}- For Windows:
{
  "mcpServers": {
    "API specification": {
      "command": "cmd",
      "args": [
        "/c",
        "npx",
        "-y",
        "apidog-mcp-server@latest",
        "--oas=https://petstore.swagger.io/v2/swagger.json"
      ]
    }
  }
}
Step 3: Verify the Connection
After saving the config, test it in the IDE by typing the following command in Agent mode:
Please fetch API documentation via MCP and tell me how many endpoints exist in the project.If it works, you'll see a structured response that lists endpoints and their details. If it doesn't, double-check the path to your OpenAPI file and ensure Node.js is installed properly.

Conclusion
MCP Server and the Agent-to-Agent Protocol aim at different layers. MCP Server gives one agent a clear window into trusted resources like API specifications and published docs. The Agent-to-Agent Protocol carries messages and tasks between agents across systems. Many teams benefit from both. Use MCP to lift the quality of code generation and refactoring inside the IDE. Use agent‑to‑agent messaging to connect planning, coding, testing, and deployment bots.
Your success still depends on the quality of the API source. Apidog, as your API development tool, keeps the contract clean with visual design, reusable components, strong tests, and live docs. With Apidog MCP Server, you add a safe, simple path for the IDE agent to read that contract and act on it. You cut guesswork, reduce rework, and speed up code reviews.
If you want a fast start: keep your OpenAPI in Apidog, enable MCP on your docs, drop the small mcp.json block into Cursor or VS Code, and ask the agent to fetch the spec. From there, generate clients, adjust DTOs, and keep controllers in sync—with tests and docs next to every change. Sign up for Apidog and bring your API and your agent into the same, reliable loop.