
Building and maintaining beautiful, functional user interfaces can be challenging without the right tools. Enter Shadcn CLI—a nifty command-line interface (CLI) designed to streamline the process of developing UI components. Whether you’re a seasoned developer or just starting out, Shadcn CLI will save you time and energy when crafting components for your project.
In this guide, we’ll walk you through how to use Shadcn CLI, highlighting its key features, installation process, and practical use cases. Plus, we’ll also discuss why it pairs perfectly with APIs and tools like Apidog, making your development process even more efficient!
What is Shadcn CLI?
Before diving into the nitty-gritty, let’s clarify what Shadcn CLI is. The Shadcn CLI is a command-line tool that simplifies the development and styling of UI components. It's especially useful for projects where you need to maintain a consistent design system. It allows you to:
- Generate reusable UI components.
- Apply customizable styling quickly.
- Ensure consistent and accessible interfaces.
Its flexibility makes it an invaluable tool for both small and large projects. If you're tired of manually managing CSS classes or repeating styles, Shadcn CLI will be your best friend.

Why Use Shadcn CLI?
1. Saves Time
Instead of writing boilerplate code or hunting down components from multiple libraries, Shadcn CLI allows you to quickly generate UI components. That’s less time worrying about the front end and more time building your app’s core functionality.
2. Consistency Across Projects
When working on multiple projects or even within one large project, maintaining a consistent design is crucial. Shadcn CLI ensures that your components remain uniform across different sections of your application.
3. API-Friendly
Since it’s important to integrate with APIs seamlessly, especially when building interactive apps, Shadcn CLI works great alongside API tools like Apidog. When you need to test API-driven components, having a CLI like Shadcn on your side speeds up the process.
4. Customizable Components
You aren’t locked into rigid templates. The CLI allows for customization, ensuring that your app maintains its unique look while following best practices in UI development.
Installing Shadcn CLI
Ready to start using Shadcn CLI? Let’s go step by step.
Step 1: Install Node.js and NPM
Before using Shadcn CLI, ensure you have Node.js and NPM installed. Open your terminal and run the following command to check if Node.js is installed:
node -v
If you don’t have it installed, you can download it from Node.js official website.
Step 2: Install Shadcn CLI Globally
Once you have Node.js and NPM, you can install Shadcn CLI globally on your machine. Open your terminal and run:
npx shadcn@latest init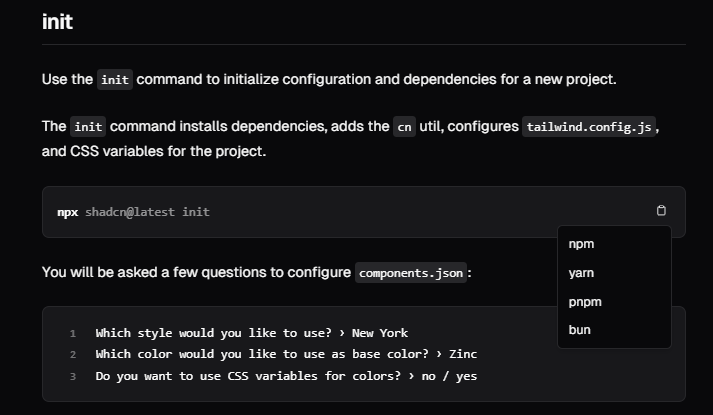
This command will install Shadcn CLI globally so that you can access it from any project folder.
Setting Up a Project with Shadcn CLI
Step 1: Initialize Your Project
Navigate to your project directory or create a new one. Let’s initialize a new Node.js project first:
mkdir my-shadcn-app
cd my-shadcn-app
npm init -y
Step 2: Create Shadcn Config File
Now, you’ll need to create a shadcn.config.js file to configure how the CLI generates your components. Inside your project folder, create a new file:
touch shadcn.config.js
Inside this file, configure your settings. For example:
module.exports = {
  componentsDir: 'src/components',
  themeDir: 'src/theme',
  styleLibrary: 'tailwindcss',
};
This configuration tells Shadcn CLI where to store your components and which styling library to use.
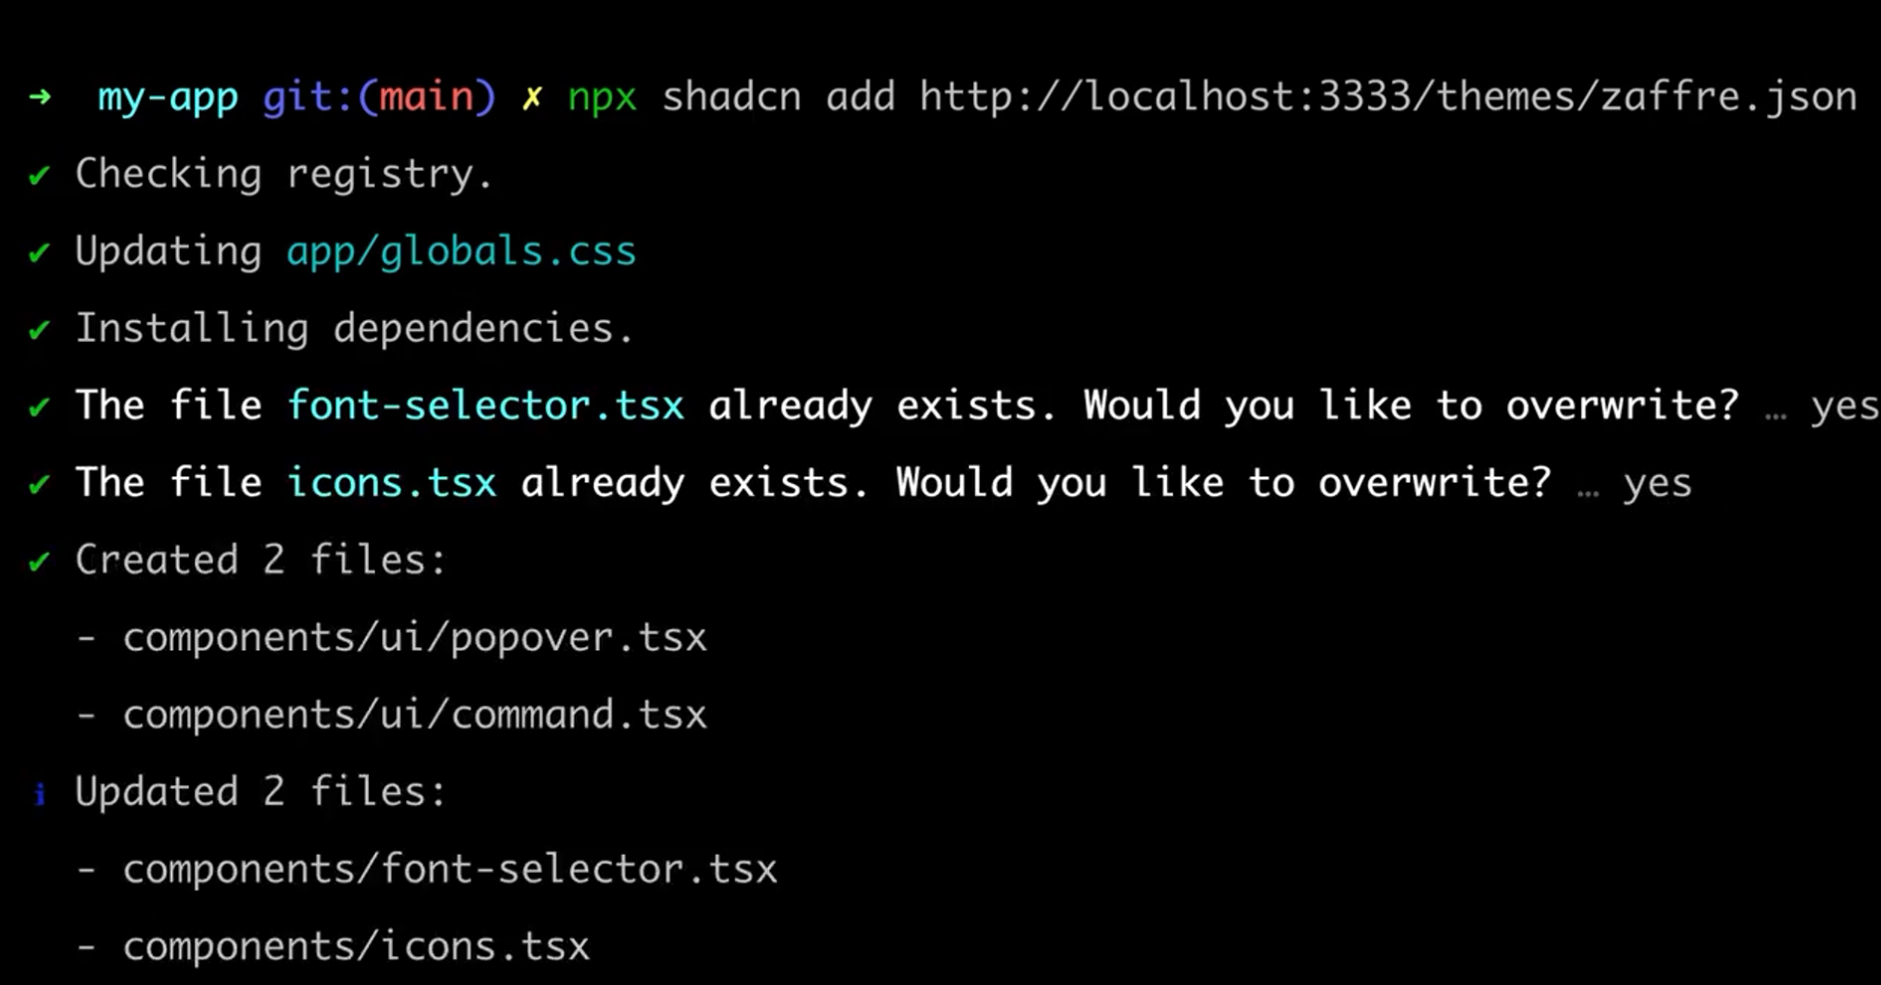
The updated CLI and registry introduce powerful theming capabilities, allowing for custom colors, animations, icons, dependencies, and even components.
With remote registry support, a single command lets you completely transform the appearance of your apps.
Integrating Shadcn CLI with APIs
Why API Integration is Important
When building apps, especially with dynamic data, APIs become crucial. You may need to display data fetched from an API or submit forms that interact with an external service. By integrating Shadcn CLI with your API-driven projects, you can create components that are already wired to work with APIs from the get-go.
How Apidog Fits In
If you're working with APIs, you should be using Apidog to streamline your workflow. Apidog allows you to:
- Design your API schema.
- Mock API requests and responses.
- Test your API endpoints before deploying them.
Integrating Shadcn CLI with Apidog gives you the best of both worlds: beautiful, functional UI components that are connected to robust, reliable APIs.
Use the CLI
The Apidog Command Line Interface (CLI) is used in three primary contexts:
1. Execution within CI/CD Platforms: Apidog automates the generation of configuration scripts for Jenkins and Github Actions. Upon saving the continuous integration settings, embedded code for the "CI / CD Tools" Tab page is created, enabling integration directly into the configuration files of the continuous integration system to seamlessly join the existing research and development workflows.
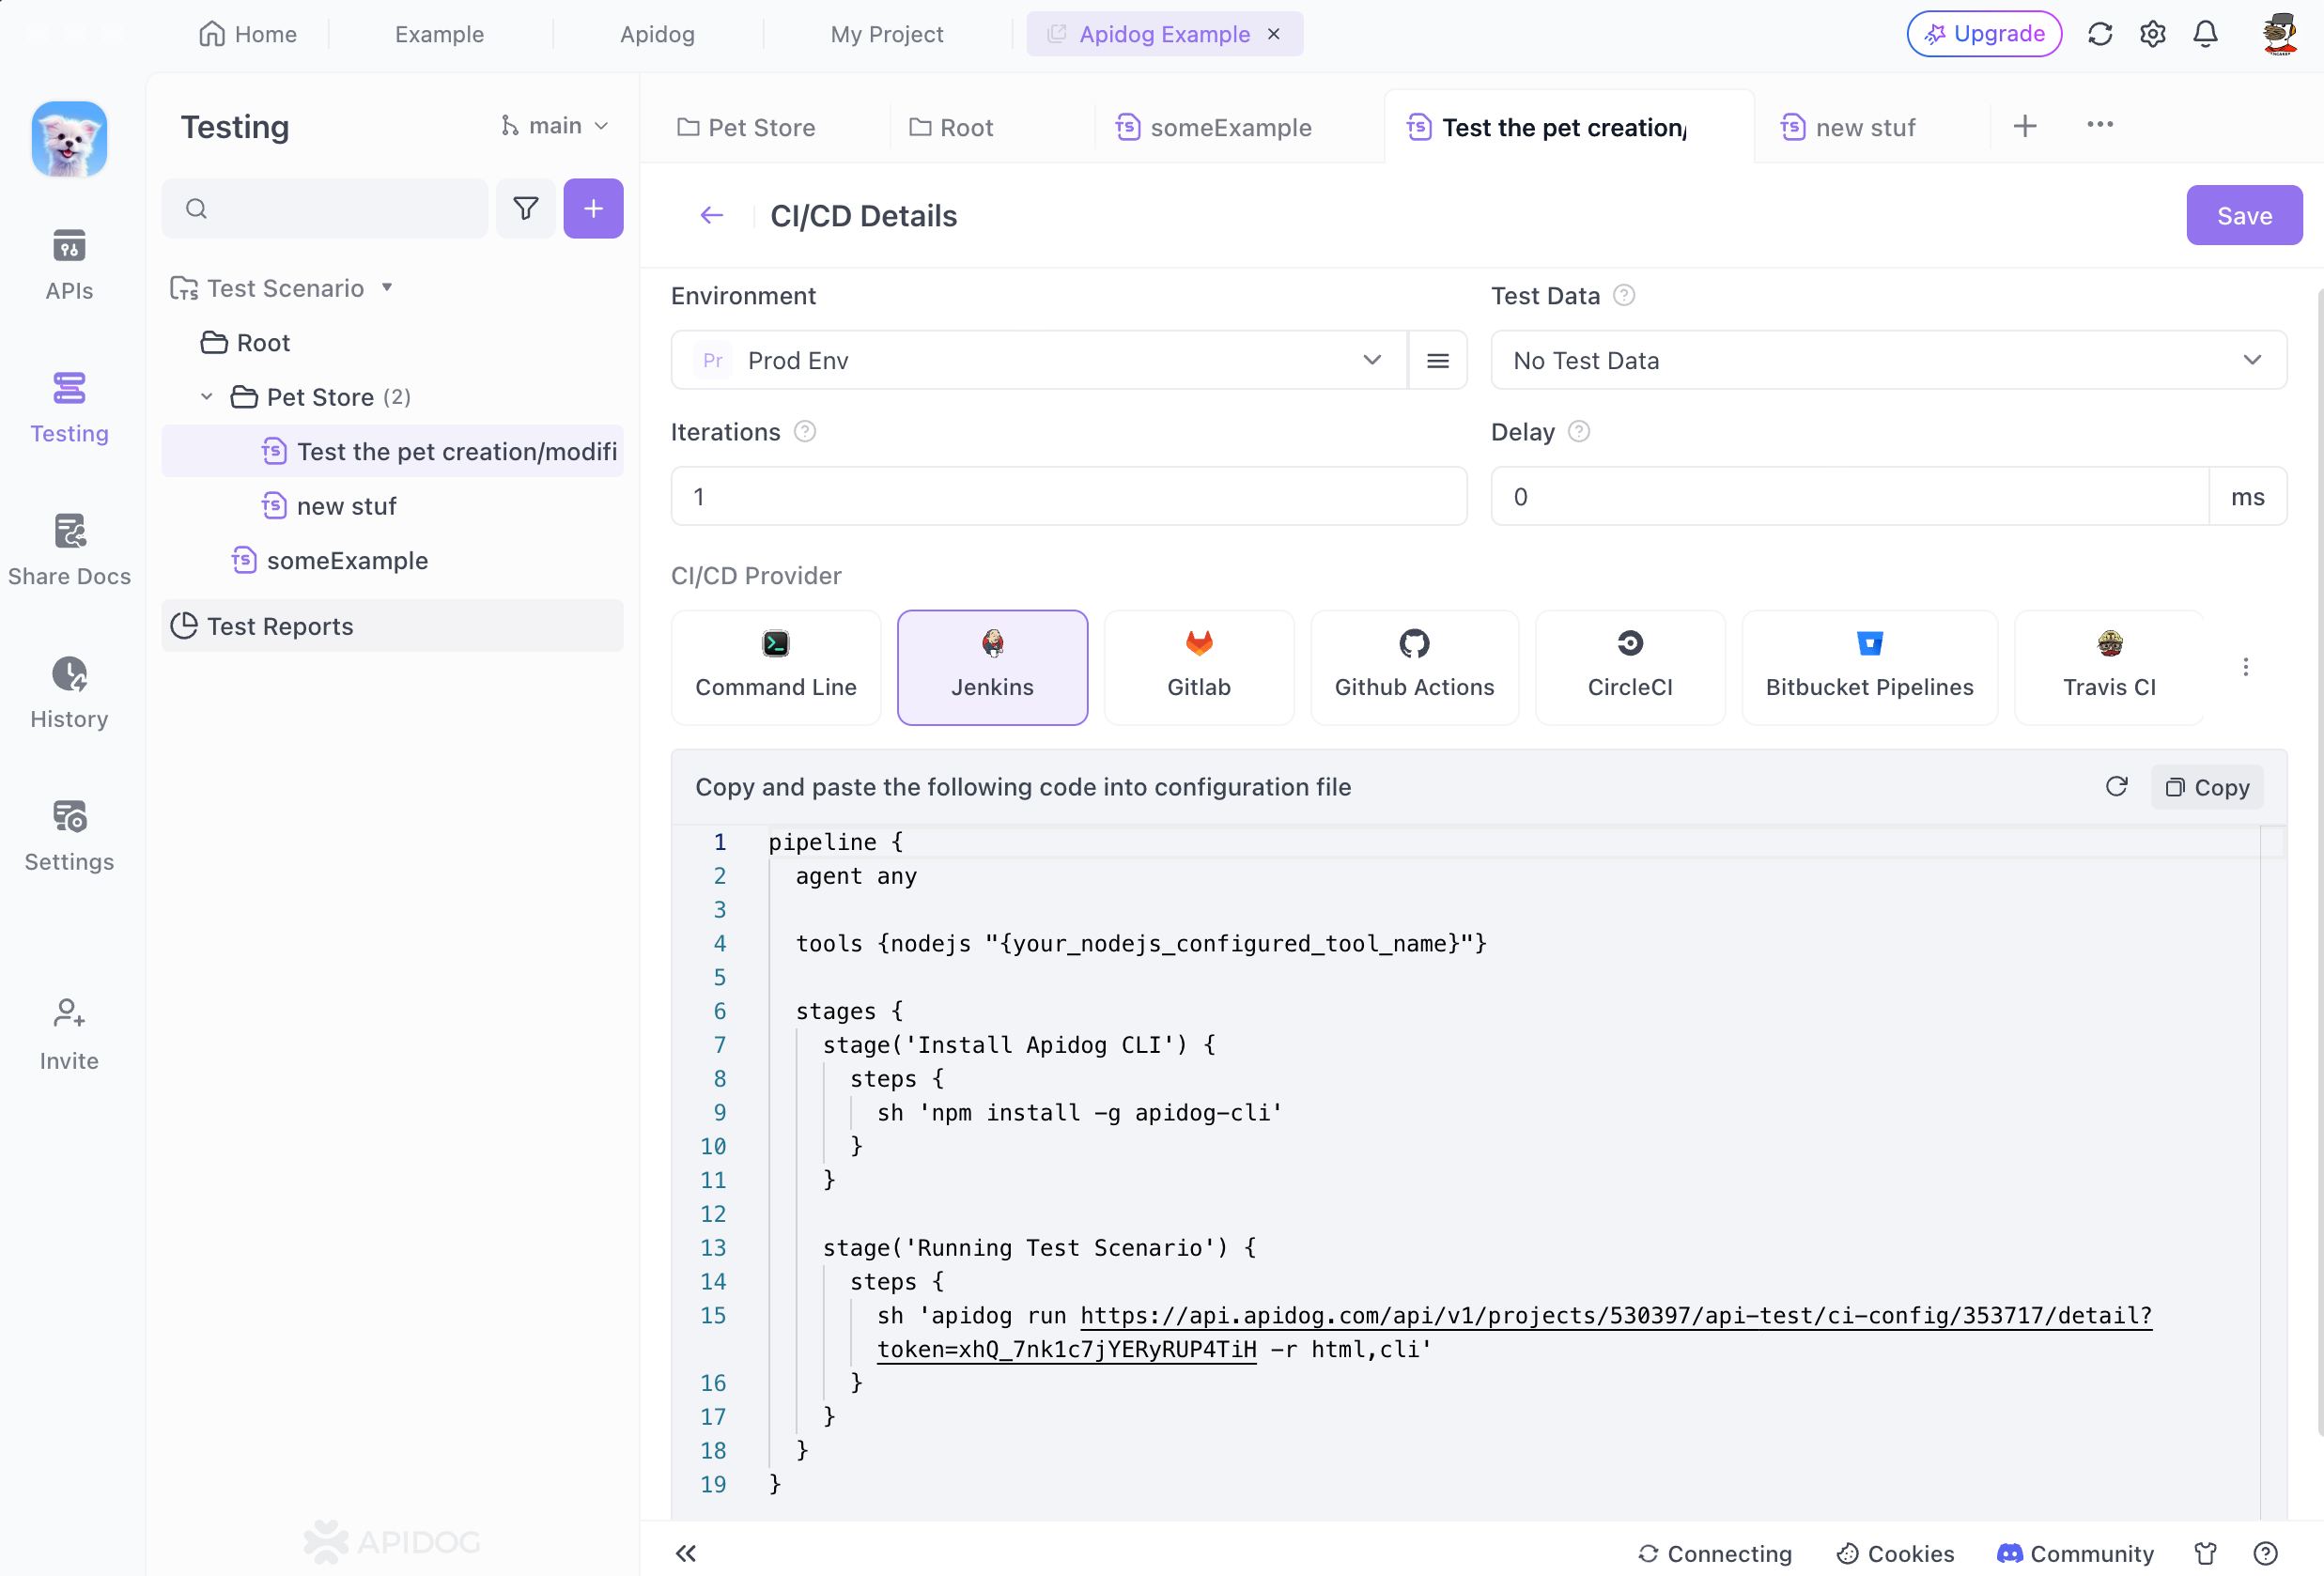
2. Real-time Execution Based on Online Data: A sequence of executable command lines becomes available on the page immediately after saving the continuous integration setup.
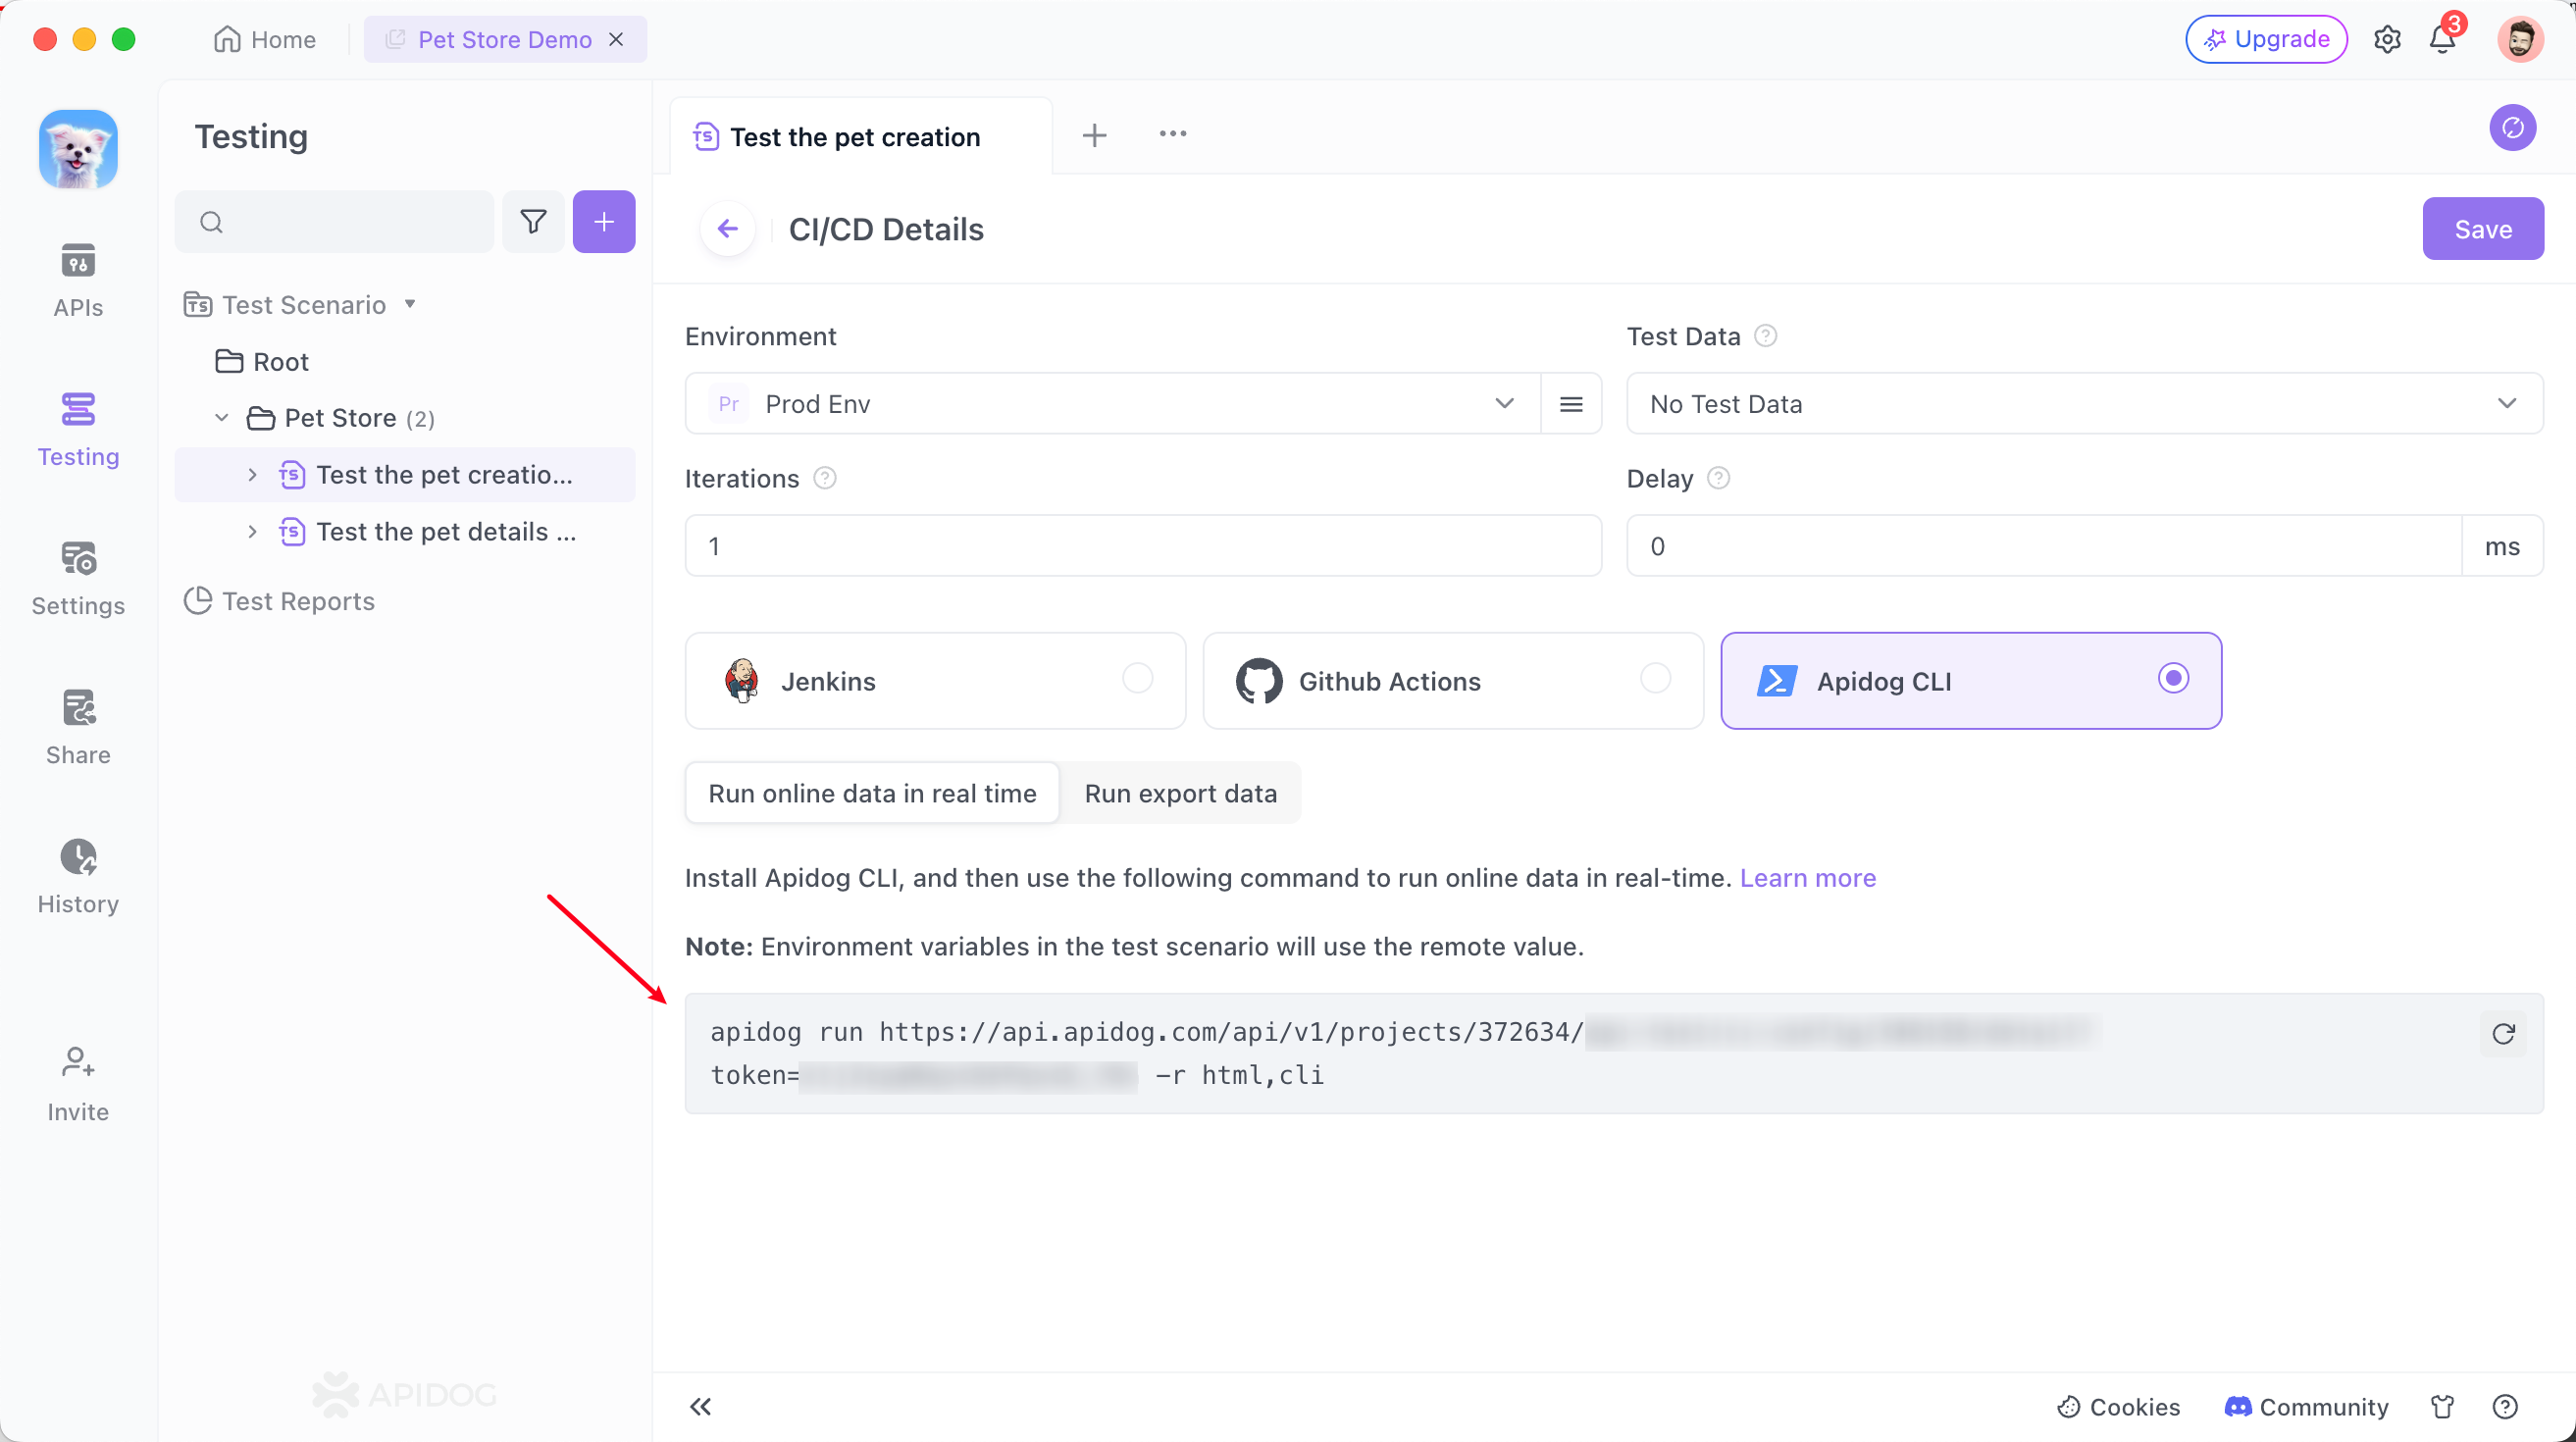
For example, the command line is as follows:
apidog run https://api.apidog.com/api/v1/projects/372634/api-test/ci-config/346158/detail?token=******** -r html,cli Database Integration: When testers incorporate database-related scripts or commands within the pre/post execution actions of the API during test steps, as illustrated below:
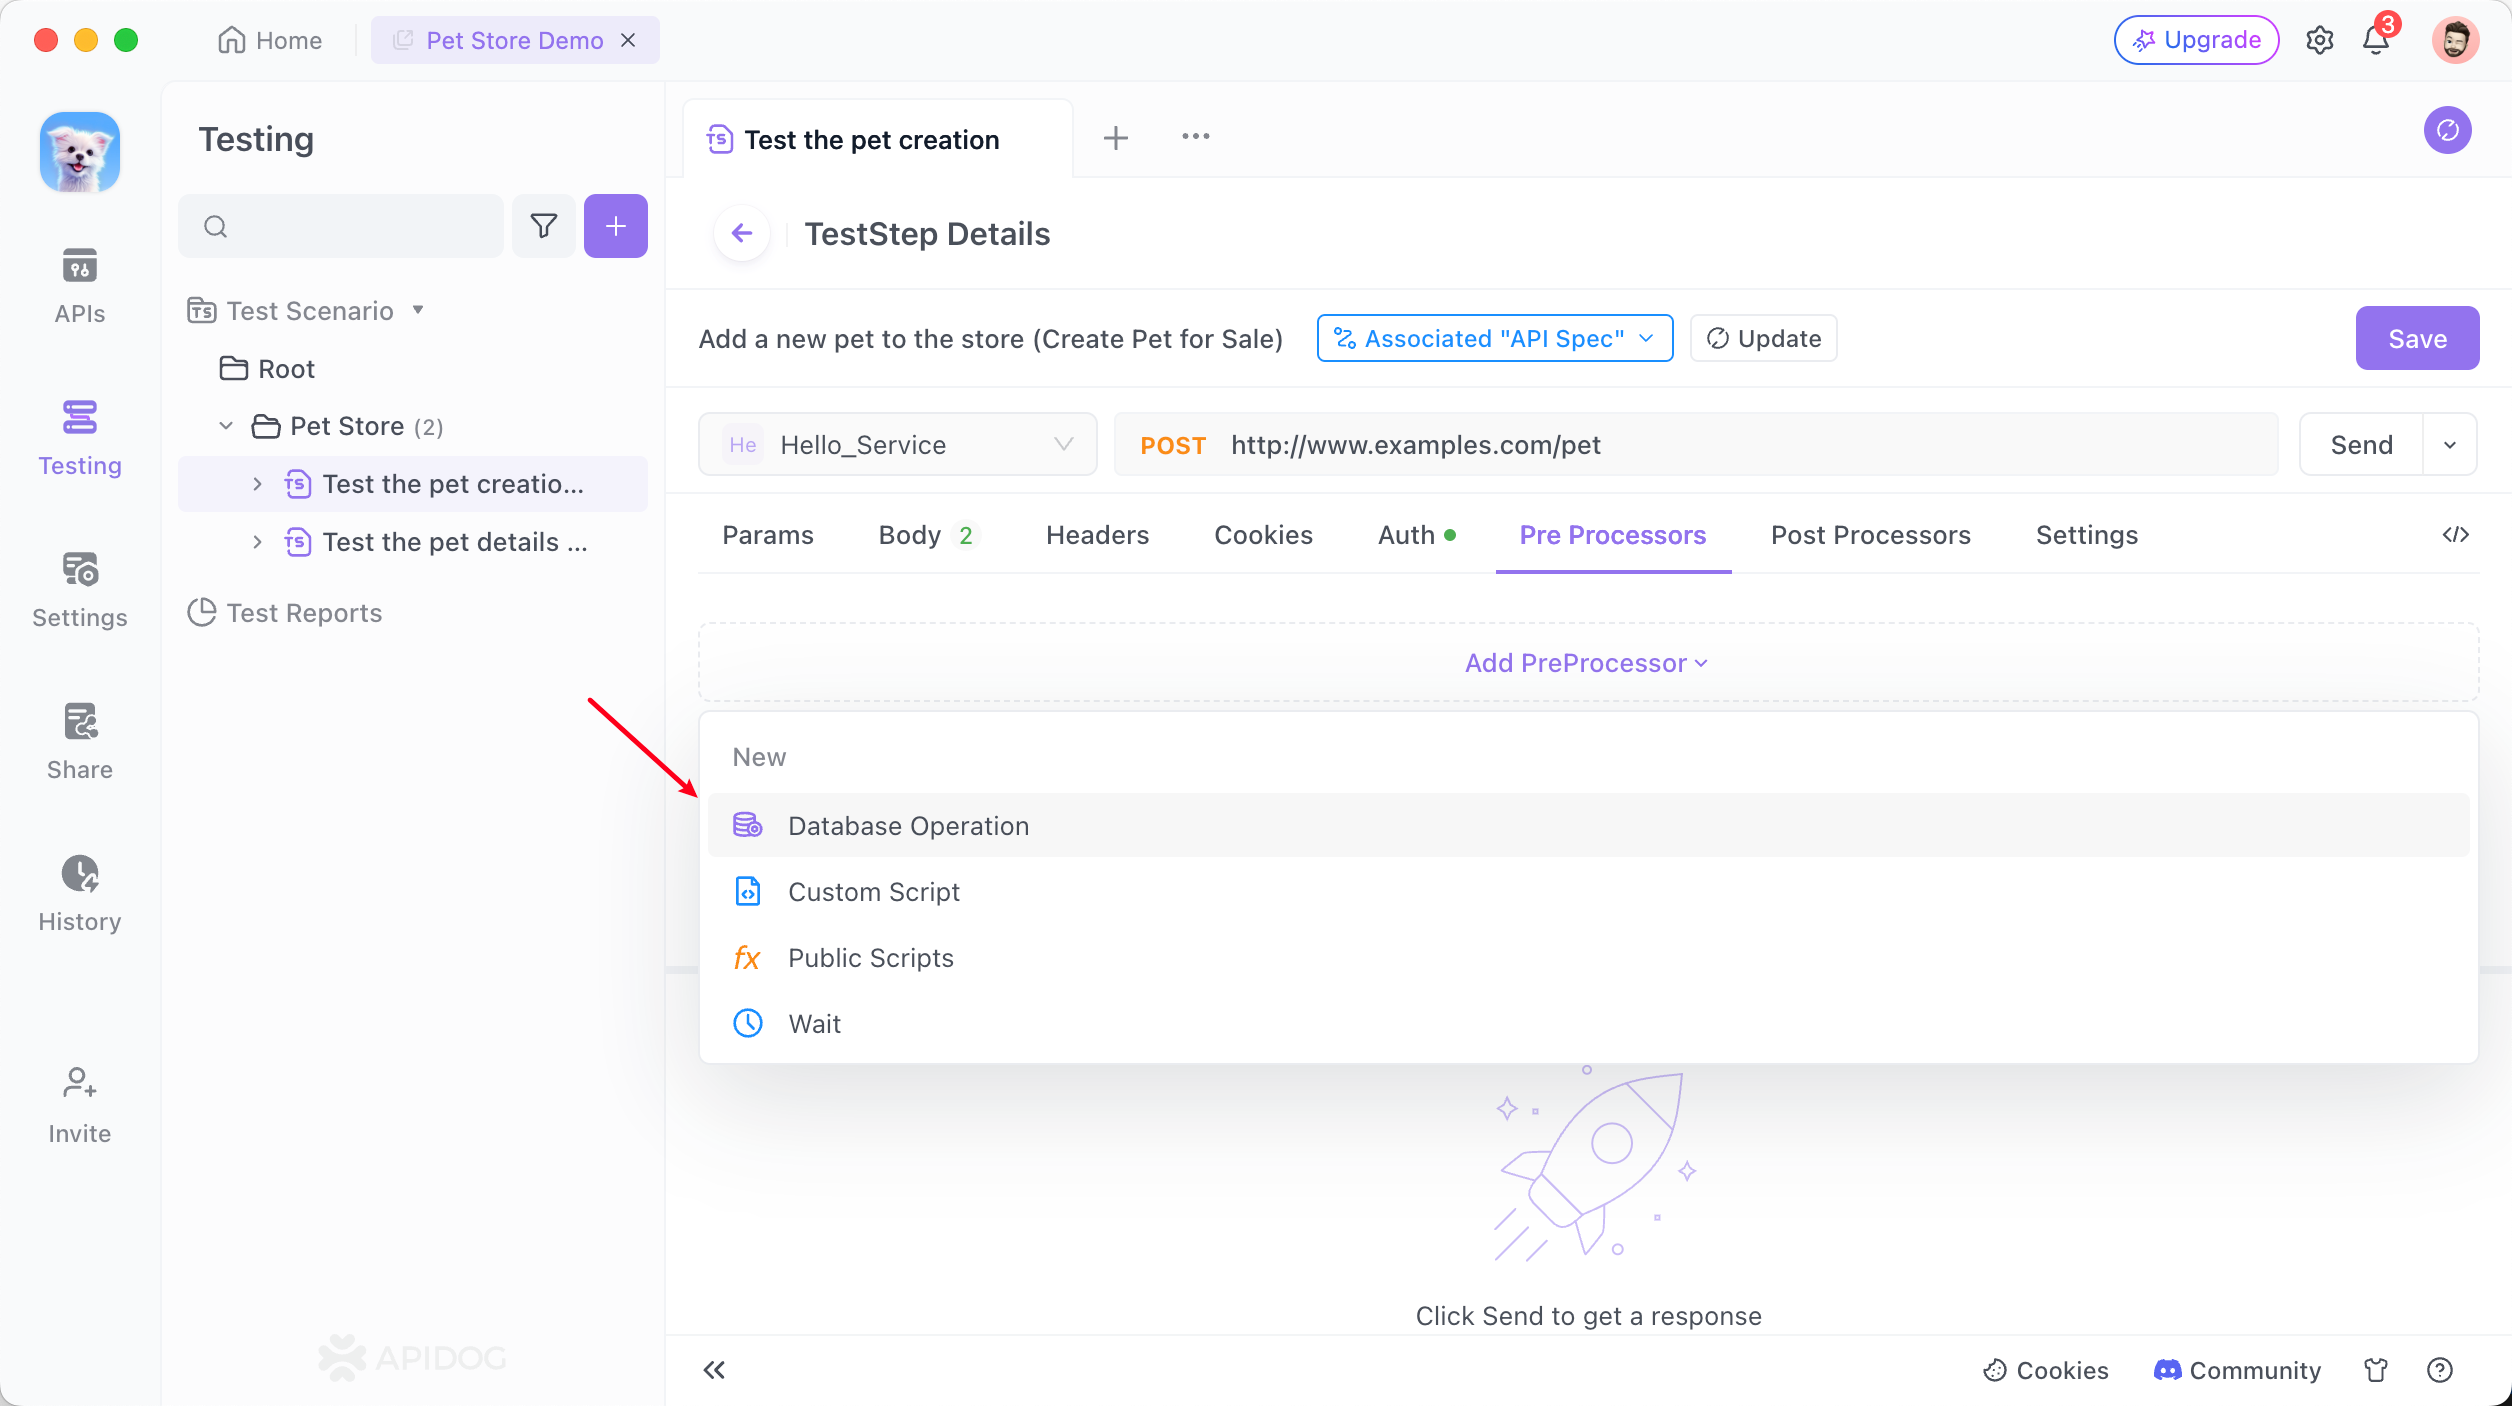
Instructions and details regarding database connectivity automatically populate among continuous integration commands. Performing the CLI command in the directory where the database connection configuration file is located initiates the automatic test sequence.
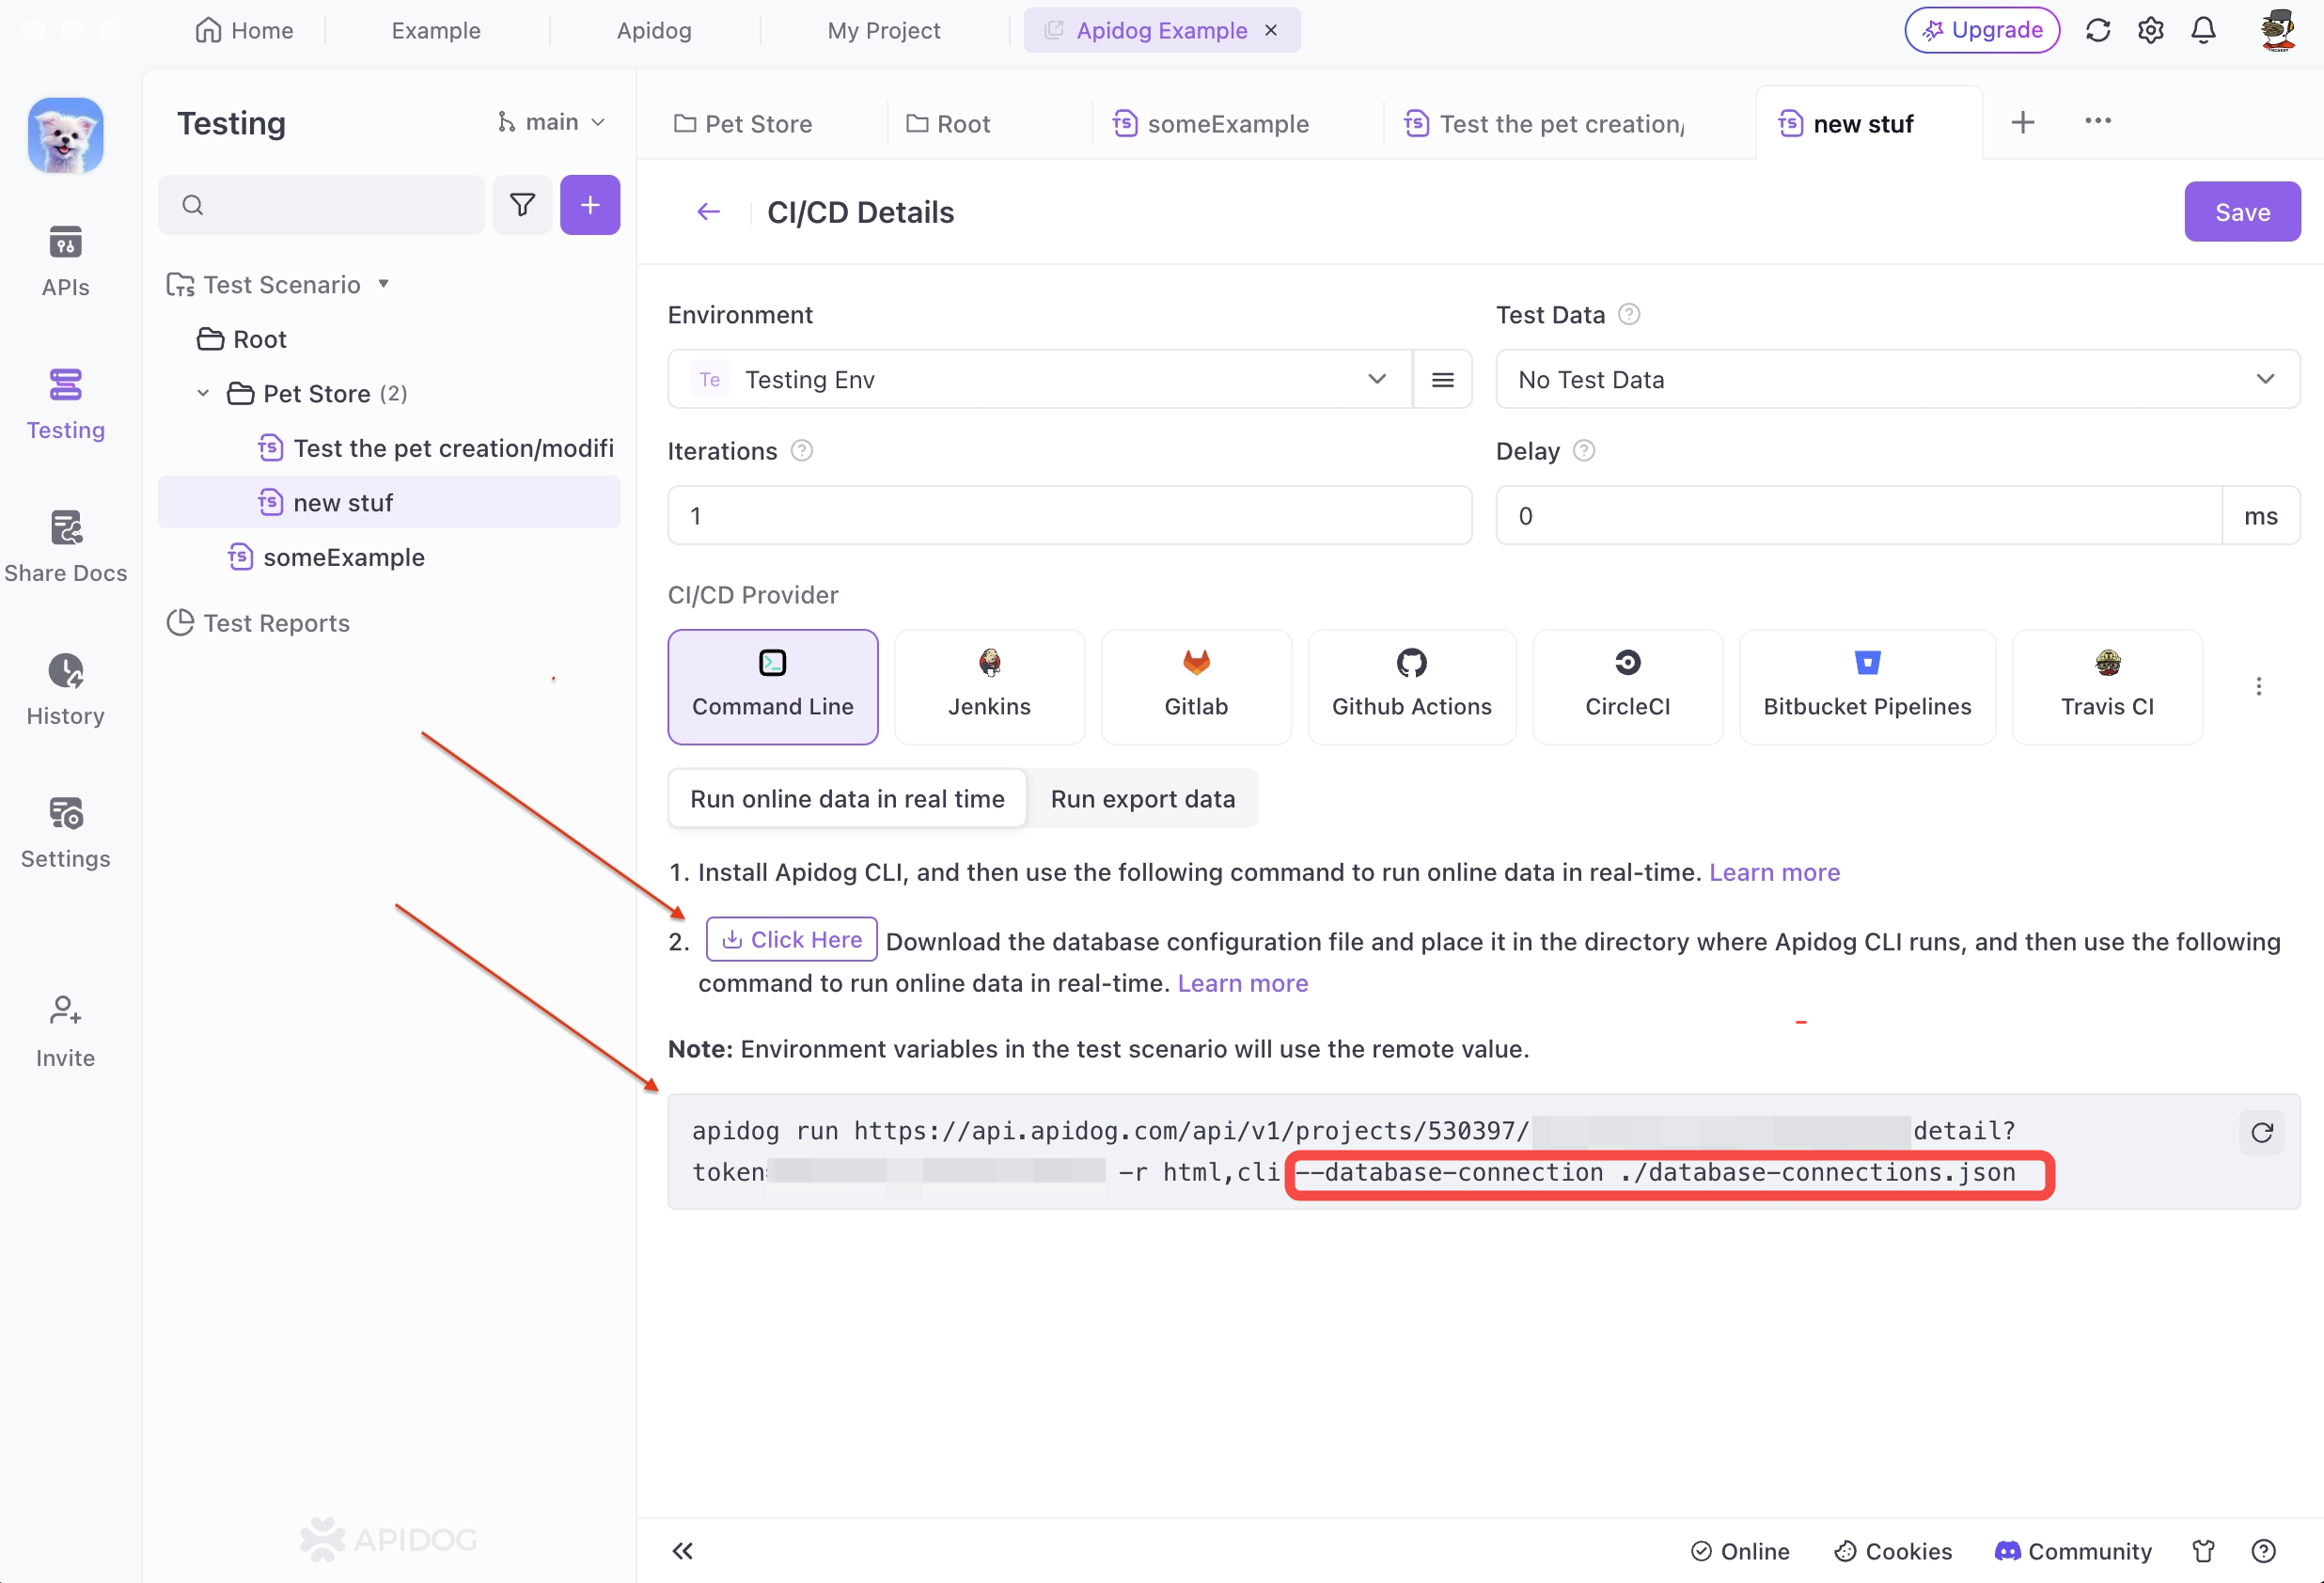
After download the configuration file, navigate to the directory in the terminal, then execute the command provided by the Apidog client. This triggers the CLI process once run locally.
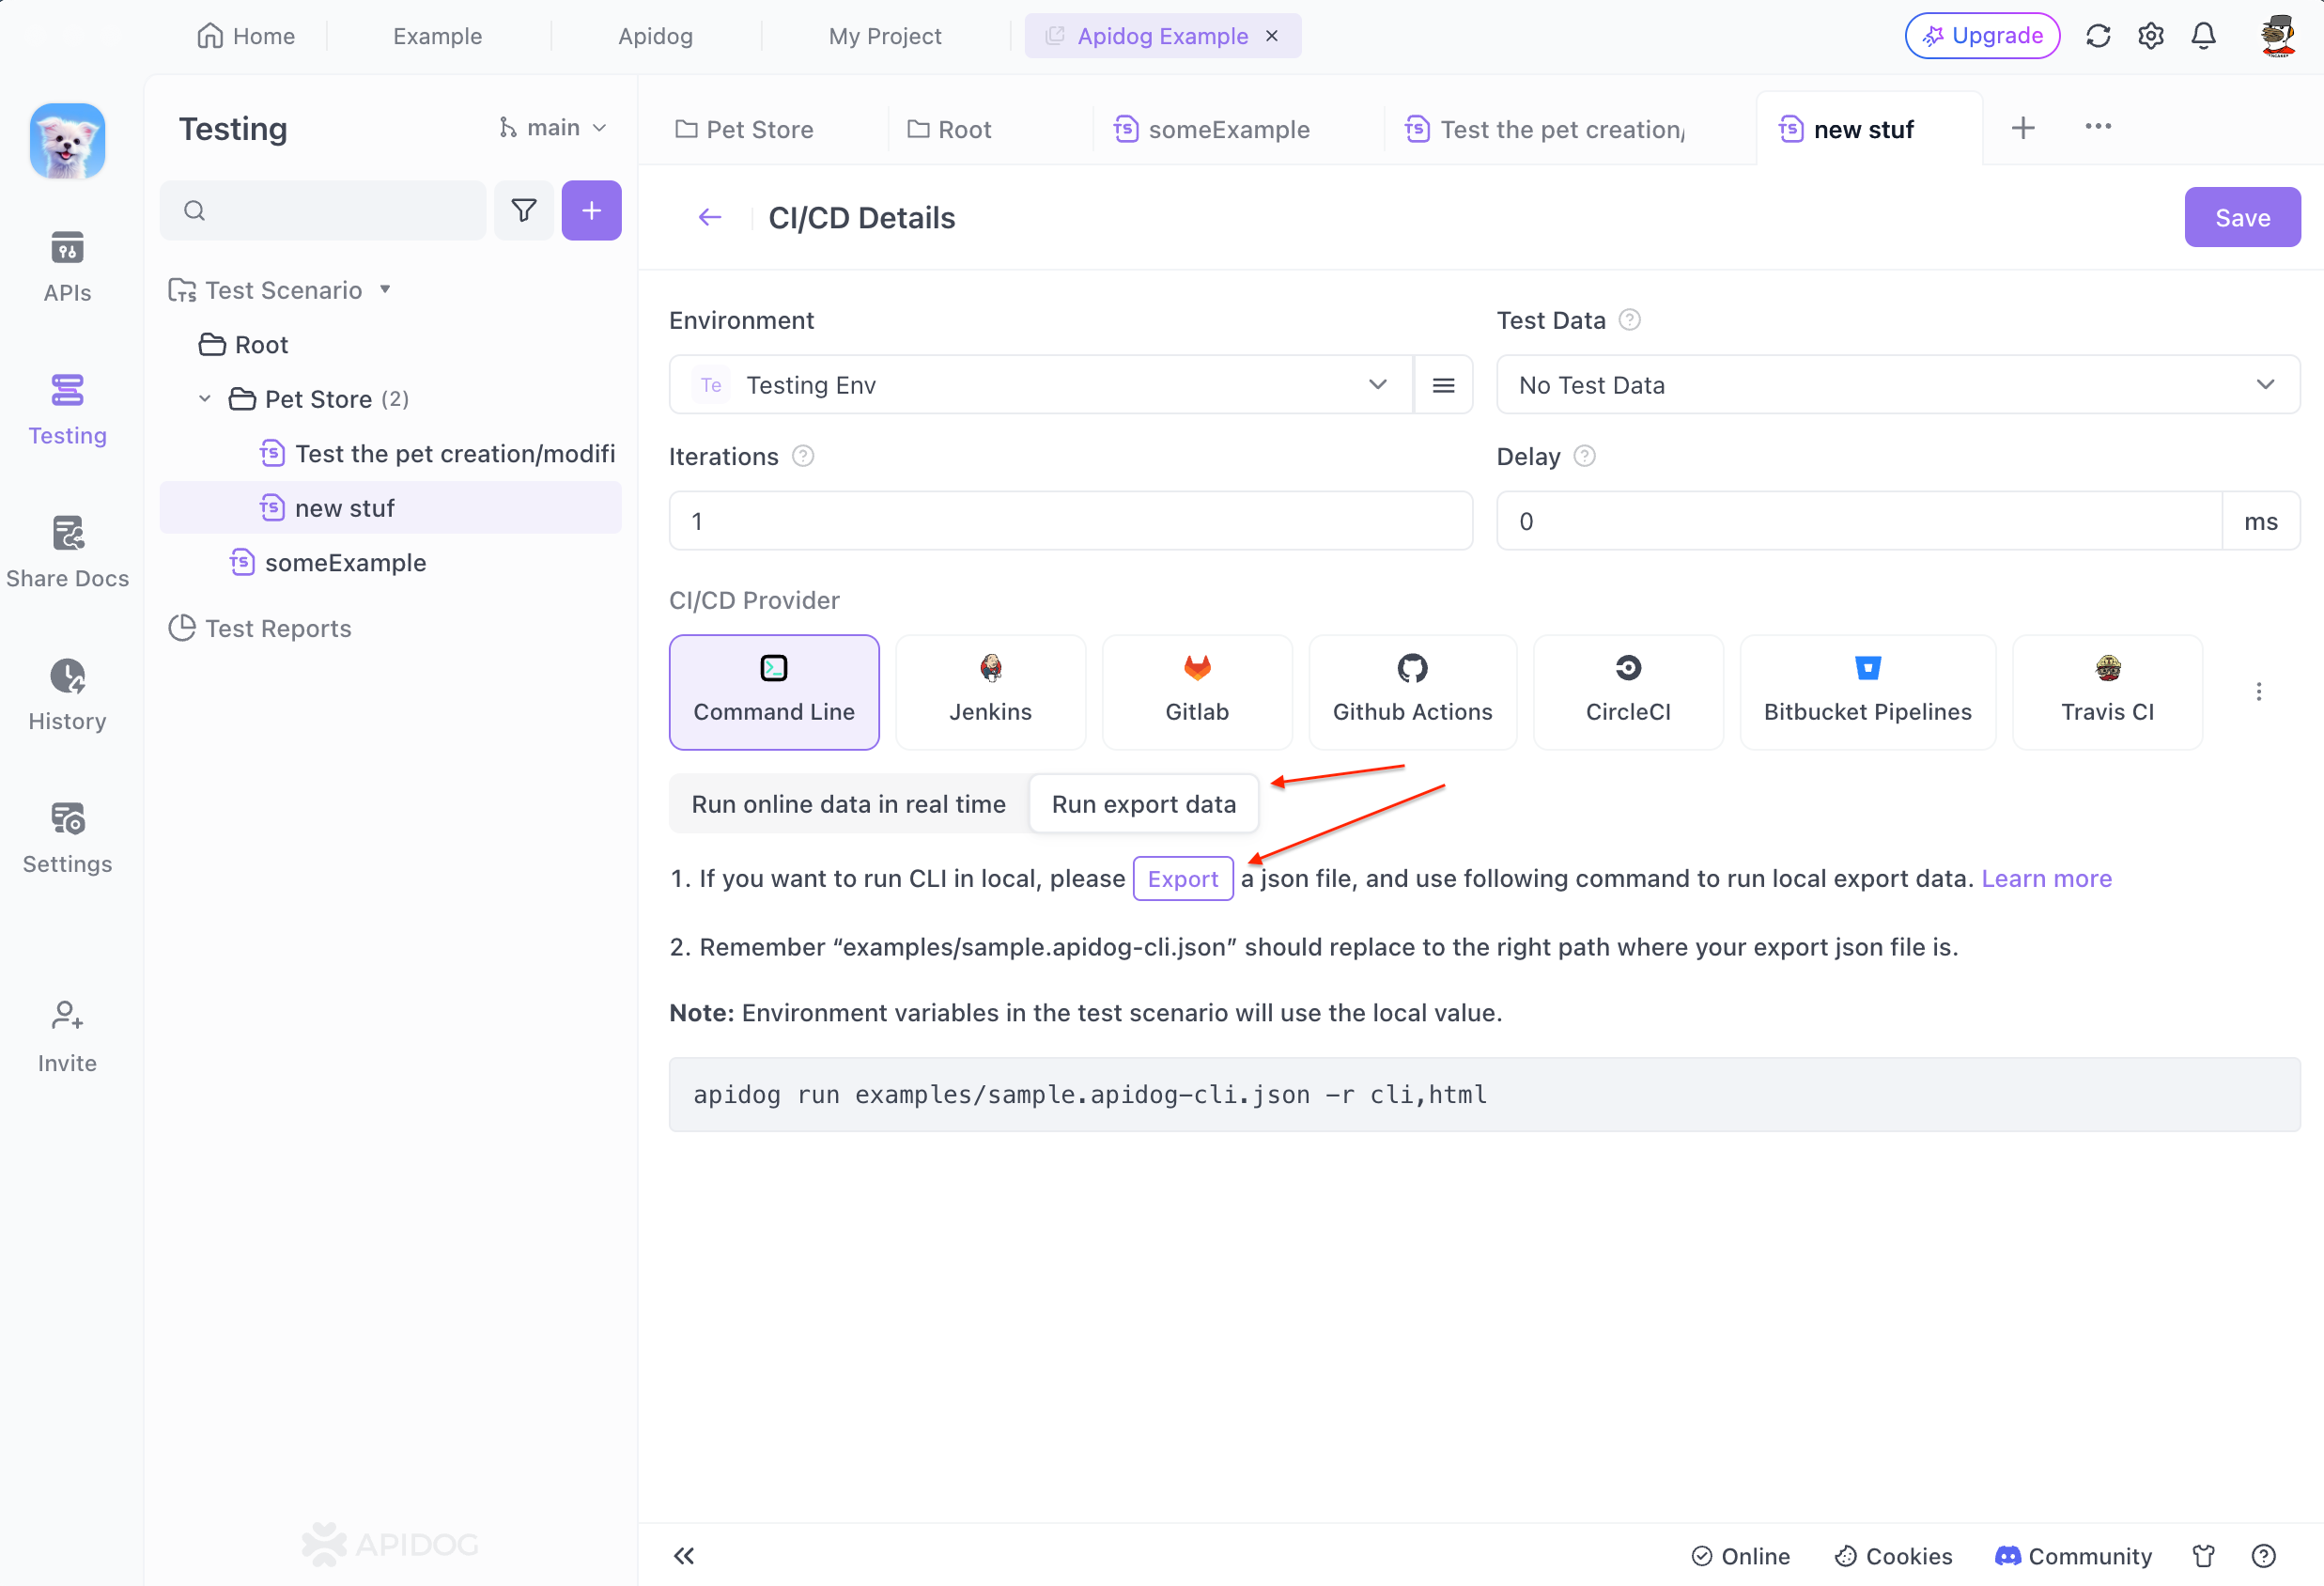
3. Local Test File Execution: To run a particular test scenario using the Apidog CLI locally, the Json file associated with that scenario must be exported first. The file is then executed using the Apidog CLI tool.
Example: API-Driven Component
Let’s create a UserCard component that fetches user data from an API. First, generate the component:
shadcn generate usercard
Now, modify the UserCard.js file:
import React, { useState, useEffect } from 'react';
import axios from 'axios';

const UserCard = () => {
  const [user, setUser] = useState(null);

  useEffect(() => {
    axios.get('https://api.example.com/user/1')
      .then(response => setUser(response.data))
      .catch(error => console.error('Error fetching user data:', error));
  }, []);

  if (!user) {
    return <div>Loading...</div>;
  }

  return (
    <div className="user-card">
      <h2>{user.name}</h2>
      <p>{user.email}</p>
    </div>
  );
};

export default UserCard;
Here, we're using axios to fetch data from an API, and Shadcn CLI provides the structure and styling for our component.
Customizing Your Components
The great thing about Shadcn CLI is its flexibility. Want to use TailwindCSS or another CSS library? You got it!
In your shadcn.config.js file, you can set styleLibrary to any supported library like TailwindCSS or Styled Components. Here's an example using TailwindCSS:
module.exports = {
  componentsDir: 'src/components',
  themeDir: 'src/theme',
  styleLibrary: 'tailwindcss',
};
With TailwindCSS, you can add utility classes to your components directly. Modify the UserCard component to use Tailwind classes:
return (
  <div className="bg-gray-100 p-4 rounded-md">
    <h2 className="text-xl font-bold">{user.name}</h2>
    <p className="text-gray-600">{user.email}</p>
  </div>
);
Optimizing Shadcn CLI for Large Projects
When working on large applications, having a consistent structure becomes critical. Shadcn CLI helps by offering modularity and reusability. You can create a library of components that can be reused across different parts of your app.
Organize Your Components
To keep your components well-organized, structure them into specific folders by functionality:
src/
  components/
    buttons/
    cards/
    forms/
This organization makes it easier to find and update components, especially as your project grows.
Troubleshooting Common Issues
Issue 1: Component Not Generating
If you run into an issue where your component isn't generating, double-check your shadcn.config.js file. Ensure that the directories you’ve specified actually exist.
Issue 2: CSS Not Applying
If your styles aren't applying, make sure that you've correctly linked your CSS library. If you’re using TailwindCSS, ensure it’s configured in your project’s tailwind.config.js file.
Conclusion
By now, you should have a solid understanding of how to use Shadcn CLI in your development projects. Whether you’re building small apps or large enterprise systems, this tool will save you time and help maintain a consistent design system. When paired with API tools like Apidog, it makes your entire development workflow smoother and more efficient.
Ready to streamline your API management and make development even easier? Download Apidog for free today and experience the power of a well-integrated development toolchain!


