Hey, automation fans! Ready to streamline your life with n8n, the open-source workflow tool that’s like Zapier’s cooler, self-hosted cousin? Whether you’re a dev, marketer, or just love connecting apps, n8n lets you automate tasks with a slick drag-and-drop interface—no coding required! I set it up locally in 10 minutes, and it’s a game-changer for tasks like syncing Slack notifications or building AI agents. In this tutorial, I’ll explain what n8n is, walk you through running it locally with Docker Desktop, and show you how to test your very first AI agent. Let’s get automating!
What is n8n? Your Automation Superpower
n8n (pronounced “n-eight-n”) is an open-source workflow automation platform that connects apps, APIs, and services to automate repetitive tasks. You can think of it as a visual pipeline where you drag “nodes” to create workflows, like sending emails when a Google Form is submitted or syncing data between Trello and Google Sheets. Here’s why n8n rocks:
- Node-Based: Build workflows with 300+ pre-built nodes for apps like Slack, Notion, or custom HTTP requests.
- Self-Hosted: Run n8n locally or on your server for full data control and privacy. No cloud costs!
- Extensible: Create custom nodes or integrate AI models like Google Gemini for next-level automation.
- Free & Open-Source: With a fair-code model, n8n’s source is on GitHub, boasting 50K+ stars.
- No-Code Friendly: Its intuitive UI makes automation accessible, even for non-coders.

Users call n8n “insanely flexible” for automating business and personal tasks without code. Ready to try it? Let’s run it locally!
Why Run n8n Locally?
Running n8n on your machine is perfect for testing, learning, or private projects. Benefits include:
- Cost-Free: No cloud hosting fees, ideal for personal use.
- Data Privacy: Keep sensitive workflows off external servers.
- Offline Testing: Develop workflows without internet access.
- Custom Development: Build and test custom nodes locally.
Downsides? Local setups can’t handle webhooks from SaaS platforms like Stripe without extra config, and your machine must stay on. For now, let’s focus on a simple local setup with Docker Desktop.
How to Run n8n Locally: Step-by-Step Guide
I’ll guide you through running n8n locally using Docker Desktop, the easiest way to ensure isolation and persistence. I tested this on Windows, but it works on macOS and Linux too. Let’s roll!
1. Install Prerequisites
You’ll need:
- Docker Desktop: Ensures n8n runs in a container for consistency.
- Terminal Skills: Basic comfort with commands (optional with Docker Desktop’s UI).
- Node.js (Optional): Only if you skip Docker (we’ll use Docker here).
Download Docker Desktop from docker.com, install it, and verify it’s running:
docker --version
2. Install n8n with Docker Desktop
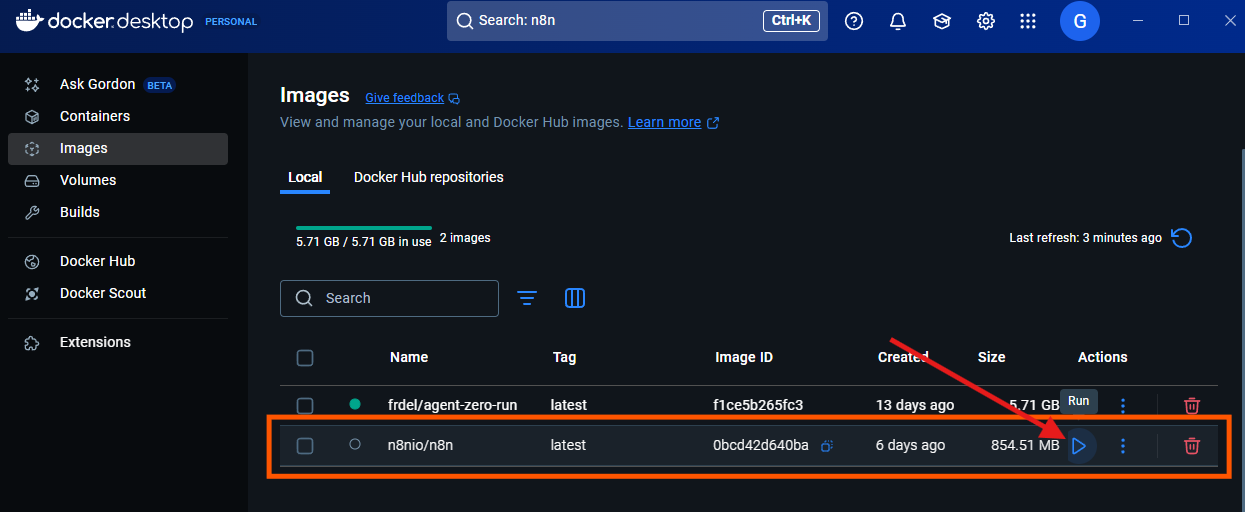
- Open Docker Desktop and search for “n8nio” in the Images tab.
- Find
n8nio/n8nand click Pull. This grabs the official n8n image from Docker Hub—took me less than a minute.

Alternatively, use the terminal:
docker pull n8nio/n8n
3. Create a Data Directory
To save workflows and settings, create a folder for n8n’s data:
- Windows:
mkdir C:\n8n-data - macOS/Linux:
mkdir ~/.n8n - This ensures your workflows persist even if the container stops.
4. Run n8n with Docker
- In Docker Desktop, after pulling
n8nio/n8n, click Run on the image.
- In Optional Settings:
- Under Volumes, copy the path of your
n8n-datafolder (e.g.,C:\n8n-dataor~/.n8n) and paste it into Host Path. - Set Container Path to
/home/node/.n8n. - Map port 5678 (host) to 5678 (container) for access.
- Click Run. Docker spins up the container.

For added security, enable basic auth via terminal:
docker run -d --name n8n -p 5678:5678 -e N8N_BASIC_AUTH_ACTIVE=true -e N8N_BASIC_AUTH_USER=admin -e N8N_BASIC_AUTH_PASSWORD=yourpassword -v ~/.n8n:/home/node/.n8n n8nio/n8n
- Replace
yourpasswordwith a strong password. - For Windows, use
-v C:\n8n-data:/home/node/.n8n.
5. Access and Create an n8n Account
- Check Docker Desktop’s output terminal for a link (e.g.,
http://localhost:5678) or open it manually. - In your browser, navigate to
http://localhost:5678.

- If auth is enabled, log in with
adminand your password. - On first launch, n8n prompts you to create an account with an email and password. If you don’t have one, sign up—it’s quick!

- The UI loads—a clean, colorful dashboard for building workflows. I was pumped!

6. Test n8n with an AI Agent
- On the n8n homepage, select Test a simple AI Agent example.

- You’ll see a demo project with a pre-built workflow you can customize.
- If you lack an OpenAI API key, swap the OpenAI model for Google Gemini. Alternatively, you could also use Ollama for models you have already installed locally:

- Search “Google Gemini” in the sidebar’s node list.
- Drag the Gemini node into your workflow, replacing the OpenAI node.
- Get a free API key from Google’s AI Studio.
- Paste the key in the Gemini node’s Settings tab and save.

- Test it: Open the workflow’s chat interface and type “Hi.” Voilà—you’ve created your first AI agent with n8n! I tried this, and Gemini responded instantly.

7. Stop or Update n8n
To stop n8n:
- In Docker Desktop, find the
n8ncontainer and click Stop.

- Or, via terminal:
docker stop n8n
docker rm n8n
To update:
- Pull the latest image:
docker pull n8nio/n8n
- Rerun the
docker runcommand from step 4. Your workflows stay safe inn8n-data.
Optional: Run n8n with npm (Alternative Method)
Prefer a non-Docker setup? Install n8n via npm, though Docker’s simpler.
- Install Node.js (18.17.0+) from nodejs.org. Verify:
node -v
npm -v
- Install n8n globally:
npm install -g n8n
- Start n8n:
n8n start
- Access at
http://localhost:5678.
Note: npm setups don’t auto-restart on crashes and may face dependency issues. Docker’s my go-to!
Customizing n8n: Level Up Your Setup
Want to make n8n your own? Try these tweaks:
- Webhooks with Tunnel: Use
n8n start --tunnelto expose your local instance for testing webhooks (e.g., Google Forms). Not secure for production! - Custom Nodes: Build nodes for unsupported APIs. Link them in
~/.n8n/custom/and restart n8n. - AI Integration: Beyond Gemini, pair with Ollama for local AI agents using the Self-Hosted AI Starter Kit.

- Environment Variables: Set
N8N_HOST=yourdomain.comorGENERIC_TIMEZONE=America/New_Yorkfor custom configs.
I added a custom Google Sheets node, and it synced my data like magic!
Real-World Use Cases for n8n
n8n is crazy versatile. Here’s what I and other users are automating:
- Social Media: Sync Twitter posts to Notion for content planning.
- Business Workflows: Email leads from Typeform to Slack and CRMs.
- AI Agents: Build chatbots with Gemini or Ollama nodes, like the demo you just tested.
- Dev Tasks: Automate CI/CD pipeline notifications to Discord.
I set up a workflow to save Gmail attachments to Dropbox—took 7 minutes and saved me hours!
Troubleshooting n8n Issues
- n8n not loading at localhost:5678? Check Docker’s running (
docker ps), ensure port 5678 isn’t blocked, and verify firewall settings. - Permission errors? Run:
sudo chown -R 1000:1000 ~/.n8n
sudo chmod -R 755 ~/.n8n
- Gemini node issues? Double-check your API key in the node settings and ensure Google’s AI Studio is active.
- Need help? Hit the n8n Community or GitHub for tips.
Why n8n is Worth Your Time
n8n is a powerhouse for automation, blending flexibility, privacy, and ease of use. The Docker Desktop setup is a breeze, and the node-based UI makes workflows—like your AI agent—fun to build. Sure, local setups have limits (like webhook challenges), but for testing or private projects, it’s unbeatable. Compared to Zapier, n8n’s self-hosting and open-source vibe give it an edge for cost and control.
Ready to automate your world? Spin up n8n and share your workflows on the n8n Forum—I can’t wait to see what you create!