
Encountering a 403 Forbidden error while using Postman can be particularly frustrating, especially when you’re working to test or debug APIs. This error signifies that while the server recognizes the request, it refuses to authorize it. There are several reasons this might happen, and understanding these can help you troubleshoot and resolve the issue more effectively.
Understanding the 403 Forbidden Error
A 403 Forbidden error indicates that the server comprehends the request but is declining to fulfill it. This could be because the request was correctly authenticated, but the authenticated user does not have the necessary permissions to access the resource. Alternatively, the server might be configured to deny access to the requested resource outright. This type of error is distinct from a 401 Unauthorized error, which typically means that authentication credentials are missing or incorrect.
Now, let's explore various methods to address this error in Postman.
Step-by-Step Guide to Fixing 403 Forbidden in Postman
1. Verify Your Authentication
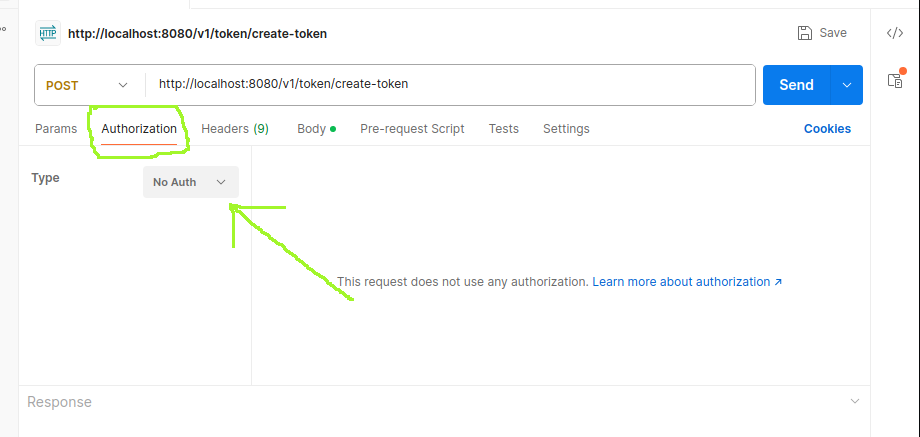
One of the most common causes of a 403 Forbidden error is improper or missing authentication. To address this, review the authentication details you’ve provided in Postman.
Open your request and navigate to the "Authorization" tab. Ensure that you have selected the correct authentication method—whether it’s Basic Auth, Bearer Token, or OAuth 2.0—and that you have entered the accurate credentials or token.
Steps:
- Open your request in Postman
- Go to the "Authorization" tab
- Select the appropriate authentication type (e.g., Basic Auth, Bearer Token, OAuth 2.0)
- Enter the correct credentials or token
- Send the request again and check if the error persists
2. Check Your API Key or Access Token
Another frequent cause of the 403 error is an invalid or expired API key or access token. Confirm that the API key or token you’re using is active and correctly inputted. Visit the API provider’s website or management console to check the status of your key or token. If the token has expired, you will need to generate a new one and update it in your Postman request.
3. Examine and Modify Headers
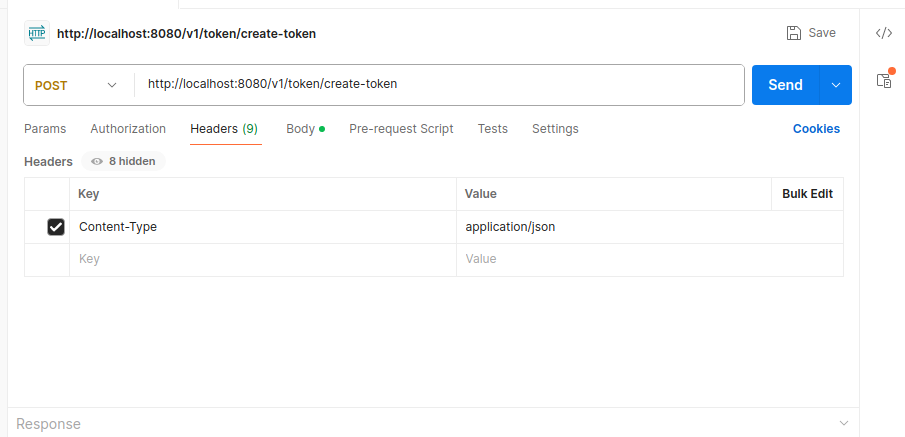
In some cases, the 403 error might result from missing or incorrect headers. Headers are essential for defining the type of content being sent and specifying other request parameters. Access the "Headers" tab in Postman and ensure that all required headers are present, such as Content-Type and Accept. Also, verify that these header values are accurate. Missing headers or incorrect values could lead to access issues, so it’s crucial to align your request headers with those specified in the API documentation.
Steps:
- Go to the "Headers" tab in your Postman request
- Check if all required headers are present (e.g., Content-Type, Accept)
- Verify header values are correct
- Add any missing headers that the API documentation specifies
- Resend the request
4. Review API Documentation
API endpoints often have specific requirements that must be met to successfully execute requests. It’s imperative to consult the API documentation to understand these requirements fully. Look for details about endpoint restrictions, prerequisites, and any special conditions such as rate limits or IP whitelisting. For example, if the API documentation mentions rate limits or specific access conditions, ensure that your request complies with these stipulations.
Steps:
- Locate the official documentation for the API you're using
- Review the requirements for the specific endpoint you're calling
- Check for any restrictions or prerequisites (e.g., rate limits, IP whitelisting)
- Ensure your request complies with all documented requirements
5. Check Your IP Address and Whitelist
Some APIs restrict access based on IP addresses for security reasons. If your API requires IP whitelisting, you will need to ensure that your current IP address is included in the allowed list. To find your IP address, you can use a service like whatismyip.com. Once you have this information, check the API’s management console to see if your IP needs to be added to the whitelist. Allow a few minutes for any changes to propagate before retrying your request.
For APIs that impose geo-restrictions or require spatial data, understanding and managing IP geolocation is crucial. This process can be seamlessly integrated into your workflow using PHP, providing information such as the user's country, region, or even precise coordinates. If security concerns arise from certain IP ranges leading to a 403 error, exploring tools to efficiently get location from IP might aid in evaluating access permissions and securing API endpoints.
6. Verify CORS Settings
When testing APIs designed for browser use, Cross-Origin Resource Sharing (CORS) settings can sometimes interfere with requests. Check whether the API supports CORS and ensure you have included the Origin header in your request. Set this header to the appropriate value that matches the allowed origin as defined by the API.
Steps:
- Check if the API supports CORS
- Add the
Originheader to your request in Postman - Set the value to the allowed origin (e.g.,
https://yourdomain.com) - Resend the request
7. Utilizing Postman’s Console for Debugging
Postman’s console is a valuable tool for debugging and diagnosing issues. Open the Postman console via the “View” menu and observe the output as you send your request. The console can provide detailed error messages or warnings that can offer insights into why the request is being forbidden. For instance, you might see messages indicating missing authorization headers or invalid credentials.
8. Try Different HTTP Methods
Ensure that you’re using the correct HTTP method as specified by the API documentation. Sometimes, using an incorrect method (such as GET instead of POST) can trigger a 403 error. Cross-check the API documentation to verify the correct method for the endpoint you’re trying to access and adjust your request accordingly.
9. Clear Postman's Cookies and Cache
Stored cookies and cached data in Postman can sometimes interfere with requests. To resolve this, clear any cookies associated with the domain by clicking on the "Cookies" link under the request URL. Additionally, navigate to Postman settings and use the “Clear cache and cookies” option in the “General” tab. Restart Postman after clearing these to ensure that outdated data does not affect your requests.
10. Update Postman
Ensure that you are using the latest version of Postman, as older versions may contain bugs or compatibility issues that could cause errors. Check your current version via the Help menu and visit the Postman website to download any available updates. Installing the latest version can help resolve issues related to deprecated features or software bugs.
Switching to Apidog: The Best Postman Alternative
While troubleshooting 403 errors in Postman can be challenging, you might consider exploring alternative tools that offer improved features and potentially fewer issues.
Why Consider Apidog?

Apidog enhances API security by offering robust API design, documentation, debugging, mocking, and testing in a single platform, streamlining your workflow. Apidog also aids in compliance with industry standards like GDPR and HIPAA, ensuring your APIs protect user data effectively.
Additionally, Apidog supports team collaboration, fostering a security-focused development environment. By integrating Apidog, you can build secure, reliable, and compliant APIs, protecting your data and users from various security threats.
If you’re considering switching from Postman to Apidog, the following steps will guide you through the process, ensuring a smooth transition and effective use of Apidog’s features.
1. Export Your Postman Collections
Begin by exporting your existing Postman collections. This step involves saving your API requests and configurations from Postman in a format that Apidog can recognize. To do this, open Postman, navigate to the collection you want to export, and select the export option. Choose the JSON format for compatibility with Apidog.
2. Sign Up for an Apidog Account
Next, create an account on the Apidog website. Visit the Apidog registration page and complete the sign-up process. This will grant you access to Apidog’s features and allow you to manage your API collections.
3. Import Collections into Apidog
Once you have your collections exported and an Apidog account set up, you can proceed with importing your Postman collections into Apidog. Log in to your Apidog account, navigate to the import section, and upload the JSON files you exported from Postman. Apidog will parse these files and recreate your API requests and configurations within its interface.
4. Adjust Settings in Apidog
After importing your collections, review and adjust any environment variables or authentication settings. Ensure that any environment-specific details, such as API keys or tokens, are correctly configured in Apidog. This step is crucial to ensure that your API requests function as expected in the new environment.
5. Explore Apidog’s Features
Familiarize yourself with Apidog’s interface and its unique features. Apidog offers various functionalities that may differ from Postman, such as automatic documentation generation and integrated mock servers. Spend some time exploring these features to understand how they can enhance your API development and testing workflows.
6. Migrate Gradually
To ensure a seamless transition, consider using Apidog for new projects while continuing to maintain and use Postman for your existing projects. This gradual migration approach allows you to become comfortable with Apidog’s interface and features at your own pace, reducing the risk of disruptions in your workflow.
By switching to Apidog, you may find that some of the issues you've encountered in Postman, including 403 errors, are easier to diagnose and resolve due to the platform's enhanced features and user-friendly interface.
FAQs About Postman 403 Forbidden Error
How do I fix 403 Forbidden in Postman?
To fix a 403 Forbidden error in Postman, start by verifying your authentication credentials, checking your API key or access token, and examining your request headers. Ensure you're using the correct HTTP method and review the API documentation for any specific requirements. If the issue persists, try clearing Postman's cache and cookies, updating to the latest version, or contacting the API provider's support team for assistance.
How do I fix HTTP 403 forbidden error?
Fixing an HTTP 403 Forbidden error involves several steps. First, confirm that you have the necessary permissions to access the resource. Check your authentication credentials and ensure they're correct. Verify that your IP address is not blocked and that you're not exceeding any rate limits. Review the server's configuration and .htaccess file if you have access. If you're a website visitor encountering this error, try clearing your browser cache and cookies or contacting the website administrator for help.
Why do I get a 403 Forbidden when performing a post?
A 403 Forbidden error when performing a POST request can occur for several reasons. The most common causes include incorrect or missing authentication, lack of necessary permissions for the specific action, invalid or expired API keys or tokens, or violating the API's usage policies. Additionally, issues with CORS (Cross-Origin Resource Sharing) settings, incorrect content type headers, or server-side restrictions on POST requests to certain endpoints can trigger this error. Review your request parameters, headers, and authentication method to ensure compliance with the API's requirements.


