Sometimes, API response data is encoded or encrypted, and it may be necessary to convert it into readable plaintext. You can achieve this using the built-in JS libraries in Apidog or by invoking external programming languages such as Python or JavaScript for processing.
For example, a Base64-encoded data can be decoded using the built-in library.

Below, we will share some common examples of decoding and decrypting. If you don't install Apidog yet, just click the button to get started!
Decoding Response Data
Base64 Decoding
When an API returns data that is Base64 encoded, you can use the CryptoJS library built into Apidog to decode it. Here’s how to do it:
Suppose the API returns the following Base64 encoded data:
{"data": "SGVsbG8gd29ybGQh"}
You can decode this Base64 data with a script like this:
// Import CryptoJS library
const CryptoJS = require("crypto-js");

// Base64 encoded string (extracted from response data)let encodedData = {"data": "SGVsbG8gd29ybGQh"
};

// Decode Base64 datalet decodedData = CryptoJS.enc.Base64.parse(encodedData.data).toString(CryptoJS.enc.Utf8);

// Output the decoded result
console.log(decodedData); // "Hello, world!"
In Apidog, you can add a custom script in the "Post-request" section with the above logic. After sending the request, you can view the decoded data in the "Console" of the response panel.
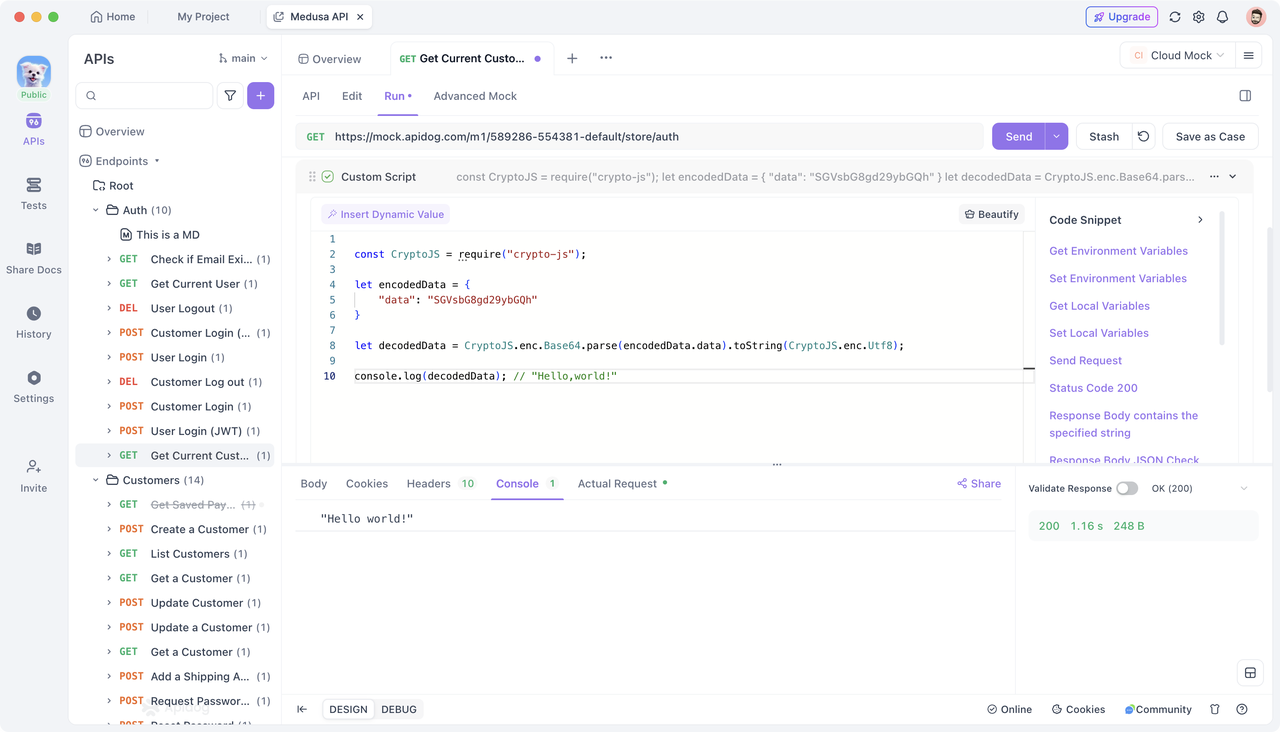
Additionally, you may store the decoded data in an environment variable for future use, like this:
pm.environment.set("decodedData", decodedData);
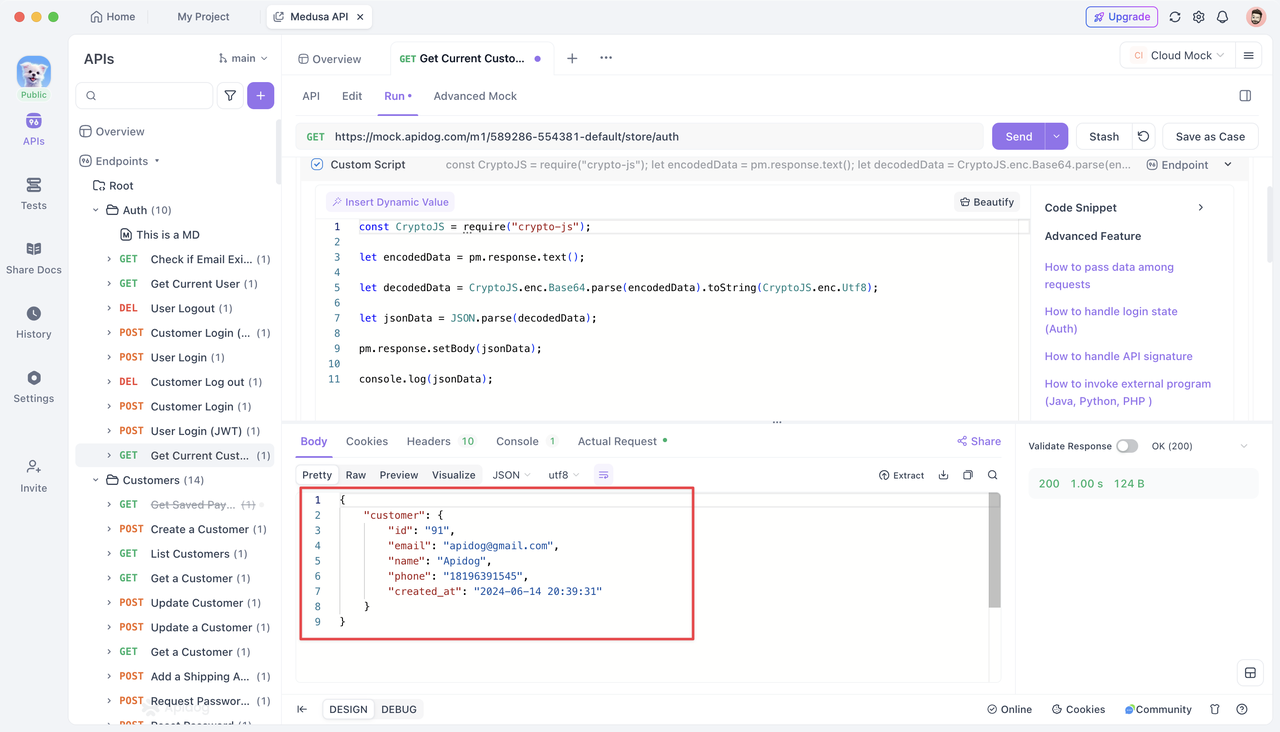
If the JSON response contains Base64 encoded data, you can similarly use CryptoJS to decode it and set the decoded JSON data as the response body with the pm.response.setBody() method. Here’s an example for a Base64 encoded JSON response:
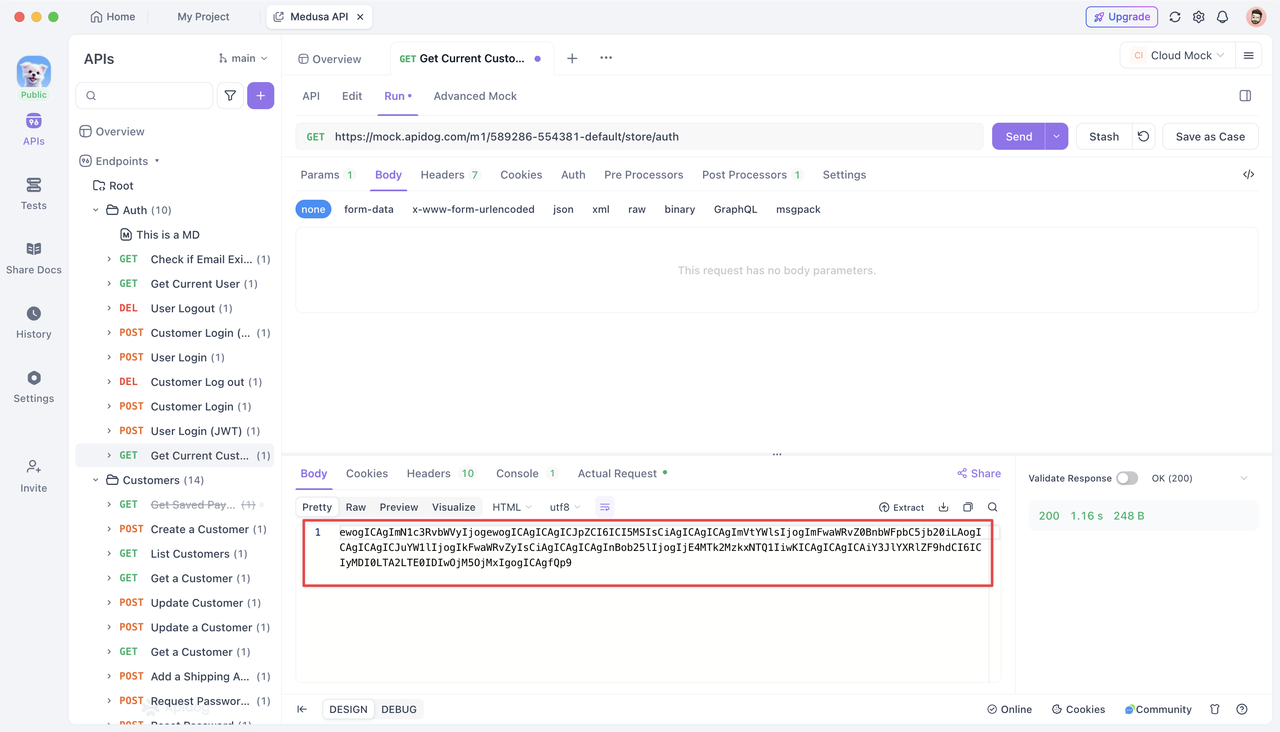
To decode it and display the decoded JSON data in the Response Body, the sample script is as follows:
// Import CryptoJS library
const CryptoJS = require("crypto-js");

// Base64 encoded string (extracted from response data)let encodedData = pm.response.text();

// Decode Base64 datalet decodedData = CryptoJS.enc.Base64.parse(encodedData).toString(CryptoJS.enc.Utf8);

// Parse the decoded JSON stringlet jsonData = JSON.parse(decodedData);

// Set the parsed JSON data as the response body
pm.response.setBody(JSON.stringify(jsonData));
URLEncode Decode
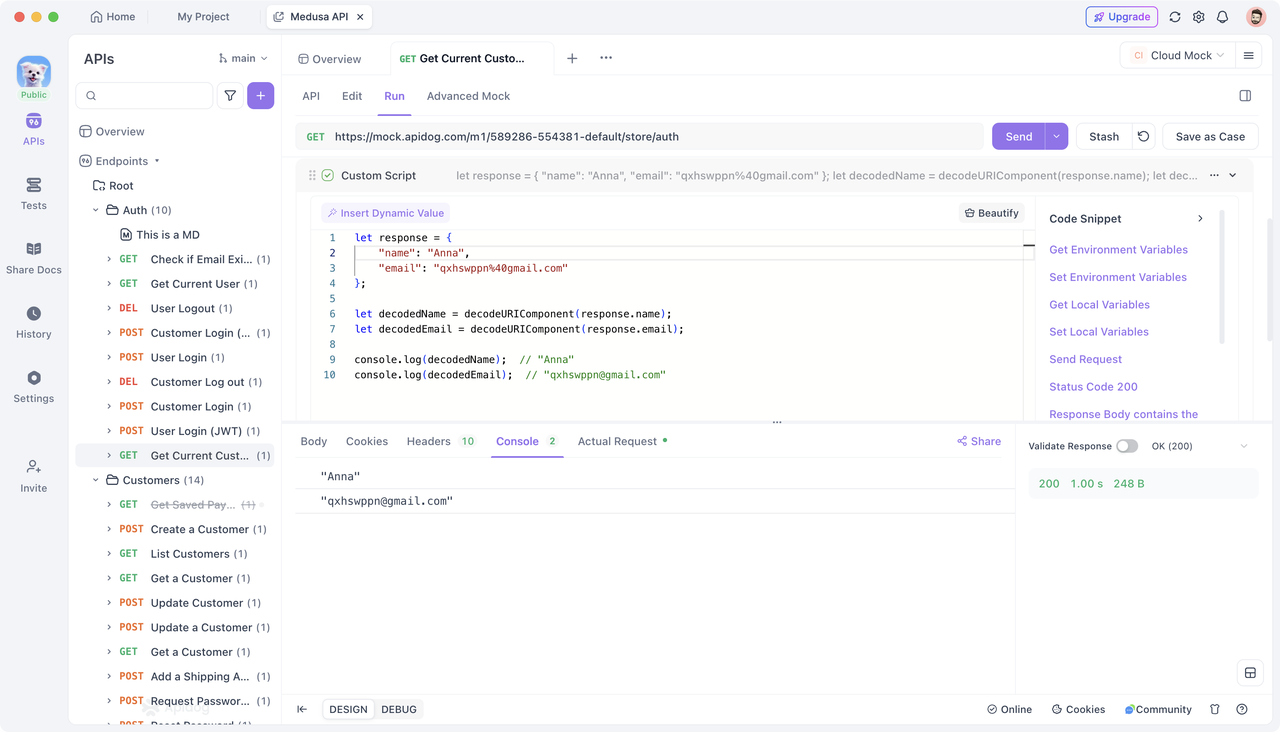
When the response data is URL-encoded, you can use JavaScript's built-in decodeURIComponent() method to decode it.
For example, consider an API that returns the following URL-encoded JSON string:
{"name": "%E5%BC%A0%E4%B8%89","email": "qxhswppn%40gmail.com"
}
You can decode this JSON string’s values like this:
// This is the URL-encoded JSON data from the responselet response = {"name": "%E5%BC%A0%E4%B8%89","email": "qxhswppn%40gmail.com"
};

// Decode using decodeURIComponentlet decodedName = decodeURIComponent(response.name);
let decodedEmail = decodeURIComponent(response.email);
console.log(decodedName);  // "Jason"
console.log(decodedEmail);  // "qxhswppn@gmail.com"
Decrypting Response Data
AES Decryption
To decrypt AES-encrypted ciphertext, you need to provide the appropriate key or initialization vector (IV). AES uses symmetric encryption, meaning the same key is used for both encryption and decryption. If you do not have the correct key or IV, you cannot decrypt the ciphertext.
Assuming you have the AES-encrypted ciphertext in ECB mode, you can use the CryptoJS library to decrypt it in Apidog like this:
// Import CryptoJS libraryconst CryptoJS = require('crypto-js');

// Base64 encoded AES encrypted ciphertext (extracted from response data)const ciphertext = "Gig+YJFu4fLrrexzam/vblRV3hoT25hPZn0HoNoosHQ=";

// Key for decryption (ensure it is 16/24/32 bytes; typically read from an environment variable)const key = CryptoJS.enc.Utf8.parse('1234567891234567');

// AES Decryptconst decryptedBytes = CryptoJS.AES.decrypt(ciphertext, key, {
    mode: CryptoJS.mode.ECB, // Decryption mode
    padding: CryptoJS.pad.Pkcs7 // Padding method
});

// Convert decrypted byte array to UTF-8 stringconst originalText = decryptedBytes.toString(CryptoJS.enc.Utf8);

// Output the decrypted text
console.log(originalText); // "Hello,Apidog!"
You can view the decrypted data in the response console.
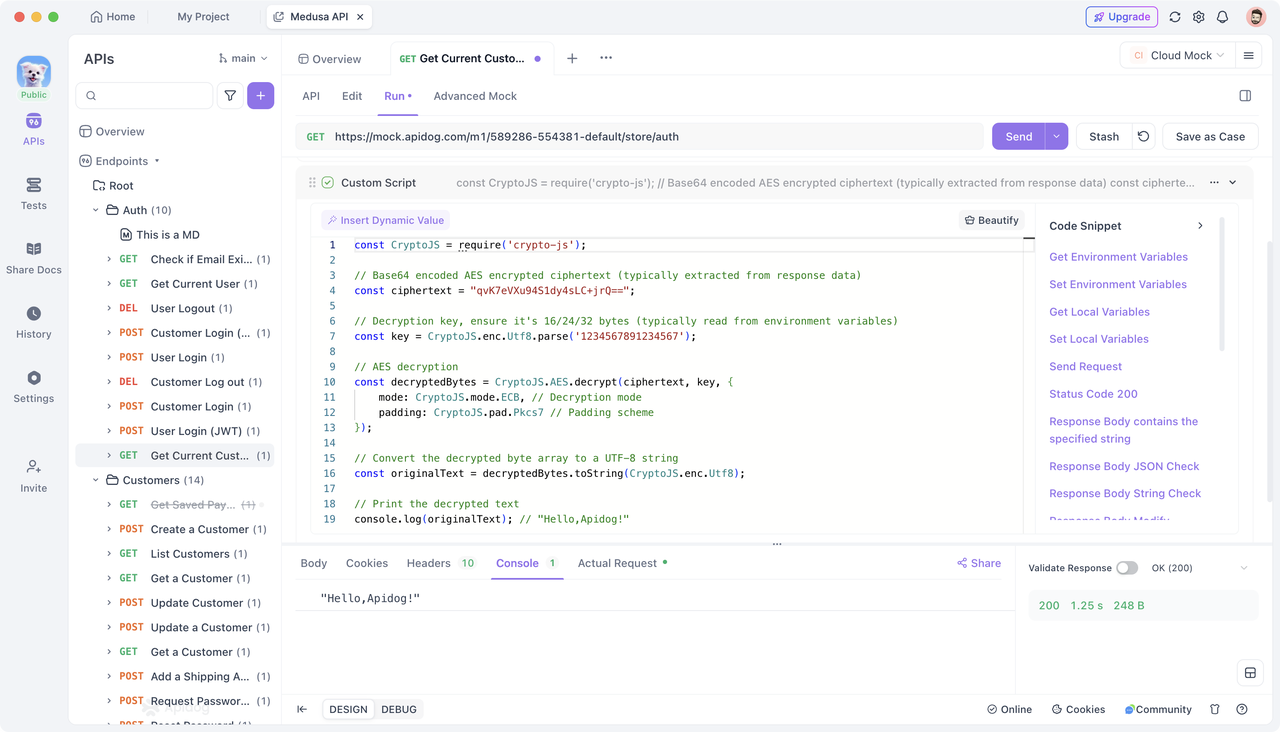
RSA Decryption
To decrypt RSA-encrypted ciphertext, you need to provide the corresponding RSA private key, as RSA is an asymmetric encryption algorithm. The key pair comprises a public key and a private key, and the private key is essential for decryption.
Apidog includes the jsrsasign library (Update latest version), which you can use to decrypt RSA ciphertext. Here’s an example:
// Import the jsrsasign library
const jsrsasign = require('jsrsasign');

// Define the private key (typically read from environment variables)
const privateKeyPEM = `
-----BEGIN PRIVATE KEY-----
Private key...
-----END PRIVATE KEY-----
`;

// Define the ciphertext (typically extracted from response data)
const ciphertext = '';

// Decrypt
const prvKeyObj = jsrsasign.KEYUTIL.getKey(privateKeyPEM);
const decrypted = jsrsasign.KJUR.crypto.Cipher.decrypt(ciphertext, prvKeyObj);
console.log(decrypted);
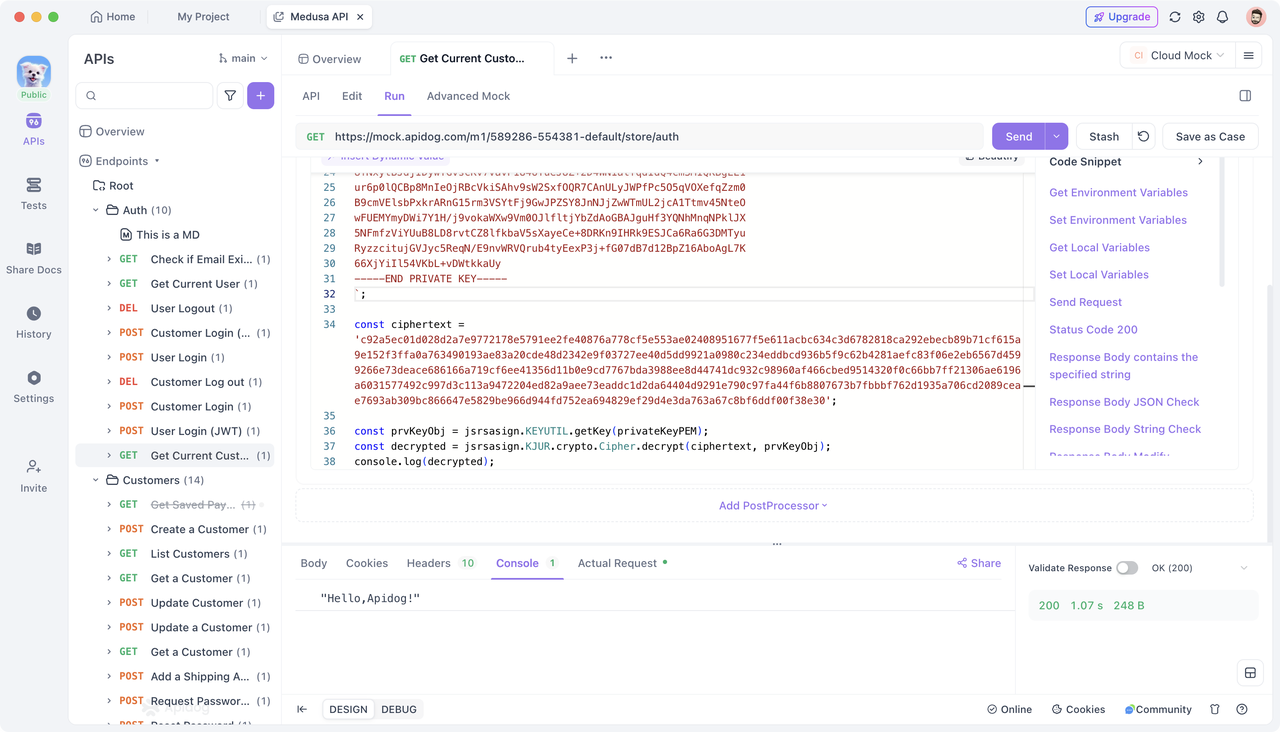
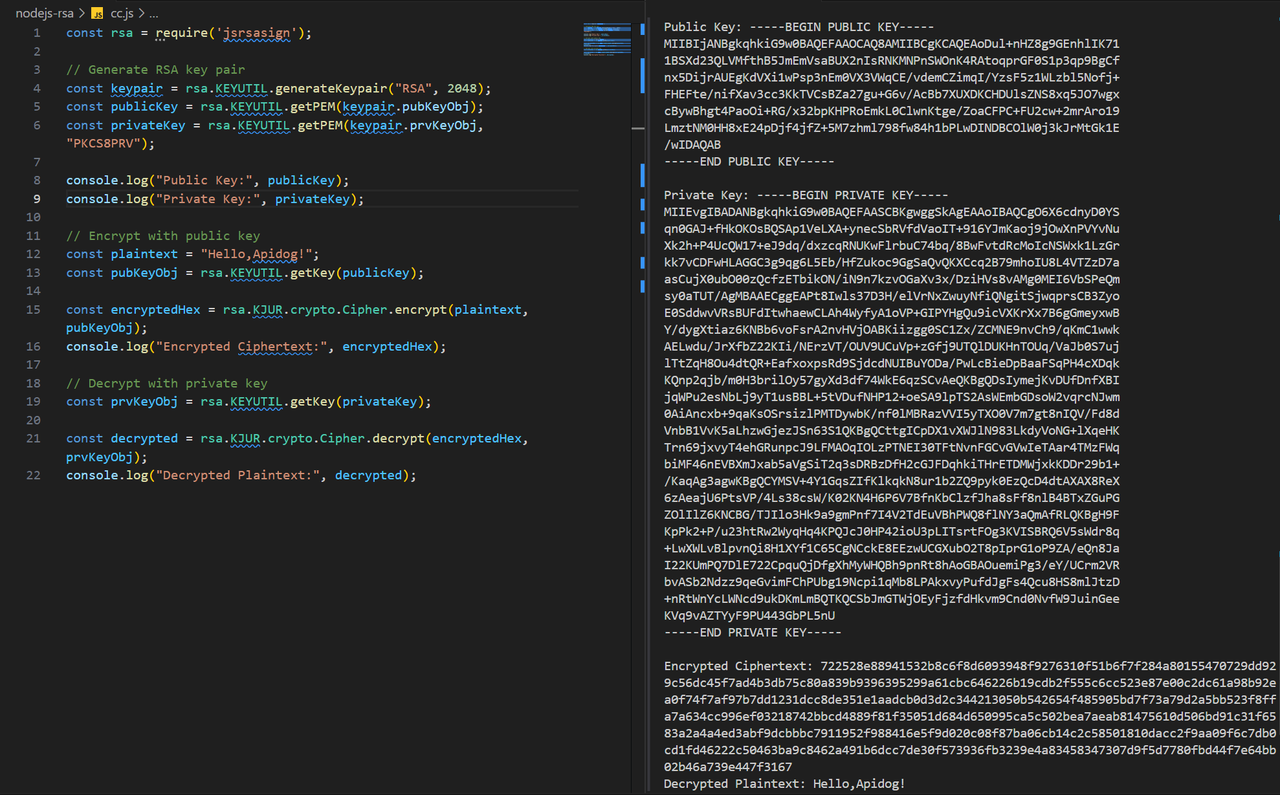
A complete example reference for simple RSA encryption and decryption (note that the jsrsasign version is 10.3.0, and the syntax of other versions may be incompatible), which you can run in a Node.js environment and perform encryption or decryption operations in Apidog as needed:
const rsa = require('jsrsasign');

// Generate RSA key pair
const keypair = rsa.KEYUTIL.generateKeypair("RSA", 2048);
const publicKey = rsa.KEYUTIL.getPEM(keypair.pubKeyObj);
const privateKey = rsa.KEYUTIL.getPEM(keypair.prvKeyObj, "PKCS8PRV");

console.log("Public Key:", publicKey);
console.log("Private Key:", privateKey);

// Encrypt with the public key
const plaintext = "Hello, Apidog!";
const pubKeyObj = rsa.KEYUTIL.getKey(publicKey);

const encryptedHex = rsa.KJUR.crypto.Cipher.encrypt(plaintext, pubKeyObj);
console.log("Encrypted Key:", encryptedHex);

// Decrypt with the private key
const prvKeyObj = rsa.KEYUTIL.getKey(privateKey);

const decrypted = rsa.KJUR.crypto.Cipher.decrypt(encryptedHex, prvKeyObj);
console.log("Decrypted Plaintext:", decrypted);
Using External Programs for Decryption
In addition to using Apidog's built-in JS libraries for decryption, you can also invoke an "external program" to perform decryption. For more information on using external programs, you can check the Apidog help center for detailed instructions.
.jar for Java programs, or .py, .php, .js for scripts in other languages. You can access this directory via "Settings -> External Programs" in the upper right corner of the Apidog interface.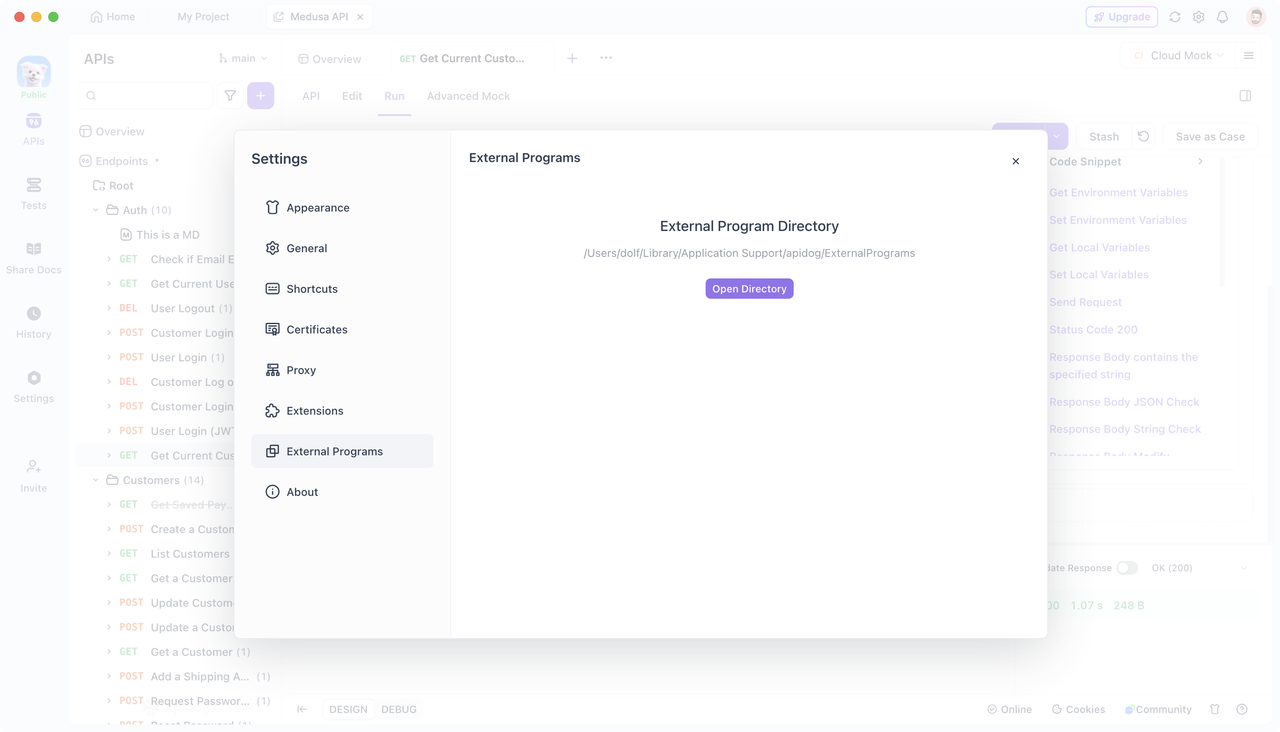
Example: RSA Decryption with Node.js
If you want to perform RSA decryption using the node-forge library in Node.js, you can create a .js file in the External Program Directory to implement the decryption logic. Here’s how to do it:
- Create Decryption Script First, create a
.jsfile and implement the decryption logic. Since you will use thenode-forgelibrary, install it in that directory using npm or yarn. Here's what your script could look like:
// Import node-forge library
const forge = require('node-forge');
// Get command-line arguments
const args = process.argv.slice(2);
// Your private key (PEM format)
const privateKeyPem = `
-----BEGIN RSA PRIVATE KEY-----
private key……
-----END RSA PRIVATE KEY-----`;
// Encrypted ciphertext from command line
const encrypted = args[0];
// Convert PEM format private key to forge private key object
const privateKey = forge.pki.privateKeyFromPem(privateKeyPem);
// Convert Base64 encoded encrypted data to byte array
const encryptedBytes = forge.util.decode64(encrypted);
// Decrypt the data
const decrypted = privateKey.decrypt(encryptedBytes, 'RSA-OAEP');
// console.log() output will be captured by Apidog
console.log(decrypted);
- Invoke the External Program in Apidog After writing the decryption script, you can use the
pm.executeAsync()method in Apidog's "Post-request" section to call this external program. Ensure that your decryption script is placed in the correct external program directory and that the path you reference is relative to that directory. Here’s how to invoke it:
// Encrypted ciphertext (typically obtained from the response data)
const encrypted = 'iDqUyR3BpaTqpzq…………';
// External program path, passing parameters
const result = await pm.executeAsync('./nodejs-rsa/rsa.js', [`${encrypted}`]);
console.log('Result:', result);
When you send the request in Apidog, it will automatically pass the ciphertext to the external program you defined, perform the decryption, and capture the result output via console.log(), ultimately returning the decrypted plaintext.
This kind of decryption is not limited to Node.js, other programming languages such as Java, PHP, Python, Go, etc. can perform similar operations and calls.
Conclusion
Using the methods outlined in this article, you can effectively decode and decrypt response data in Apidog, turning it into readable plaintext. Try Apidog now!


