If you have trouble with Kerberos configurations and preauthentication failures that keep you up at night, then you are not alone. Even the most seasoned system administrators know the unique frustrations that come with setting up Kerberos authentication.
And you can’t bypass small errors because you know it plays a crucial role in enterprise security as a backbone of authentication protocols for organizations of all sizes. So that’s why your development team needs platforms to test your Kerberos-authenticated APIs, which can be a challenge because, unfortunately, even the most popular testing platforms like Postman do not support it yet or its way too complicated to use like in SoapUI.
That’s where Apidog comes in, offering native support for both Kerberos and NTLM authentication protocols, allowing you to get started with testing Kerberos-authenticated APIs on Windows, Mac, and Linux. Now, whether we’ve caught your interest or not, please continue reading the rest of our blog, where we’ll help you become more familiar with Kerberos, explain its importance, and demonstrate how to use it on our platform.
Before diving into the steps, let's take a quick refresher on Kerberos Authentication Protocol—the core of many enterprise security systems.
What is Kerberos Authentication Protocol?
Developed by MIT, Kerberos is a network security authentication protocol that provides a secure way of transmitting user identity data over a network. It’s particularly popular in Microsoft Windows environments and is integral to Single Sign-On (SSO) solutions, allowing users to authenticate once and access multiple services without needing to re-enter passwords.
How Does Kerberos Authentication Work?
At the heart of Kerberos are several key components that work together to ensure secure authentication:
- KDC (Key Distribution Center): This is the central server that manages authentication requests. It includes two critical components:
- AS (Authentication Server): Verifies the user’s identity and issues the Ticket Granting Ticket (TGT).
- TGS (Ticket Granting Service): Issues service tickets that allow users to access specific resources.
- TGS (Ticket Granting Service): Issues service tickets that allow users to access specific resources.
- Service Tickets: These are issued by the TGS and are used to authenticate access to specific services.
The Kerberos authentication flow is simple yet secure:
- The user logs in and requests a TGT from the AS.
- The AS verifies the user’s identity and issues a TGT.
- To access a service, the user requests a service ticket from the TGS using their TGT.
- The TGS verifies the TGT and issues the service ticket.
- The user uses the service ticket to authenticate access to the requested service.
In this process, the KDC functions as a central entity, encompassing two key components: the Authentication Server (AS) and the Ticket Granting Service (TGS). The TGT (Ticket Granting Ticket) and service tickets serve as essential credentials to verify identity and authorize access throughout the authentication flow.
This design enables users to authenticate just once (by obtaining a TGT) and then request multiple service tickets as needed, without re-entering their credentials. This approach supports Single Sign-On (SSO), offering a seamless user experience while maintaining robust security within the system.

Testing Kerberos-Authenticated APIs with Apidog on macOS

Now that you understand how Kerberos works, let’s walk through the steps for testing a Kerberos-authenticated API endpoint using Apidog on macOS.
Step 1: Preparation
To start, you’ll need some basic Kerberos-related information that your organization typically provides when using Kerberos authentication:
- Account: Your Kerberos user account (e.g., Scarlett@APIDOG.LOCAL).
- Password: Your Kerberos login password.
- Kerberos Realm: The domain name in uppercase (e.g., APIDOG.LOCAL).
- KDC Server Address: The Fully Qualified Domain Name (FQDN) or IP address of the KDC (e.g., ills7i8hyt2.apidog.local).
Before you begin, ensure you’ve downloaded and installed the latest version of Apidog. Note that Apidog’s web version doesn’t support Kerberos, so you must use the desktop client.
Step 2: Modify your local DNS for Kerberos authentication:
Kerberos authentication is typically used within an internal network. To ensure proper connectivity, you’ll need to configure your DNS server to point to your Active Directory (AD) server address.
Step 3: Configure /etc/krb5.conf on macOS
The krb5.conf file is the central configuration for Kerberos. It defines your Kerberos realm and the KDC server address. You’ll need to create or modify this file on your system.
- Open a terminal and check if
krb5.confalready exists:
cat /etc/krb5.conf- If the file doesn’t exist, create it:
nano /etc/krb5.conf- Add the following content to configure the Kerberos realm and KDC server:
[libdefaults]
    default_realm = APIDOG.LOCAL  # Your Kerberos realm name, typically the uppercase form of your organization's domain name

[realms]
    EXAMPLE.COM = {
        kdc = ills7i8hyt2.apidog.local # KDC server address, assumed here to be the FQDN of the domain controller
        admin_server = ills7i8hyt2.apidog.local # Usually the same as the KDC
    }

[domain_realm]
    .apidog.local = APIDOG.LOCAL  # Mapping between domain name and Kerberos realm name, left side is lowercase
apidog.local = APIDOG.LOCAL- Save and close the file.
Step 4: Log in to AD Account
To authenticate with Kerberos, you can use either the GUI or CLI tools on macOS.
GUI: Use Ticket Viewer to add your identity. Open Spotlight, search for Ticket Viewer, then add your credentials.

CLI: Alternatively, you can use the kinit command: bash kinit <username@domain>
Check your Kerberos tickets with: bash klist
# Obtain a Ticket for an AD account
kinit <username@domain>
# Check local Tickets
klist
Step 5: Configure Kerberos Authentication in Apidog
Now that you’re logged into your AD account and Kerberos is set up, open Apidog and follow these steps:
- Create a
New Requestin Apidog.

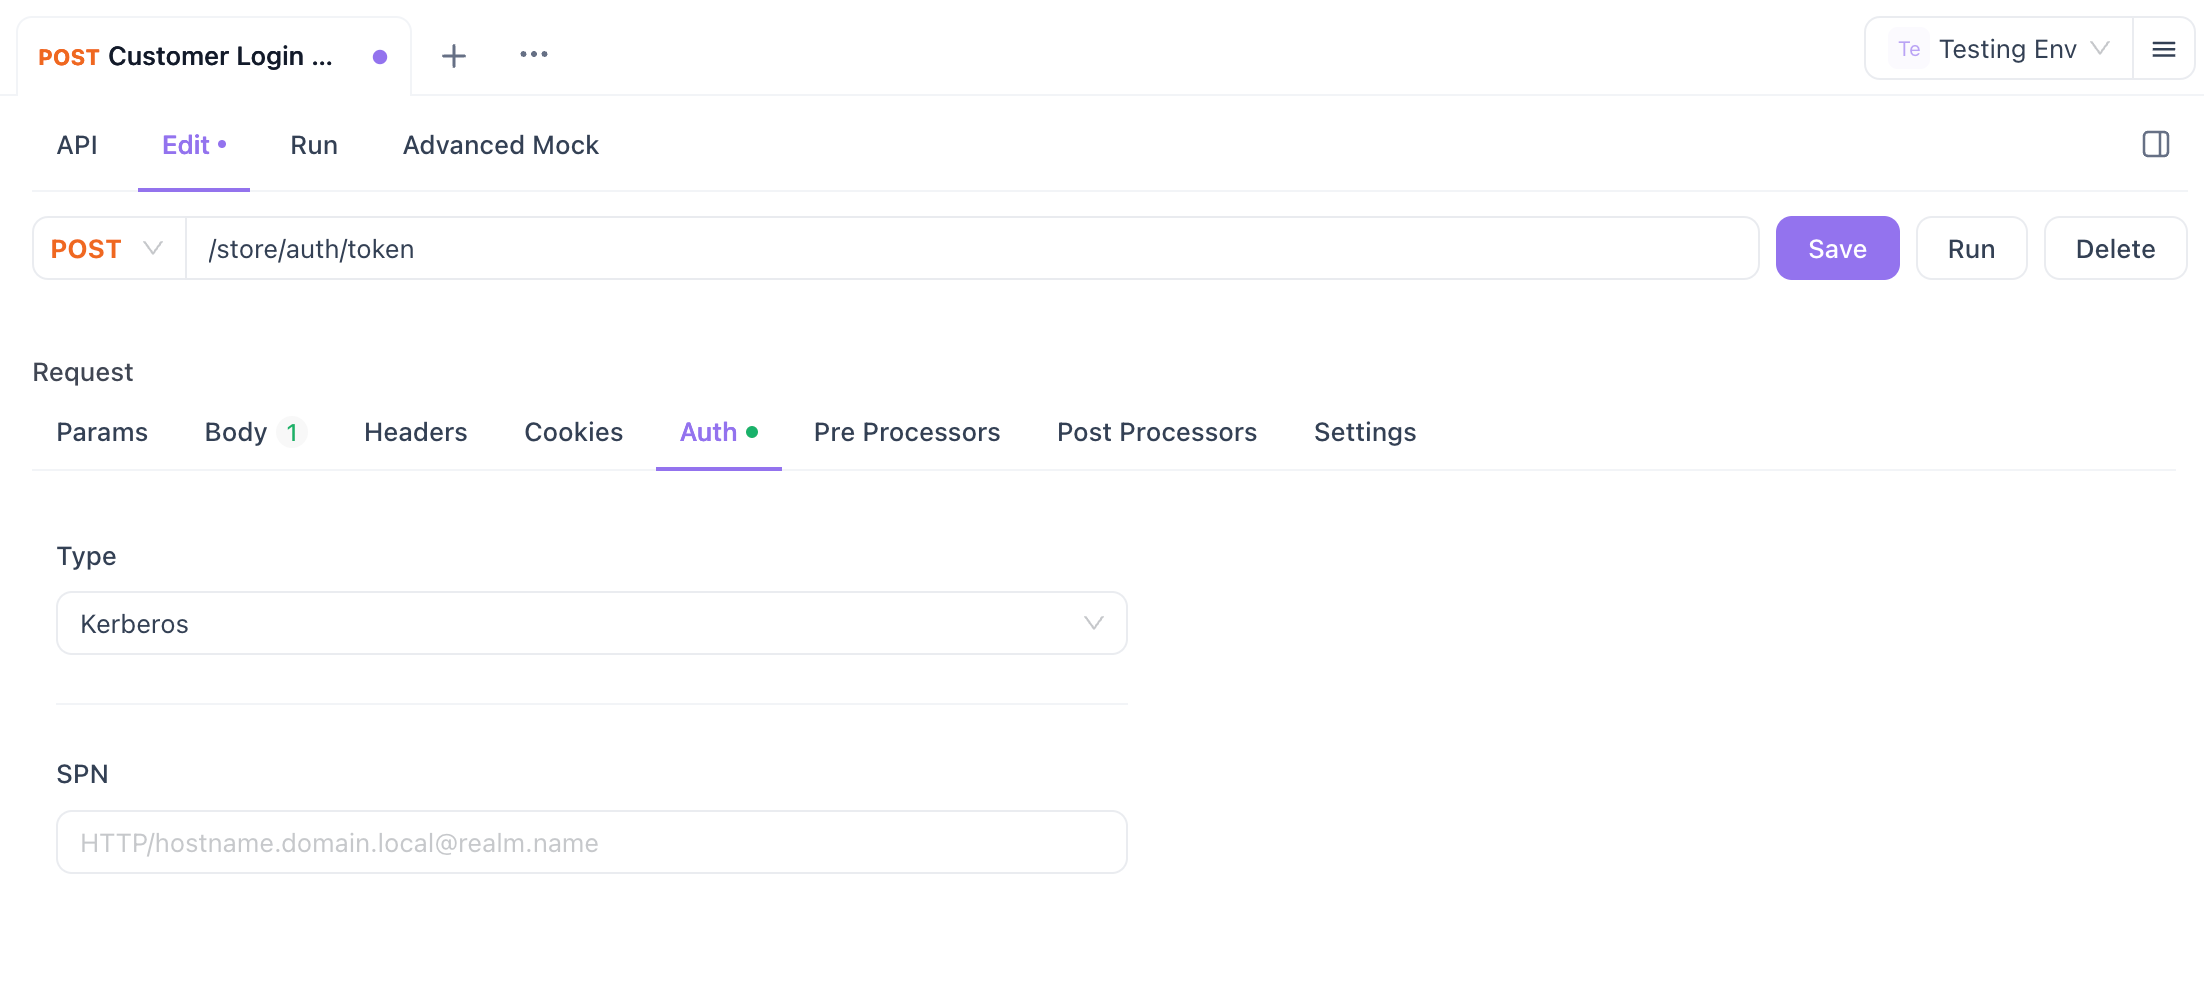
- In the Auth section, select Kerberos as the authentication type.

- Enter the Service Principal Name (SPN), which is a combination of your KDC server and realm name. For example:
HTTP/ills7i8hyt2.apidog.local@APIDOG.LOCAL

- Click Send to test the API.

Troubleshooting 401 Errors
If you encounter a 401 Unauthorized error, check the following:
- DNS Configuration: Ensure DNS is set up correctly.
- Kerberos Setup: Verify your Kerberos configuration in
krb5.conf. - Credential Validity: Ensure your username and password are correct and active.
- API Access Permissions: Confirm you have the necessary permissions to access the API.
- Ticket Expiration: Kerberos tickets expire, so ensure your ticket is still valid. You may need to renew it with
kinit.

Configuring Kerberos Authentication on Windows
For domain-joined Windows systems, Apidog integrates seamlessly with existing Kerberos configurations. If your system is already part of a domain, no additional configuration is needed to begin testing Kerberos-authenticated APIs.
For non-domain systems, you'll need administrative privileges and valid domain credentials to join the domain and set up Kerberos. Here is the steps involved:
- Configure your DNS settings to point to the domain's DNS servers.
- Navigate to System Settings > Access Work or School to access domain settings.
- Complete the domain joining process by providing the necessary authorized credentials.
Using Apidog to Test NTLM-Authenticated APIs
In addition to Kerberos, Apidog also supports NTLM authentication, commonly used for legacy systems. NTLM is faster but less secure than Kerberos, making it ideal for smaller networks or as a fallback when Kerberos is unavailable.
For NTLM authentication, simply enter your username and password in Apidog’s Auth section and click Send—no additional setup required.
Step 1: Preparation & Modify Local DNS
NTLM authentication is straightforward and only requires your company-provided account and password. Ensure that you have the latest version of Apidog downloaded and registered.
Since NTLM-authenticated endpoints are often accessed within the internal network, make sure your DNS server is configured to point to the Active Directory (AD) server address.
Step 2: Configure Auth in Apidog
Configuring NTLM authentication in Apidog is simple and doesn’t require additional setup.
In the Auth section of Apidog, select NTLM Authentication as the authentication type. You'll be prompted to enter your username and password in the respective fields.

Once you've filled in your credentials, click the Send button to complete the authentication process.
Benefits of Kerberos Authentication
Kerberos offers several advantages that make it the preferred authentication method for enterprises:
- Centralized Authentication: All authentication is handled by a central server, making user management and policy enforcement easier.
- Mutual Authentication: Both the client and server verify each other’s identity, providing an added layer of security.
- Single Sign-On (SSO): Once authenticated, users can access multiple services without needing to log in again.
- Ticket-based Authentication: User credentials (passwords) are never transmitted over the network. Instead, encrypted tickets are used to prove identity.
- Limited Ticket Validity: Tickets are time-stamped and expire after a set period, reducing the risks associated with compromised credentials.
- Reduced Server Load: Servers don’t need to authenticate users repeatedly, improving system performance.
Conclusion
In modern enterprise environments, both Kerberos and NTLM play critical roles in authentication. While Kerberos offers enhanced security for large-scale deployments, NTLM provides compatibility with older systems and smaller networks.
With Apidog’s native support for both protocols, testing APIs that rely on these authentication methods becomes straightforward, whether you’re working with Kerberos-authenticated services in a Windows, Mac, or Linux environment, or using NTLM for legacy systems.
Apidog helps you test and validate your authentication setup efficiently, saving time and reducing frustration for developers and QA teams. Get started with Apidog today and experience seamless, secure API testing with built-in Kerberos and NTLM support.


