
It seems like for every week, we get a new AI Image Generation models capable of creating stunning visuals. One such powerful model is HiDream-I1-Full. While running these models locally can be resource-intensive, leveraging APIs provides a convenient and scalable way to integrate this technology into your applications or workflows.
This tutorial will guide you through:
- Understanding HiDream-I1-Full: What it is and its capabilities.
- API Options: Exploring two popular platforms offering HiDream-I1-Full via API: Replicate and Fal.ai.
- Testing with Apidog: A step-by-step guide on how to interact with and test these APIs using the Apidog tool.
Want an integrated, All-in-One platform for your Developer Team to work together with maximum productivity?
Apidog delivers all your demands, and replaces Postman at a much more affordable price!
Target Audience: Developers, designers, AI enthusiasts, and anyone interested in using advanced AI image generation without complex local setups.
Prerequisites:
- Basic understanding of APIs (HTTP requests, JSON).
- An account on Replicate and/or Fal.ai to obtain API keys.
- Apidog installed (or access to its web version).
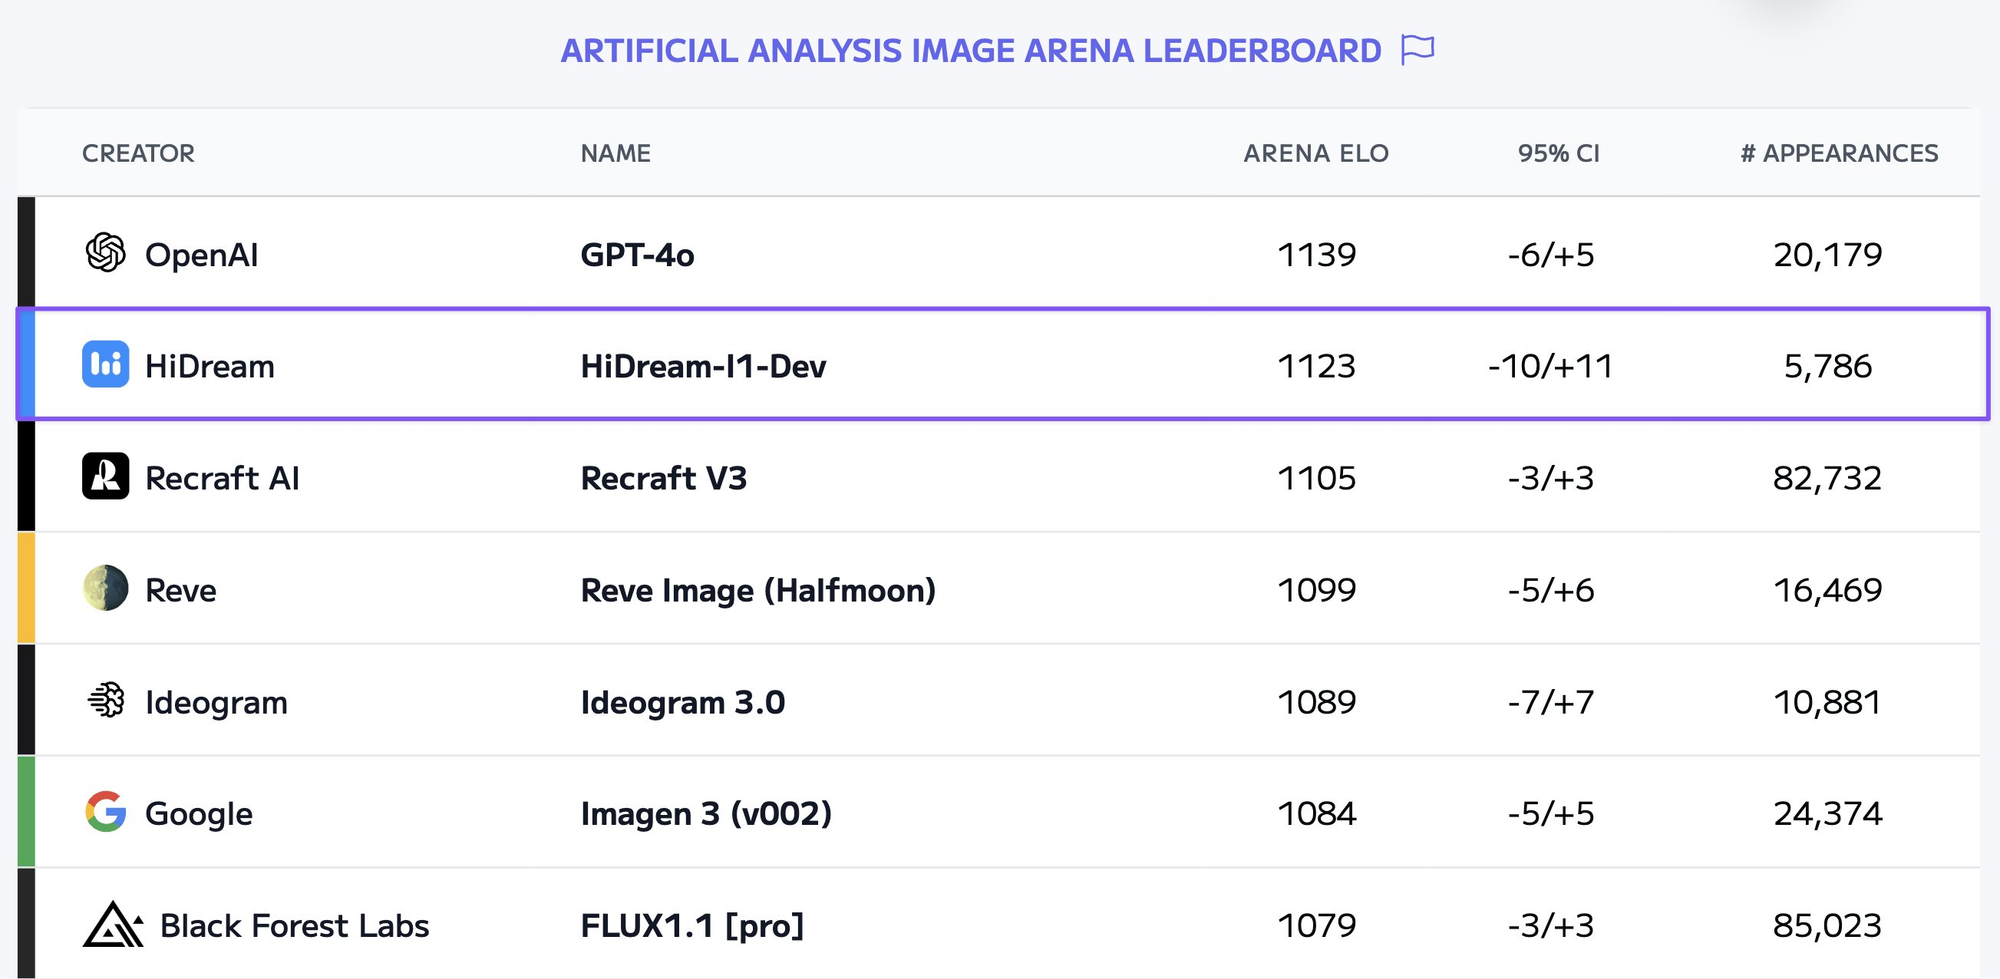
What is HiDream-I1-Full?

HiDream-I1-Full is an advanced text-to-image diffusion model developed by HiDream AI. It belongs to the family of models designed to generate high-quality, coherent, and aesthetically pleasing images based on textual descriptions (prompts).

Model Details: You can find the official model card and more technical information on Hugging Face: https://huggingface.co/HiDream-ai/HiDream-I1-Full
Key Capabilities (Typical for models of this class):
- Text-to-Image Generation: Creates images from detailed text prompts.
- High Resolution: Capable of generating images at reasonably high resolutions suitable for various applications.
- Style Adherence: Can often interpret stylistic cues within the prompt (e.g., "in the style of Van Gogh," "photorealistic," "anime").
- Complex Scene Composition: Ability to generate images with multiple subjects, interactions, and detailed backgrounds based on the prompt's complexity.
- Control Parameters: Often allows fine-tuning through parameters like negative prompts (things to avoid), seeds (for reproducibility), guidance scale (how strongly to follow the prompt), and potentially image-to-image variations or control inputs (depending on the specific API implementation).
Why Use an API?
Running large AI models like HiDream-I1-Full locally requires significant computational resources (powerful GPUs, ample RAM, and storage) and technical setup (managing dependencies, model weights, environment configurations). Using an API offers several advantages:
- No Hardware Requirements: Offload the computation to powerful cloud infrastructure.
- Scalability: Easily handle varying loads without managing infrastructure.
- Ease of Integration: Integrate image generation capabilities into websites, apps, or scripts using standard HTTP requests.
- Maintenance-Free: The API provider handles model updates, maintenance, and backend management.
- Pay-as-you-go: Often, you only pay for the compute time you use.
How to Use HiDream-I1-Full via API
Several platforms host AI models and provide API access. We will focus on two popular choices for HiDream-I1-Full:
Option 1: Use Replicate's HiDream API
Replicate is a platform that makes it easy to run machine learning models via a simple API, without needing to manage infrastructure. They host a vast library of community-published models.
- Replicate Page for HiDream-I1-Full: https://replicate.com/prunaai/hidream-l1-full (Note: The URL mentions
l1-full, but it's the relevant link provided in the prompt for the HiDream model on Replicate. Assume it corresponds to the intended model for this tutorial).
How Replicate Works:
- Authentication: You need a Replicate API token, which you can find in your account settings. This token is passed in the
Authorizationheader. - Starting a Prediction: You send a POST request to the Replicate API endpoint for predictions. The request body contains the model version and the input parameters (like
prompt,negative_prompt,seed, etc.). - Asynchronous Operation: Replicate typically operates asynchronously. The initial POST request returns immediately with a prediction ID and URLs to check the status.
- Getting Results: You need to poll the status URL (provided in the initial response) using GET requests until the status is
succeeded(orfailed). The final successful response will contain the URL(s) of the generated image(s).
Conceptual Python Example (using requests):
import requests
import time
import os

REPLICATE_API_TOKEN = "YOUR_REPLICATE_API_TOKEN" # Use environment variables in production
MODEL_VERSION = "TARGET_MODEL_VERSION_FROM_REPLICATE_PAGE" # e.g., "9a0b4534..."

# 1. Start Prediction
headers = {
    "Authorization": f"Token {REPLICATE_API_TOKEN}",
    "Content-Type": "application/json"
}
payload = {
    "version": MODEL_VERSION,
    "input": {
        "prompt": "A majestic cyberpunk cityscape at sunset, neon lights reflecting on wet streets, detailed illustration",
        "negative_prompt": "ugly, deformed, blurry, low quality, text, watermark",
        "width": 1024,
        "height": 1024,
        "seed": 12345
        # Add other parameters as needed based on the Replicate model page
    }
}

start_response = requests.post("<https://api.replicate.com/v1/predictions>", json=payload, headers=headers)
start_response_json = start_response.json()

if start_response.status_code != 201:
    print(f"Error starting prediction: {start_response_json.get('detail')}")
    exit()

prediction_id = start_response_json.get('id')
status_url = start_response_json.get('urls', {}).get('get')

print(f"Prediction started with ID: {prediction_id}")
print(f"Status URL: {status_url}")

# 2. Poll for Results
output_image_url = None
while True:
    print("Checking status...")
    status_response = requests.get(status_url, headers=headers)
    status_response_json = status_response.json()

    status = status_response_json.get('status')
    if status == 'succeeded':
        output_image_url = status_response_json.get('output') # Usually a list of URLs
        print("Prediction succeeded!")
        print(f"Output: {output_image_url}")
        break
    elif status == 'failed' or status == 'canceled':
        print(f"Prediction failed or canceled: {status_response_json.get('error')}")
        break
    elif status in ['starting', 'processing']:
        # Wait before polling again
        time.sleep(5) # Adjust polling interval as needed
    else:
        print(f"Unknown status: {status}")
        print(status_response_json)
        break

# Now you can use the output_image_url
Pricing: Replicate charges based on the execution time of the model on their hardware. Check their pricing page for details.
Option 2: Fal.ai
Fal.ai is another platform focused on providing fast, scalable, and cost-effective inference for AI models via APIs. They often emphasize real-time performance.
How Fal.ai Works:
- Authentication: You need Fal API credentials (Key ID and Key Secret, often combined as
KeyID:KeySecret). This is passed in theAuthorizationheader, typically asKey YourKeyID:YourKeySecret. - API Endpoint: Fal.ai provides a direct endpoint URL for the specific model function.
- Request Format: You send a POST request to the model's endpoint URL. The request body is typically JSON containing the input parameters required by the model (similar to Replicate:
prompt, etc.). - Synchronous vs. Asynchronous: Fal.ai can offer both. For potentially long-running tasks like image generation, they might use:
- Serverless Functions: A standard request/response cycle, possibly with longer timeouts.
- Queues: An asynchronous pattern similar to Replicate, where you submit a job and poll for results using a request ID. The specific API page linked will detail the expected interaction pattern.
Conceptual Python Example (using requests - assuming async queue):
import requests
import time
import os

FAL_API_KEY = "YOUR_FAL_KEY_ID:YOUR_FAL_KEY_SECRET" # Use environment variables
MODEL_ENDPOINT_URL = "<https://fal.run/fal-ai/hidream-i1-full>" # Check the exact URL on Fal.ai

# 1. Submit Request to Queue (Example - check Fal docs for exact structure)
headers = {
    "Authorization": f"Key {FAL_API_KEY}",
    "Content-Type": "application/json"
}
payload = {
    # Parameters are often directly in the payload for Fal.ai serverless functions
    # or within an 'input' object depending on the setup. Check the docs!
    "prompt": "A hyperrealistic portrait of an astronaut floating in space, Earth reflecting in the helmet visor",
    "negative_prompt": "cartoon, drawing, illustration, sketch, text, letters",
    "seed": 98765
    # Add other parameters supported by the Fal.ai implementation
}

# Fal.ai might require adding '/queue' or specific query params for async
# Example: POST <https://fal.run/fal-ai/hidream-i1-full/queue>
# Check their documentation! Assuming an endpoint that returns a status URL:

submit_response = requests.post(f"{MODEL_ENDPOINT_URL}", json=payload, headers=headers, params={"fal_webhook": "OPTIONAL_WEBHOOK_URL"}) # Check docs for query params like webhook

if submit_response.status_code >= 300:
    print(f"Error submitting request: {submit_response.status_code}")
    print(submit_response.text)
    exit()

submit_response_json = submit_response.json()

# Fal.ai's async response might differ - it could return a request_id or a direct status URL
# Assuming it returns a status URL similar to Replicate for this conceptual example
status_url = submit_response_json.get('status_url') # Or construct from request_id, check docs
request_id = submit_response_json.get('request_id') # Alternative identifier

if not status_url and request_id:
     # You might need to construct the status URL, e.g., <https://fal.run/fal-ai/hidream-i1-full/requests/{request_id}/status>
     # Or query a generic status endpoint: <https://fal.run/requests/{request_id}/status>
     print("Need to construct status URL or use request_id, check Fal.ai documentation.")
     exit() # Needs specific implementation based on Fal docs

print(f"Request submitted. Status URL: {status_url}")

# 2. Poll for Results (if async)
output_data = None
while status_url: # Only poll if we have a status URL
    print("Checking status...")
    # Polling might require authentication too
    status_response = requests.get(status_url, headers=headers)
    status_response_json = status_response.json()

    status = status_response_json.get('status') # Check Fal.ai docs for status keys ('COMPLETED', 'FAILED', etc.)

    if status == 'COMPLETED': # Example status
        output_data = status_response_json.get('response') # Or 'result', 'output', check docs
        print("Request completed!")
        print(f"Output: {output_data}") # Output structure depends on the model on Fal.ai
        break
    elif status == 'FAILED': # Example status
        print(f"Request failed: {status_response_json.get('error')}") # Check error field
        break
    elif status in ['IN_PROGRESS', 'IN_QUEUE']: # Example statuses
        # Wait before polling again
        time.sleep(3) # Adjust polling interval
    else:
        print(f"Unknown status: {status}")
        print(status_response_json)
        break

# Use the output_data (which might contain image URLs or other info)
Pricing: Fal.ai typically charges based on execution time, often with per-second billing. Check their pricing details for the specific model and compute resources.
Test HiDream API with Apidog
Apidog is a powerful API design, development, and testing tool. It provides a user-friendly interface to send HTTP requests, inspect responses, and manage API details, making it ideal for testing the Replicate and Fal.ai APIs before integrating them into code.
Steps to Test HiDream-I1-Full API using Apidog:
Step 1. Install and Open Apidog: Download and install Apidog or use its web version. Create an account if necessary.

Step 2. Create a New Request:
- In Apidog, create a new project or open an existing one.
- Click the "+" button to add a new HTTP Request.
Step 3. Set HTTP Method and URL:
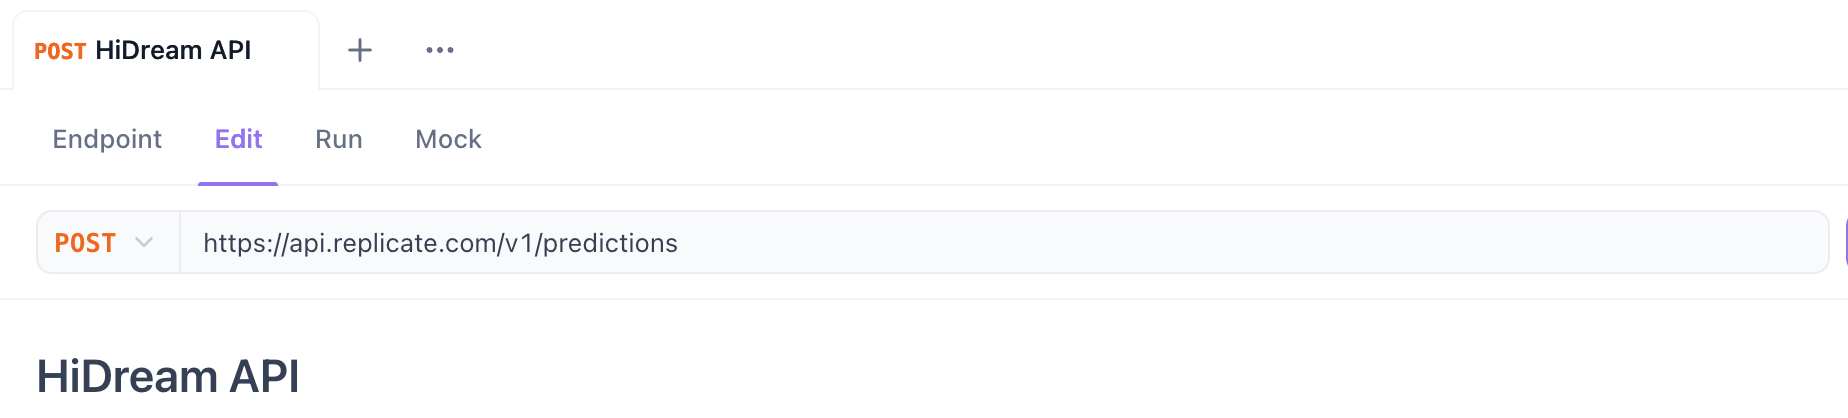
- Method: Select
POST. - URL: Enter the API endpoint URL.
- For Replicate (Starting Prediction):
https://api.replicate.com/v1/predictions - For Fal.ai (Submitting Request): Use the specific model endpoint URL provided on their page (e.g.,
https://fal.run/fal-ai/hidream-i1-full- check if it needs/queueor query parameters for async).
Step 4. Configure Headers:
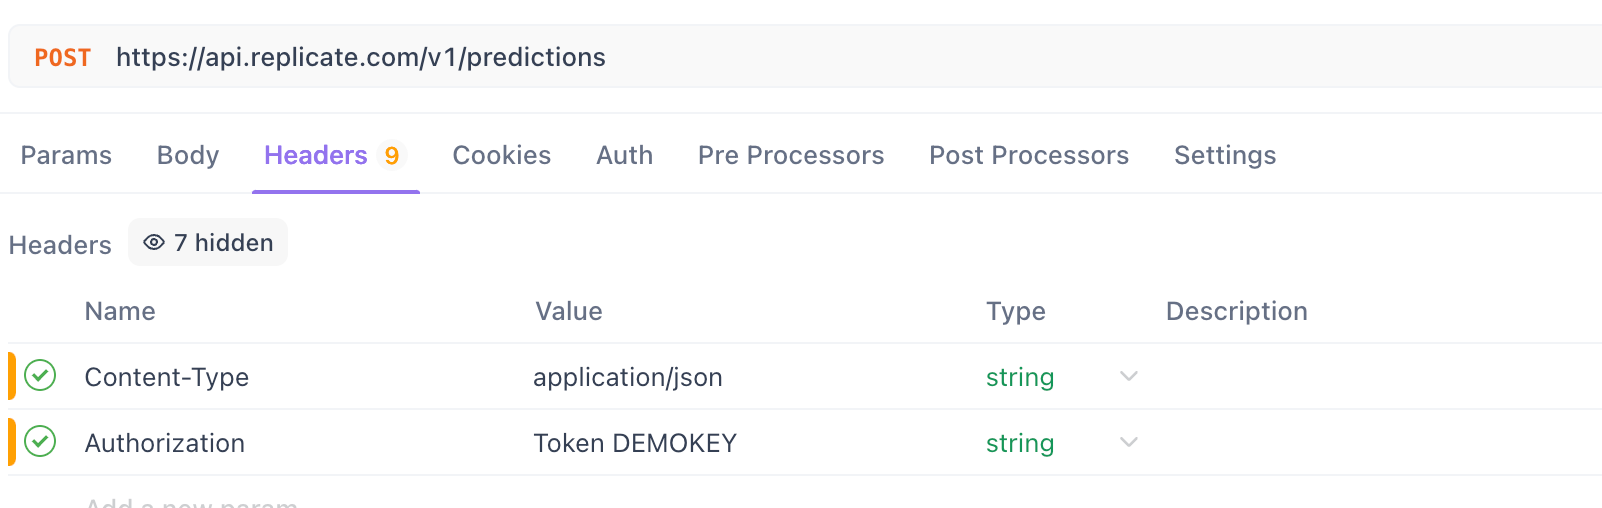
- Go to the
Headerstab.
Add the Content-Type header:
- Key:
Content-Type - Value:
application/json
Add the Authorization header:
For Replicate:
- Key:
Authorization - Value:
Token YOUR_REPLICATE_API_TOKEN(Replace with your actual token)
For Fal.ai:
- Key:
Authorization - Value:
Key YOUR_FAL_KEY_ID:YOUR_FAL_KEY_SECRET(Replace with your actual credentials) - Pro Tip: Use Apidog's Environment variables to store your API keys securely instead of hardcoding them directly in the request. Create an environment (e.g., "Replicate Dev", "Fal Dev") and define variables like
REPLICATE_TOKENorFAL_API_KEY. Then, in the header value, useToken {{REPLICATE_TOKEN}}orKey {{FAL_API_KEY}}.
Step 5. Configure Request Body:
Go to the Body tab.
Select the raw format and choose JSON from the dropdown.
Paste the JSON payload according to the platform's requirements.
Example JSON Body for Replicate:
{
  "version": "PASTE_MODEL_VERSION_FROM_REPLICATE_PAGE_HERE",
  "input": {
    "prompt": "A watercolor painting of a cozy library corner with a sleeping cat",
    "negative_prompt": "photorealistic, 3d render, bad art, deformed",
    "width": 1024,
    "height": 1024,
    "seed": 55555
  }
}
Example JSON Body for Fal.ai
{
  "prompt": "A watercolor painting of a cozy library corner with a sleeping cat",
  "negative_prompt": "photorealistic, 3d render, bad art, deformed",
  "width": 1024,
  "height": 1024,
  "seed": 55555
  // Other parameters like 'model_name' might be needed depending on Fal.ai setup
}
Important: Refer to the specific documentation on the Replicate or Fal.ai pages for the exact required and optional parameters for the HiDream-I1-Full model version you are using. Parameters like guidance_scale, num_inference_steps, etc., might be available.
Step 6. Send the Request:
- Click the "Send" button.
- Apidog will display the response status code, headers, and body.
- For Replicate: You should get a
201 Createdstatus. The response body will contain theidof the prediction and aurls.getURL. Copy thisgetURL. - For Fal.ai (Async): You might get a
200 OKor202 Accepted. The response body might contain arequest_id, a directstatus_url, or other details based on their implementation. Copy the relevant URL or ID needed for polling. If it's synchronous, you might get the result directly after processing (less likely for image generation).
Poll for Results (for Asynchronous APIs):
- Create another new request in Apidog.
- Method: Select
GET. - URL: Paste the
status URLyou copied from the initial response (e.g., theurls.getfrom Replicate or the status URL from Fal.ai). If Fal.ai gave arequest_id, construct the status URL according to their documentation (e.g.,https://fal.run/requests/{request_id}/status). - Configure Headers: Add the same
Authorizationheader as in the POST request. (Content-Type is usually not needed for GET). - Send the Request: Click "Send".
- Inspect Response: Check the
statusfield in the JSON response. - If
processing,starting,IN_PROGRESS,IN_QUEUE, etc., wait a few seconds and click "Send" again. - If
succeededorCOMPLETED, look for theoutputfield (Replicate) orresponse/resultfield (Fal.ai) which should contain the URL(s) of your generated image(s). - If
failedorFAILED, check theerrorfield for details.
View the Image: Copy the image URL from the final successful response and paste it into your web browser to view the generated image.
Want an integrated, All-in-One platform for your Developer Team to work together with maximum productivity?
Apidog delivers all your demands, and replaces Postman at a much more affordable price!

Conclusion
HiDream-I1-Full offers powerful image generation capabilities, and using APIs from platforms like Replicate or Fal.ai makes this technology accessible without managing complex infrastructure. By understanding the API workflow (request, potential polling, response) and utilizing tools like Apidog for testing, you can easily experiment with and integrate state-of-the-art AI image generation into your projects.
Remember to always consult the specific documentation on Replicate and Fal.ai for the most up-to-date endpoint URLs, required parameters, authentication methods, and pricing details, as these can change over time. Happy generating!


