
Hey there! If you've been keeping up with the latest trends in web development, you've probably heard the term gRPC-Web thrown around. Maybe you're a developer wondering if it's something you should integrate into your projects. Or perhaps you're just curious about what all the fuss is about. Either way, you've come to the right place. Let's dive into the world of gRPC-Web, and by the end of this post, you'll have a solid understanding of what it is, why it's useful, and how you can start using it.
What is gRPC-Web?
First things first: what exactly is gRPC-Web? At its core, gRPC-Web is a JavaScript client library that enables web applications to communicate with gRPC services. It extends the functionality of gRPC (Google Remote Procedure Call), which is an open-source framework that uses HTTP/2 for transporting messages. gRPC is designed to make it easier to build scalable and efficient APIs.
A Quick Recap on gRPC
Before we dive deeper into gRPC-Web, let's take a quick refresher on gRPC itself. gRPC was developed by Google and is widely used for microservices communication. It leverages HTTP/2, Protocol Buffers (protobufs), and provides features like authentication, load balancing, and more. With gRPC, you define your service methods and message types using protocol buffers, which then generates code for both the client and server.
Why gRPC-Web?
So, why do we need gRPC-Web when we already have gRPC? The answer lies in the limitations of browsers. While gRPC is excellent for server-to-server communication, it doesn’t work directly with browsers because they don't support HTTP/2 trailers, which gRPC relies on. This is where gRPC-Web comes in. It acts as a bridge, enabling gRPC services to be consumed by web applications.
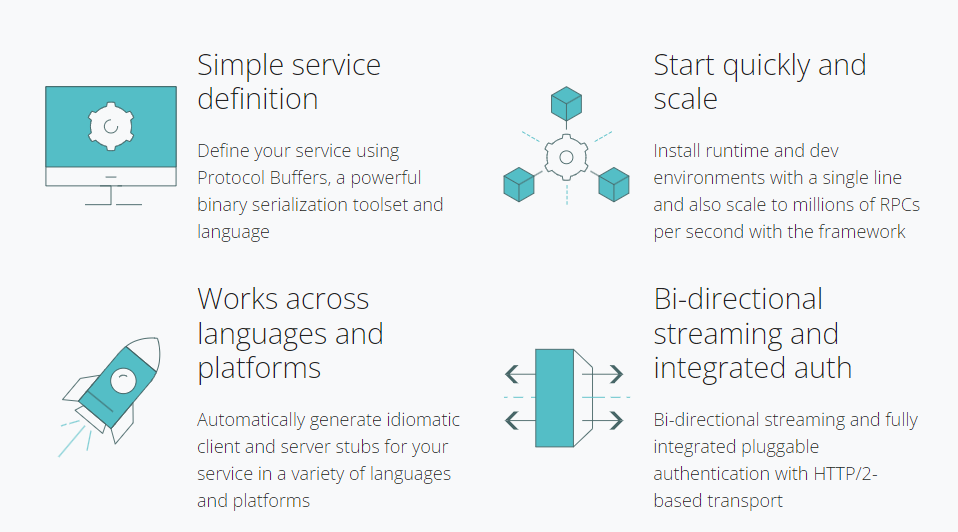
The Key Benefits of gRPC-Web
Now that we know what gRPC-Web is, let’s explore why you might want to use it. Here are some of the key benefits:
1. Performance
One of the standout features of gRPC-Web is its performance. Thanks to its use of HTTP/2 and Protocol Buffers, gRPC-Web can handle a high number of requests efficiently. This makes it ideal for applications that require real-time data exchange or need to manage multiple simultaneous connections.
2. Ease of Use
With gRPC-Web, you can leverage the same protocol buffer definitions for both your web clients and backend services. This means you can maintain consistency across your application stack and reduce the amount of boilerplate code you need to write. Plus, with tools like Apidog, you can streamline your API development process even further.
3. Scalability
Because gRPC-Web uses HTTP/2, it benefits from features like multiplexing, which allows multiple requests to be sent over a single connection. This helps reduce the overhead associated with creating and managing multiple connections, making your application more scalable.
4. Interoperability
gRPC-Web enables seamless communication between your web applications and gRPC services. This means you can build modern web apps that can interact with your existing gRPC-based microservices architecture without needing to create additional REST APIs.
Getting Started with gRPC-Web
Alright, enough theory! Let’s get our hands dirty and see how you can start using gRPC-Web in your projects.
Prerequisites
Before you begin, make sure you have the following installed:
- Node.js
- npm or yarn
- Protocol Buffers compiler (
protoc)
Step 1: Define Your Service
The first step is to define your gRPC service using protocol buffers. Create a .proto file with your service and message definitions. For example:
syntax = "proto3";

package example;

service HelloService {
  rpc SayHello (HelloRequest) returns (HelloResponse);
}

message HelloRequest {
  string name = 1;
}

message HelloResponse {
  string message = 1;
}
Step 2: Generate Client and Server Code
Next, use the Protocol Buffers compiler to generate the client and server code. Run the following command:
protoc -I=. --js_out=import_style=commonjs,binary:. --grpc-web_out=import_style=commonjs,mode=grpcwebtext:. example.proto
This command generates the necessary JavaScript files for your gRPC-Web client.
Step 3: Set Up Your Server
Now, set up a gRPC server to handle requests. Here’s an example using Node.js:
const grpc = require('@grpc/grpc-js');
const protoLoader = require('@grpc/proto-loader');

const packageDefinition = protoLoader.loadSync('example.proto', {});
const exampleProto = grpc.loadPackageDefinition(packageDefinition).example;

function sayHello(call, callback) {
  callback(null, { message: `Hello, ${call.request.name}!` });
}

const server = new grpc.Server();
server.addService(exampleProto.HelloService.service, { sayHello: sayHello });
server.bindAsync('0.0.0.0:50051', grpc.ServerCredentials.createInsecure(), () => {
  server.start();
});
Step 4: Set Up Your Client
Finally, set up your web client to communicate with the gRPC server. Here’s an example using React:
import React, { useState } from 'react';
import { HelloServiceClient } from './example_grpc_web_pb';
import { HelloRequest } from './example_pb';

const client = new HelloServiceClient('http://localhost:8080');

function App() {
  const [response, setResponse] = useState('');

  const sayHello = () => {
    const request = new HelloRequest();
    request.setName('World');

    client.sayHello(request, {}, (err, response) => {
      if (err) {
        console.error(err);
      } else {
        setResponse(response.getMessage());
      }
    });
  };

  return (
    <div>
      <button onClick={sayHello}>Say Hello</button>
      <p>{response}</p>
    </div>
  );
}

export default App;
Step 5: Set Up a Proxy
Because gRPC-Web uses HTTP/2, you’ll need to set up a proxy to convert the requests. You can use the grpc-web proxy for this purpose. Here’s how to do it:
docker run -d -p 8080:8080 --network host \
  --name grpc-web-proxy \
  envoyproxy/envoy:v1.18.3 -c /etc/envoy-config.yaml
Create an envoy-config.yaml file with the following content:
static_resources:
  listeners:
    - address:
        socket_address:
          address: 0.0.0.0
          port_value: 8080
      filter_chains:
        - filters:
            - name: envoy.filters.network.http_connection_manager
              typed_config:
                "@type": type.googleapis.com/envoy.extensions.filters.network.http_connection_manager.v3.HttpConnectionManager
                codec_type: AUTO
                stat_prefix: ingress_http
                route_config:
                  name: local_route
                  virtual_hosts:
                    - name: local_service
                      domains: ["*"]
                      routes:
                        - match:
                            prefix: "/"
                          route:
                            cluster: grpc_service
                http_filters:
                  - name: envoy.filters.http.grpc_web
                  - name: envoy.filters.http.router
  clusters:
    - name: grpc_service
      connect_timeout: 0.25s
      type: logical_dns
      lb_policy: round_robin
      http2_protocol_options: {}
      load_assignment:
        cluster_name: grpc_service
        endpoints:
          - lb_endpoints:
              - endpoint:
                  address:
                    socket_address:
                      address: 127.0.0.1
                      port_value: 50051
Tools to Enhance Your gRPC-Web Development
While setting up gRPC-Web is fairly straightforward, there are tools that can make the development process even smoother. One such tool is Apidog. Apidog is an API management tool that helps you design, test, and monitor your APIs effortlessly. It supports gRPC, making it an excellent choice for gRPC-Web development. With Apidog, you can:
- Design APIs: Create and manage your gRPC service definitions with an intuitive UI.
- Test APIs: Easily test your gRPC services with powerful testing tools.
- Monitor APIs: Keep track of your API's performance and ensure everything is running smoothly.
Using Apidog in conjunction with gRPC-Web can significantly streamline your development workflow and ensure you’re building robust, reliable APIs.
Step-by-Step Guide to Testing gRPC-Web with Apidog
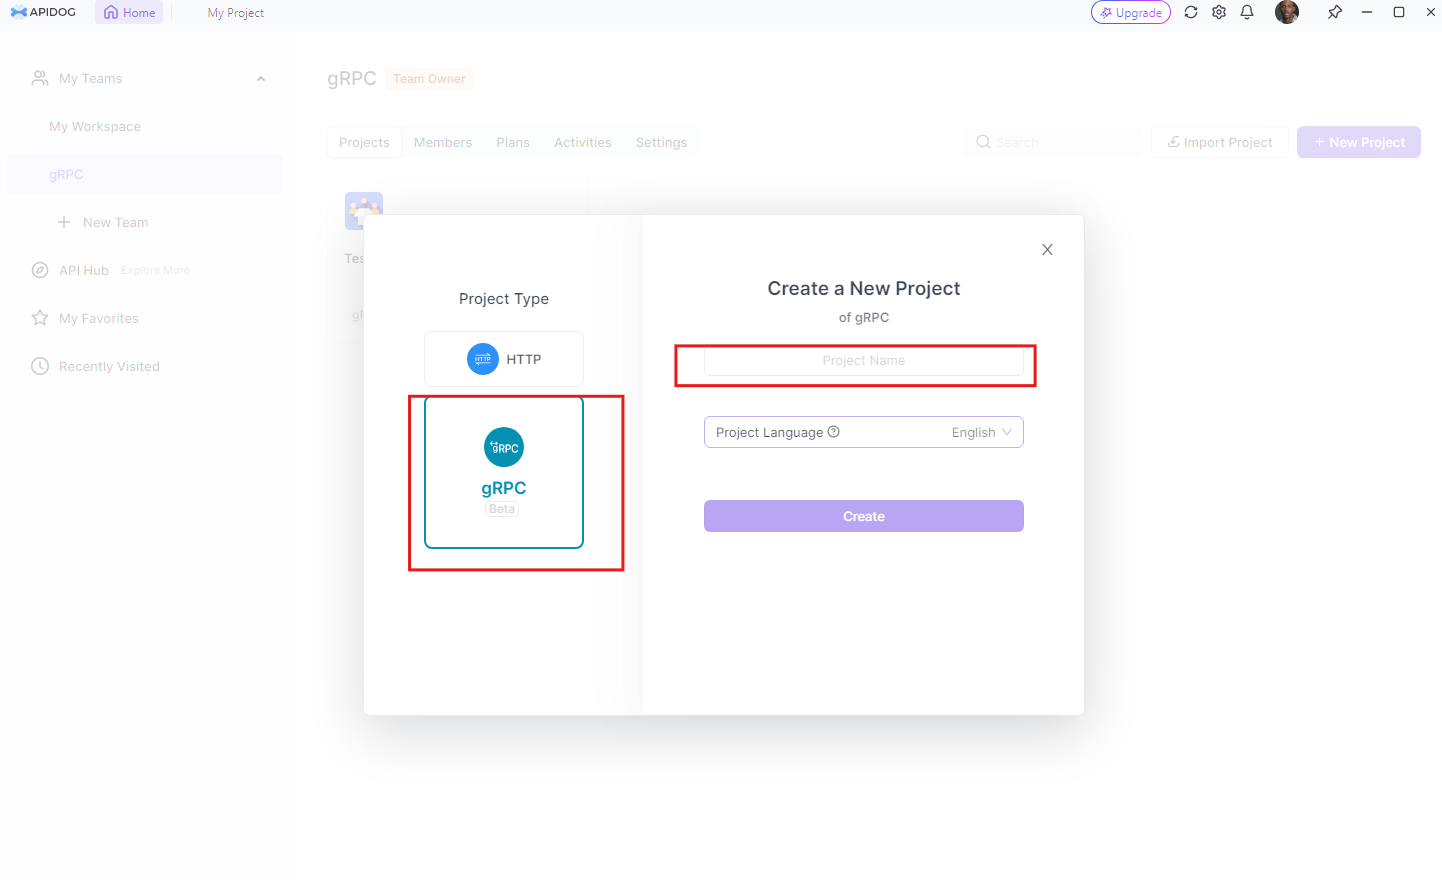
Step 1: Set Up Apidog
Create a New Project: Open Apidog, create a new project by clicking on the "+ New project" button. Give your project a name and description to help keep things organized.
Step 2: Define Your gRPC Service
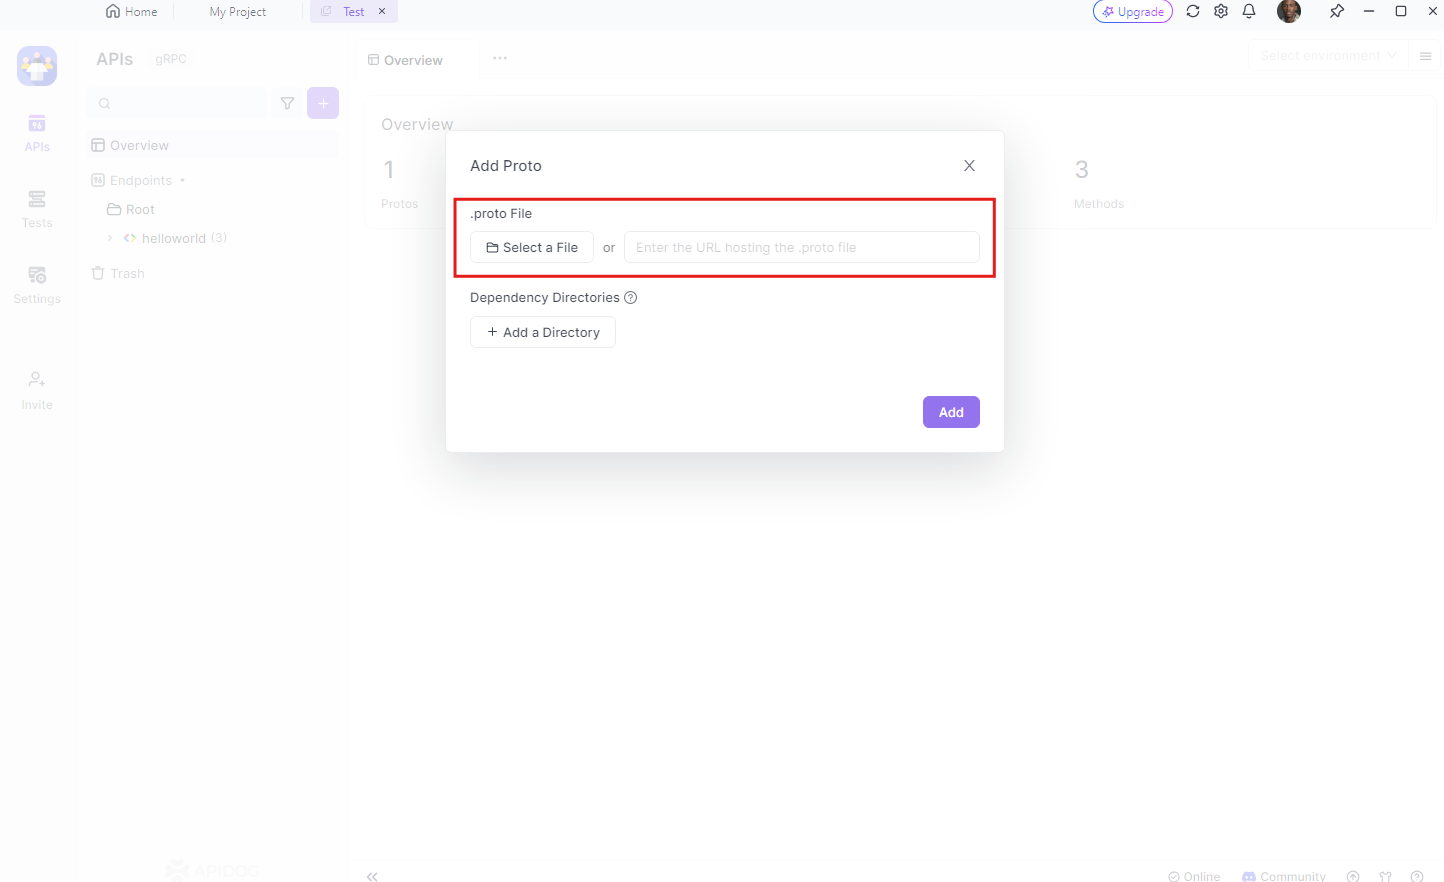
Import Your .proto File: You can either import your existing .proto file or manually define your gRPC service. To import, click on the "Import" button and select your .proto file. Apidog will automatically parse the file and generate the necessary API definitions.
Step 3: Configure Your gRPC-Web Endpoint
Set Up the Endpoint: After importing your .proto file, configure your gRPC-Web endpoint by specifying the URL of your gRPC-Web server. For example, if your server is running on http://localhost:8080, enter this URL in the endpoint configuration.
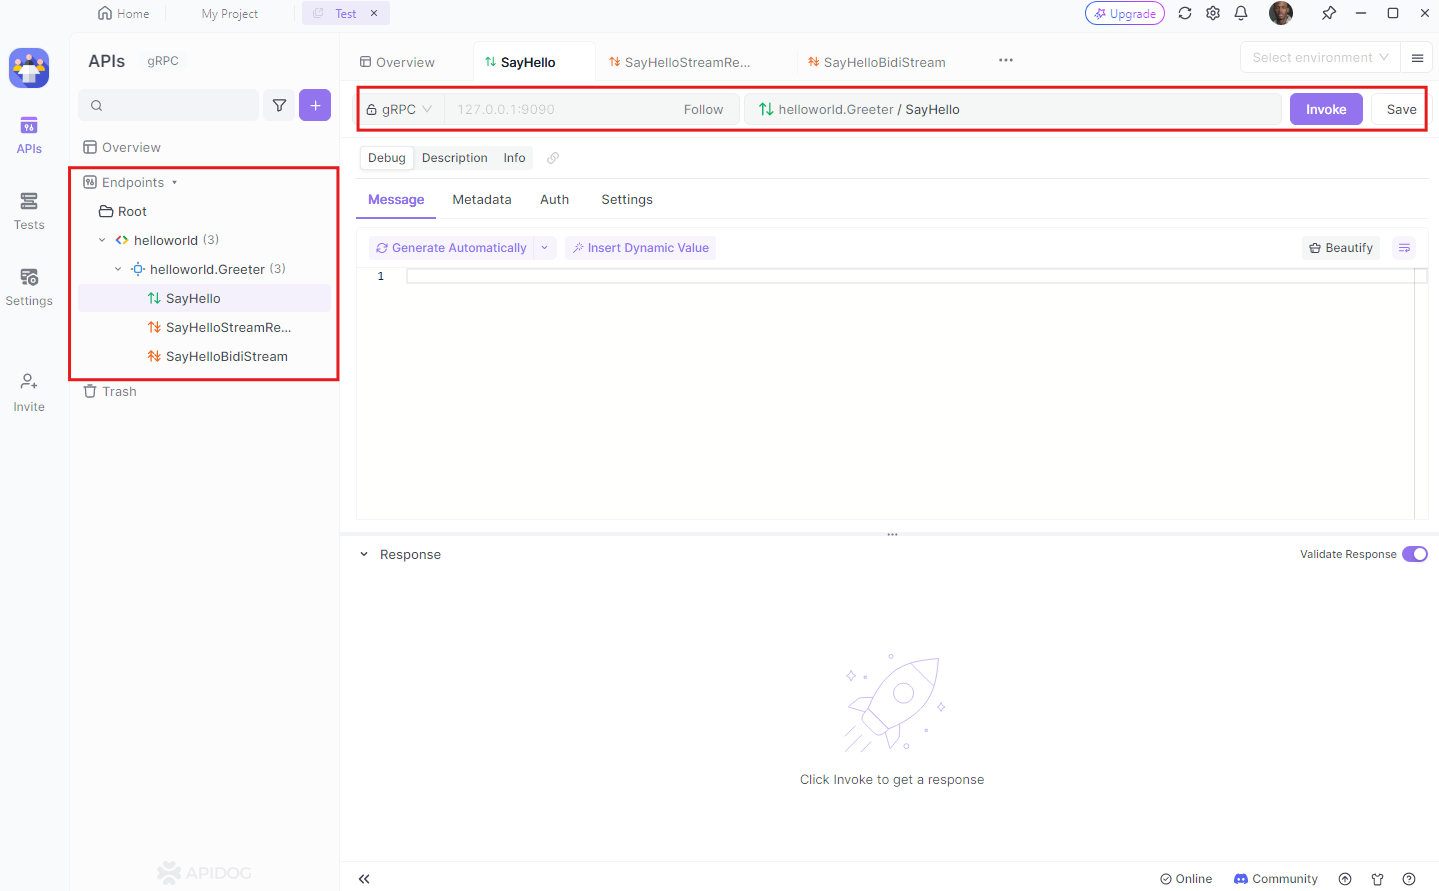
Apidog will list all the service methods defined in your .proto file. You can select the methods you want to test and add them to your API.
Real-World Use Cases for gRPC-Web
To give you a better idea of where gRPC-Web shines, here are some real-world use cases:
1. Real-Time Applications
Applications that require real-time data updates, such as chat applications or live dashboards, can benefit greatly from gRPC-Web. Its efficient communication protocol ensures low latency and high performance.
2. Microservices Architectures
If you’re working with a microservices architecture, gRPC-Web can help your web applications seamlessly communicate with backend services. This allows you to maintain a consistent communication protocol across your entire stack.
3. Data-Intensive Applications
Applications that need to handle large volumes of data, like video streaming services or big data analytics platforms, can leverage gRPC-Web’s efficient data serialization and transport capabilities.
4. IoT Platforms
IoT platforms often require efficient and scalable communication between devices and servers. gRPC-Web provides a robust solution for managing these interactions.
Conclusion
And there you have it—a comprehensive overview of gRPC-Web. We’ve covered what it is, why it’s useful, and how you can start using it in your projects. With its performance benefits, ease of use, and scalability, gRPC-Web is a powerful tool for modern web development. Whether you’re building real-time applications, microservices architectures, or data-intensive platforms, gRPC-Web has got you covered. And with tools like Apidog, you can streamline your API development process and ensure your services are running smoothly.
So, what are you waiting for? Dive into gRPC-Web and start building the next generation of web applications!


