
FLUX 2 represents a significant advancement in generative AI, particularly for developers building applications that require high-fidelity image generation and editing. As teams increasingly rely on scalable APIs to handle complex visual tasks, the FLUX 2 API from fal.ai emerges as a robust solution. It supports variants like FLUX 2 Pro for professional-grade outputs and FLUX 2 Flex for customizable control, enabling precise text-to-image transformations and edits without the overhead of local infrastructure.
This guide equips you with the technical knowledge to harness the FLUX 2 API effectively. You will learn about setup, key endpoints, parameter tuning, and best practices for error handling and optimization. Moreover, it highlights how tools like Apidog enhance your development cycle, reducing debugging time and improving collaboration.
Understanding the FLUX 2 API Architecture
Developers appreciate the FLUX 2 API for its modular design, which builds on Black Forest Labs' flow-matching technology. Unlike traditional diffusion models that iteratively denoise images, FLUX 2 employs a transformer-based architecture with 12 billion parameters, generating outputs in fewer steps while maintaining superior prompt adherence and realism. This efficiency translates to lower latency and cost in API calls, making it ideal for real-time applications such as content creation tools or e-commerce visualizers.
The API operates through fal.ai's serverless infrastructure, which distributes workloads across global regions with NVIDIA H100 and H200 GPUs. You interact with it via HTTP POST requests to specific endpoints, each tailored to a FLUX 2 variant. Authentication relies on a simple API key, passed in the Authorization header as Key {your_fal_key}. This setup ensures secure, scalable access without managing servers.
Furthermore, the API supports streaming responses, allowing progressive image rendering for user-facing apps. Costs follow a pay-per-megapixel model—typically $0.003 to $0.012 per output—billed based on rounded resolution. For instance, a 1024x1024 image incurs about 1 MP, keeping expenses predictable for high-volume use.
To get started, sign up at fal.ai and generate your API key from the dashboard. Store it securely in environment variables, as exposing it in client-side code risks unauthorized access. With these foundations in place, you can proceed to explore the core endpoints.
Setting Up Authentication and Environment
Secure authentication forms the cornerstone of any API integration, and the FLUX 2 API keeps it straightforward yet robust. Begin by installing the official fal.ai client SDK, which abstracts HTTP complexities into language-specific wrappers. For Python, run pip install fal-client; for JavaScript, use npm install @fal-ai/client.
Once installed, initialize the client with your key:
import fal_client as fal
fal.config(api_key="your_fal_key_here")
In JavaScript:
import { fal } from "@fal-ai/client";
const falClient = new fal.Client({ apiKey: "your_fal_key_here" });
This configuration handles retries, timeouts, and rate limiting automatically. Test connectivity with a simple ping to a FLUX 2 endpoint, such as subscribing to a model for a basic prompt. If the response returns a 200 status, your setup succeeds.
Next, prepare your development environment. Use virtual environments in Python (python -m venv flux_env) to isolate dependencies, and ensure Node.js v18+ for JavaScript projects. Integrate environment variable management with tools like python-dotenv or .env files to avoid hardcoding secrets.
As you build, Apidog proves invaluable here. It allows you to import the FLUX 2 OpenAPI spec (available via fal.ai docs) and simulate requests with mock data. This step prevents costly live API calls during prototyping. Consequently, developers report up to 40% faster iteration cycles when using such platforms.
With authentication secured, turn attention to the specific FLUX 2 endpoints, starting with the pro variant for high-stakes applications.
Leveraging FLUX 2 Pro for Professional Text-to-Image Generation
FLUX 2 Pro stands out as the flagship endpoint for developers seeking state-of-the-art image quality. Hosted at fal-ai/flux-2-pro, it excels in prompt adherence, rendering complex scenes with photorealistic detail and accurate typography. Use it when your application demands outputs rivaling closed-source models, such as in advertising or product mockups.

The endpoint accepts POST requests with JSON payloads defining the prompt and generation parameters. Core inputs include:
prompt: A descriptive string guiding the output (e.g., "A serene mountain landscape at dawn, with mist rolling over alpine peaks, in the style of Ansel Adams").image_size: Options likelandscape_16_9or custom dimensions (width/height in pixels, max 2048x2048).num_inference_steps: Defaults to 28 for balanced quality-speed; increase to 50 for finer details.guidance_scale: Controls prompt fidelity (7.5 default; higher values enforce stricter adherence).
A sample Python request generates an image:
result = fal.subscribe("fal-ai/flux-2-pro", {
    "input": {
        "prompt": "A futuristic cityscape at night, neon lights reflecting on wet streets, cyberpunk aesthetic",
        "image_size": "square_hd",
        "num_inference_steps": 30,
        "guidance_scale": 8.0
    }
})
print(result["images"][0]["url"])  # Access the generated image URL
JavaScript equivalent:
const result = await fal.subscribe("fal-ai/flux-2-pro", {
    input: {
        prompt: "A futuristic cityscape at night, neon lights reflecting on wet streets, cyberpunk aesthetic",
        image_size: "square_hd",
        num_inference_steps: 30,
        guidance_scale: 8.0
    }
});
console.log(result.images[0].url);
Responses return a JSON object with base64-encoded images or URLs to fal.ai-hosted files. For production, enable streaming by setting stream: true in the client config, which yields partial outputs for real-time previews.
However, optimize costs by batching requests—up to 10 prompts per call—reducing overhead. Monitor usage via fal.ai's dashboard to avoid throttling at 100 requests per minute.
Transitioning from generation to customization, the FLUX 2 Flex endpoint offers granular control for tailored workflows.
Customizing Outputs with the FLUX 2 Flex Endpoint
For scenarios requiring adjustable parameters, FLUX 2 Flex at fal-ai/flux-2-flex empowers developers to fine-tune inference. This variant shines in applications like iterative design tools, where you balance speed against detail. It supports variable steps (4-50) and guidance scales (0-20), plus advanced features like seed control for reproducible results.
Key parameters extend beyond Pro:
num_inference_steps: Fine-tune from 4 (ultra-fast) to 50 (high-fidelity).guidance_scale: Adjust from 0 (creative freedom) to 20 (strict prompt following).seed: Integer for deterministic outputs (e.g., 42).safety_tolerance: Threshold for content moderation (0-5; default 3).
Implement a Flex call in Python:
flex_result = fal.subscribe("fal-ai/flux-2-flex", {
    "input": {
        "prompt": "An abstract watercolor of ocean waves crashing on rocks, vibrant blues and greens",
        "num_inference_steps": 20,
        "guidance_scale": 5.0,
        "seed": 12345
    }
})
In JavaScript:
const flexResult = await fal.subscribe("fal-ai/flux-2-flex", {
    input: {
        prompt: "An abstract watercolor of ocean waves crashing on rocks, vibrant blues and greens",
        num_inference_steps: 20,
        guidance_scale: 5.0,
        seed: 12345
    }
});
Outputs mirror Pro but allow experimentation with LoRA weights for style transfer—upload custom safetensors via URL and set lora_scale: 0.8. This flexibility suits A/B testing in UI/UX design.
Yet, with great control comes the need for validation. Use Apidog to mock Flex endpoints, injecting varied parameters to simulate edge cases like high-step generations. This approach catches performance bottlenecks early.
Building on generation, image editing via FLUX 2 Edit introduces transformative capabilities.
Advanced Image Editing with FLUX 2 Edit
The FLUX 2 Edit endpoint (fal-ai/flux-2/edit) revolutionizes image-to-image workflows, enabling natural language modifications without masks or segmentation. Developers use it to swap elements, apply styles, or composite scenes, perfect for photo retouching apps or AR filters.
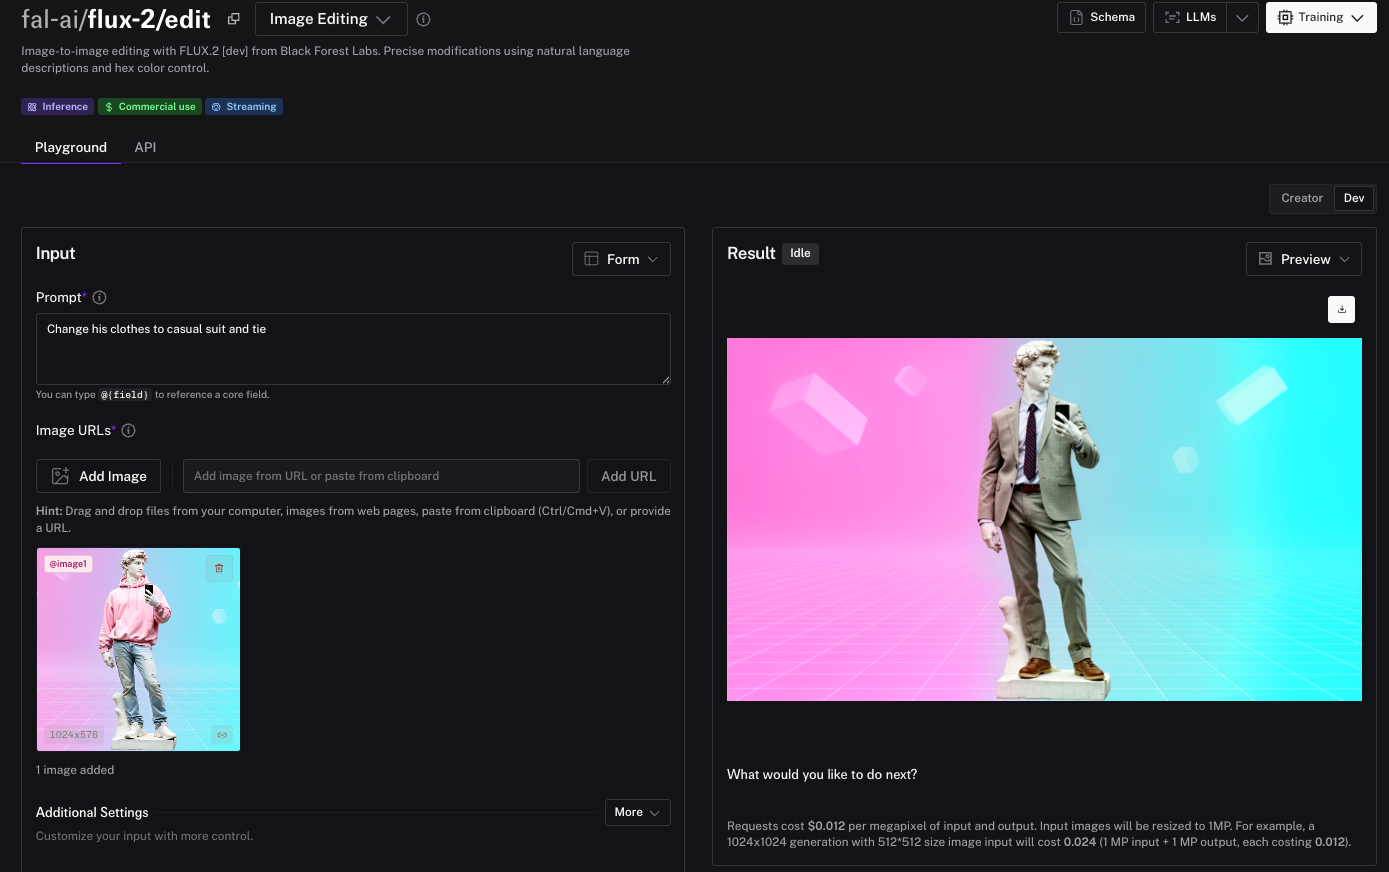
Inputs combine images with descriptive prompts:
@image1: Base image URL or base64.prompt: Edit instructions (e.g., "Replace the sky with a starry night and add a full moon").- Multi-image refs:
@image2for style transfer. - JSON prompts for structure: Define scenes, subjects, and camera angles.
Example Python code:
edit_result = fal.subscribe("fal-ai/flux-2/edit", {
    "input": {
        "image": "https://example.com/base.jpg",  # Or base64 URI
        "prompt": "@image wearing a red dress from @image2, sunset background",
        "num_inference_steps": 25
    }
})
For JavaScript:
const editResult = await fal.subscribe("fal-ai/flux-2/edit", {
    input: {
        image: "https://example.com/base.jpg",
        prompt: "@image wearing a red dress from @image2, sunset background",
        num_inference_steps: 25
    }
});
Enhance precision with HEX colors: "Paint the car in #FF0000". Costs double for input/output MP, so resize images client-side.
Apidog integrates seamlessly by supporting file uploads in requests, letting you test multi-image edits visually.
Error Handling and Optimization Strategies
Robust applications anticipate failures, and FLUX 2 API calls are no exception. Common errors include 429 (rate limit), 401 (auth failure), and 422 (invalid prompt). Implement exponential backoff in your client:
import time
from fal_client import FalError

try:
    result = fal.subscribe("fal-ai/flux-2-pro", {...})
except FalError as e:
    if e.status_code == 429:
        time.sleep(2 ** e.retry_after)  # Backoff
        # Retry logic here
Optimize further by caching seeds for variations and using fal.ai's file storage for reusable assets. Profile requests with Apidog's analytics to identify slow parameters.
For scaling, batch endpoints process arrays of prompts, slashing latency by 70%. Monitor via webhooks for async jobs.
Integrating FLUX 2 API with Apidog for Streamlined Testing
Apidog elevates FLUX 2 development by centralizing testing. Import fal.ai schemas, add auth headers, and run collections for endpoint coverage. Mock responses simulate GPU delays, while team sharing fosters collaboration.
Setup takes minutes: Create a project, paste endpoint docs, and execute. Debug prompts iteratively, ensuring outputs align with expectations.
This integration cuts deployment risks, as evidenced by reduced bug rates in similar AI pipelines.Conclusion: Elevate Your Projects with FLUX 2
The FLUX 2 API delivers unmatched versatility for image-centric applications. By mastering authentication, endpoints, and optimizations—bolstered by Apidog—you position your team for innovation. Start implementing today; the results will transform your workflows. For deeper dives, explore fal.ai docs and Apidog's free tier.


