If you’re a Cursor user running Powerlevel10k with Oh-My-Zsh, you may have hit a frustrating bug: the Cursor agent terminal just doesn’t play nice. Commands hang, sessions stall, and your productivity takes a nosedive. But don’t worry—this guide will delve into the root of the problem, offer a clean workaround, and show you how to indulge in a next-level API workflow.
The Bug: Why Cursor Agent Terminal Doesn't Work with Powerlevel10k + Oh-My-Zsh
Cursor agent Terminal doesn't work—that’s the headline, but what’s really going on? Let’s break it down in my situation:
- The Setup: macOS, default shell is Oh-My-Zsh with the Powerlevel10k theme.
- The Problem: When Cursor Agent tries to execute commands, the terminal session doesn’t detect when a command finishes. It just waits… forever. This only happens with Powerlevel10k enabled.
- Tried Solutions: Switching to a minimal Zsh profile, changing Cursor’s global settings, and even creating custom terminal profiles. No dice—the agent still defaults to the system profile.
- The Pain: You’re forced to give up your beautiful, customized terminal just to get Cursor Agent working. For devs who live in their terminal, that’s a dealbreaker.
Common Symptoms:
| Symptom | When It Happens |
|---|---|
| Command never finishes in Cursor Agent | Powerlevel10k + Oh-My-Zsh |
| Custom profile ignored | Agent runs commands automatically |
| Works in manual terminal, not agent | Only agent sessions affected |
Why does this happen? Powerlevel10k’s advanced prompt features can interfere with how Cursor Agent detects command completion. The agent expects certain signals, but Powerlevel10k’s customizations can block or alter them.
Solution: Keep Powerlevel10k and Make Cursor Agent Terminal Work
You don’t have to ditch your favorite terminal theme. Here’s a step-by-step fix that keeps Powerlevel10k and restores Cursor Agent’s command detection:
Step 1: Download Shell Integration
curl -L https://iterm2.com/shell_integration/zsh -o ~/.iterm2_shell_integration.zshStep 2: Update Your ~/.zshrc
Add this snippet to your .zshrc so it only activates in Cursor Agent sessions:
if [[ -n $CURSOR_TRACE_ID ]]; then
  PROMPT_EOL_MARK=""
  test -e "${HOME}/.iterm2_shell_integration.zsh" && source "${HOME}/.iterm2_shell_integration.zsh"
  precmd() { print -Pn "\e]133;D;%?\a" }
  preexec() { print -Pn "\e]133;C;\a" }
fi
Step 3: Reload and Restart
source ~/.zshrcRestart Cursor. Now, Powerlevel10k stays active in your normal terminal, but Cursor Agent gets the right signals to detect command completion. The CURSOR_TRACE_ID check ensures this only affects Cursor sessions.
Beyond the Bug: Why Apidog MCP Server is the Real Game-Changer for API Workflows
In the rapidly changing landscape of API development, you need tools that don’t just work—they make you faster, smarter, and more collaborative. That’s where Apidog MCP Server comes in. If you’re tired of terminal bugs and want to indulge in a seamless API workflow, this is your next move.
What is Apidog MCP Server?
- Connects your API specs to AI-powered IDEs like Cursor and VS Code.
- Lets AI generate, search, and modify code based on your API documentation.
- Works with Apidog projects, online docs, or OpenAPI/Swagger files.
- Caches API data locally for lightning-fast access.
Key Features Table:
| Feature | Benefit |
|---|---|
| Connects to Cursor/VS Code | Use AI to generate and update code from API specs |
| Supports Apidog/OpenAPI/Swagger | Flexible data sources |
| Local caching | Fast, offline-friendly performance |
| Secure and private | Data stays on your machine |
| Easy setup | Simple config, works on all major OS |
Step-by-Step: How to Use Apidog MCP Server
Step 1. Prerequisites
- Node.js v18+ installed
- Cursor, VS Code, or any IDE that supports MCP
Step 2. Choose Your Data Source
- Apidog Project: Use your team’s API specs directly.
- Online API Docs: Connect to public docs published via Apidog.
- OpenAPI/Swagger Files: Use local or remote files as your data source.
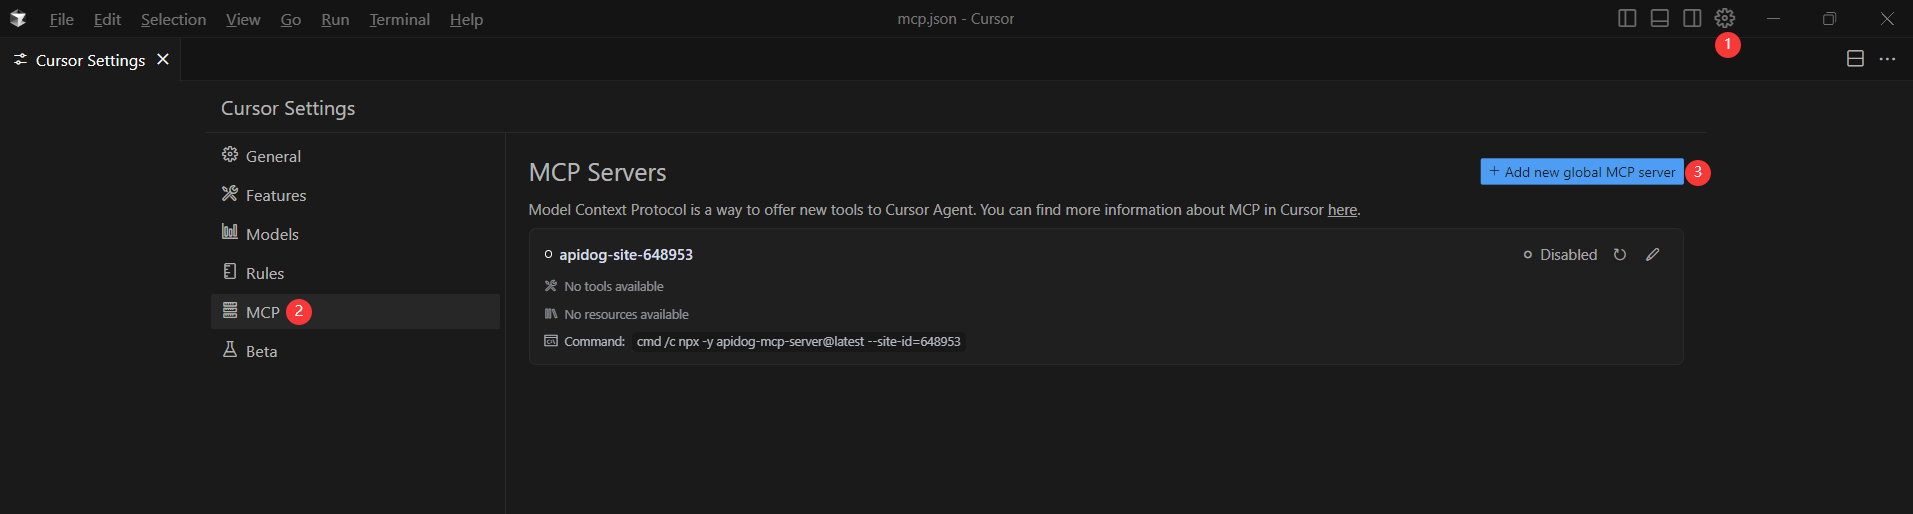
Step 3. Configure MCP in Cursor (Use the OpenAPI file as an example)
Open Cursor, click the settings icon, select "MCP", and add a new global MCP server.
Remember to Replace <oas-url-or-path> with your actual OpenAPI URL or local path.
- For MacOS/Linux:
{
  "mcpServers": {
    "API specification": {
      "command": "npx",
      "args": [
        "-y",
        "apidog-mcp-server@latest",
        "--oas=https://petstore.swagger.io/v2/swagger.json"
      ]
    }
  }
}
For Windows:
{
  "mcpServers": {
    "API specification": {
      "command": "cmd",
      "args": [
        "/c",
        "npx",
        "-y",
        "apidog-mcp-server@latest",
        "--oas=https://petstore.swagger.io/v2/swagger.json"
      ]
    }
  }
}
Step 4. Verify the Connection
After saving the config, test it in the IDE by typing the following command in Agent mode:
Please fetch API documentation via MCP and tell me how many endpoints exist in the project.If it works, you’ll see a structured response that lists endpoints and their details. If it doesn’t, double-check the path to your OpenAPI file and ensure Node.js is installed properly.
Conclusion: Fix the Bug, Upgrade Your Workflow
The Cursor agent Terminal doesn't work bug with Powerlevel10k and Oh-My-Zsh is a real headache, but with the right workaround, you can keep your custom terminal and get back to coding. But why stop there? With Apidog MCP Server, you can take your API workflow to the next level—connect your specs, let AI generate code, and collaborate like never before.
- Fix your terminal bug and keep your favorite theme.
- Delve into seamless API development with Apidog MCP Server.
- Indulge in a future-proof, efficient, and collaborative workflow.
Sign up for Apidog today and experience the next level of API development. The future is here—don’t miss it.