GraphQL has taken the API world by storm, offering a more efficient, powerful, and flexible approach to fetching data. If you’re a developer or tech enthusiast, you’ve probably heard of GraphQL and its many benefits. But what about actually fetching GraphQL data in your applications? How do you make it work seamlessly? That's exactly what we're diving into today. Plus, we’ll introduce you to Apidog—a tool that will make your API life a breeze. Download Apidog for free and follow along as we explore the fascinating world of fetching GraphQL data!
Understanding GraphQL: A Brief Overview
Before we dive into fetching data, let's quickly recap what GraphQL is. In a nutshell, GraphQL is a query language for APIs and a runtime for executing those queries by using a type system you define for your data. Developed by Facebook in 2012 and released as open-source in 2015, it allows clients to request exactly the data they need, nothing more, nothing less.
Why Choose GraphQL Over REST?
You might wonder why you should use GraphQL instead of the traditional REST API. Here are some compelling reasons:
- Single Endpoint: With REST, you typically have multiple endpoints for different resources. GraphQL consolidates these into a single endpoint.
- Efficient Data Fetching: GraphQL queries allow you to fetch nested and related resources in one go, reducing the number of requests.
- Flexible Querying: You specify exactly what data you need, which can optimize performance and reduce payload sizes.
Now, let's move to the main topic—fetching GraphQL data using APIs.
The Basics of Fetching GraphQL Data
Fetching GraphQL data involves sending a request to a GraphQL server, typically via HTTP. Unlike REST APIs where you might use GET, POST, PUT, and DELETE methods, GraphQL usually uses POST requests with a query or mutation in the request body.
The Structure of a GraphQL Query
A basic GraphQL query looks something like this:
{
  user(id: "1") {
    name
    email
    posts {
      title
      content
    }
  }
}
In this query, we request a user’s name and email, along with the titles and contents of their posts.
Fetching GraphQL Data Using Fetch API
The Fetch API is a simple and powerful way to make network requests in JavaScript. Here’s how you can use it to fetch data from a GraphQL endpoint.
const query = `
  query {
    user(id: "1") {
      name
      email
      posts {
        title
        content
      }
    }
  }
`;

fetch('https://your-graphql-endpoint.com/graphql', {
  method: 'POST',
  headers: {
    'Content-Type': 'application/json',
  },
  body: JSON.stringify({ query }),
})
  .then(response => response.json())
  .then(data => console.log(data))
  .catch(error => console.error('Error fetching data:', error));
This code sends a POST request to the GraphQL endpoint with the query in the request body, and then logs the response.
Introducing Apidog: Your GraphQL Fetching Companion
Now that you have a basic understanding of how to fetch GraphQL data using the Fetch API, let's introduce you to Apidog—a powerful tool designed to streamline your API workflows.
What is Apidog?
Apidog is an all-in-one API development tool that helps you design, test, and document APIs with ease. It supports REST, GraphQL, and other API protocols, making it a versatile choice for developers.
Why Use Apidog?
- User-Friendly Interface: Apidog offers a clean and intuitive interface that makes it easy to design and test your APIs.
- GraphQL Support: It has robust support for GraphQL, allowing you to write and test queries and mutations effortlessly.
- Collaboration Features: You can collaborate with your team in real-time, ensuring everyone is on the same page.
HTTP Requests with Apidog
Apidog offers several advanced features that further enhance its ability to test HTTP requests. These features allow you to customize your requests and handle more complex scenarios effortlessly.
Step 1: Open Apidog and create a new request.

Step 2: Find or manually input the API details for the POST request you want to make.

Step 3: Fill in the required parameters and any data you want to include in the request body.

Integrating Apidog with Your GraphQL
Once you have Apidog installed, you can import your GraphQL schema to manage and test your API more efficiently.

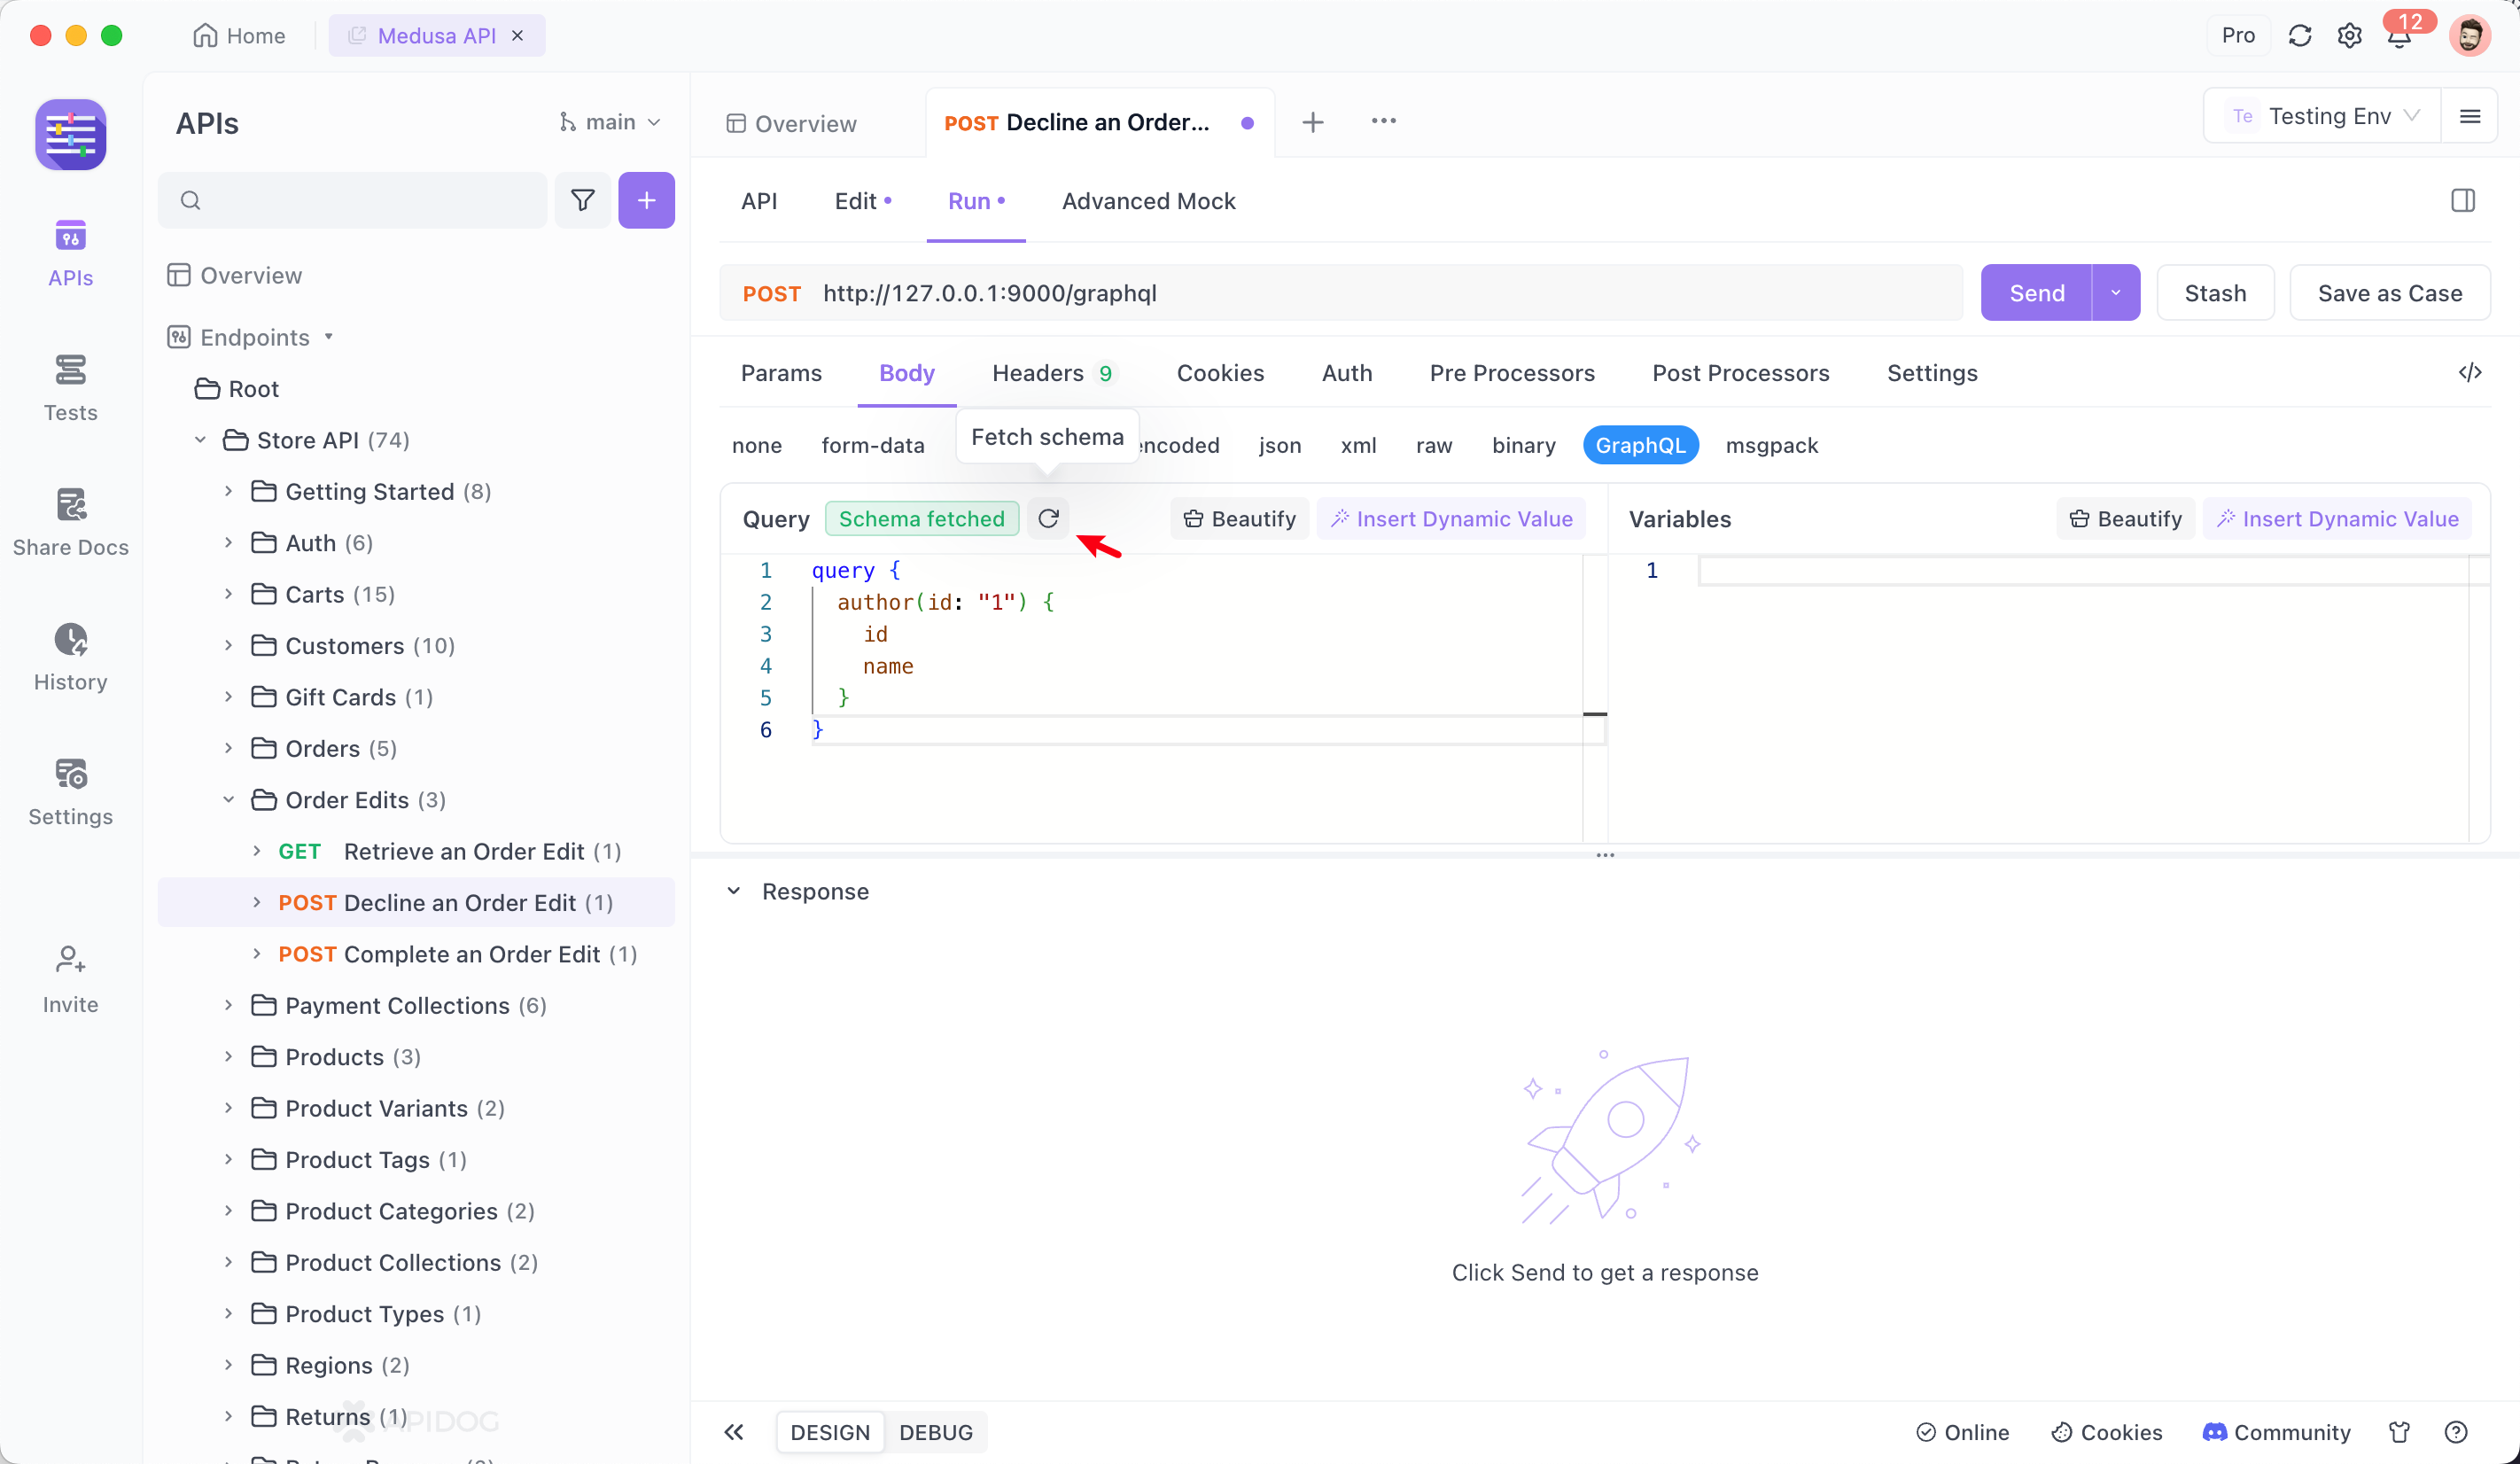
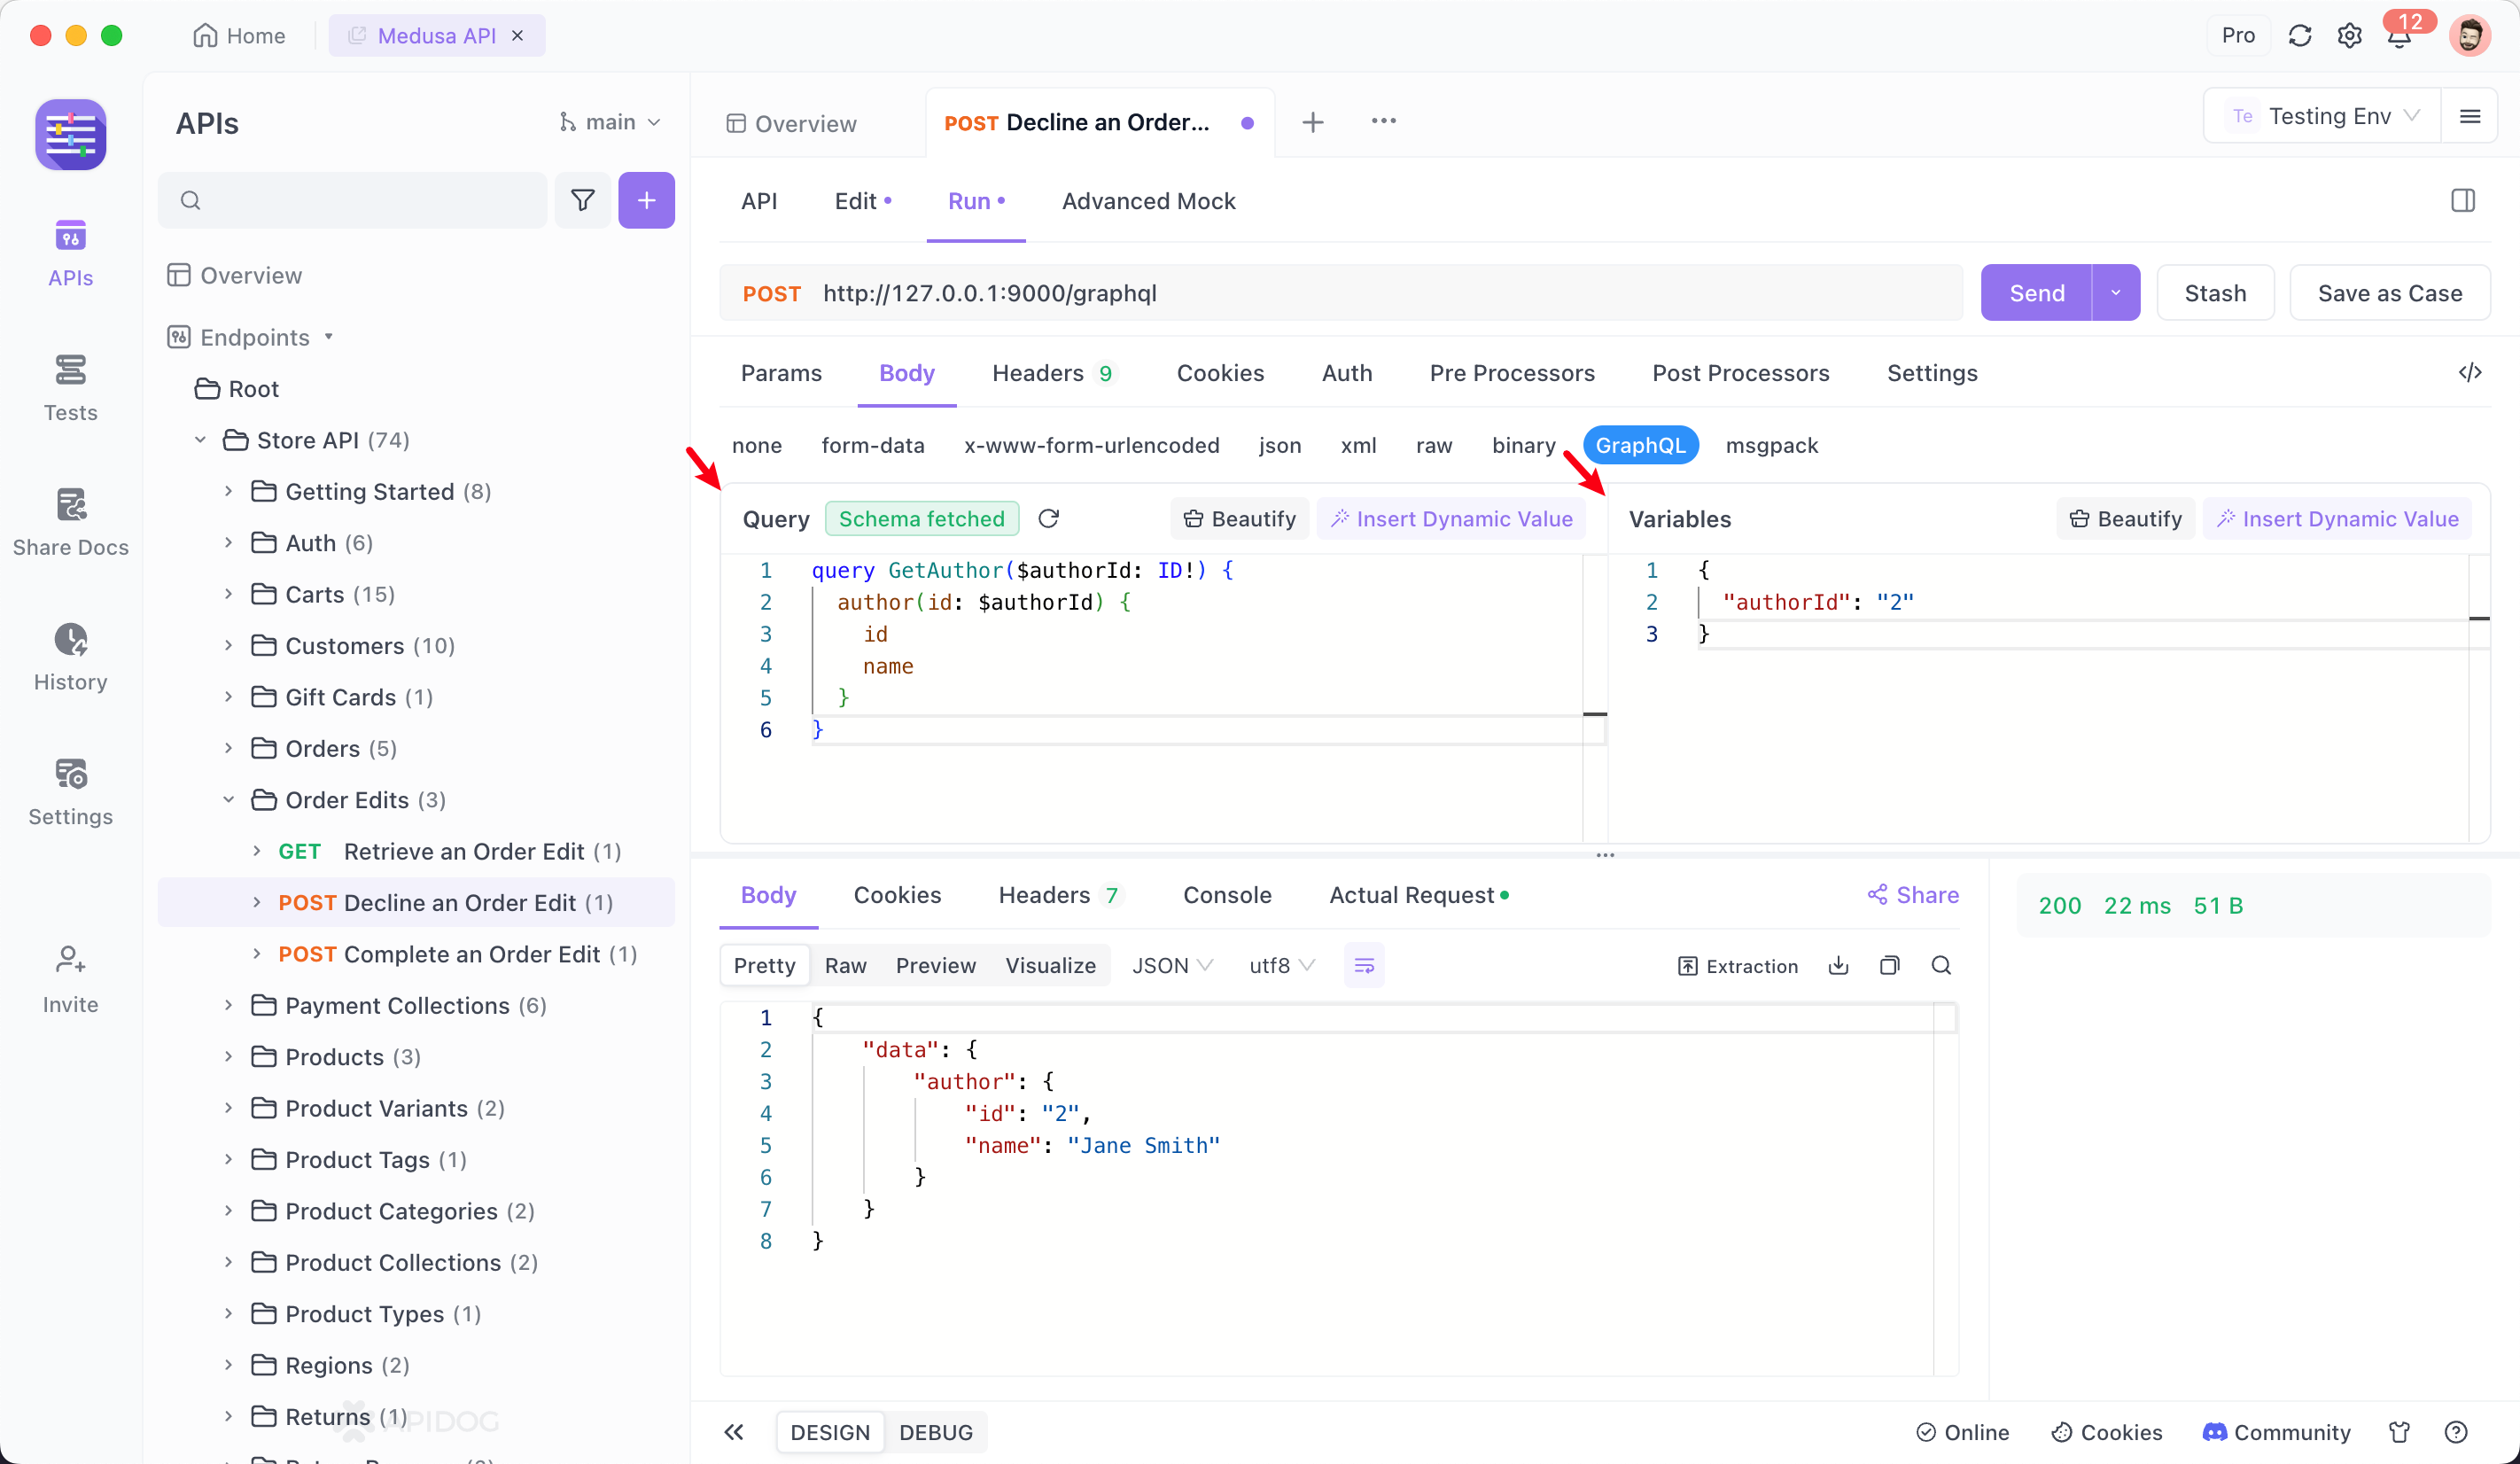
Enter your query in the Query box on the "Run" tab. You can also click the manual Fetch Schema button in the input box to enable the "code completion" feature for Query expressions, assisting in entering Query statements.

With your schema imported, you can use Apidog to test your queries and mutations, generate documentation, and even mock responses. This will help you ensure your API is working as expected and provide a comprehensive guide for your API users.

Advanced GraphQL Fetching Techniques
Once you're comfortable with the basics, you can explore more advanced techniques to optimize and enhance your GraphQL fetching process.
Using Variables in GraphQL Queries
Variables make your queries more dynamic and reusable. Here’s an example of how to use variables in a GraphQL query:
query($id: ID!) {
  user(id: $id) {
    name
    email
    posts {
      title
      content
    }
  }
}
In your fetch request, you can pass variables like this:
const query = `
  query($id: ID!) {
    user(id: $id) {
      name
      email
      posts {
        title
        content
      }
    }
  }
`;

const variables = { id: "1" };

fetch('https://your-graphql-endpoint.com/graphql', {
  method: 'POST',
  headers: {
    'Content-Type': 'application/json',
  },
  body: JSON.stringify({ query, variables }),
})
  .then(response => response.json())
  .then(data => console.log(data))
  .catch(error => console.error('Error fetching data:', error));
Handling Errors Gracefully
When working with APIs, handling errors is crucial. GraphQL provides a robust error-handling mechanism that you can leverage.
In your response, GraphQL will return an errors field if something goes wrong. Here’s how you can handle errors in your fetch request:
fetch('https://your-graphql-endpoint.com/graphql', {
  method: 'POST',
  headers: {
    'Content-Type': 'application/json',
  },
  body: JSON.stringify({ query, variables }),
})
  .then(response => response.json())
  .then(data => {
    if (data.errors) {
      console.error('GraphQL errors:', data.errors);
    } else {
      console.log('Data fetched successfully:', data.data);
    }
  })
  .catch(error => console.error('Network error:', error));
Optimizing Performance with Batch Requests
GraphQL allows you to batch multiple queries into a single request, reducing the number of network round trips. This can significantly improve performance, especially in mobile and low-bandwidth scenarios.
const queries = [
  {
    query: `
      query {
        user(id: "1") {
          name
          email
        }
      }
    `,
  },
  {
    query: `
      query {
        posts {
          title
          content
        }
      }
    `,
  },
];

fetch('https://your-graphql-endpoint.com/graphql', {
  method: 'POST',
  headers: {
    'Content-Type': 'application/json',
  },
  body: JSON.stringify(queries),
})
  .then(response => response.json())
  .then(data => console.log(data))
  .catch(error => console.error('Error fetching data:', error));
Securing Your GraphQL API
Security is a critical aspect of any API. Here are some best practices for securing your GraphQL API:
Authentication and Authorization
Ensure that your API endpoints are protected using authentication mechanisms like OAuth, JWT, or API keys. Additionally, implement authorization checks to ensure users can only access data they’re permitted to.
Query Complexity Analysis
Prevent abuse by analyzing the complexity of incoming queries. Limit the depth and breadth of queries to avoid excessive resource consumption.
Rate Limiting
Implement rate limiting to protect your API from being overwhelmed by too many requests.
Using Apidog for Security
Apidog provides features that help you secure your API. You can set up authentication, monitor API usage, and enforce rate limits directly within the tool.
Conclusion
Fetching GraphQL data efficiently and securely is a crucial skill for modern developers. With tools like Apidog, you can simplify and enhance your API workflows, making it easier to build robust applications. So, go ahead and download Apidog for free to take your GraphQL fetching to the next level!


