
The software application cURL, an abbreviation for "Client for URLs," offers a comprehensive suite of functionalities for developers to manage data transfers. It functions in two distinct modes: a user-friendly command-line interface for basic interactions and a powerful library that can be seamlessly integrated into programming projects.
To learn more about what Apidog has to offer developers like you, click the button below!
Formal Definition of curl_init()
Based on the official PHP website, the curl_init function initializes a cURL session and returns a cURL handle for use with the curl_setopt(), curl_exec(), and curl_close() functions.
Parameters Involved
url
If you provide a URL, the CURLOPT_URL option will be set to its value. You can also manually set this option using the curl_setopt() function.
However, do note that the file protocol is disabled by cURL itself if the open_basedir has been set.
Return Values
The curl_init() function returns a cURL handle on success, and false on errors.
What is a POST Request?
In the context of web communication, the Hypertext Transfer Protocol (HTTP) serves as the foundation for data exchange. One crucial method employed within HTTP is the POST request, specifically designed for the transmission of data to a web server. This document delves into the intricacies of the POST request, elucidating its function and contrasting it with its counterpart, the GET request.

Key Features of POST Requests
Data Transmission
POST requests are specifically designed to send data to a web server. This data can be used to create new resources, update existing information, or delete data.
Data Placement
POST requests send data in the request body instead of including it within the URL itself. This separation enhances security, particularly for sensitive information like passwords or credit card details, which are not exposed in the URL.
State-Changing
POST requests typically result in a modification on the server side. This could involve creating a new user account, uploading a file, adding a new product to a shopping cart, or deleting a comment.
Not Cachable
Since POST requests modify data, web browsers typically don't cache them. This ensures that the latest information is always sent to the server, preventing outdated data from being used.
Code Examples of curl_init() POST Requests
Here are some PHP coding examples that you can refer to if you wish to make POST requests with the curl_init() function.
Example 1 - Sending Simple Text Data
This example sends a basic username and password to a login script.
<?php

$url = "https://www.example.com/login.php";
$username = "your_username";
$password = "your_password";

$data = array(
  "username" => $username,
  "password" => $password
);

$ch = curl_init($url);

curl_setopt($ch, CURLOPT_POST, 1);  // Set request method to POST
curl_setopt($ch, CURLOPT_POSTFIELDS, http_build_query($data));  // Set POST data
curl_setopt($ch, CURLOPT_RETURNTRANSFER, 1);  // Return the response

$response = curl_exec($ch);

curl_close($ch);

if($response) {
  echo "Login successful!";
} else {
  echo "Error: " . curl_error($ch);
}

?>
Code explanation:
- We define the target URL, username, and password.
- We create an array
$datacontaining the username and password. - We initialize the curl handle with
curl_init($url). - We set the request method to POST using
curl_setopt($ch, CURLOPT_POST, 1). - We set the POST data using
curl_setopt($ch, CURLOPT_POSTFIELDS, http_build_query($data)).http_build_queryconverts the data array to a URL-encoded string. - We set
CURLOPT_RETURNTRANSFERto 1 to capture the response instead of printing it directly. - We execute the request with
curl_exec($ch)and store the response in$response. - We close the curl handle with
curl_close($ch). - Finally, we check if the response exists and display a success message or error.
Example 2 - Sending JSON Data
This example sends a JSON object containing user information to a registration script.
<?php

$url = "https://www.example.com/register.php";

$user_data = array(
  "name" => "John Doe",
  "email" => "john.doe@example.com",
  "password" => "your_password"
);

$data_json = json_encode($user_data);

$ch = curl_init($url);

curl_setopt($ch, CURLOPT_POST, 1);  // Set request method to POST
curl_setopt($ch, CURLOPT_POSTFIELDS, $data_json);  // Set POST data as JSON
curl_setopt($ch, CURLOPT_RETURNTRANSFER, 1);  // Return the response

curl_setopt($ch, CURLOPT_HTTPHEADER, array(
  'Content-Type: application/json',   // Set content type to JSON
));

$response = curl_exec($ch);

curl_close($ch);

if($response) {
  echo "Registration successful!";
} else {
  echo "Error: " . curl_error($ch);
}

?>
Code explanation:
- We define the target URL and user data array.
- We convert the user data to a JSON string using
json_encode. - We initialize the curl handle and set the request method to POST.
- We set the POST data using
curl_setopt($ch, CURLOPT_POSTFIELDS, $data_json). - We set
CURLOPT_RETURNTRANSFERto 1 to capture the response. - We set a custom header
Content-Type: application/jsonto inform the server that the data is in JSON format. - We execute the request and close the curl handle as in the previous example.
- Finally, we check for a response and display a success message or error.
Example 3 - Setting Custom Headers and Following Redirects
This example sends a POST request with custom headers and follows redirects.
<?php

$url = "https://www.example.com/login.php";

$data = array(
  "username" => "your_username",
  "password" => "your_password"
);

$ch = curl_init($url);

curl_setopt($ch, CURLOPT_POST, 1);  // Set request method to POST
curl_setopt($ch, CURLOPT_POSTFIELDS, http_build_query($data));
curl_setopt($ch, CURLOPT_RETURNTRANSFER, 1);  // Return the response

curl_setopt($ch, CURLOPT_HTTPHEADER, array(
  'Authorization: Bearer YOUR_API_KEY',  // Set custom header
));

// Follow redirects up to 3 times
curl_setopt($ch, CURLOPT_FOLLOWLOCATION, 1);
curl_setopt($ch, CURLOPT_MAXREDIRS, 3);

$response = curl_exec($ch);

curl_close($ch);

if($response) {
  echo "Login successful!";
} else {
  echo "Error: " . curl_error($ch);
}

?>
Code explanation:
- We define the login URL and user data.
- We set up the curl handle and POST request as before.
- We create a custom header with an authorization token using
CURLOPT_HTTPHEADER. - We enable the following redirects with
CURLOPT_FOLLOWLOCATIONand limit it to 3 withCURLOPT_MAXREDIRS.
Note to Remember
Please ensure that the code samples above are not copied and pasted into your IDEs, as they are simplified and will require further modifications to fit your application's needs.
For the official documentation, you can check it out at: https://www.php.net/manual/en/book.curl.php

Apidog - Import cURL Commands With Ease
Apidog is a sophisticated API development platform that provides users with all the necessary tools for the entire API lifecycle. With Apidog, you can build, debug, mock, and document APIs all within a single application.
Let's take a look at how you can import cURL commands into Apidog!
Import cURL Commands into Apidog Effortlessly
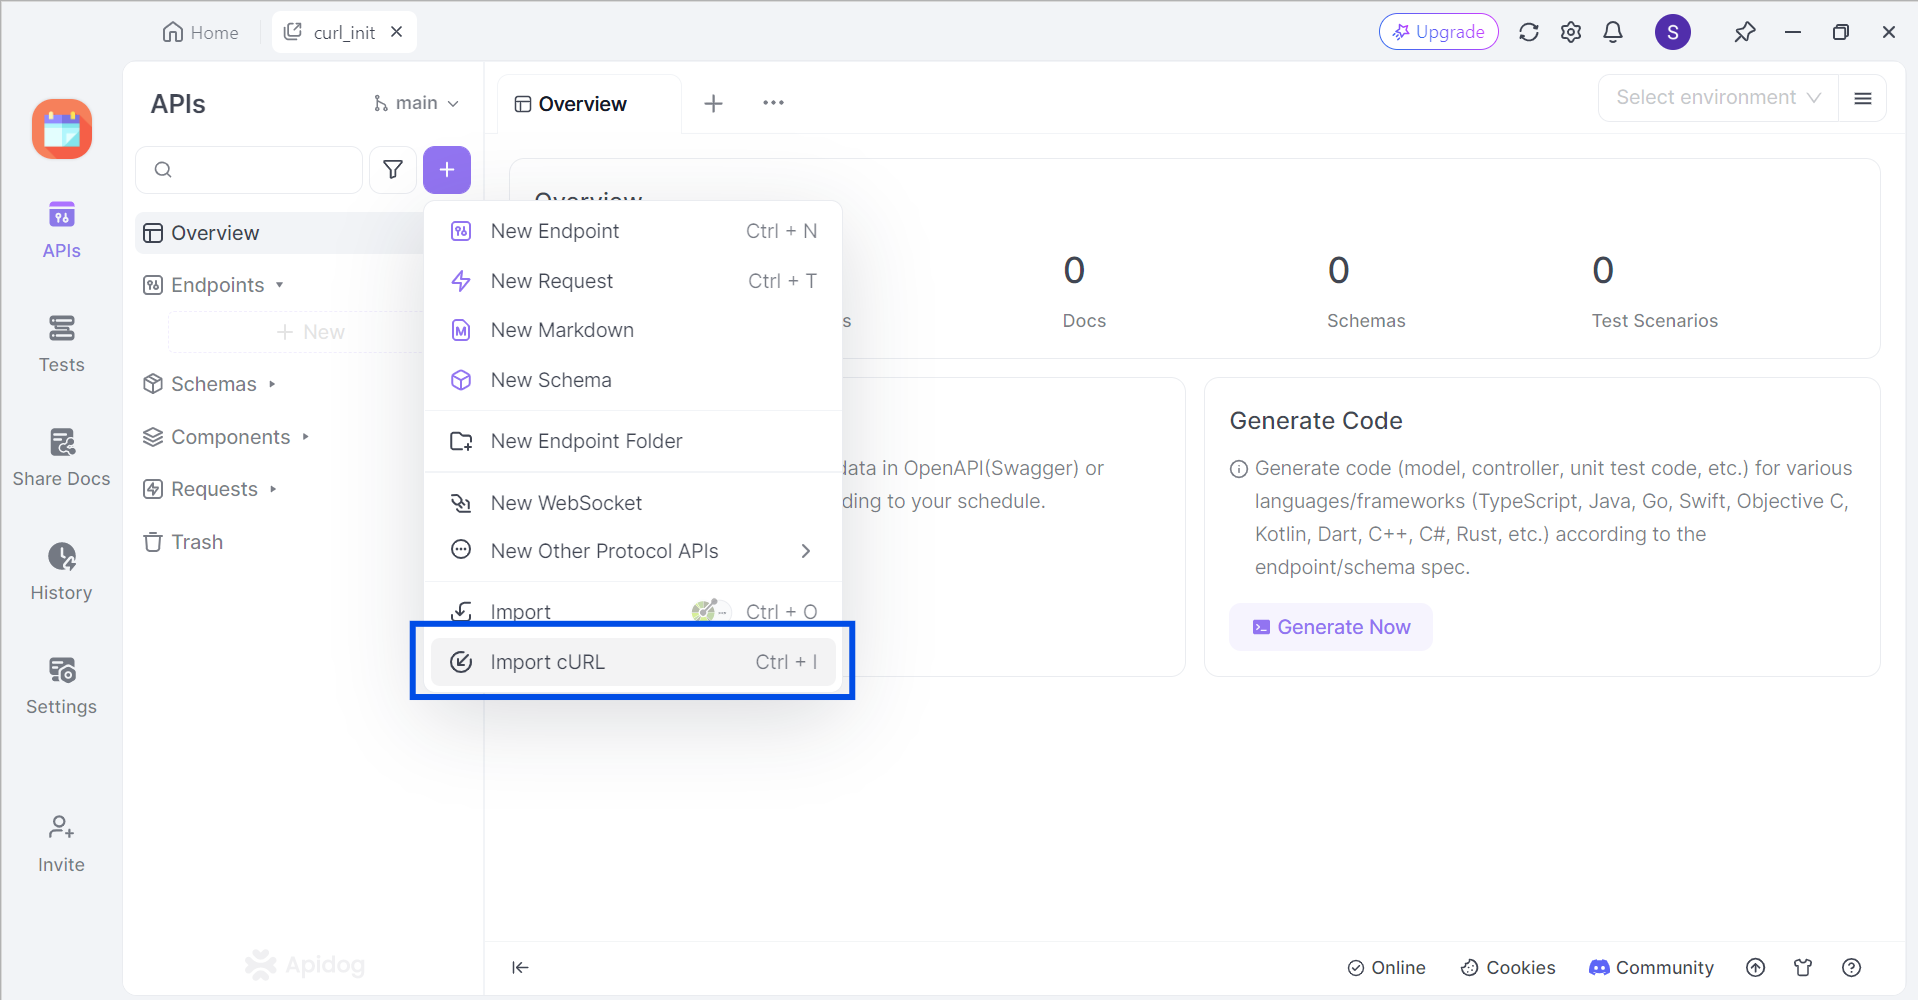
Apidog supports users who wish to import cURL commands to Apidog. In an empty project, click the purple + button around the top left portion of the Apidog window, and select Import cURL.
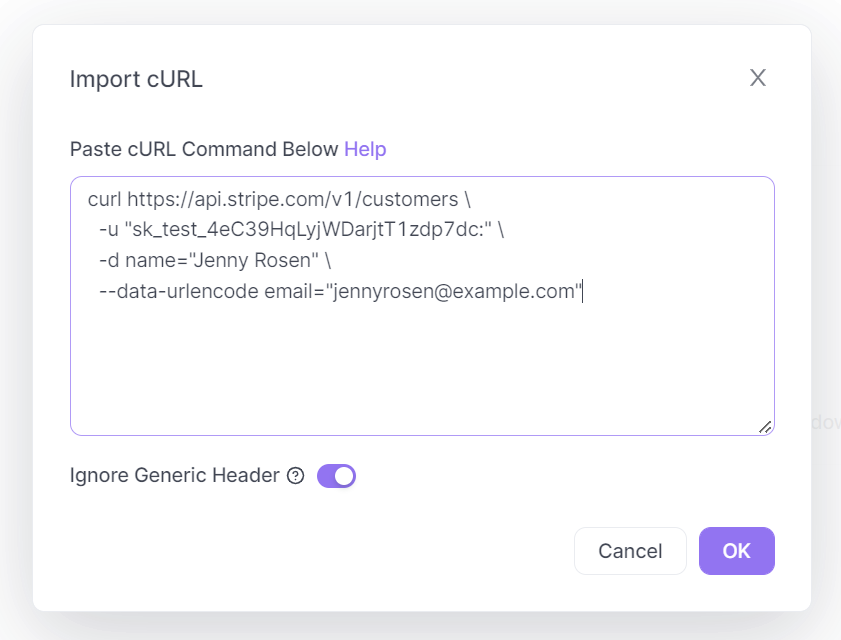
Copy and paste the cURL command into the box displayed on your screen.
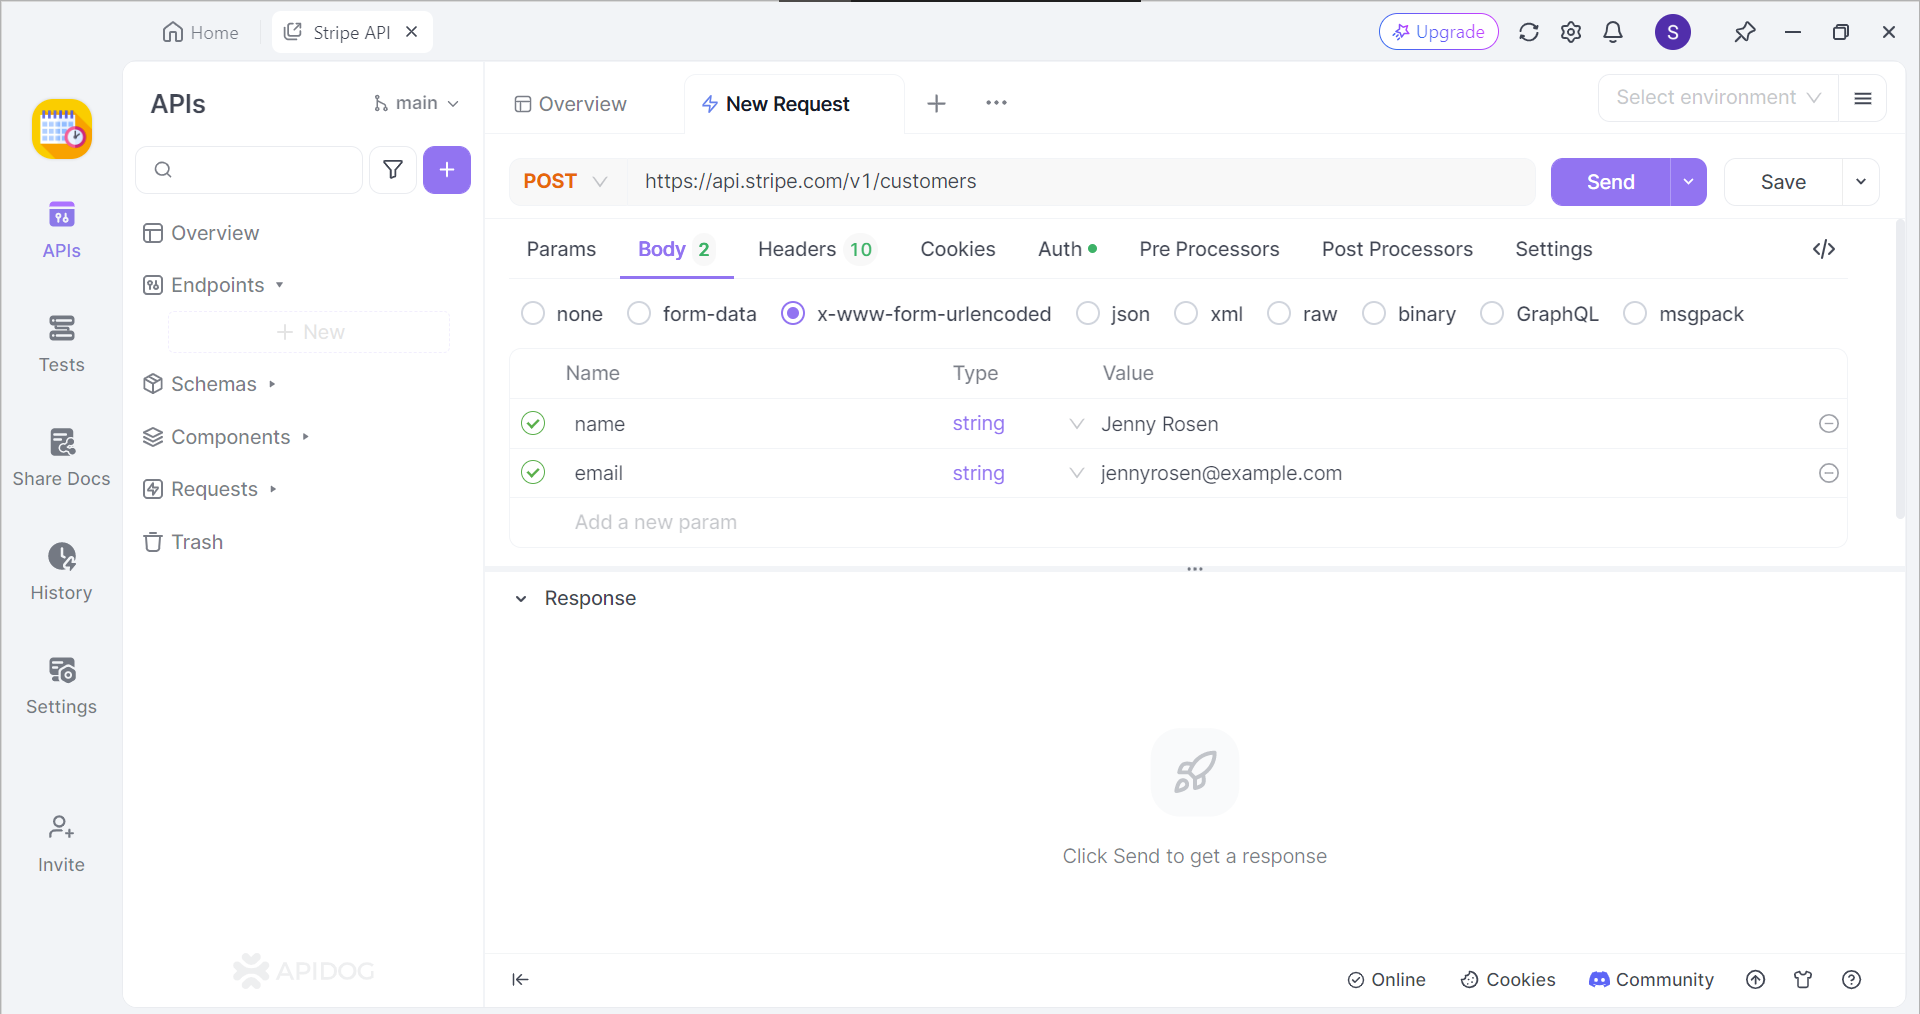
If successful, you should now be able to view the cURL command in the form of an API request.
Generate PHP Code with Apidog
If you do not have prior experience coding in the PHP programming language, fear not! Apidog has a code generation feature that provides developers a faucet for various languages!
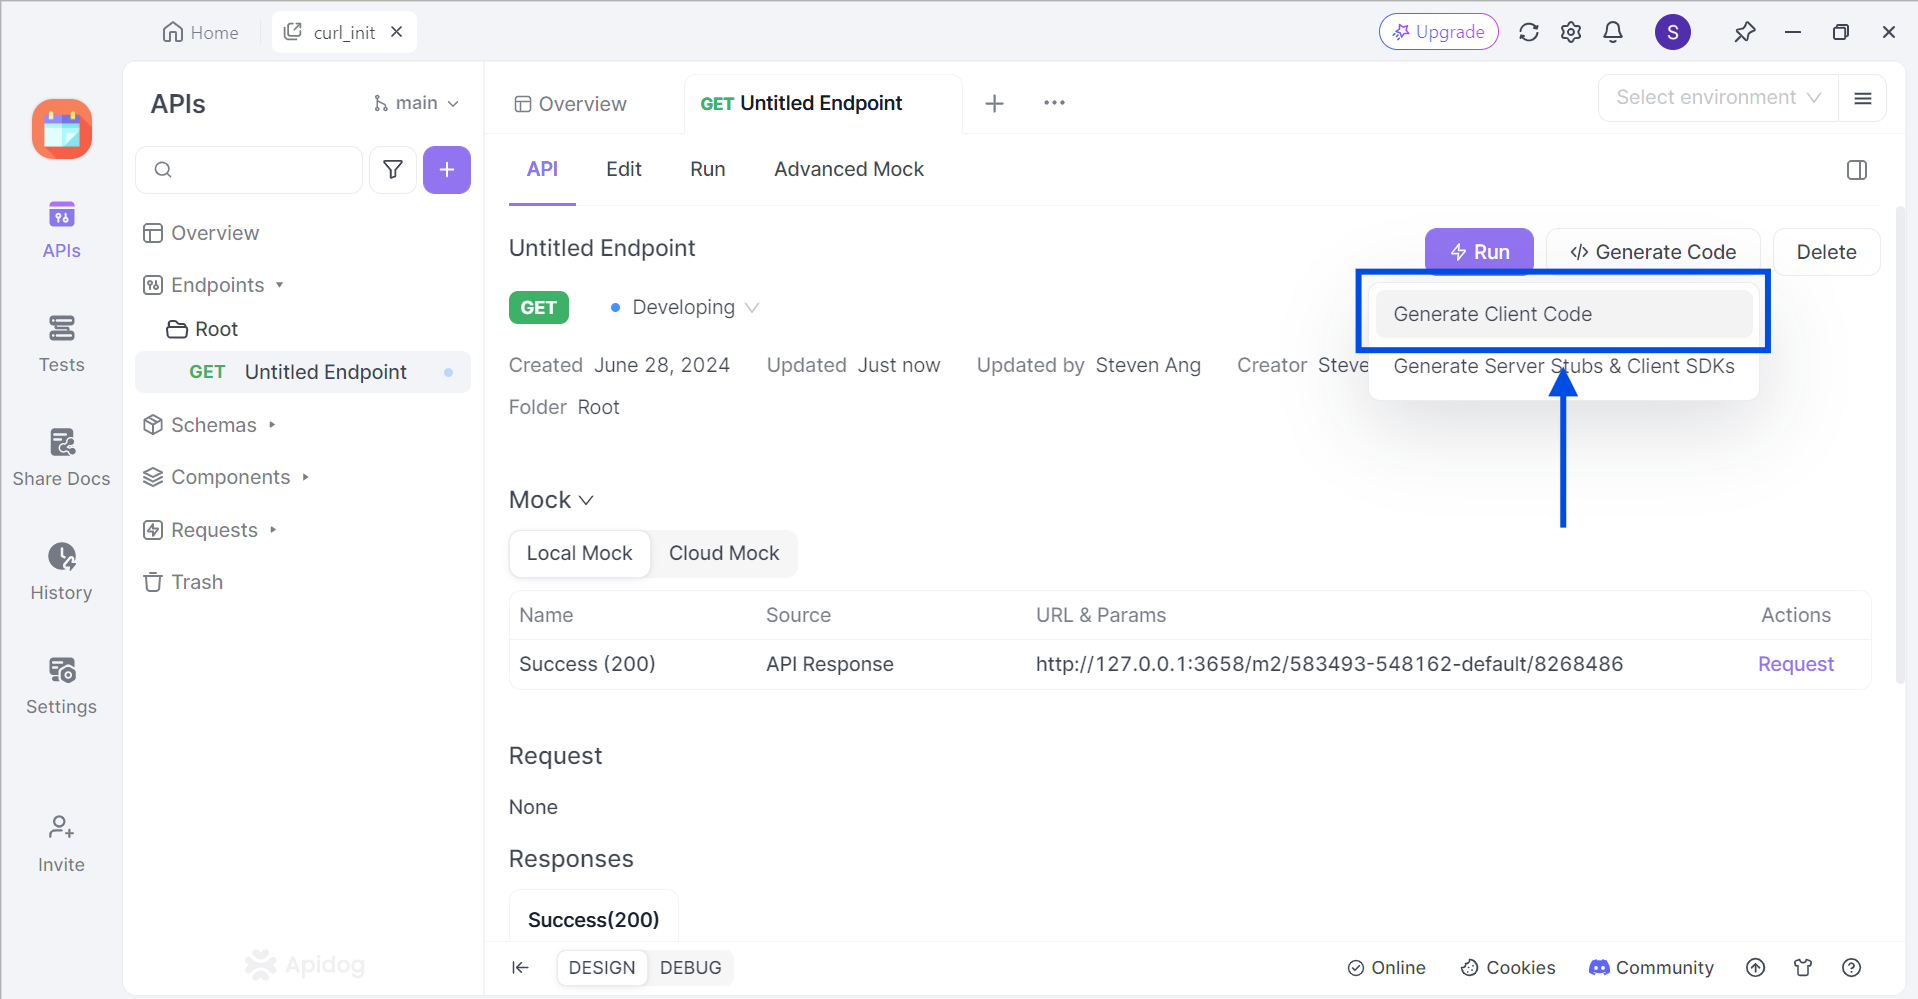
First, locate the </> Generate Code button on any API or request, and select Generate Client Code on the drop-down list.

Next, select PHP, and find the cURL section. You should now see the generated code for cURL. All you have to do is copy and paste it to your IDE (Integrated Development Environment) and continue developing your application.
Conclusion
Mastering POST requests with curl_init() unlocks a powerful tool for developers. It empowers you to send data to web servers, enabling actions like creating user accounts, uploading files, and submitting forms. By understanding the core concepts of POST requests and the functionalities of curl_init(), you can craft tailored solutions for various web interactions.
Remember,curl_init() offers a flexible approach, allowing you to send data in different formats, set custom headers, and handle scenarios like file uploads and redirects. With this newfound knowledge, you can confidently leverage POST requests to enhance the capabilities of your web applications.


