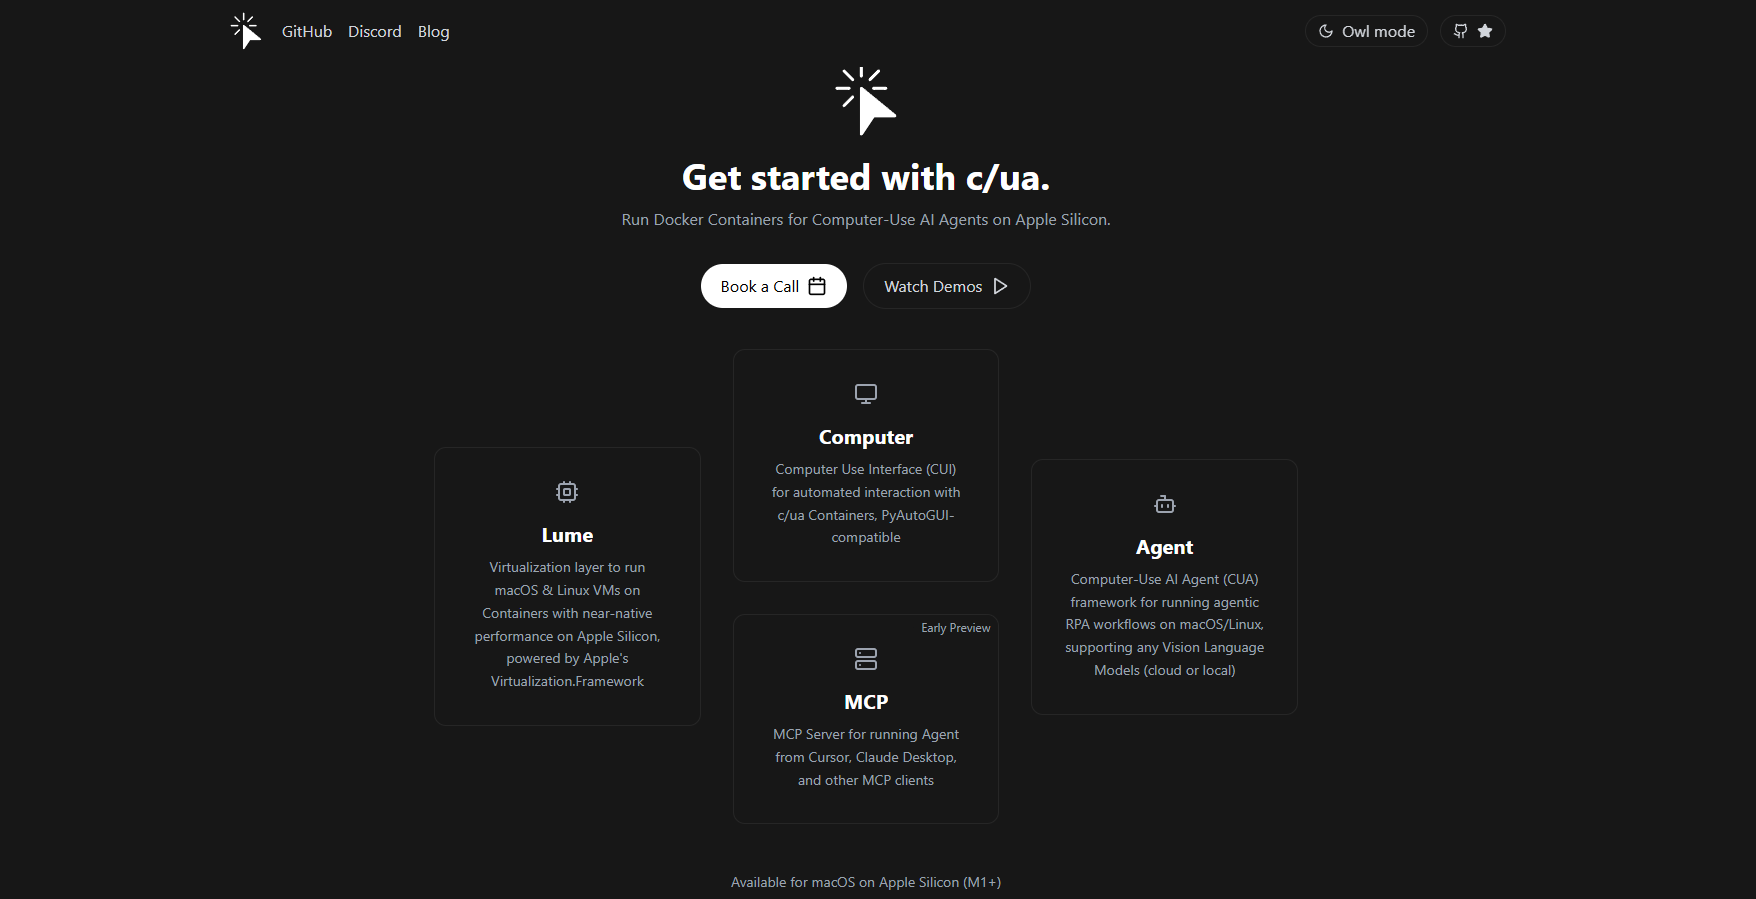
CUA, the Computer-Use Agent framework, and its slick MCP server, Cua, lets AI agents control your macOS or Linux system with natural language. I dove into setting up the CUA MCP server on my Apple Silicon Mac, and let me tell you—it’s a game-changer for automating tasks locally. In this beginner’s guide, I’ll be sharing my takes on installing and testing CUA’s MCP server, with a fun example: making it open a terminal and list directory contents. No technical skills required—just a bit of curiosity! Ready to turn your AI into a computer-whisperer? Let’s roll!
Want an integrated, All-in-One platform for your Developer Team to work together with maximum productivity?
Apidog delivers all your demands, and replaces Postman at a much more affordable price!
What is Cua and the CUA MCP Server?
CUA (Computer-Use Agent) is an open-source framework that lets AI agents interact with your computer—think screen control, keyboard/mouse automation, and sandboxed virtual machines (VMs) on macOS and Linux, especially Apple Silicon. The Cua MCP server is its Model Context Protocol (MCP) component, acting as a bridge to let AI clients like Claude Desktop or Cursor run CUA tasks via natural language. It’s like giving your AI a remote control for your system, securely executing commands without cloud dependencies. We’ll set it up and test it with a simple task, all while keeping things private and fun. Let’s dive in
Setting Up Your Environment: Getting Ready for CUA
Before we launch the CUA MCP server, let’s prep your system. This is beginner-friendly, with each step explained to keep you in the loop.
1. Check Prerequisites: Ensure you have these tools ready:
- Python: Version 3.10 or higher. Run python --version in your terminal. If it’s missing or outdated, download from python.org. Python powers CUA’s scripts and server.
- Git: Needed to clone the Cua repo. Check with git --version. Install from git-scm.com if needed.
- Docker: Required for the MCP server’s containerized setup. Download from docker.com and verify with docker --version.
- Hardware: A Mac with Apple Silicon (M1/M2/M3) or Linux system, 4+ core CPU, 16GB+ RAM, and 10GB+ free storage for dependencies.Missing anything? Install it now to avoid hiccups.
2. Create a Project Folder: Let’s keep things tidy with a dedicated folder:
mkdir cua-mcp-test
cd cua-mcp-test
This folder will hold your CUA project, and cd sets you up for the next steps.
3. Clone the Cua Repository: Grab the CUA source code from GitHub:
git clone https://github.com/trycua/cua.git
cd cua
The git clone fetches the Cua repo, including the MCP server code in libs/mcp-server. The cd cua moves you into the project directory.
4. Set Up a Virtual Environment: To prevent package conflicts, create a Python virtual environment:
python -m venv venvActivate it:
- Mac/Linux: source venv/bin/activate
- Windows: venv\Scripts\activateSeeing (venv) in your terminal means you’re in a clean Python environment, isolating CUA’s dependencies.
5. Open in VS Code: Launch the project in Visual Studio Code for easy coding:
code .VS Code opens the cua folder, ready for scripting. If you don’t have VS Code, grab it from code.visualstudio.com or use another editor, but VS Code’s Python integration is top-notch.
Installing the CUA MCP Server
Let’s install the CUA MCP server to work with Claude 3.7. We’ll use a simple script for a hassle-free setup, ensuring all dependencies are in place.
1. Run the Easy Setup Script: The CUA repo provides a one-liner to streamline installation:
curl -fsSL https://raw.githubusercontent.com/trycua/cua/main/libs/mcp-server/scripts/install_mcp_server.sh | bashThis script does a lot of heavy lifting:
- Creates the ~/.cua directory if it doesn’t exist.
- Generates a startup script at ~/.cua/start_mcp_server.sh.
- Makes the script executable.
- Manages Python virtual environments and installs/updates the cua-mcp-server package.It’s tailored for macOS and Linux, using Docker for a containerized server. Expect it to take a minute as it pulls dependencies.
2. Install Python Dependencies: If you prefer manual installation or hit issues, install the CUA MCP server directly:
pip install cua-mcp-serverThis installs:
- The MCP server itself.
- CUA agent and computer dependencies (e.g., for screen control, keyboard/mouse automation).
- An executable cua-mcp-server script in your PATH.
3. Verify Docker: The MCP server runs in a Docker container, so ensure Docker is active:
docker psIf Docker’s not running, start it via Docker Desktop (Mac) or sudo systemctl start docker (Linux). This is crucial for the server’s sandboxed environment.
Configuring the CUA MCP Server for Claude Desktop
Now, let’s configure the CUA MCP server to work with Claude 3.7 in Claude Desktop, setting up the necessary API keys and environment variables.
1. Get an Anthropic API Key: Sign up at anthropic.com, navigate to the API section, and generate an API key. Save it securely (don’t share it!). This key lets Claude 3.7 communicate with the CUA MCP server.
2. Update Claude Desktop Configuration: Add the CUA MCP server to Claude Desktop’s config file, typically at ~/.config/claude-desktop/claude_desktop_config.json (Mac). Create it if it doesn’t exist:
{
  "mcpServers": {
    "cua-agent": {
      "command": "/bin/bash",
      "args": ["~/.cua/start_mcp_server.sh"],
      "env": {
        "CUA_AGENT_LOOP": "OMNI",
        "CUA_MODEL_PROVIDER": "ANTHROPIC",
        "CUA_MODEL_NAME": "claude-3-7-sonnet-20250219",
        "ANTHROPIC_API_KEY": "your-api-key"
      }
    }
  }
}
Replace your-api-key with your Anthropic API key. This config:
- Uses the startup script from the install step.
- Sets the agent loop to OMNI for flexible task handling.
- Specifies Claude 3.7 (claude-3-7-sonnet-20250219) as the model.
- Passes the API key securely.Save the file in the correct location. For more details, check Anthropic’s MCP User Guide.
3. Optional: Cursor Integration: Want to use CUA with Cursor? Create an MCP config file:
- Project-specific: Add .cursor/mcp.json in your project directory.
- Global: Add ~/.cursor/mcp.json in your home directory.Use the same mcpServers config as above. Then, in Cursor’s Agent chat, say, “Use the computer control tools to open Safari,” and CUA will take over. See Cursor’s MCP documentation for more.
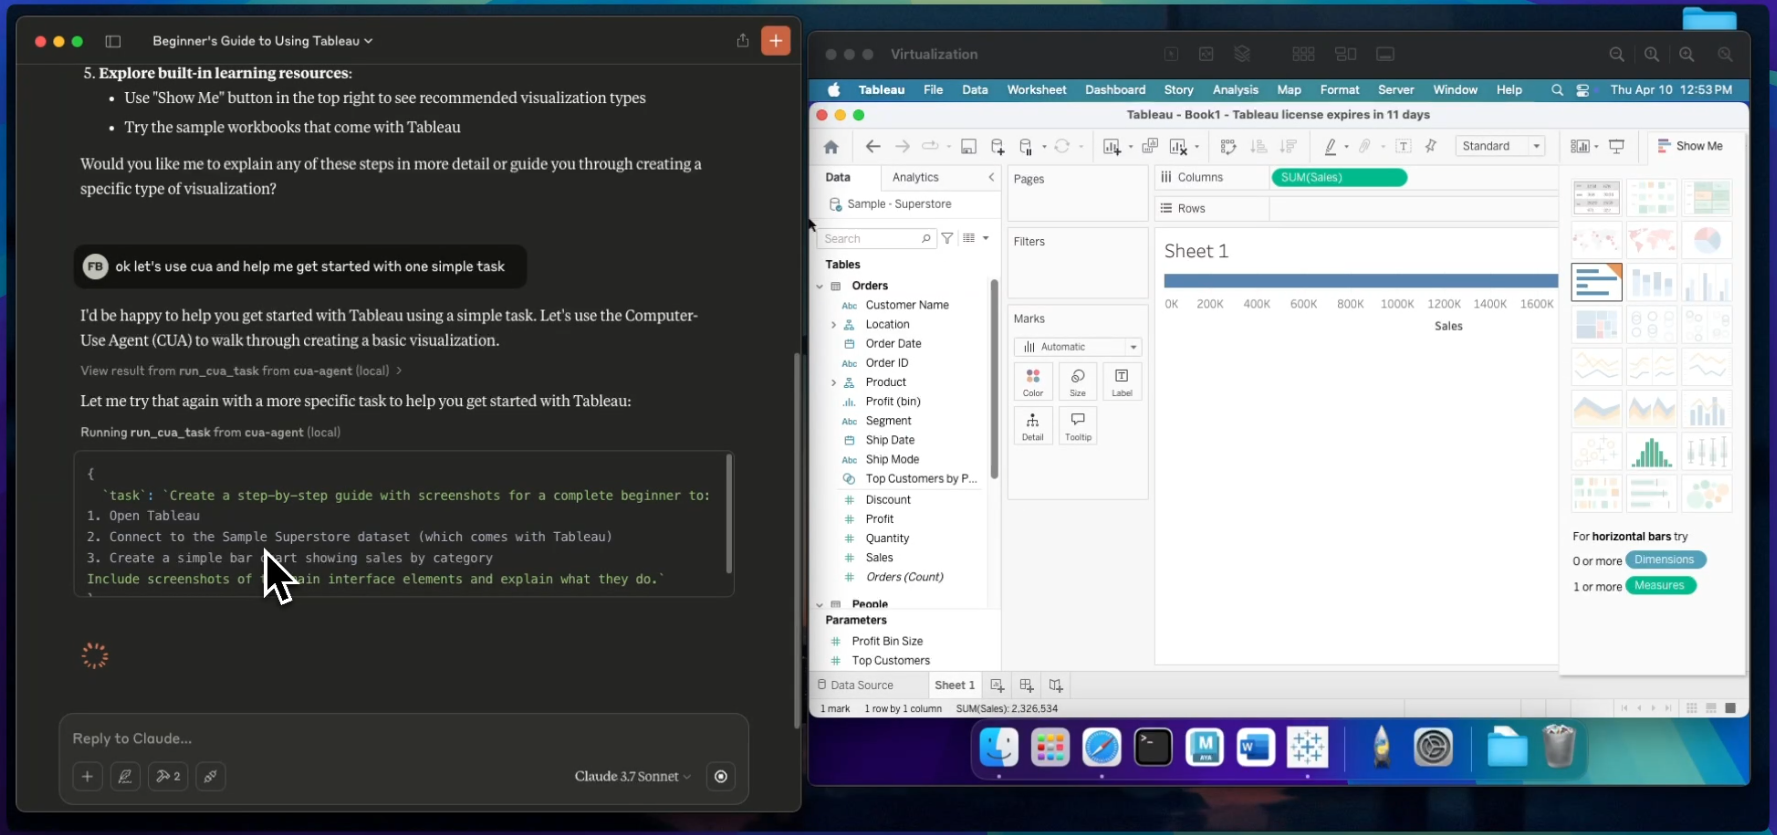
Testing Your CUA MCP Server with Claude 3.7
Time to test the CUA MCP server by having Claude 3.7 open a terminal and list directory contents! We’ll create a script to simulate the task and run it in VS Code.
1. Create a Test Script: In VS Code, with your cua project open, create a file named test.py in the cua folder. Paste this code:
import os
import asyncio
from computer import Computer
from agent import ComputerAgent, LLM, AgentLoop, LLMProvider

async def run_task() -> str:
    async with Computer(verbosity='DEBUG') as computer:
        agent = ComputerAgent(
            computer=computer,
            loop=AgentLoop.OMNI,
            model=LLM(
                provider=LLMProvider.ANTHROPIC,
                model_name="claude-3-7-sonnet-20250219",
                api_key="your-api-key"
            )
        )
        task = "Open a terminal and list the contents of the current directory"
        async for result in agent.run(task):
            return result

async def main():
    result = await run_task()
    print("\n\nResult:", result)

if __name__ == "__main__":
    asyncio.run(main())
Replace your-api-key with your Anthropic API key (alternatively, set ANTHROPIC_API_KEY as an environment variable in your shell profile). This script:
- Initializes a CUA Computer for system interaction.
- Sets up a ComputerAgent with Claude 3.7 via Anthropic’s API.
- Tasks the agent to open a terminal (e.g., Terminal.app on macOS) and run ls.
- Prints the result, like a list of files.
2. Select the Python Interpreter in VS Code: Ensure VS Code uses your project’s Python environment:
- Press Ctrl + P (or Cmd + P on Mac).
- Type > Select Python Interpreter and hit Enter.
- Choose the interpreter from your virtual environment (e.g., ./venv/bin/python).This ensures CUA’s dependencies are available, preventing “module not found” errors.
3. Run the Script: Ensure Docker is running and the Claude Desktop config is set. With test.py open, click the “Run” button in VS Code (top-right triangle) or, in the terminal (with the virtual environment active):
python test.pyThe CUA MCP server will start, Claude 3.7 will process the task, and a terminal will open, running ls. I got “Result: cua test.py venv” on my Mac—pretty slick! If it fails, verify Docker, the API key, and port 11434 (if using Ollama fallback). Check ~/Library/Logs/Claude/mcp*.log (Mac) for debug info.
4. Test in Claude Desktop: Open Claude Desktop, type: “Open a terminal and list the contents of the current directory.” Claude will use the CUA MCP server to execute the task, showing the results in the chat. My test listed my project files instantly!
Available CUA Tools and Usage
The CUA MCP server exposes two powerful tools to Claude 3.7:
- run_cua_task: Executes a single task, like “Open Chrome and go to github.com.”
- run_multi_cua_tasks: Runs multiple tasks in sequence, e.g., “Create a folder called ‘Projects’ on my desktop, then open it.”
You can use these in Claude Desktop or Cursor by asking:
- “Create a folder called ‘Projects’ on my desktop.”
- “Find all PDFs in my Downloads folder.”
- “Take a screenshot and highlight the error message.”
Claude automatically routes these to the CUA agent, making automation a breeze.
My Takes on CUA with Claude 3.7
After testing CUA with Claude 3.7, here’s my vibe:
- Local Powerhouse: Running everything on my Mac keeps data private—no cloud needed.
- Claude 3.7 Shines: Its reasoning makes tasks like terminal commands feel effortless.
- Setup Hiccups: Docker and API key config took a bit of fiddling, but the install script saved time.
- Endless Potential: From opening apps to managing files, CUA feels like a superpower.
If you hit issues, double-check Docker and your API key, and skim the CUA GitHub issues for fixes.
Pro Tips for CUA Success
- Debug Logs: Check Claude logs (~/Library/Logs/Claude/mcp*.log) or Docker logs (docker logs) for errors.
- Try New Tasks: Ask Claude to “Open a browser and go to github.com” or “Create a file named hello.txt” in test.py or the Desktop app.
- Optimize Config: Set CUA_MAX_IMAGES=5 in the config to keep more screenshots in context for tasks like “Highlight an error.”
Final Thoughts: Your CUA and Claude 3.7 Adventure Begins
You’ve done it—you’ve set up the CUA MCP server and unleashed Claude 3.7 to control your computer! From opening a terminal to listing files, you’ve seen how CUA makes automation feel like magic. Try tasks like launching apps or organizing files next, and share your wins on. What’s your next move? A CUA coding assistant? A screenshot bot? And for more, check the CUA GitHub, and happy automating!