Boosting developer productivity requires more than just smart tools—it’s about retaining project knowledge between coding sessions. If you use Cursor’s AI agent, you know it resets its memory every session, causing repetitive explanations and lost context. The Cline Memory Bank solves this, letting you and your AI assistant preserve architectural decisions, key documentation, and API specs—even after a reset. This guide shows you how to set up the Cline Memory Bank in Cursor and seamlessly integrate it with your Apidog API projects for a smoother, more reliable workflow.
What is the Cline Memory Bank in Cursor?
The Cline Memory Bank is a persistent knowledge base for Cursor’s AI agent. While most AI coding tools forget everything after a session ends, the Memory Bank acts as an external brain—storing project details, evolution, and conventions in a series of structured Markdown files. This approach was inspired by Claude’s Cline memory system, adapted specifically for Cursor.
The Memory Bank helps developers and teams:
- Preserve architecture and design decisions
- Track code and feature changes over time
- Maintain documentation of project-specific requirements and conventions
- Eliminate repetitive re-explanations to the AI
- Enable context-aware, accurate code assistance
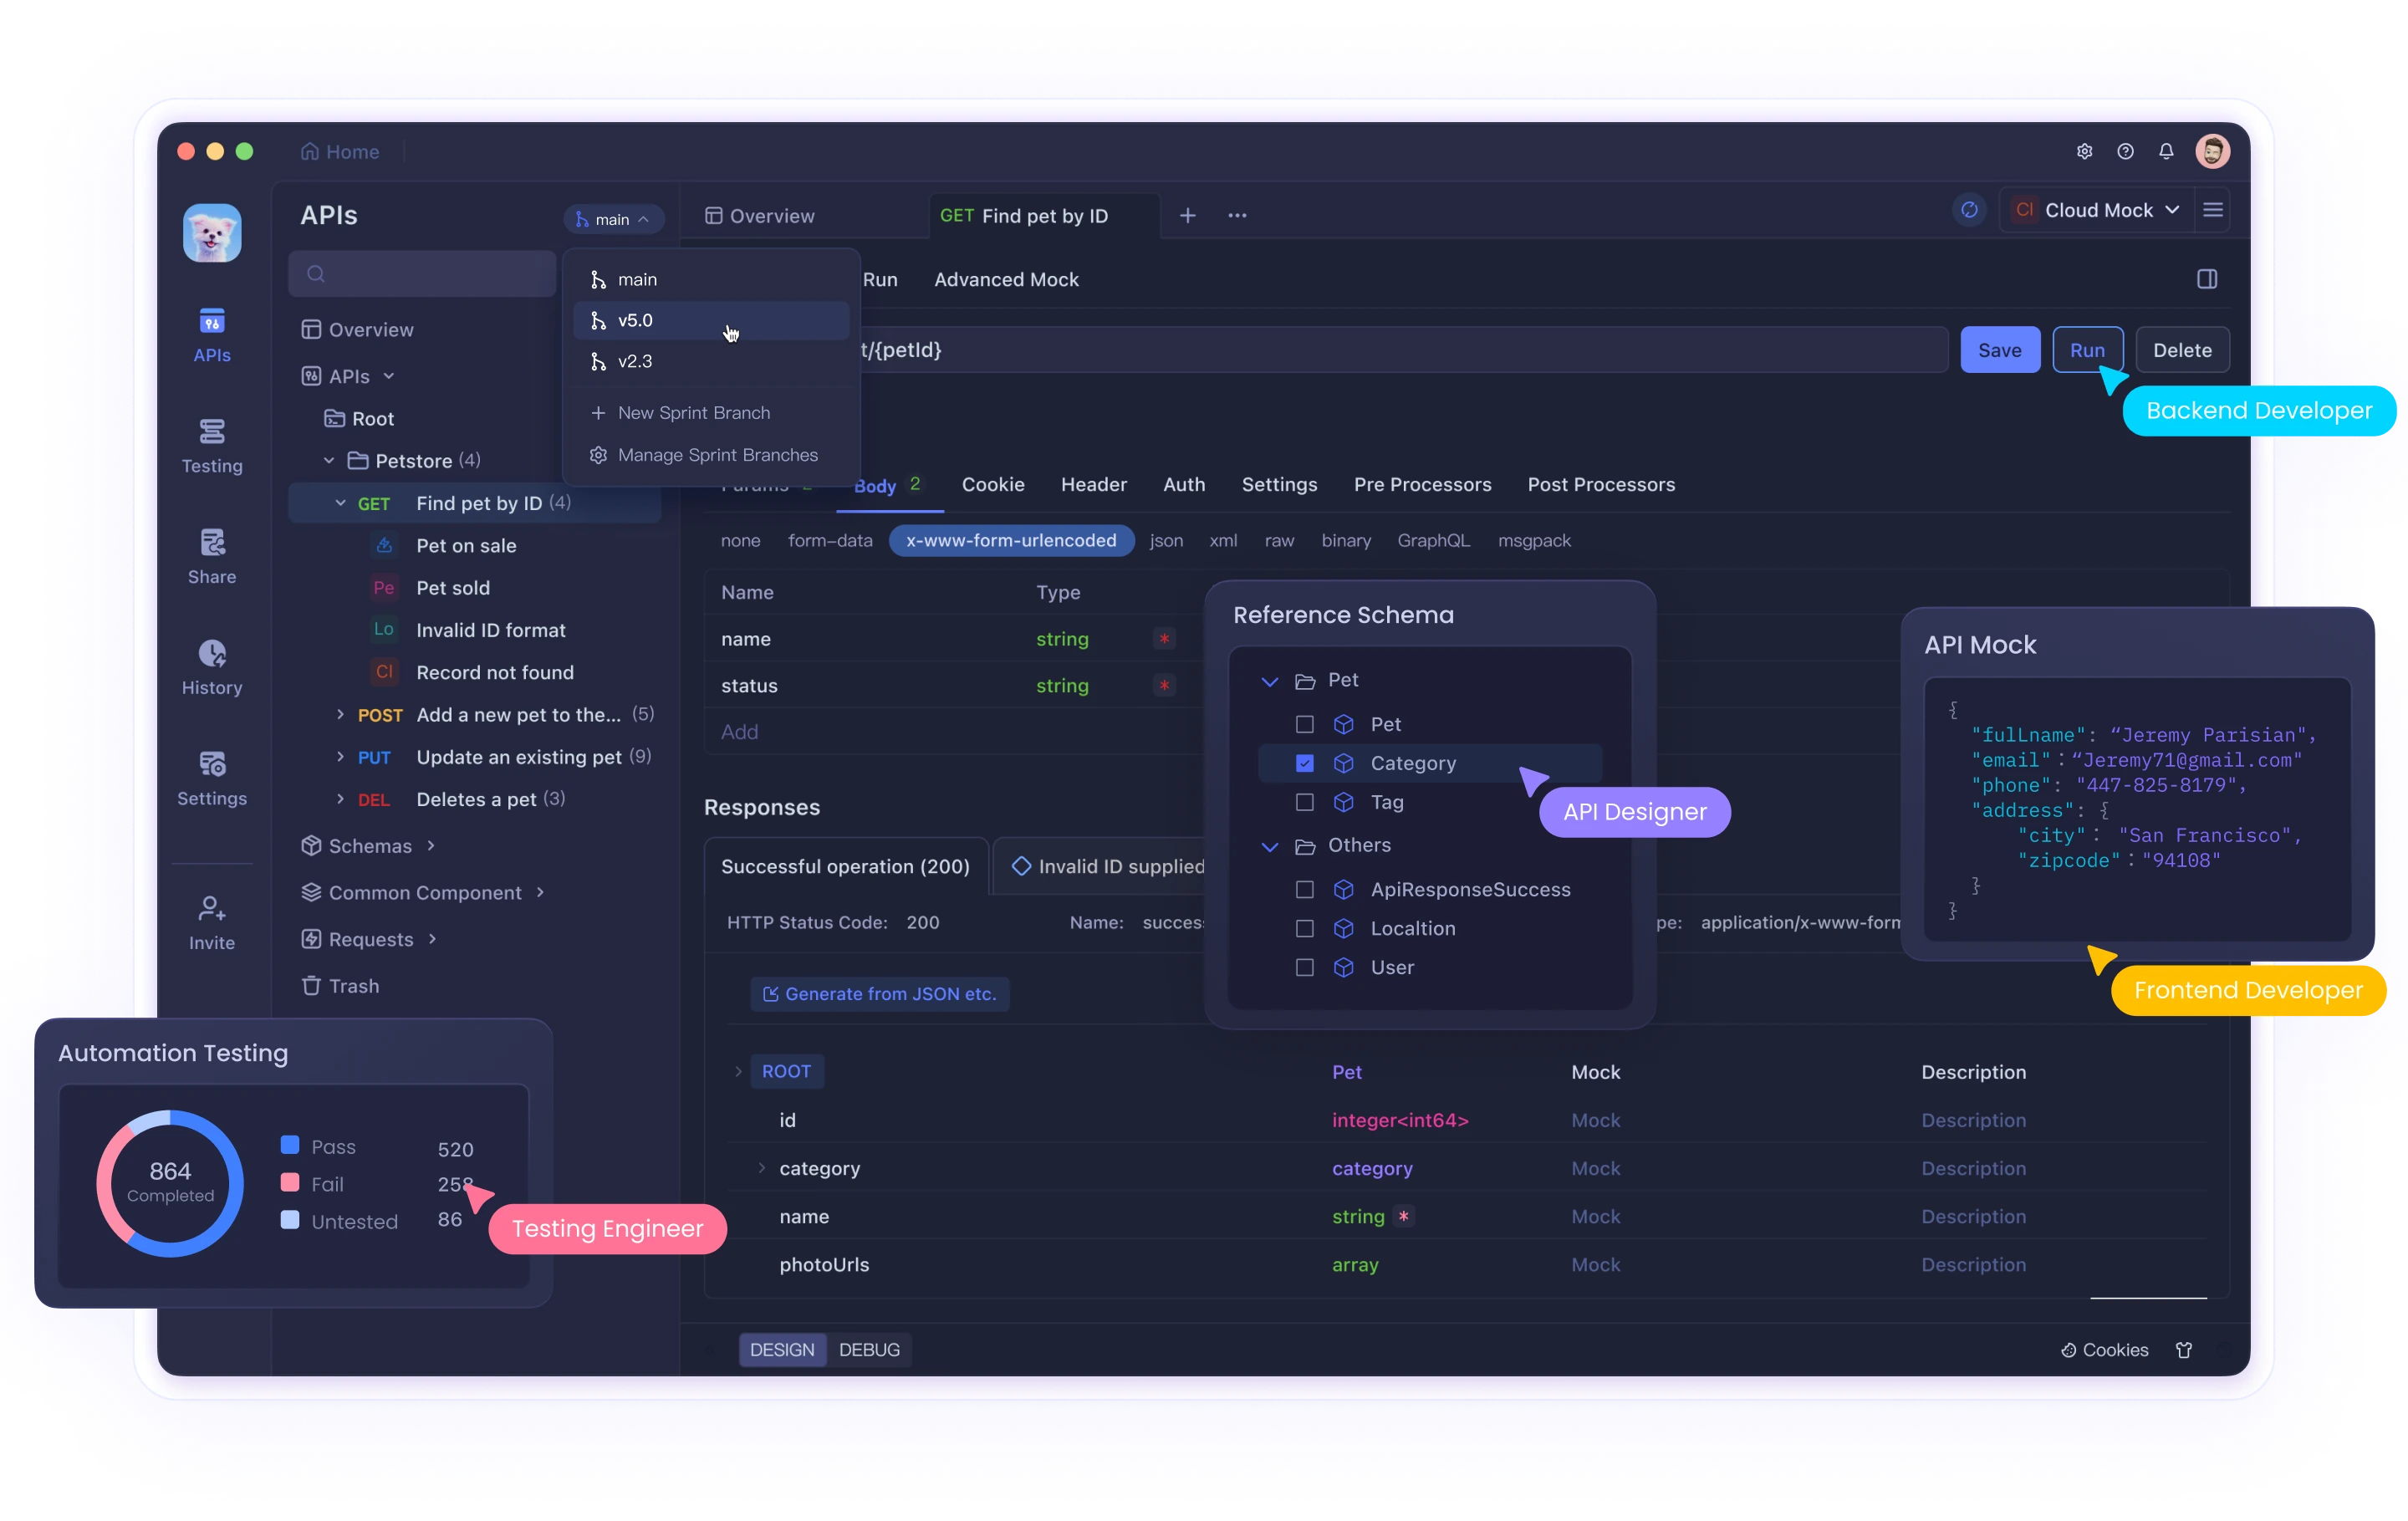
For API-centric projects, you can further extend Cursor’s capabilities by connecting your Apidog API specifications through the Apidog MCP Server.
Why Integrate Apidog MCP Server?
Integrating Apidog MCP Server with Cursor allows the AI agent to:
- Reference your latest API specifications directly from Apidog
- Generate or update code based on real API definitions
- Search API endpoints or models for accurate suggestions
- Create DTOs and add documentation aligned with your API design
This connection ensures your AI assistant always works against the most current API specs, reducing errors and saving time. Learn more in the Apidog MCP Server Documentation or check out the npm package. If you’re looking for a unified, powerful, and cost-effective alternative to Postman, try Apidog.
Key Benefits of the Memory Bank Approach
- Session Continuity: Cursor remembers your project’s structure, rules, and progress, no matter how many times you restart.
- Improved Accuracy: Context-rich responses based on your documented project knowledge.
- Faster Onboarding: No need to re-describe your codebase for every session—Cursor reads from your Memory Bank.
- Knowledge Preservation: Both AI and human teammates benefit from a single source of truth.
- Structured Documentation: Encourages disciplined, team-friendly docs—vital for scaling and maintenance.
Step-by-Step: Setting Up the Cline Memory Bank in Cursor
1. Create a Structured Memory Bank Directory
Organize your project root as follows:
project-root/
├── memory-bank/
│   ├── 00-project-overview.md
│   ├── 01-architecture.md
│   ├── 02-components.md
│   ├── 03-development-process.md
│   ├── 04-api-documentation.md
│   ├── 05-progress-log.md
│   └── notes/
│       ├── feature-specific-notes.md
│       └── other-contextual-information.md
└── .cursor/
    └── rules/
        ├── core.mdc
        └── memory-bank.mdc
- Numbered files serve as main documentation.
- Add granular or feature-specific notes in the
notes/subdirectory.
2. Configure Cursor’s Rules for Memory Management
core.mdc (.cursor/rules/core.mdc)
---
description: Core operational rules for the Cursor agent
globs:
alwaysApply: true
---
## Core Rules

You have two modes of operation:

1. Plan mode - You will work with the user to define a plan, gather all the necessary information, but will not make any changes.
2. Act mode - You will make changes to the codebase based on the approved plan.

- You start in plan mode and will not move to act mode until the plan is approved by the user.
- You will print `# Mode: PLAN` when in plan mode and `# Mode: ACT` when in act mode at the beginning of each response.
- Unless explicitly instructed by the user to switch to act mode by typing `ACT`, you will stay in plan mode.
- You will revert to plan mode after every response unless the user types `PLAN`.
- If the user asks for an action in plan mode, remind them they need to approve the plan first.
- When in plan mode, always output the full updated plan in every response.
- During plan mode, you should thoroughly think through potential challenges and edge cases.
- In act mode, focus on implementing the agreed plan precisely and efficiently.
memory-bank.mdc (.cursor/rules/memory-bank.mdc)

---
description: Memory Bank implementation for persistent project knowledge
globs:
alwaysApply: true
---
I am Cursor, an expert software engineer with a unique characteristic: my memory resets completely between sessions. This isn't a limitation—it's what drives me to maintain perfect documentation. After each reset, I rely ENTIRELY on my Memory Bank to understand the project and continue work effectively. I MUST read ALL memory bank files at the start of EVERY task—this is not optional.

## Memory Bank Guidelines

1. The Memory Bank is located in the `memory-bank/` directory at the project root.
2. All memory files use Markdown format for structured, easy-to-read documentation.
3. The Memory Bank contains both required core files and optional context files.
4. Files are prefixed with numbers to indicate their priority and reading order.
5. I will proactively suggest updates to Memory Bank files when new information emerges.

## Core Memory Files

00-project-overview.md - General project information, goals, and scope
01-architecture.md - System architecture, design patterns, and technical decisions
02-components.md - Details about key components, modules, and their relationships
03-development-process.md - Workflow, branching strategy, and deployment processes
04-api-documentation.md - API endpoints, parameters, and response formats
05-progress-log.md - Chronological record of major changes and implementations

I will read and process these files at the beginning of each session to ensure I have complete context before providing assistance.
3. Initialize Your Memory Bank Documentation
Create each file in memory-bank/ with clear, structured sections. Example templates:
00-project-overview.md
# Project Overview

## Name
[Project name]

## Description
[Project purpose and main goals]

## Key Stakeholders
- [Team members, roles]

## Timeline
- [Milestones and deadlines]

## Technology Stack
- [Languages, frameworks, libraries]

## Repository Structure
- [Directory overview]

## Getting Started
- [Setup and onboarding instructions]
01-architecture.md
# Architecture Documentation

## System Architecture
[Diagram or description]

## Design Patterns
- [Patterns applied]

## Data Flow
[How data moves through the system]

## Security
[Security measures]

## Database Schema
[Structure and relationships]

## Technical Decisions
[Key rationales and trade-offs]
Continue with similar detail for 02-components.md, 03-development-process.md, 04-api-documentation.md, and 05-progress-log.md.
💡 Want a single hub for all MCP Servers? Visit himcp.ai.

4. Instruct Cursor to Use the Memory Bank
Start a session and provide this instruction:
“I’ve set up the Memory Bank. Please read all files in the
memory-bank/directory. Always consult them at the start of future sessions and suggest updates as the project evolves.”
5. Keep Your Memory Bank Up to Date
- Update after major changes: Reflect new features, refactors, or API updates.
- Review regularly: Ensure documentation stays accurate for both AI and team members.
- Be specific: Concrete examples and code snippets increase value.
- Track progress: Log changes in
05-progress-log.md. - Delegate updates: Cursor can suggest changes based on your coding conversations.
Advanced Techniques for Large Projects
Domain-Based Slicing
For complex systems, split the Memory Bank by area:
memory-bank/
├── core/
│   ├── 00-project-overview.md
│   └── 01-architecture.md
├── frontend/
│   ├── components.md
│   └── state-management.md
├── backend/
│   ├── api-endpoints.md
│   └── database.md
└── devops/
    ├── deployment.md
    └── monitoring.md
Memory Tags and Cross-References
Use tags for quick lookup and linking:
## Authentication Flow #auth #security
...
See also: [API Security Measures](#api-security)
Persistent vs. Session Memory
Separate long-term project docs from session-specific notes:
memory-bank/
├── persistent/
│   └── [core project docs]
└── session/
    └── [task-specific info]
Conclusion
By implementing the Cline Memory Bank and connecting your Apidog API specs via MCP Server, Cursor transforms from a stateless code assistant into a context-aware project partner. Your team gains continuity, accuracy, and time savings—especially on API-driven projects, where staying up-to-date is critical. Invest in maintaining this system and you’ll notice fewer repeated explanations, smarter AI responses, and a more organized codebase.
Looking to streamline your API development process? Apidog offers a unified platform for designing, testing, and documenting APIs. Improve your team’s productivity and collaboration—try Apidog today!