
Java is a top choice for building robust backend systems and APIs, but its complex development environments can create a steep learning curve for new and experienced developers alike. BlueJ, a free and beginner-friendly Java IDE, is designed to simplify Java development by focusing on object-oriented fundamentals without overwhelming you with unnecessary features. Whether you're a backend engineer, QA, or API-focused team looking to train new Java talent, BlueJ offers a visual, interactive environment for rapid learning and prototyping.
In this guide, you'll learn how to install and use BlueJ effectively for free Java development, explore its features tailored for object-oriented programming, and see how integrating API design and testing with Apidog can streamline your workflow as you move from local Java projects to real-world API services.
Why BlueJ is the Best Free Java IDE for Learning and API Prototyping
BlueJ was developed at Monash University with education in mind—making it ideal for those new to Java or anyone seeking a lightweight environment for prototyping. Unlike heavyweight IDEs like Eclipse or IntelliJ, BlueJ removes distractions and offers:
- Visual Class Diagrams: Instantly see class relationships and inheritance.
- Interactive Object Bench: Create, test, and modify objects without boilerplate.
- Direct Method Interaction: Right-click to invoke methods and view real-time results.
- Minimalist Interface: Only essential tools—no clutter, no confusion.
- Cross-Platform Compatibility: Runs smoothly on Windows, macOS, and Linux.
- Completely Free: No licenses, no hidden fees, no limitations.
Why API Developers and Teams Choose BlueJ
For API engineers and QA teams, BlueJ accelerates onboarding and experimentation. Its visual approach clarifies class design and data modeling—skills essential for effective API development. By stripping away nonessential features, BlueJ lets you focus on Java basics, object modeling, and rapid prototyping, setting a strong foundation before you scale up to full-stack or enterprise tools.
How to Install BlueJ (and Java) on Any Platform
Before using BlueJ, ensure Java is installed on your system. BlueJ supports JDK 1.3 or higher (JDK 8+ is recommended for modern features and security).
Step 1: Install Java JDK
- Download the latest JDK from Oracle or use OpenJDK.
- Follow OS-specific installation instructions.
- Verify installation:
java -version
Step 2: Download and Install BlueJ
For Windows
- Go to bluej.org.
- Download the Windows
.msiinstaller. - Run the installer and follow the setup prompts.
- Choose your install directory and create shortcuts.
- Launch BlueJ from Start menu or desktop.
For macOS
- Download the
.zipfrom bluej.org. - Extract and move BlueJ to your Applications folder.
- Launch from Applications or pin to Dock.
For Linux
- Download the
.debpackage for Debian/Ubuntu. - Install via terminal:
sudo dpkg -i BlueJ-linux-xxx.deb - Alternatively, use the portable JAR:
java -jar BlueJ-generic-xxx.jar
System Requirements
- 64-bit operating system
- Java 8 or newer
- Minimum 4GB RAM (8GB recommended)
- 500MB free storage
Getting Started: Create Your First Java Project in BlueJ
With BlueJ installed, you can quickly build and test Java classes—ideal for backend prototyping and object modeling.
Launch BlueJ and Set Up a Project
- Open BlueJ.
- Click
Project → New... - Name your project (e.g.,
ApiModelDemo) and choose a save location.
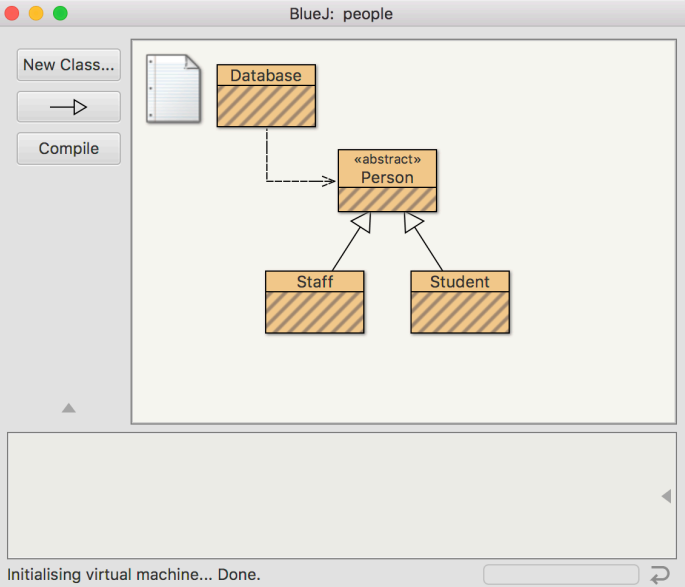
Explore the BlueJ Interface
- Project View: Visual layout of classes as boxes and relationships as arrows.
- Object Bench: Instantiated objects for testing live at the bottom.
- Toolbar: Fast access to project, edit, and compile options.
- Menu Bar: File, Project, Edit, View, Tools for extended features.
Create and Edit Your First Java Class
- Click "New Class" or use
Project → New Class. - Choose "Standard" and name your class (e.g.,
Student). - Double-click the class box to edit code.
Example: Simple Java Class for API Modeling
public class Student {
    private String name;
    private int id;

    public Student(String name, int id) {
        this.name = name;
        this.id = id;
    }

    public void displayInfo() {
        System.out.println("Student: " + name + ", ID: " + id);
    }

    public static void main(String[] args) {
        Student s = new Student("Alice", 101);
        s.displayInfo();
    }
}
- Click "Compile" to check for errors and build the class.
Key BlueJ Features Every API Developer Should Use
BlueJ's interactive and visual tools help backend and API teams rapidly model, test, and iterate on Java code.
Interactive Object Creation and Method Testing
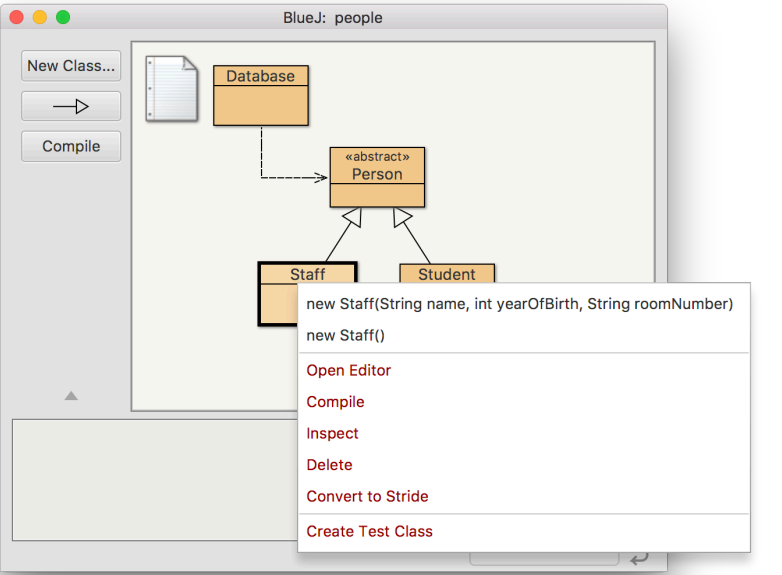
- Right-click a Class: Choose a constructor to instantiate an object (e.g.,
new Student("Bob", 102)). - Object Bench: Your created object appears here.
- Right-click Object: Call methods like
displayInfo()without extra code. - Immediate Feedback: Output and object state are shown instantly.
Benefits for API Teams:
- Test data models and logic before integrating with APIs.
- Debug and verify method behaviors interactively.
- Teach or review OOP principles visually within your team.
Visualizing Class Relationships and Dependencies
- Inheritance: Hollow arrows show superclass/subclass links.
- Interfaces: Dotted arrows indicate implementations.
- Dependencies: Dashed lines represent usage relationships.
Why It Matters:
For backend and API design, visualizing how entities relate (e.g., User, Order, Product) is crucial. BlueJ lets you diagram and adjust these connections before you write actual endpoints.
Error-Resistant Code Editing and Compilation
- Syntax Highlighting: Easily spot Java keywords and structure.
- Real-Time Error Detection: Catch mistakes as you type.
- Simple Compilation: One-click compile; issues are highlighted and explained.
- Basic Debugging: Set breakpoints, step through code, inspect variables and call stack.
Tip: Use BlueJ’s debugging tools to trace logic in model or utility classes that your APIs will depend on.
Advanced BlueJ Tips for Growing Java and API Projects
As you move beyond basics, BlueJ supports more advanced workflows for API and backend development.
Using the Code Pad for Rapid Prototyping
- Open via
View → Show Code Pad. - Run quick expressions or try out Java library features:
2 + 3;
"API".toLowerCase();
Math.max(5, 8);
new Student("Eve", 103).displayInfo();
Perfect for:
Quickly testing logic or library methods before integrating them into your API models.
Utilizing Java Libraries in BlueJ
- Go to
Tools → Use Library Class. - Add classes like
java.util.ArrayList,java.util.Scanner, or others relevant to API data handling. - Instantiate and test how standard libraries behave with your custom classes.
Why:
Understanding and integrating Java libraries is essential for backend engineers building scalable API services.
Project Management and Documentation
- Create Executable JARs:
Project → Create JAR Filefor easy distribution. - Generate Javadoc:
Tools → Project Documentation—essential for team collaboration and API documentation alignment. - Organization Tips:
- Use clear, descriptive names for classes and projects.
- Group related entities logically.
- Regularly back up your BlueJ projects.
Integrating BlueJ and Apidog for Rapid API Design and Testing
As your Java skills grow, you’ll want to connect your backend logic to external systems via APIs. Apidog is an all-in-one API development platform that bridges the gap between local Java modeling in BlueJ and real-world API design, testing, and documentation.
How Apidog Enhances Your Java Workflow
- API Design: Create precise OpenAPI specifications for your Java projects.
- Mocking: Generate API mocks to test endpoints before full implementation.
- Testing & Validation: Send requests, verify responses, and catch errors early—without leaving your workflow.
- Collaboration: Share API contracts across your team for consistent backend and frontend integration.
Typical Workflow for Backend/API Teams
- Design API in Apidog: Define endpoints, schemas, authentication, and validation.
- Model in BlueJ: Build data structures and logic classes that align with your API contract.
- Test Integration: Use Apidog to send live requests to your Java backend, ensuring your implementation matches the API spec.
- Document and Share: Generate interactive docs and code samples for your team or partners.
Practical Example: Student Management API
API Contract in Apidog:
GET /students— List all students.POST /students— Create a new student.GET /students/{id}— Retrieve specific student.PUT /students/{id}— Update student details.DELETE /students/{id}— Remove a student.
Java Implementation in BlueJ:
Studentclass for data modeling.StudentServicefor business logic.StudentControllerfor handling HTTP routes.- Optionally, simple in-memory or file-based storage.
Testing:
- Use Apidog to send requests to your endpoints.
- Validate JSON responses and error handling.
- Ensure your backend matches the API spec—catching discrepancies before production.
Troubleshooting: Common BlueJ Issues and Solutions
Even with BlueJ’s user-friendly design, some issues can arise:
Installation Problems
- Java Not Found:
- Confirm JDK is installed:
java -version. - Check your system PATH.
- Reinstall Java if needed.
- Confirm JDK is installed:
- BlueJ Won’t Launch:
- Use 64-bit OS.
- Ensure Java version is supported.
- Reset BlueJ preferences if problems persist.
- Missing Dependencies:
- Install JavaFX if required.
- Update BlueJ to the latest version.
Compilation and Runtime Errors
- Syntax Errors:
- Check for missing semicolons, brackets, or mismatched class/file names.
- Review import statements.
- Use BlueJ’s error messages and navigation.
- Runtime Issues:
- Confirm correct object instantiation and method calls.
- Check parameter types.
- Use debugger and inspect object state.
- Performance:
- Close unused projects.
- Limit the number of active objects.
- Restart BlueJ to clear memory.
Conclusion: Level Up Your Java and API Development with BlueJ + Apidog
BlueJ remains the go-to free Java IDE for rapid learning, prototyping, and backend modeling. Its visual, interactive approach accelerates mastery of object-oriented concepts for API and backend engineers—making it a smart choice for onboarding, teaching, or prototyping.
Key Takeaways:
- Start Simple: BlueJ removes barriers for new Java developers and teams.
- Visualize Relationships: Instantly understand object models and dependencies.
- Test Interactively: Debug and validate logic before full API integration.
- Integrate with Apidog: Transition seamlessly from local modeling to professional API design, testing, and documentation.
Next Steps:
- Download BlueJ from bluej.org and begin modeling your backend entities.
- As you move toward API-driven applications, leverage Apidog for robust API design, testing, and collaboration.
- Practice by building small projects, then scale to real-world APIs as your team’s needs grow.


