In the age of RESTful APIs and microservices, securing your endpoints is absolutely essential. One popular and effective method to ensure that only authorized users can access specific resources is through Bearer Token authentication. In this blog, we will explore how to implement Bearer Token authentication in a Node.js application using Express. We’ll cover the basics of Bearer Tokens, how to set them up in your application, and best practices to ensure a robust security architecture.
What is Bearer Token Authentication?
Bearer Token authentication involves issuing a token upon user authentication, which the client must include in the Authorization header of subsequent requests. This token acts as a "bearer" of credentials, meaning that anyone possessing the token can gain access to the associated resources. JSON Web Tokens (JWT) are a commonly used form of Bearer Tokens due to their stateless nature and flexibility.
Step 1: Setting Up Your Node.js and Express Application
Before we dive into Bearer Token implementation, let’s set up a basic Node.js and Express application. We’ll start by initializing a new project and installing the necessary dependencies.
1. Initialize a New Project:
mkdir express-bearer-token && cd express-bearer-token
npm init -y
2. Install Required Packages:
npm install express body-parser jsonwebtoken
express: The web framework for Node.js.jsonwebtoken: A library to sign, verify, and decode JWTs.body-parser: Middleware to parse incoming request bodies.
3. Set Up Basic Server:
Create an index.js file and set up an Express server:
const express = require('express');
const bodyParser = require('body-parser');
const jwt = require('jsonwebtoken');

const app = express();
const PORT = 3000;
const SECRET_KEY = 'your_secret_key';

app.use(bodyParser.json());

app.get('/', (req, res) => {
    res.send('Welcome to the Bearer Token Authentication Tutorial!');
});

app.listen(PORT, () => {
    console.log(`Server is running on http://localhost:${PORT}`);
});
Step 2: Generating a JWT
First and foremost, you need to create an endpoint for user login to generate and send back a JWT token. For simplicity, we'll use a dummy user.
1. Add a Login Route:
const users = {
    user1: { username: 'user1', password: 'password1' }  // Dummy user
};

app.post('/login', (req, res) => {
    const { username, password } = req.body;
    const user = users[username];

    if (user && user.password === password) {
        const token = jwt.sign({ username }, SECRET_KEY, { expiresIn: '1h' });
        res.json({ token });
    } else {
        res.status(401).send('Invalid credentials');
    }
});
Step 3: Protecting Routes with Bearer Token
To protect certain routes, you'll need middleware that validates the Bearer Token from incoming requests.
1. Create Authentication Middleware:
Create a middleware function to verify the Bearer token. This middleware will check the Authorization header in incoming requests and verify the token using a secret key.
const authenticateToken = (req, res, next) => {
    const authHeader = req.headers['authorization'];
    const token = authHeader && authHeader.split(' ')[1];  // Bearer <token>

    if (token == null) return res.sendStatus(401);  // No token present

    jwt.verify(token, SECRET_KEY, (err, user) => {
        if (err) return res.sendStatus(403);  // Invalid token

        req.user = user;
        next();
    });
};
2. Creating Routes:
Create routes for login and a protected route that requires authentication.
const users = [
  { id: 1, username: 'user1', password: 'password1' },
  { id: 2, username: 'user2', password: 'password2' }
];

app.post('/login', (req, res) => {
  const { username, password } = req.body;
  const user = users.find(u => u.username === username && u.password === password);

  if (!user) {
    return res.status(400).send('Username or password is incorrect');
  }

  const token = jwt.sign({ username: user.username }, 'your_jwt_secret_key', { expiresIn: '1h' });
  res.json({ token });
});

app.get('/protected', authenticateToken, (req, res) => {
  res.send('This is a protected route');
});
Step 4: Testing the Implementation
Run your server:
node app.js
To test the implementation:
- Login: Send a POST request to
/loginwith a JSON body containing a validusernameandpassword. If the credentials are correct, you'll receive a JWT. - Access Protected Route: Send a GET request to
/protectedwith theAuthorizationheader set toBearer <your_token>. If the token is valid, you'll be able to access the protected route.
Testing API Bearer Token Authentication with Apidog
Bearer token authentication is a common method used in web applications to secure API requests. Apidog, a versatile API tool, simplifies this process, allowing developers to authenticate API requests effortlessly. Here is a step-by-step guide on how you can test API Bearer token authentication using Apidog.
Step 1: Setting Up Apidog
- Download and Install Apidog: Download Apidog and follow the installation instructions for your operating system.
- Create a New Project: Open Apidog and create a new project where you can manage your API requests and tests.
Step 2: Adding a Bearer Token to API Request
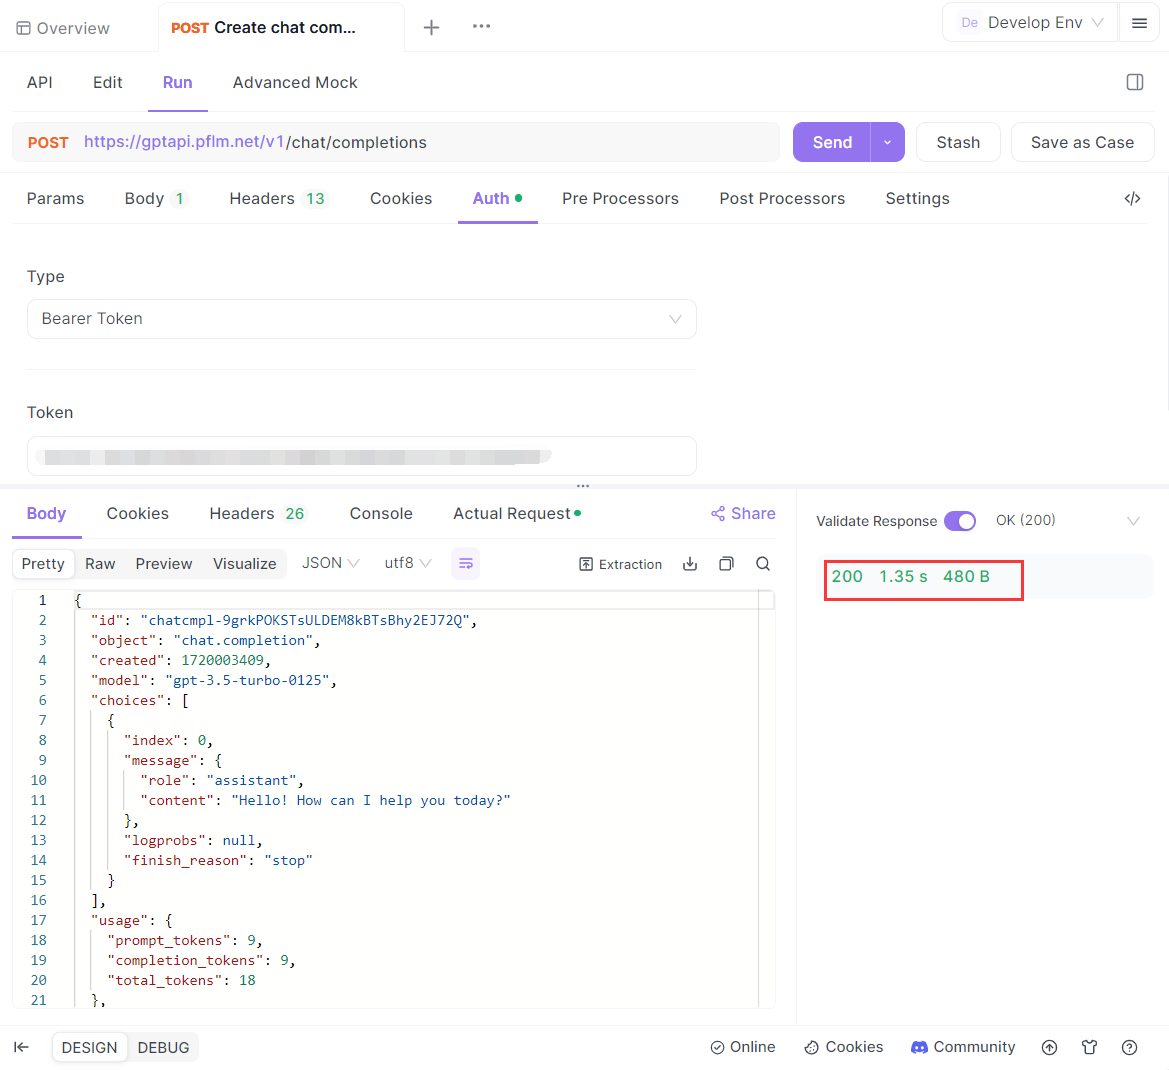
1. Select the Bearer Token Authentication: At the project dashboard, create a new API request. Navigate to "Auth", and select "Bearer Token" from the dropdown.
2. Enter the Token: Directly enter your token value. Apidog automatically prefixes it with "Bearer" for the actual request.
3. Send the Request: With the Bearer token set, send the request. Apidog will include the token in the authorization header, allowing you to access protected resources.
Step 3: Verifying the Response
After sending the request, check the response to ensure that the API call was successful. A 200 OK status typically indicates successful authentication.
Why Choosing Bearer Token for API Authentication?
Bearer token authentication is widely chosen for API authentication due to several advantages:
- Statelessness: Bearer tokens allow the server to authenticate requests without maintaining session state, making it easier to scale applications.
- Simplicity: Tokens are easy to implement and use, typically included in the HTTP Authorization header.
- Security: Tokens can be encrypted and have expiration times, enhancing security.
- Interoperability: Bearer tokens are standardized and can be used across different platforms and services, promoting interoperability.
These benefits make Bearer tokens a robust and flexible option for securing APIs.
Best Practices for Bearer Token Security
1. Use Strong Secret Keys:
Ensure your secret key used for signing JWTs is complex and stored securely. Avoid hardcoding it in your codebase—consider using environment variables.
2. Token Expiration:
Always set an expiration time for tokens to minimize the risk of misuse if they are stolen. Regularly rotate and invalidate tokens.
3. HTTPS:
Use HTTPS to protect data in transit, including the Bearer Tokens, ensuring encryption between client and server.
4. Secure Storage:
On the client-side, store tokens securely. HTTP-only and Secure cookies are often the best choice over local storage or session storage.
5. Rate Limiting and Monitoring:
Implement rate limiting to prevent brute force attacks. Additionally, monitor your APIs for any unauthorized access attempts.
6. Blacklist Compromised Tokens:
Maintain a mechanism to invalidate tokens, such as a blacklist, should there be a need to revoke access immediately.
Conclusion
Bearer Token authentication using JWT in a Node.js and Express application provides a robust and scalable approach to securing your APIs. Following the steps outlined in this blog, you can implement secure token-based authentication and effectively protect your resources.
Security is an ongoing process, and while Bearer Tokens offer many advantages, always stay informed about the latest security best practices and threats. With this foundation, you're well on your way to building secure, scalable, and efficient APIs in Node.js using Express.