
Model Context Protocol (MCP) is an emerging standard that enables applications to provide context and capabilities to large language models (LLMs). A key feature of MCP is its ability to define tools that AI agents can leverage to accomplish tasks. Azure Functions MCP bridges the gap between serverless cloud computing and AI assistant capabilities, allowing developers to build scalable tools that can be accessed by AI agents.
In this tutorial, we'll explore what Azure Functions MCP is, how to install it, how to start an MCP server, and how to use it with GitHub Copilot. By the end of this guide, you'll have a functional MCP server running that can be accessed by AI agents to perform useful tasks.
Pro Tip: While building your MCP servers, you'll need to test those API endpoints thoroughly. I highly recommend giving Apidog a try—it's the best Postman alternative I've found for API testing and development.

Unlike traditional API tools, Apidog offers built-in mock servers, automated testing, and a collaborative workspace that's particularly helpful when working with event-driven architectures like Azure Functions.

The ability to visualize SSE streams in real-time will be invaluable as you debug your MCP server implementations. You can grab it at apidog.com to streamline your development workflow.
What is Azure Functions MCP Server?
Azure Functions MCP Server is an experimental preview feature that adds Model Context Protocol (MCP) support to Azure Functions, Microsoft's serverless computing solution. It introduces specialized triggers and bindings specifically designed for creating tools that AI agents can use via MCP.
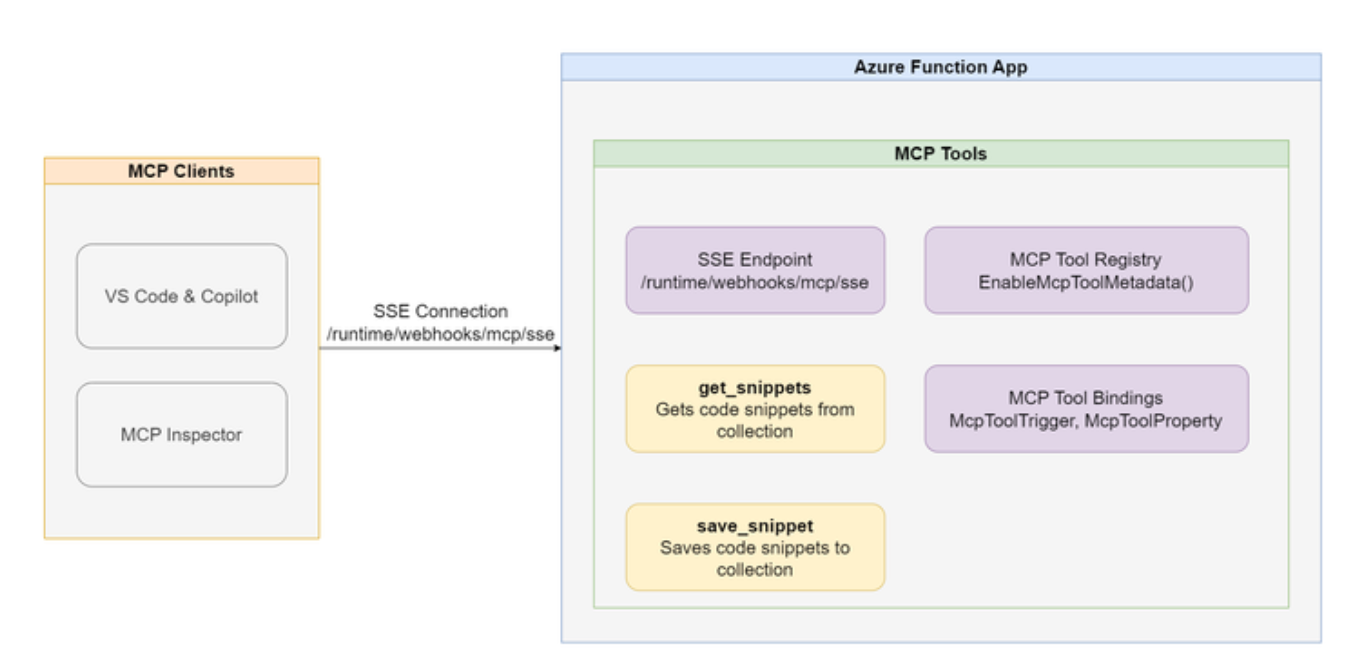
This integration allows developers to build cloud-scale remote MCP servers with server-sent events (SSE) that can be leveraged by AI models like those in GitHub Copilot. Azure Functions MCP provides a seamless way to develop event-driven, automatically scaling AI-assistive tools across Python, Node.js (TypeScript), and .NET (C#) environments.
The key component is the MCP tool trigger, which enables functions to act as tools with defined properties that AI agents can discover and invoke based on context.
How to Install Azure Functions MCP Server
Let's walk through the steps to install and configure Azure Functions MCP:
Prerequisites
- Visual Studio Code
- Azure Functions Core Tools
- .NET SDK 6.0 or later (for C# development)
- Node.js (for TypeScript development)
- Python 3.8 or later (for Python development)
- Azure CLI (for deployment to Azure)
Installation Steps
Create an Azure Functions project: Start by creating a new Azure Functions project in your preferred language. You can follow the Azure Functions documentation for Visual Studio Code to create a project.
Add the MCP extension:
For C#:
dotnet add package Microsoft.Azure.Functions.Worker.Extensions.Mcp --version 1.0.0-preview.1
For Python and Node.js, you'll need to add an experimental extension bundle to your host.json file:
"extensionBundle": {
  "id": "Microsoft.Azure.Functions.ExtensionBundle.Experimental",
  "version": "[4.*, 5.0.0)"
}
Install Azurite (for local development): Since MCP extension uses blob storage, you'll need to run Azurite, the Azure Storage emulator, locally:
Open the command palette (Shift + Ctrl + P)
Select "Azurite: Start"
Update your local.settings.json to use it:
{
  "IsEncrypted": false,
  "Values": {
    "AzureWebJobsStorage": "UseDevelopmentStorage=true",
    "FUNCTIONS_WORKER_RUNTIME": "dotnet-isolated"
  }
}
How to Start Azure Functions MCP Server
Now that you have installed the MCP extension, let's create and run an MCP server:
Creating an MCP Tool
Here's an example of creating a simple time utility tool in C#:
using Microsoft.Azure.Functions.Worker;
using Microsoft.Azure.Functions.Worker.Extensions.Mcp;
using System.Globalization;
using System.Text.Json;

namespace AzfuncMcp;

public class TimeUtil
{
    [Function(nameof(GetCurrentTime))]
    public string GetCurrentTime(
        [McpToolTrigger("getcurrenttime", "Gets the current time. If no timezone is specified, the tool will return the time in UTC.")] ToolInvocationContext context,
        [McpToolProperty("timezone", "string", "The name of the timezone.")] string timezone = "UTC")
    {
        try
        {
            TimeZoneInfo timeZoneInfo = TimeZoneInfo.FindSystemTimeZoneById(timezone);
            DateTime currentTime = TimeZoneInfo.ConvertTimeFromUtc(DateTime.UtcNow, timeZoneInfo);

            var response = new {
                timezone = timeZoneInfo.StandardName,
                time = currentTime.ToString("yyyy-MM-dd HH:mm:ss", CultureInfo.InvariantCulture),
                displayName = timeZoneInfo.DisplayName
            };

            return JsonSerializer.Serialize(response);
        }
        catch (TimeZoneNotFoundException)
        {
            return $"The timezone '{timezone}' was not found.";
        }
        catch (InvalidTimeZoneException)
        {
            return $"The timezone '{timezone}' is invalid.";
        }
        catch
        {
            return "Could not get the current time.";
        }
    }
}
Configuring Program.cs for MCP
Update your Program.cs file to register the MCP tool:
using Microsoft.Azure.Functions.Worker.Builder;
using Microsoft.Extensions.Hosting;
using AzfuncMcp;

var builder = FunctionsApplicationBuilder.CreateBuilder(args);
builder.ConfigureFunctionsWebApplication();
builder.EnableMcpToolMetadata();
builder.ConfigureMcpTool(nameof(TimeUtil.GetCurrentTime))
    .WithProperty("timezone", "string", "The timezone.");

builder.Build().Run();
Starting the Server
To start the MCP server locally:
Make sure Azurite is running.
Open a terminal in your project directory.
Run this command:
func start
Or use Visual Studio Code's debugging features:
- Open the "Run and Debug" view
- Select "Attach to .NET Functions"
- Press F5 or click the green play button
Once started, your MCP server will be accessible at: http://localhost:7071/runtime/webhooks/mcp/sse
How to Use Azure Functions MCP Server with GitHub Copilot
Now that your MCP server is running, let's connect it to GitHub Copilot:
Configuring GitHub Copilot to Use Your MCP Server
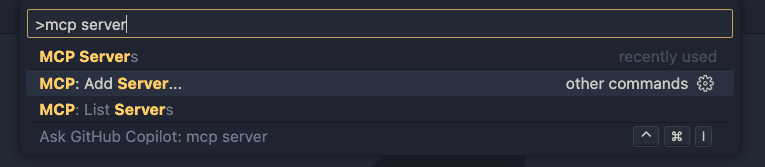
Add your MCP server to VS Code:
- Open the Command Palette (Shift + Ctrl + P)
- Type and select "MCP: Add Server"
- Choose "HTTP (server sent events)" option
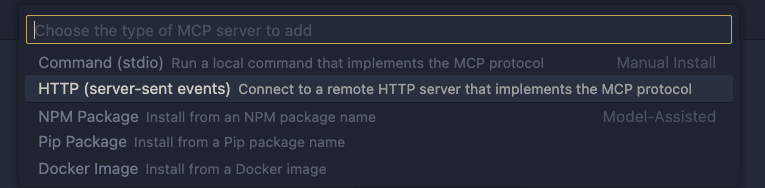
- Enter the URL:
http://localhost:7071/runtime/webhooks/mcp/sse - Give your server a name (e.g., "my-azfunc-mcp-server")
Verify the configuration: The settings.json file in your VS Code workspace should be updated with something like:
"mcp": {
  "inputs": [],
  "servers": {
    "my-azfunc-mcp-server": {
      "type": "sse",
      "url": "<http://localhost:7071/runtime/webhooks/mcp/sse>"
    }
  }
}
Remove sample servers if needed: If there are any pre-configured sample servers (like "mcp-server-time"), you might want to remove them to avoid conflicts with your implementation.
Using Your MCP Server with GitHub Copilot
- Open GitHub Copilot Chat:
- Make sure the mode is set to "Agent" mode (this is essential for MCP functionality)
- Enable your MCP server:
- Click the MCP settings icon (wrench and screwdriver icon)
- Ensure your added MCP server is enabled
- Interact with your tool:
- In the chat window, ask a question that would require your MCP tool
- For example, with our time utility tool, you could ask "What time is it right now?" or "What's the current time in Tokyo?"
- GitHub Copilot will prompt you for permission to use the external MCP tool
- After clicking "Continue", Copilot will invoke your MCP tool and display the results
- Watch your function in action: If you're running in debug mode, you can set breakpoints in your function and see them being hit when GitHub Copilot invokes your tool.
Deploying to Azure
For production use, you'll want to deploy your MCP server to Azure:
Deploy your function app using Azure Functions Core Tools or Azure Developer CLI:
func azure functionapp publish <your-function-app-name>
or
azd up
Configure MCP client with authentication: When accessing a deployed Azure Function, you'll need to provide authentication. Update your settings.json:
"mcp": {
  "inputs": [
    {
      "type": "promptString",
      "id": "functions-mcp-extension-system-key",
      "description": "Azure Functions MCP Extension System Key",
      "password": true
    }
  ],
  "servers": {
    "my-azfunc-mcp-server": {
      "type": "sse",
      "url": "<your-app-name>.azurewebsites.net/runtime/webhooks/mcp/sse",
      "headers": {
        "x-functions-key": "${input:functions-mcp-extension-system-key}"
      }
    }
  }
}
Get your function key:
- Navigate to your function app in Azure Portal
- Go to App Keys
- Copy the
mcp_extensionsystem key
Example Use Cases
Azure Functions MCP can be used for various scenarios:
- Code snippet management: Create tools to save and retrieve code snippets
- Data retrieval: Access databases or APIs to fetch specific information
- Calculations: Perform complex calculations not easily done by the LLM
- External system integration: Connect to enterprise systems, APIs, or services
Limitations and Considerations
- This is an early experimental preview, so expect breaking changes as the feature evolves.
- At the time of writing, Windows Azure Functions hosting might have issues with MCP; Linux hosting is recommended.
- While MCP currently supports tools, other features like prompts will be added over time.
- Since this is a preview feature, it doesn't qualify for standard Azure support plans yet.
Conclusion
Azure Functions MCP provides a powerful way to extend AI agents with custom tools that can leverage the full power of the Azure ecosystem. By following this guide, you've learned how to install, configure, and use Azure Functions MCP with GitHub Copilot.
As MCP becomes more widely adopted, having these skills will enable you to build increasingly sophisticated AI-powered applications that combine the reasoning capabilities of large language models with the execution capabilities of your custom code.
Remember that MCP is an evolving standard, and Azure Functions MCP is in preview, so keep an eye on the official documentation and community forums for updates and best practices.
Resources
- Official Azure Functions MCP announcement
- Azure Functions MCP samples on GitHub
- MCP servers implementation samples
- Azure Functions documentation
- GitHub Copilot documentation
By following this guide, you now have the knowledge to leverage Azure Functions MCP to create powerful tools that can be used by AI agents through GitHub Copilot and other MCP-compatible interfaces.


