In modern API gateway architectures, the ability to dynamically orchestrate plugins represents a critical advancement in traffic management and request processing. Apache APISIX's plugin orchestration system implements a sophisticated approach to handling complex API scenarios through a directed acyclic graph (DAG) execution model.
Still struggling with writing API Documentation? Want to create professional, dynamic API Docs on auto-pilot?
Use APIDog to keep your API Documentation up-to-date, automatically!
Never bother to update your documentation whenever you make a change in API parameter, or updating to a new API version, APIDog keeps everything updated, all the time!
Boost your API Testing efficiency with APIDog!
Plugin Orchestration of APISIX, A Quick Overview
At its core, plugin orchestration in APISIX enables conditional processing paths based on plugin execution results, allowing for dynamic request handling without requiring custom code. This system operates through a distributed architecture that maintains separation between control and data planes while ensuring high performance through optimized state management and in-memory processing.
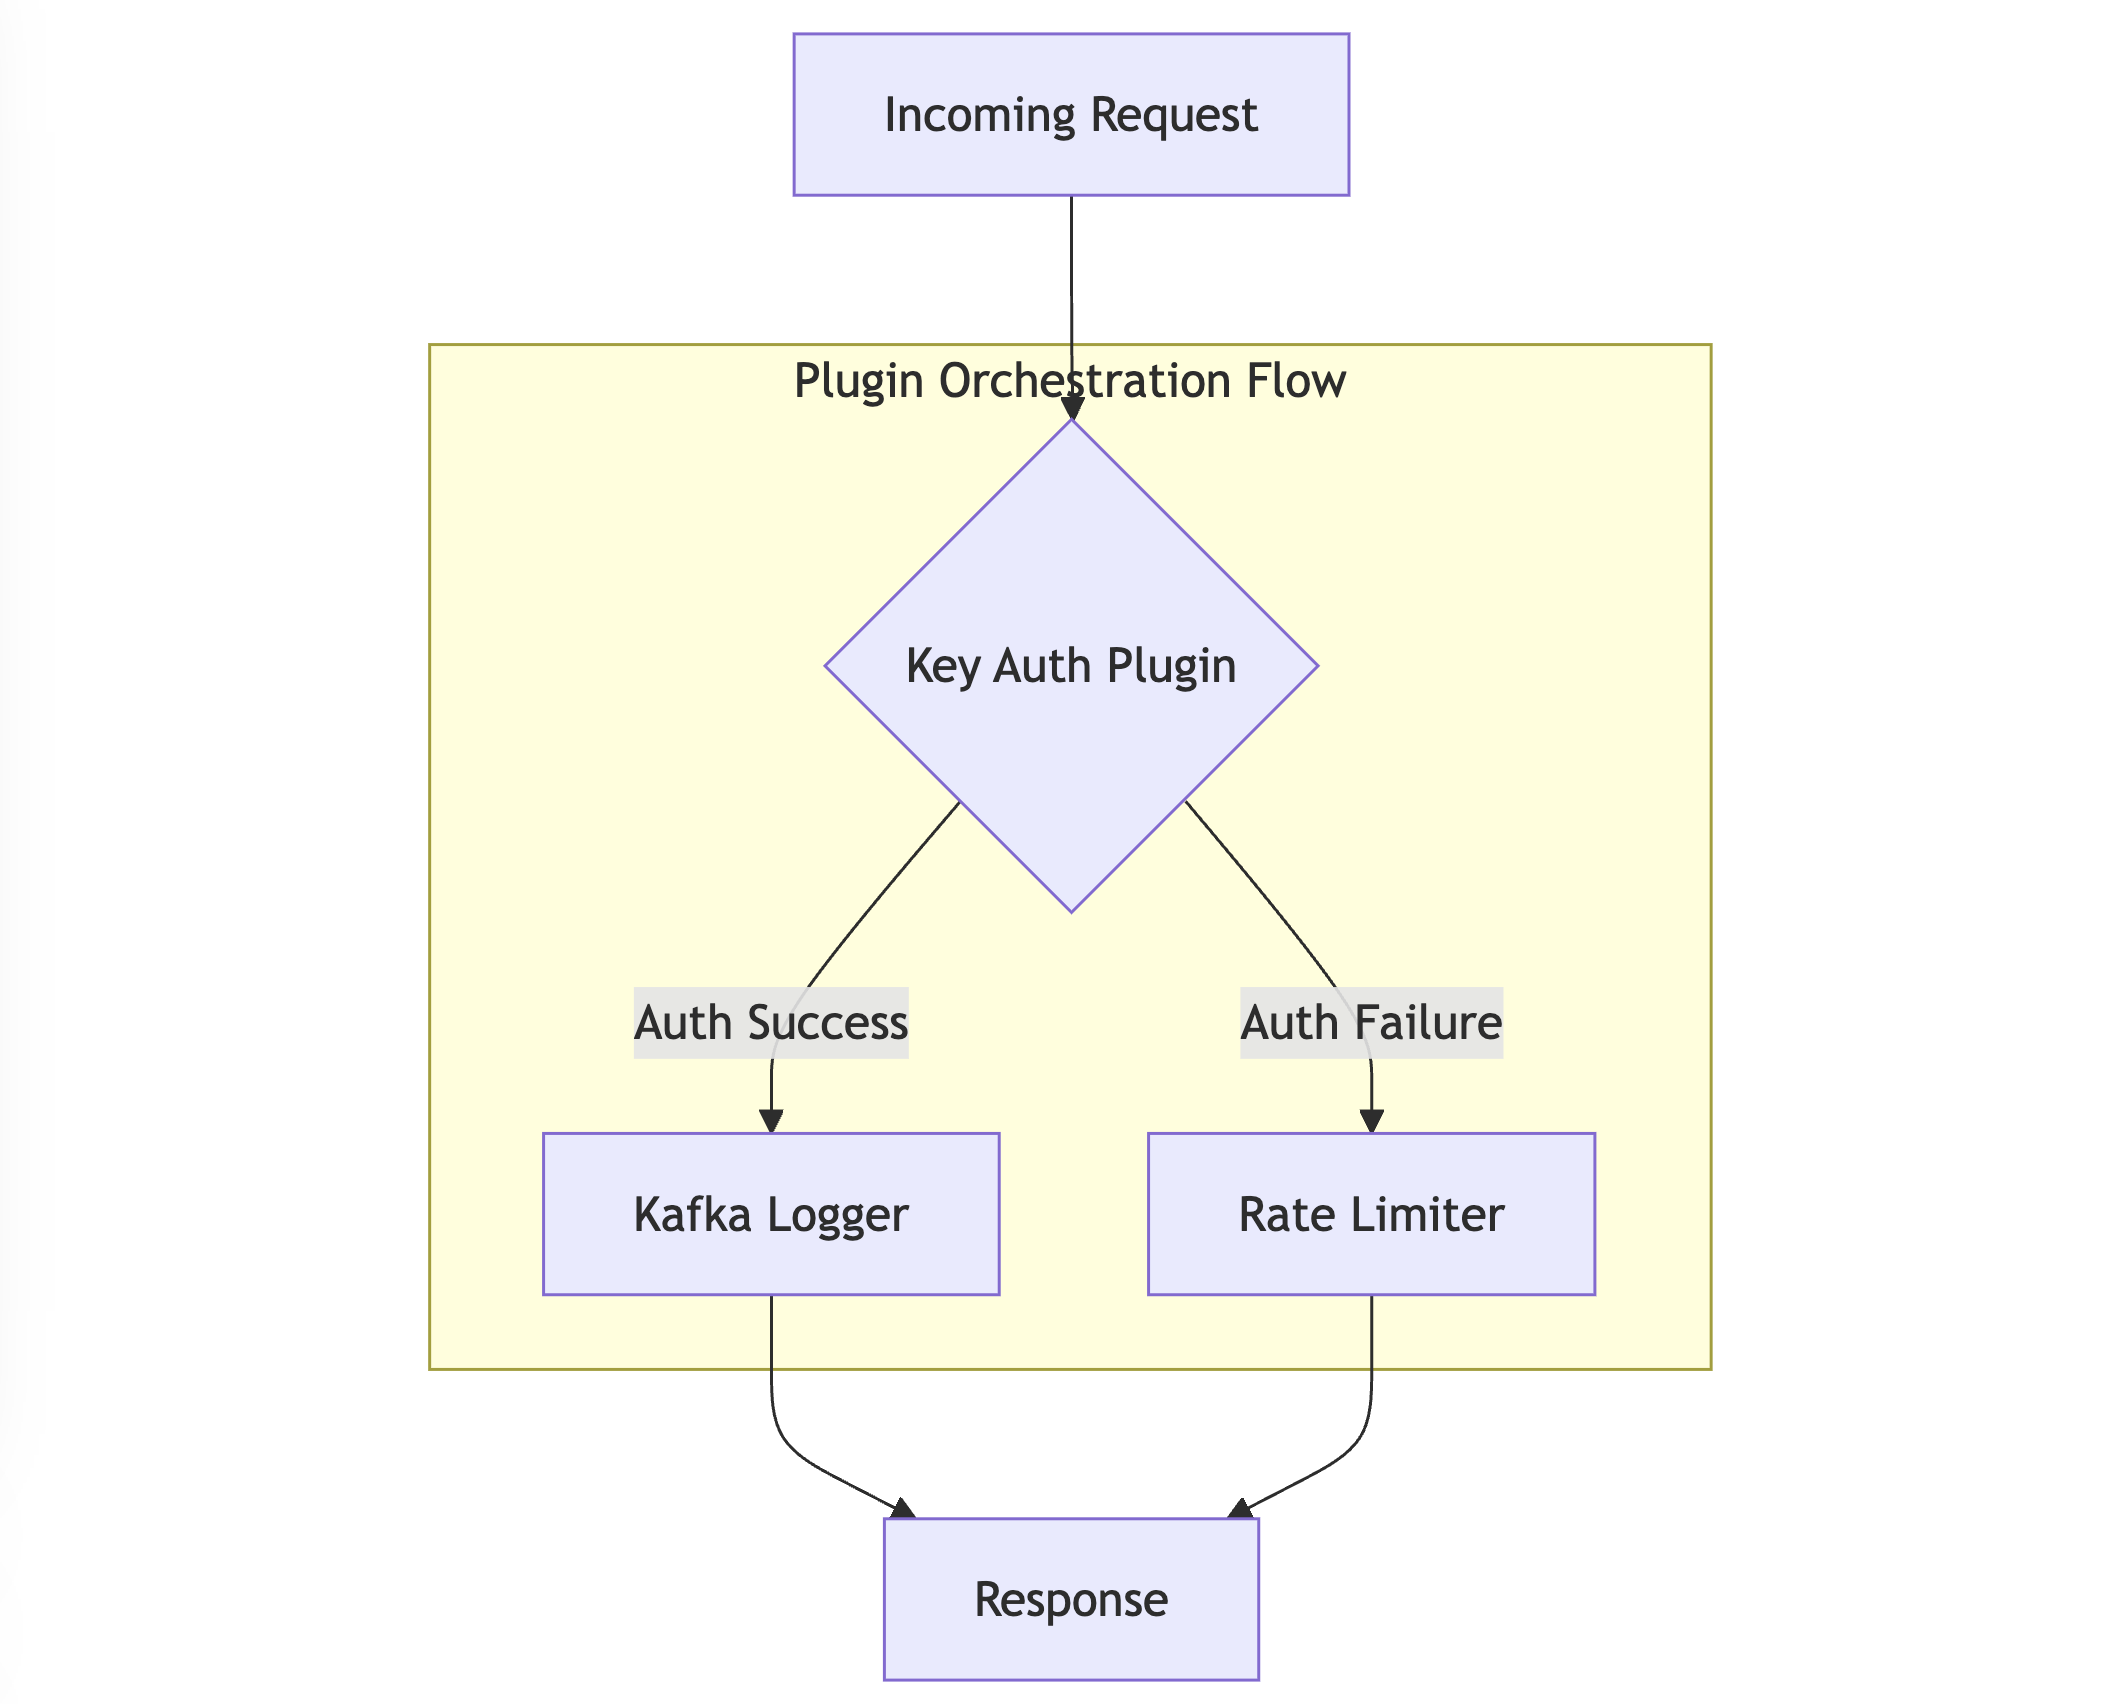
The orchestration engine processes plugins through a sophisticated state management system that maintains execution context while enabling complex conditional logic. Each plugin in the chain can influence the execution path of subsequent plugins, creating a dynamic and responsive processing flow. This approach enables scenarios such as:
- Conditional authentication flows based on request attributes
- Dynamic rate limiting based on authentication results
- Contextual logging based on request processing outcomes
- Adaptive traffic routing based on plugin execution states
The technical implementation leverages several key components:
- A DAG execution engine that manages plugin dependencies and flow
- A state management system for maintaining plugin execution context
- An optimized in-memory processing system for high-performance operation
- A distributed configuration system using etcd for real-time updates
This architecture enables complex API management scenarios while maintaining high performance through careful optimization of state management and plugin execution paths. The system supports dynamic plugin loading, custom plugin integration, and complex conditional logic, all while maintaining the performance characteristics required for production deployments.
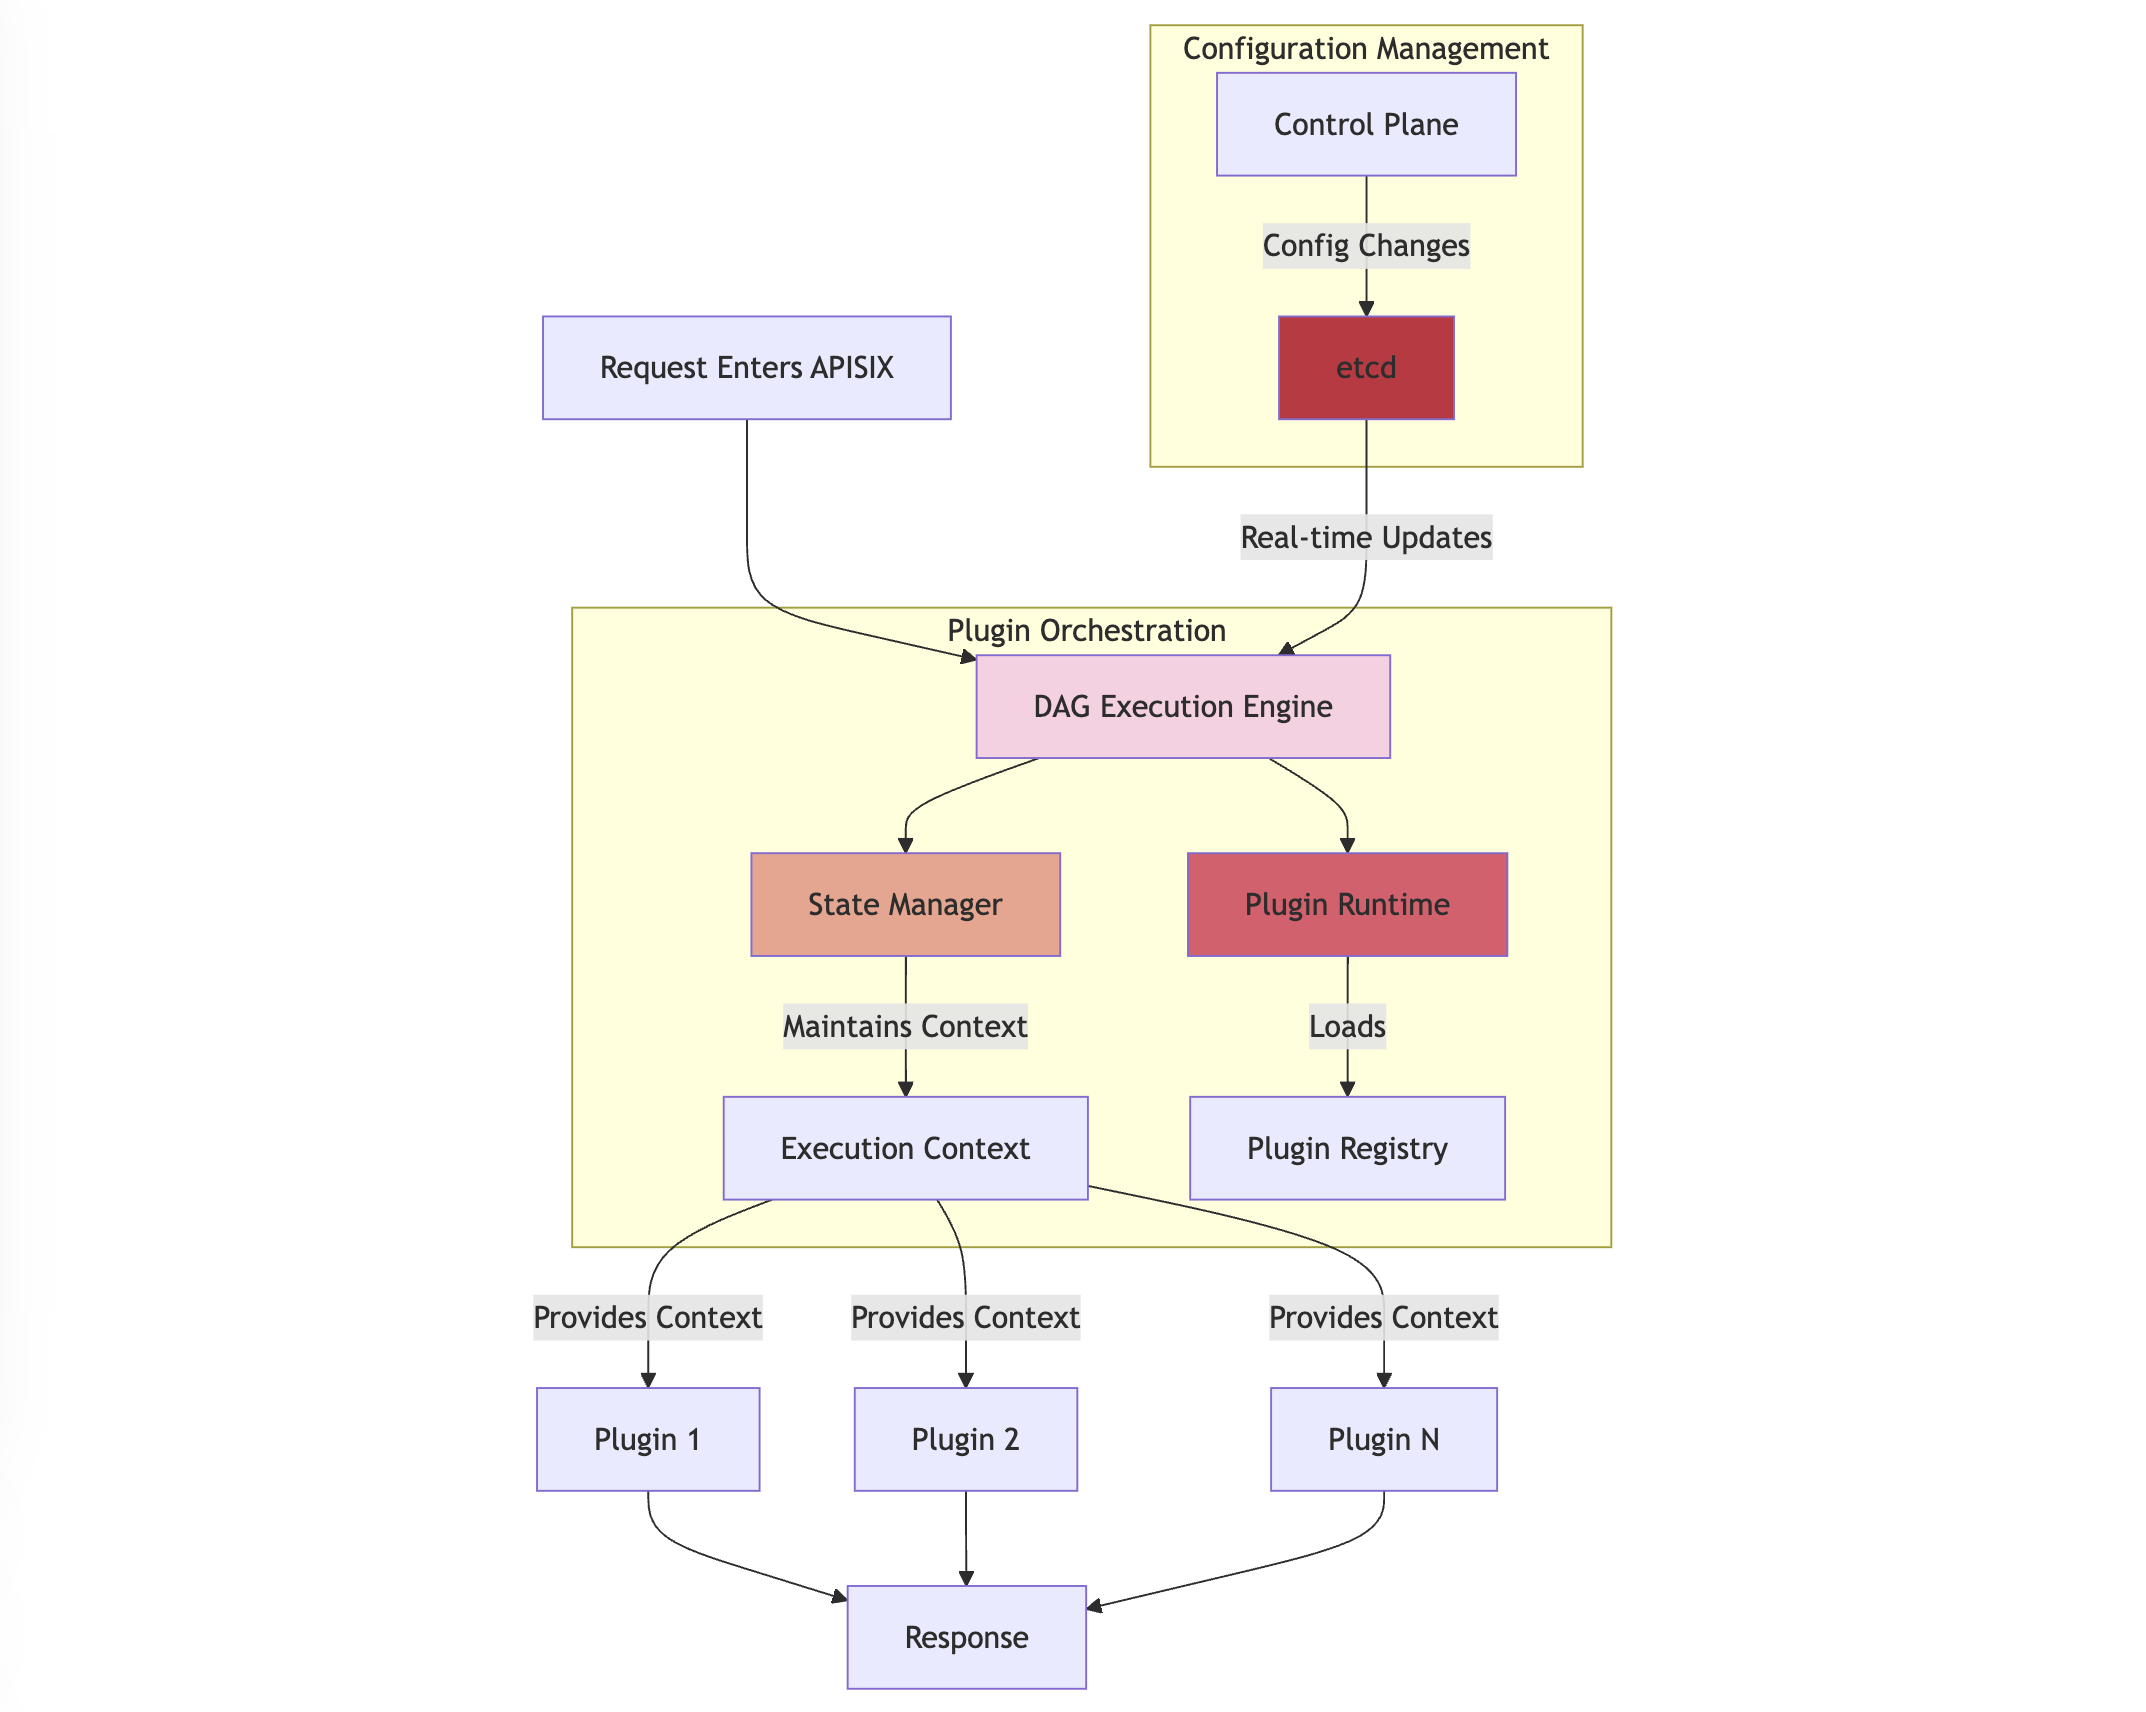
In APISIX's plugin orchestration, "Context" represents a shared state that persists throughout the plugin execution lifecycle. This context operates across multiple execution phases: rewrite, access, before_proxy, header_filter, body_filter, and log. For instance, the Execution Context maintains:
- Request Data: HTTP headers, body, and client information
- Plugin States: Authentication results and modified request/response data
- Flow Control: Current execution path and plugin results
By implementing this architecture, APISIX provides a flexible yet powerful system for handling complex API management requirements through configuration rather than code, significantly reducing operational complexity while maintaining system reliability and performance.
Infrastructure Setup, First Things First
The foundation of a secure APISIX deployment begins with proper network isolation and configuration. First, create a dedicated network with specific subnet configurations:
docker network create \
--driver=bridge \
--subnet=172.18.0.0/16 \
--ip-range=172.18.5.0/24 \
--gateway=172.18.5.254 \
apisix
This network configuration ensures proper isolation and communication between APISIX components.
Deploy Core Components
ETCD Configuration
ETCD serves as the configuration center. Deploy it with proper security settings:
docker run -it --name etcd-server \
-v $(pwd)/example/etcd_conf/etcd.conf.yml:/opt/bitnami/etcd/conf/etcd.conf.yml \
-p 2379:2379 \
-p 2380:2380 \
--network apisix \
--ip 172.18.5.10 \
--env ALLOW_NONE_AUTHENTICATION=yes bitnami/etcd:3.4.9
This configuration ensures proper data persistence and network accessibility.
APISIX Core Installation
Deploy APISIX with comprehensive logging and configuration:
docker run --name test-api-gateway \
-v $(pwd)/example/apisix_conf/config.yaml:/usr/local/apisix/conf/config.yaml \
-v $(pwd)/example/apisix_log:/usr/local/apisix/logs \
-p 9080:9080 \
-p 9091:9091 \
-p 9443:9443 \
--network apisix \
--ip 172.18.5.11 \
-d apache/apisix
This setup includes volume mounts for configuration and logs.
Implement Security
Authentication Layer
APISIX provides robust key-based authentication. Here's a complete implementation:
# Create a consumer with authentication
curl http://127.0.0.1:9180/apisix/admin/consumers -H "X-API-KEY: $admin_key" -X PUT -d '
{
    "username": "jack",
    "plugins": {
        "key-auth": {
            "key": "auth-one"
        }
    }
}'

# Configure route with authentication
curl http://127.0.0.1:9180/apisix/admin/routes/1 -H "X-API-KEY: $admin_key" -X PUT -d '
{
    "methods": ["GET"],
    "uri": "/index.html",
    "plugins": {
        "key-auth": {}
    },
    "upstream": {
        "type": "roundrobin",
        "nodes": {
            "127.0.0.1:1980": 1
        }
    }
}'
This configuration creates a secure authentication layer requiring API keys for access.
Rate Limiting Implementation
Protect your APIs from abuse with sophisticated rate limiting:
curl http://127.0.0.1:9180/apisix/admin/routes/1 -H "X-API-KEY: $admin_key" -X PUT -d '
{
    "uri": "/index.html",
    "plugins": {
        "limit-count": {
            "count": 2,
            "time_window": 60,
            "rejected_code": 503,
            "key": "remote_addr",
            "policy": "redis",
            "redis_host": "127.0.0.1",
            "redis_port": 6379,
            "redis_password": "password",
            "redis_database": 1,
            "redis_timeout": 1001
        }
    },
    "upstream": {
        "type": "roundrobin",
        "nodes": {
            "127.0.0.1:1980": 1
        }
    }
}'
This configuration implements Redis-based distributed rate limiting.
Advanced Rate Limiting Strategies
For cluster-level rate limiting with consumer differentiation:
curl -i http://127.0.0.1:9180/apisix/admin/routes/1 \
-H "X-API-KEY: $admin_key" -X PUT -d '
{
    "uri": "/index.html",
    "plugins": {
        "limit-count": {
            "count": 2,
            "time_window": 60,
            "rejected_code": 503,
            "key_type": "var_combination",
            "key": "$consumer_name $remote_addr"
        }
    },
    "upstream": {
        "type": "roundrobin",
        "nodes": {
            "127.0.0.1:9001": 1
        }
    }
}'
This configuration allows for sophisticated rate limiting based on both consumer identity and IP address.
Health Monitoring and Metrics
Prometheus Integration
Enable comprehensive metrics collection:
curl -i http://127.0.0.1:9180/apisix/admin/routes/1 \
-H "X-API-KEY: $admin_key" -X PUT -d '
{
    "uri": "/metrics",
    "plugins": {
        "prometheus": {
            "prefer_name": true,
            "metrics": {
                "http_status": true,
                "latency": true,
                "bandwidth": true
            }
        }
    },
    "upstream": {
        "type": "roundrobin",
        "nodes": {
            "prometheus:9090": 1
        }
    }
}'
This configuration enables detailed metrics collection for monitoring and analysis.
System Management
Service Initialization
After installation, initialize the system with proper configurations:
# Initialize configuration
sudo apisix init

# Start the service
sudo apisix start

# For systemd-based systems
systemctl start apisix
These commands ensure proper system initialization and service management.
Configuration Updates
Update the admin API key for enhanced security:
deployment:
  admin:
    admin_key:
      - name: "admin"
        key: newsupersecurekey
        role: admin
This configuration enhances the security of the admin API.
Conclusion
The comprehensive implementation of these configurations creates a robust, secure, and scalable API gateway infrastructure. The combination of authentication, rate limiting, and monitoring ensures both security and reliability. Regular maintenance, including updating admin keys and monitoring system metrics, is crucial for maintaining the health of the deployment.
Remember to adjust these configurations based on your specific requirements and security needs. The modular nature of APISIX allows for easy expansion and customization through its plugin system, making it suitable for both simple and complex API management scenarios.