
Don't miss out—join thousands of developers who trust Apidog for their API needs. Download now and experience the difference in API development, testing, and documentation at a much more affordable price!
You may have already needed to call a third-party API in some project, or are learning how to make different systems communicate with each other. When you send a request according to the documentation, you often receive inexplicable error responses: 400 Bad Request, 401 Unauthorized, or simply nothing returned.
The issues often lie in some seemingly simple but actually crucial details: incorrect request format, missing necessary Header information, incorrect authentication method, or data format mismatch with what the API expects. If these basic concepts are not clearly understood, every API call feels like gambling.
You need to truly understand each component of requests and responses and know their respective roles, so you can quickly pinpoint the cause when problems arise.
Next, we'll start from the most basic concepts and step by step clarify the complete process of API interactions.
Requests: What You Say to the Server
When you want to get information from the server or have the server perform an operation, you need to send a request.
A complete API request includes several key elements. First is the request method, the most common being GET, POST, PUT, DELETE.
- GET is used to retrieve data;
- POST is used to create new data;
- PUT is used to update existing data;
- DELETE is used to delete data.
In addition to the method, the request needs to specify a URL, which tells the system where the specific resource you want to access is located. For example, https://api.weather.com/current/beijing clearly indicates you want to get the current weather information for Beijing.
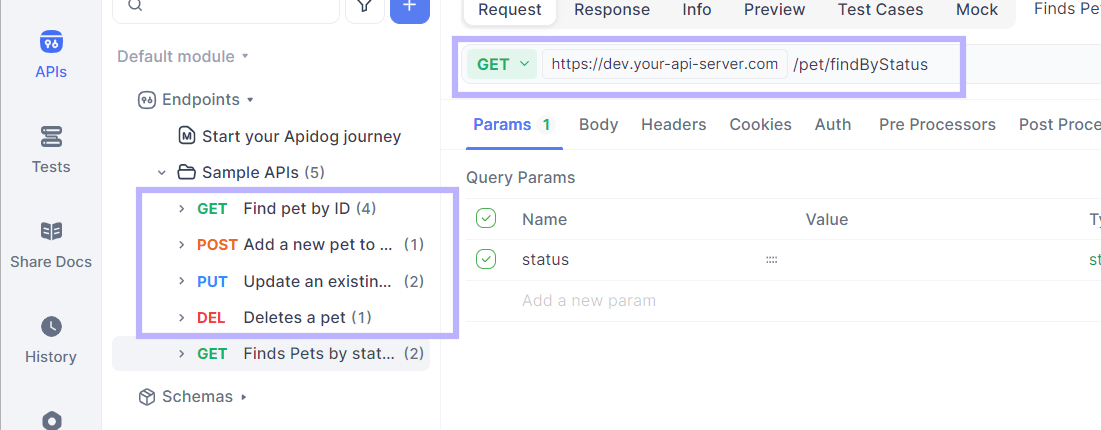
But just having the method and URL isn't enough; often, you need to pass more information to the server. This is where other parts of the request come in: Header and Body.
Header: Additional Instructions for the Request
The Header contains various metadata about the request, helping the server better understand and process your request.
The most basic Header is Content-Type, which tells the server what format the data you're sending is in. If you're sending JSON data, set Content-Type: application/json. If sending form data, set Content-Type: application/x-www-form-urlencoded.
Another important Header is User-Agent, which identifies what client is sending the request. Browsers automatically set this value, telling the server if the request is from Chrome, Firefox, or another browser.
The Accept Header tells the server what format you expect for the response. For example, Accept: application/json means you want the server to return data in JSON format.
There are also Headers for cache control, like Cache-Control, which can instruct the server or intermediate proxy servers on how to handle caching. These Headers may seem technical, but understanding them helps you better control API behavior.
Body: The Specific Content of the Request
When you need to send a large amount of data to the server, that data goes in the Body.
GET requests usually don't have a Body, as GET is mainly for retrieving data, and required parameters can be placed directly in the URL. But requests like POST and PUT often need a Body to carry data.
The most common Body format is JSON. For example, when registering a user on a website, your browser sends a POST request with a Body that might look like this:
{
  "username": "john_doe",
  "email": "john@example.com",
  "password": "secretpassword"
}
Another common Body format is form-data, especially when uploading files. This format can include both text data and file data, making it ideal for handling complex form submissions.
Some APIs use XML format for the Body, though it's less common now than JSON, but still widely used in certain enterprise systems. Regardless of the format, the key is to ensure the Content-Type Header matches the actual format of the Body.
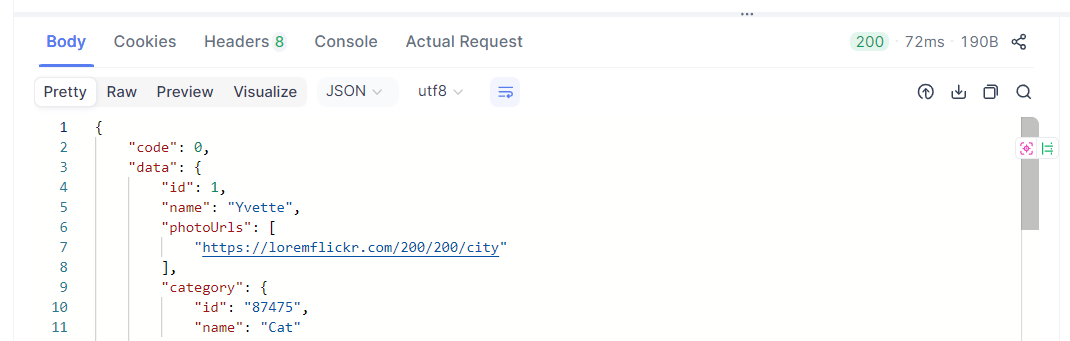
Responses: The Server's Reply to You
When the server receives your request, it returns a response. The response structure is similar to the request, including Header and Body, but with an additional important element: the status code.
The status code is a three-digit number that tells you the result of the request processing. 200 indicates success, which is what you most hope to see. 404 means the requested resource couldn't be found, the infamous "404 error." 500 indicates an internal server error, usually meaning something went wrong on the server side.
The response Header contains various information about the response. Content-Type tells you the format of the response data, Content-Length tells you the size of the response data, and Set-Cookie is used to set cookies on the client.
The response Body contains the actual data you requested. If requesting weather information, the Body might include temperature, humidity, wind speed, etc. If requesting user information, the Body might include username, email, registration time, etc.
Understanding the response structure helps you determine if the API call was successful and how to handle the returned data. When API calls go wrong, checking the status code and response Body is usually the first step in diagnosing issues.
Auth: Proving Your Identity
Most valuable APIs require some form of authentication. Just like you need an ID to enter certain places, you need to provide credentials to access protected APIs.
The simplest authentication method is API Key. The service provider gives you a unique key, which you include in every request. API Keys are usually placed in the Header, like Authorization: Bearer your-api-key-here.
Another common method is Basic Authentication. You provide a username and password, which the client encodes and places in the Authorization Header. Though simple, this method has relatively low security.
OAuth is a more complex but secure authentication method. It allows users to authorize third-party apps to access their data without directly providing passwords. When you log in to other apps using WeChat, you're using the OAuth process.
JWT (JSON Web Token) is another popular authentication method. After a user logs in, the server generates a token containing user information, which the user carries in subsequent requests. The benefit of JWT is that the server doesn't need to store session information, improving system scalability.
Choosing an authentication method depends on your specific needs and security requirements. For simple personal projects, API Key might suffice. For apps requiring user login, OAuth or JWT may be more appropriate.
Practical Application: Tying These Concepts Together
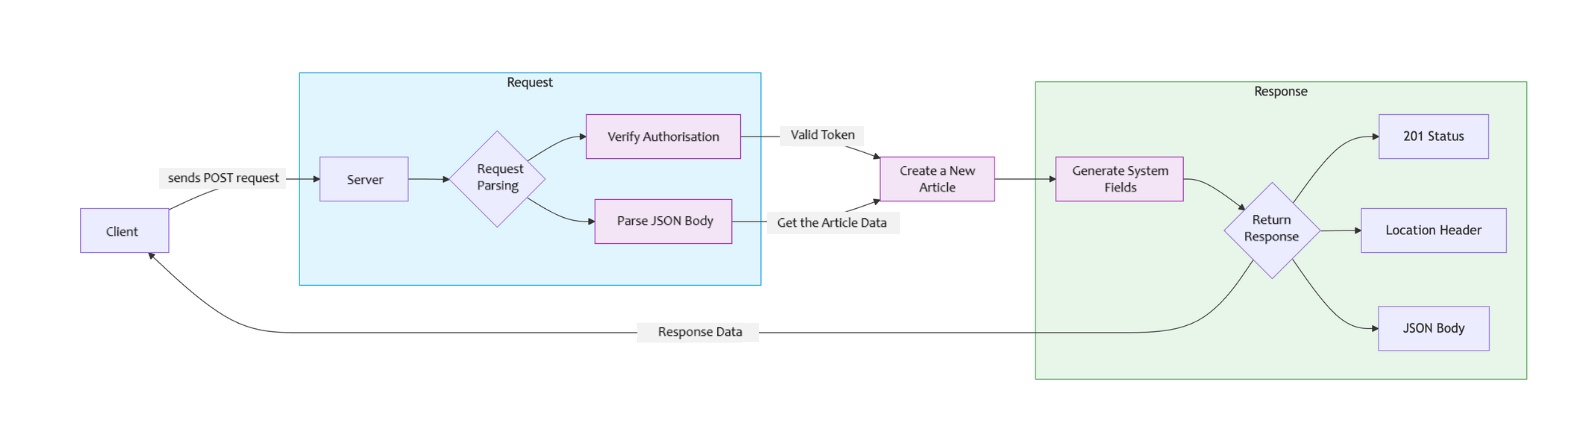
Now let's look at how these concepts work together through a specific example. Suppose you're developing a blog app and need to create a new article.
First, you send a POST request to https://api.myblog.com/articles. The request Header includes Content-Type to specify the data format and Authorization to provide authentication information:
POST /articles HTTP/1.1
Host: api.myblog.com
Content-Type: application/json
Authorization: Bearer eyJ0eXAiOiJKV1QiLCJhbGciOiJIUzI1NiJ9...
The Body contains the specific content of the article:
{
  "title": "API Basics Introduction",
  "content": "This is a detailed introduction to APIs...",
  "tags": ["API", "Programming", "Beginner"]
}
After receiving the request, the server first verifies the token in the Authorization Header to confirm you have permission to create articles. Then it parses the JSON data in the Body and creates a new article record.
If everything goes smoothly, the server returns a 201 status code (indicating successful creation). The response Header might include the location of the newly created article, and the Body contains the full article information, including the system-generated ID and creation time:
{
  "id": 12345,
  "title": "API Basics Introduction",
  "content": "This is a detailed introduction to APIs...",
  "tags": ["API", "Programming", "Beginner"],
  "created_at": "2024-01-15T10:30:00Z",
  "author_id": 678
}
This complete process demonstrates how requests, responses, Body, Header, and Auth work together. Each part has its own role, but they collectively complete a full API interaction.
Debugging and Testing: Making API Development Smoother
When you start actually using APIs, you'll inevitably encounter various issues. The request is sent, but it returns an error status code; or the response data format isn't what you expected; or authentication always fails.
At this point, you need to be able to view the complete request and response content. The browser's developer tools are a good starting point, as they can display all HTTP requests, including Header and Body. For more complex API testing, using Apidog to operate will be more helpful.
Common issues include Content-Type mismatches, authentication information errors, incorrect request formats, etc. Carefully checking the status code and error messages usually helps you quickly locate the problem.