In today's rapidly evolving development landscape, Model Context Protocol (MCP) servers have emerged as powerful tools that bridge AI assistants with specialized data sources. ACI.dev MCP Servers stand out by offering a comprehensive solution that provides access to multiple app functions through a unified interface.
ACI.dev provides two distinct types of MCP servers, each designed to address different development needs:
Apps MCP Server: This server provides direct access to functions from specific apps you select. Unlike most MCP servers that limit you to a single app, ACI.dev's Apps Server allows you to include multiple apps in a single server configuration.
Unified MCP Server: This innovative server takes a different approach by providing two meta functions that can discover and execute any function available on the ACI.dev platform. This dynamic approach eliminates the need to list all tools upfront.
The power of ACI.dev MCP Servers lies in their ability to:
- Access multiple app functions without switching between different MCP servers
- Discover relevant tools dynamically based on your specific needs
- Execute functions across different apps seamlessly
- Reduce context window usage by only loading relevant tools when needed
For API developers, these capabilities translate to a more streamlined workflow where AI assistants can access and utilize tools from various applications without the overhead of managing multiple separate connections.
Setting Up ACI.dev MCP Servers: A Step-by-Step Guide
Getting started with ACI.dev MCP Servers requires a few straightforward steps. This section walks through the complete setup process for both server types.
Prerequisites for ACI.dev MCP Servers
Before beginning the setup process, ensure you have:
- An ACI.dev API key (obtainable from ACI development platform)
- UV package manager installed
- Configured apps and set them in
allowed_appsfor your agent on platform.aci.dev - Linked your app-specific accounts under the same
linked-account-owner-id - An IDE that supports MCP, such as:
- Claude Desktop
- Cursor
- VS Code with appropriate extensions
Installing UV Package Manager
First, install the UV package manager if you haven't already:
curl -sSf https://install.pypa.io/get-pip.py | python3 -
pip install uv
Setting Up the Apps MCP Server
The Apps MCP Server provides direct access to functions from specific apps you select:
Choose Your Apps
Identify which apps you want to access. You can find available apps at platform.aci.dev/apps.
Run the Server
uvx aipolabs-mcp apps-server --apps "BRAVE_SEARCH,GMAIL" --linked-account-owner-id <LINKED_ACCOUNT_OWNER_ID>Replace <LINKED_ACCOUNT_OWNER_ID> with your account ID from platform.aci.dev.
Configure Your IDE
For Claude Desktop, add this to your claude_desktop_config.json:
{
 "mcpServers": {
   "aipolabs-mcp-apps": {
     "command": "uvx",
     "args": ["aipolabs-mcp", "apps-server", "--apps", "BRAVE_SEARCH,GMAIL", "--linked-account-owner-id", "<LINKED_ACCOUNT_OWNER_ID>"]
   }
 }
}
For Cursor, add to your mcp.json:
{
 "mcpServers": {
   "aipolabs-mcp-apps": {
     "command": "uvx",
     "args": ["aipolabs-mcp", "apps-server", "--apps", "BRAVE_SEARCH,GMAIL", "--linked-account-owner-id", "<LINKED_ACCOUNT_OWNER_ID>"],
     "env": {
       "AIPOLABS_ACI_API_KEY": "<AIPOLABS_ACI_API_KEY>"
     }
   }
 }
}
Setting Up the Unified MCP Server
The Unified MCP Server provides a more dynamic approach with two meta functions:
ACI_SEARCH_FUNCTIONS_WITH_INTENT- Discovers functions based on your intent/needsACI_EXECUTE_FUNCTION- Executes any function discovered by the search
Run the Server
uvx aipolabs-mcp unified-server --linked-account-owner-id <LINKED_ACCOUNT_OWNER_ID>Configure Your IDE
For Claude Desktop, add this to your claude_desktop_config.json:
{
 "mcpServers": {
   "aipolabs-mcp-unified": {
     "command": "uvx",
     "args": ["aipolabs-mcp", "unified-server", "--linked-account-owner-id", "<LINKED_ACCOUNT_OWNER_ID>"]
   }
 }
}
For Cursor, add to your mcp.json:
{
 "mcpServers": {
   "aipolabs-mcp-unified": {
     "command": "uvx",
     "args": ["aipolabs-mcp", "unified-server", "--linked-account-owner-id", "<LINKED_ACCOUNT_OWNER_ID>"],
     "env": {
       "AIPOLABS_ACI_API_KEY": "<AIPOLABS_ACI_API_KEY>"
     }
   }
 }
}
Verifying Your Setup
To verify your setup is working correctly:
For Apps Server: Ask your AI assistant to use a function from one of your specified apps:
"Search for recent news about API development using Brave Search"For Unified Server: Ask your AI assistant to discover and use a function:
"I need to find information about REST API best practices"The AI should respond by either directly using the specified function (Apps Server) or by first discovering and then executing the appropriate function (Unified Server).
Use Apidog MCP Server for API Development
While ACI.dev MCP Servers excel at providing access to multiple app functions, API development often requires tools specifically designed for working with API specifications and implementations. This is where Apidog MCP Server comes into focus, offering capabilities purposefully built for API-driven development workflows that complement the general-purpose functionality of ACI.dev servers.
Enhancing API Development with Apidog MCP Server
Apidog MCP Server represents a significant advancement in API development methodology, focusing specifically on making API specifications directly accessible to AI assistants. Unlike general-purpose MCP servers, Apidog MCP Server is purpose-built for API development, ensuring perfect alignment between specifications and implementations.
How Apidog MCP Server Works
Once set up, Apidog MCP Server automatically reads and caches API specification data on your local machine. This allows AI assistants to retrieve and utilize this data seamlessly during development. The process works by:
- Connecting to API Specifications: Apidog MCP Server links directly to your API specifications, whether they're in Apidog projects, published documentation, or OpenAPI files
- Caching Data Locally: Specifications are cached for quick access
- Providing Context to AI: When you ask the AI about your API, it can access the exact specifications
- Enabling Code Generation: AI can generate code that perfectly matches your API design
This specialized approach ensures that all AI-assisted development remains perfectly aligned with your API specifications, eliminating the common disconnect between design and implementation.
Setting Up Apidog MCP Server
Setting up Apidog MCP Server requires a few simple steps:
Prerequisites:
- Node.js (version 18 or higher)
- An IDE that supports MCP (Cursor, VS Code + Cline plugin)
Choose Your Data Source: Apidog MCP Server supports three different data sources:
- Apidog Project: For accessing API specifications within your team
- Online API Documentation: For reading API documentation published via Apidog
- OpenAPI Files: For working with local or online Swagger/OpenAPI files
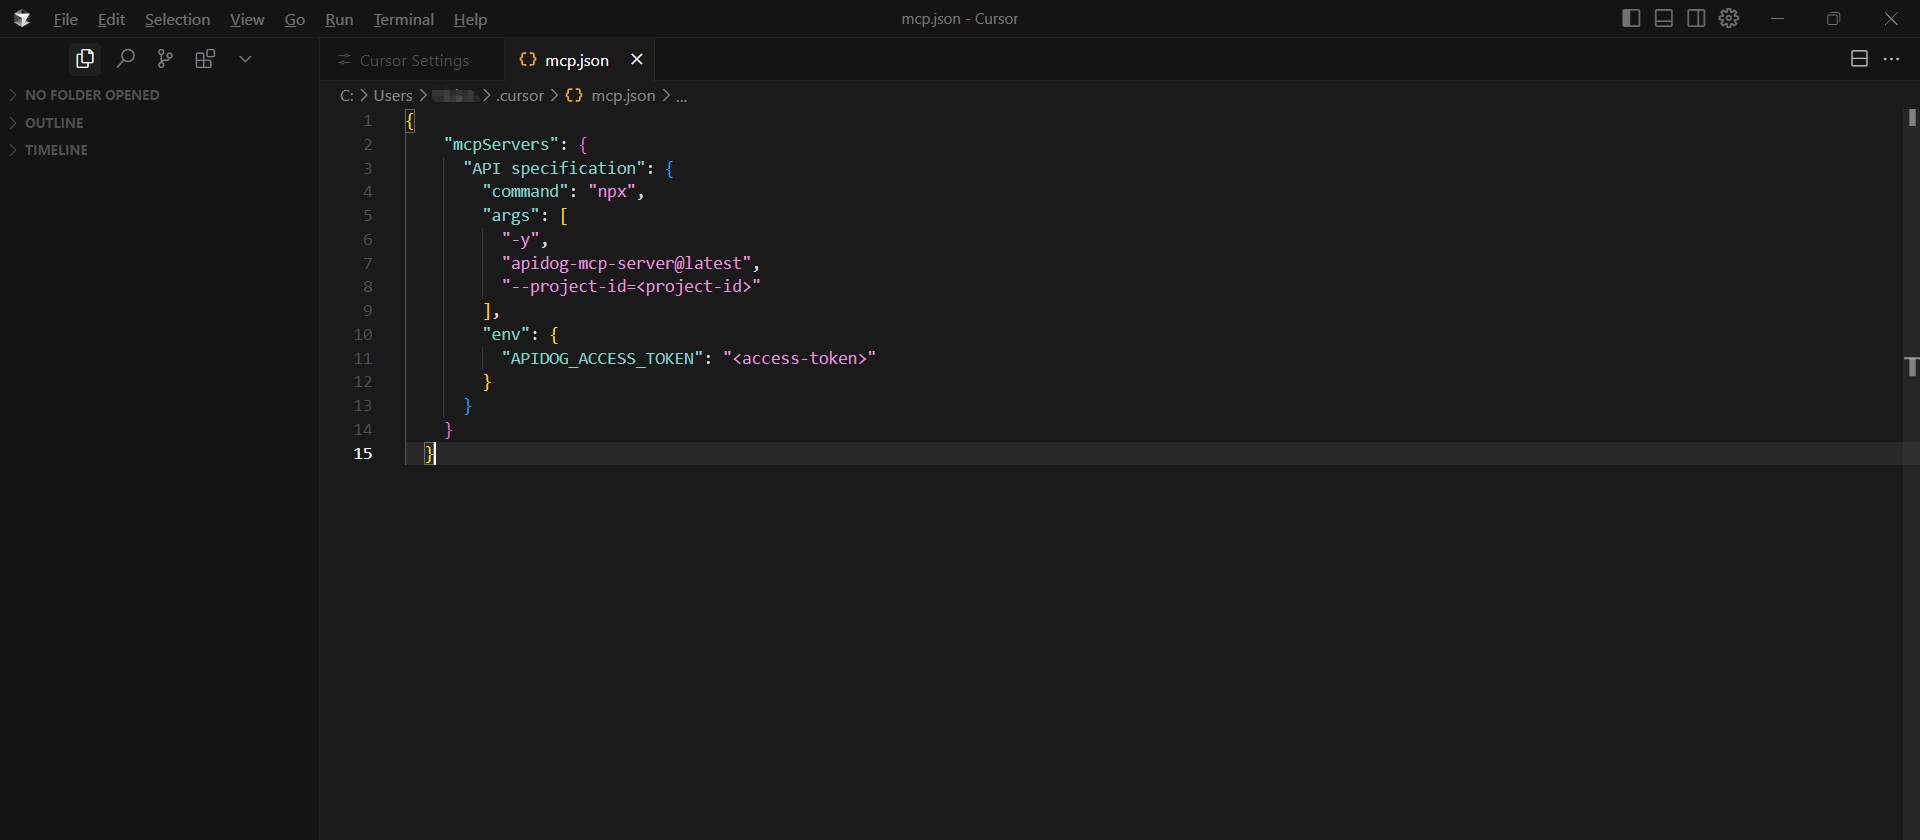
Configure MCP in Your IDE: For Apidog Project as the data source (Windows example):
{
 "mcpServers": {
   "API specification": {
     "command": "cmd",
     "args": [
       "/c",
       "npx",
       "-y",
       "apidog-mcp-server@latest",
       "--project=<project-id>"
     ],
     "env": {
       "APIDOG_ACCESS_TOKEN": "<access-token>"
     }
   }
 }
}
Verify Configuration: Test by asking your AI assistant:
"Please fetch API specification via MCP and tell me how many endpoints exist in the project"Powerful API Development Workflows with Apidog MCP
Apidog MCP Server enables specialized workflows that transform API development:
Code Generation Based on Specifications
"Use MCP to fetch the API specification and generate Java records for the 'Product' schema and related schemas"Updating Implementations When Specs Change
"Based on the API specification, add the new fields to the 'Product' DTO"Adding Documentation to Code
"Add comments for each field in the 'Product' class based on the API specification"Creating Complete API Implementations
"Generate all the MVC code related to the endpoint '/users' according to the API specification"Conclusion: Choosing the Right MCP Server for Your Development Needs
The emergence of specialized MCP servers marks a significant advancement in AI-assisted development. ACI.dev MCP Servers excel at providing multi-app function access, while Apidog MCP Server focuses specifically on API development by ensuring perfect alignment between specifications and implementations.
For developers, these tools serve complementary purposes:
- ACI.dev MCP Servers: Ideal when you need to access functions from multiple apps or want dynamic function discovery based on your specific needs.
- Apidog MCP Server: Perfect when implementing APIs and ensuring code aligns perfectly with API specifications.
By incorporating these specialized tools into your workflow based on your specific requirements, you can significantly enhance productivity and code quality. These MCP servers represent a fundamental shift in development practices—making work more efficient, accurate, and ultimately more enjoyable.


