
Zig, sağlam, optimum ve sürdürülebilir olması için tasarlanmış modern bir programlama dilidir. Performansa, bellek tahsisinde açık kontrole ve derleme zamanı özelliklerine odaklanmasıyla Zig, önemli miktarda kaynak kullanımıyla önemli yükleri yönetmesi gereken REST API'leri de dahil olmak üzere yüksek performanslı uygulamalar oluşturmak için mükemmel bir seçimdir.
Bu eğitimde, yalnızca işlevsel değil, aynı zamanda "ışık hızında" bir REST API oluşturmak için Zig'den nasıl yararlanacağımızı inceleyeceğiz. Bir proje kurma, temel API işlevselliğini uygulama ve onu en yüksek performans için optimize etme adımlarını inceleyeceğiz. Sonunda, Zig kullanarak yüksek performanslı web hizmetleri oluşturmak için sağlam bir temele sahip olacaksınız.

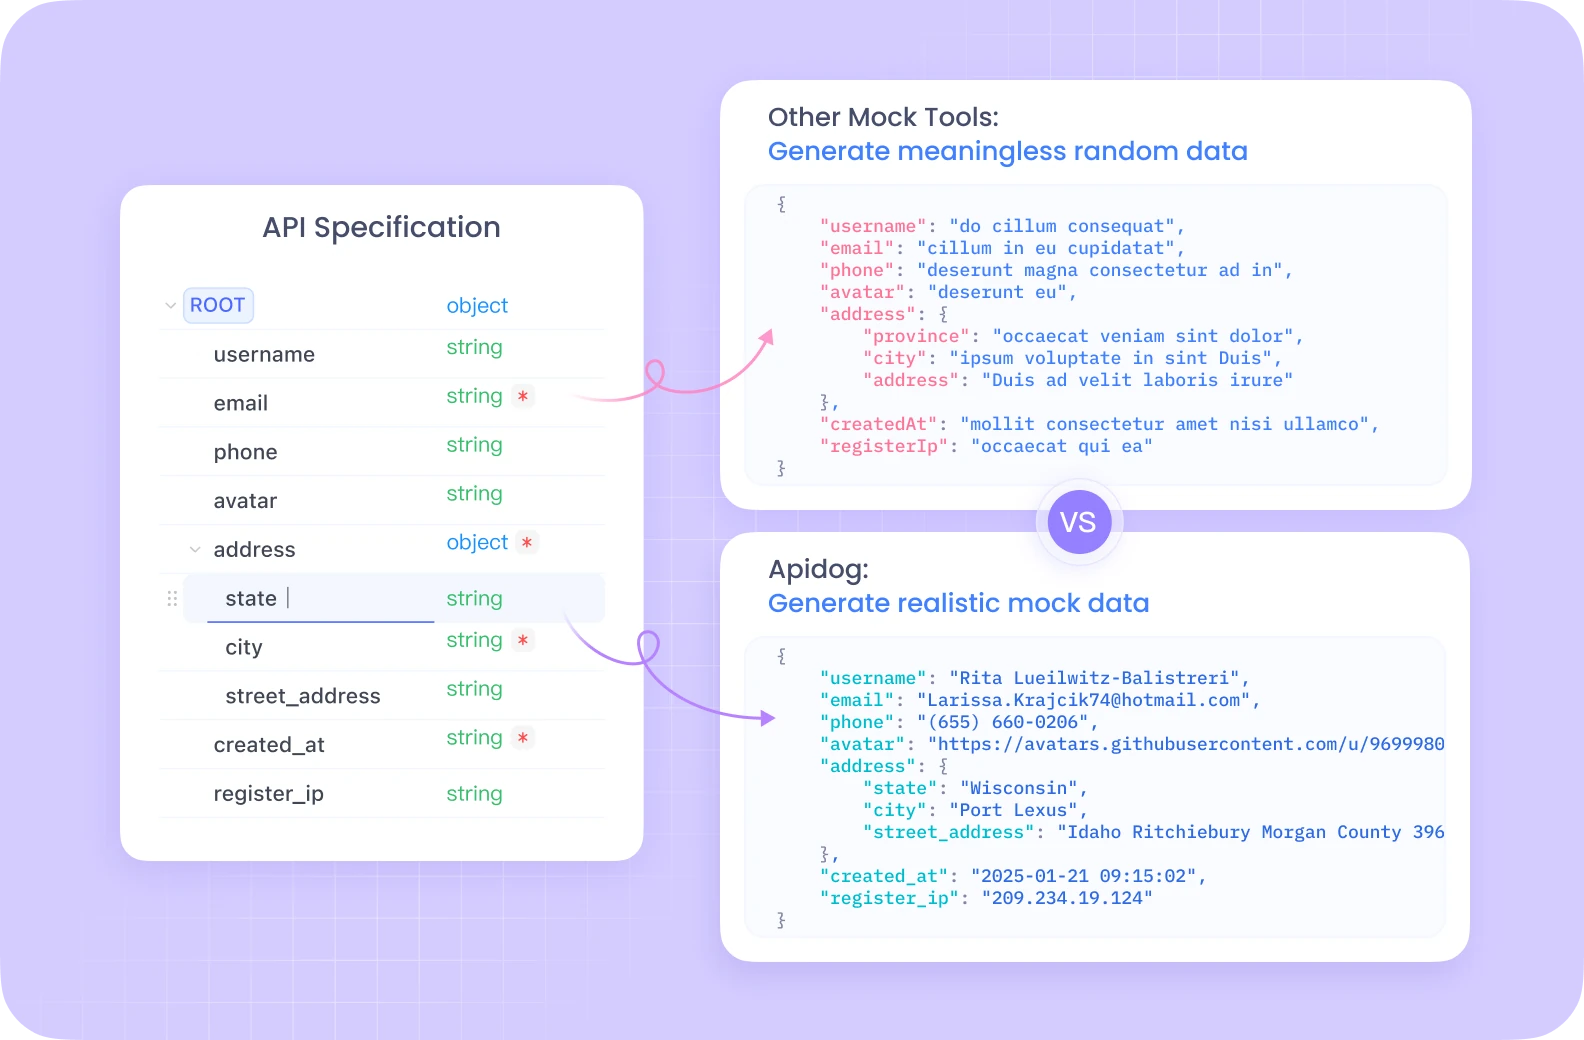
Apidog, API dokümantasyonunu, tasarımını, testini ve hata ayıklamasını tek bir kesintisiz iş akışında birleştirerek, yüksek performanslı Zig API'mizi test etmek için mükemmel hale getirir.
Zig Geliştirme Ortamınızı Kurma
Kodlamaya başlamadan önce, Zig ile geliştirmek için gereken her şeye sahip olduğunuzdan emin olalım:
Zig'i Yükleyin: En son sürümü ziglang.org adresinden indirin veya bir paket yöneticisi kullanın:
# macOS'ta Homebrew ile
brew install zig

# Linux'ta apt ile
sudo apt install zig
Yüklemeyi doğrulayın:
zig version
Proje Yapısı
Temiz bir proje yapısı oluşturalım:
mkdir zig-rest-api
cd zig-rest-api
zig init-exe
Bu, bir src/main.zig dosyasıyla temel bir Zig projesi oluşturur. Bu yapıyı genişleteceğiz:
zig-rest-api/
├── src/
│   ├── main.zig
│   ├── server.zig
│   ├── router.zig
│   ├── handlers/
│   │   ├── users.zig
│   │   └── products.zig
│   └── models/
│       ├── user.zig
│       └── product.zig
├── build.zig
└── README.md
HTTP Sunucu Uygulaması
İlk olarak, temel bir HTTP sunucusu oluşturalım. Zig'in standart kitaplığı ağ ilkelere sahiptir, ancak tam bir HTTP sunucusu içermez. Mükemmel zhttp paketini kullanacağız.
Bu bağımlılığı build.zig dosyanıza ekleyin:
const std = @import("std");

pub fn build(b: *std.Build) void {
    const target = b.standardTargetOptions(.{});
    const optimize = b.standardOptimizeOption(.{});

    const zhttp = b.dependency("zhttp", .{});

    const exe = b.addExecutable(.{
        .name = "zig-rest-api",
        .root_source_file = .{ .path = "src/main.zig" },
        .target = target,
        .optimize = optimize,
    });

    exe.addModule("zhttp", zhttp.module("zhttp"));

    b.installArtifact(exe);
}
Şimdi sunucumuzu src/server.zig içinde uygulayalım:
const std = @import("std");
const zhttp = @import("zhttp");
const Allocator = std.mem.Allocator;

pub const Server = struct {
    server: zhttp.Server,
    allocator: Allocator,

    pub fn init(allocator: Allocator, port: u16) !Server {
        return Server{
            .server = try zhttp.Server.init(allocator, .{
                .address = "0.0.0.0",
                .port = port,
            }),
            .allocator = allocator,
        };
    }

    pub fn deinit(self: *Server) void {
        self.server.deinit();
    }

    pub fn start(self: *Server) !void {
        std.log.info("Server listening on port {d}", .{self.server.port});
        try self.server.start();
    }
};
Yönlendirici ve İstek İşleme Ekleme
src/router.zig içinde, basit bir yönlendirici oluşturalım:
const std = @import("std");
const zhttp = @import("zhttp");
const Allocator = std.mem.Allocator;

pub const Router = struct {
    routes: std.StringHashMap(HandlerFn),
    allocator: Allocator,

    pub const HandlerFn = fn(zhttp.Request, *zhttp.Response) anyerror!void;

    pub fn init(allocator: Allocator) Router {
        return Router{
            .routes = std.StringHashMap(HandlerFn).init(allocator),
            .allocator = allocator,
        };
    }

    pub fn deinit(self: *Router) void {
        self.routes.deinit();
    }

    pub fn addRoute(self: *Router, path: []const u8, handler: HandlerFn) !void {
        try self.routes.put(try self.allocator.dupe(u8, path), handler);
    }

    pub fn handleRequest(self: *Router, req: zhttp.Request, res: *zhttp.Response) !void {
        const handler = self.routes.get(req.path) orelse {
            res.status = .not_found;
            try res.send("Not Found");
            return;
        };

        try handler(req, res);
    }
};
JSON İşleme
JSON ile çalışmak için yardımcı işlevler oluşturalım:
// src/json_utils.zig
const std = @import("std");

pub fn parseJson(comptime T: type, json_str: []const u8, allocator: std.mem.Allocator) !T {
    var tokens = std.json.TokenStream.init(json_str);
    return try std.json.parse(T, &tokens, .{
        .allocator = allocator,
        .ignore_unknown_fields = true,
    });
}

pub fn stringify(value: anytype, allocator: std.mem.Allocator) ![]const u8 {
    return std.json.stringifyAlloc(allocator, value, .{});
}
API İşleyicileri Oluşturma
Şimdi src/handlers/users.zig içinde kullanıcı kaynakları için bir işleyici oluşturalım:
const std = @import("std");
const zhttp = @import("zhttp");
const json_utils = @import("../json_utils.zig");

const User = struct {
    id: usize,
    name: []const u8,
    email: []const u8,
};

// In-memory store for demonstration
var users = std.ArrayList(User).init(std.heap.page_allocator);

pub fn getUsers(req: zhttp.Request, res: *zhttp.Response) !void {
    const json = try json_utils.stringify(users.items, req.allocator);
    res.headers.put("Content-Type", "application/json") catch unreachable;
    try res.send(json);
}

pub fn getUserById(req: zhttp.Request, res: *zhttp.Response) !void {
    // Extract ID from URL path parameters
    const id_str = req.params.get("id") orelse {
        res.status = .bad_request;
        try res.send("Missing ID parameter");
        return;
    };

    const id = try std.fmt.parseInt(usize, id_str, 10);

    // Find user with matching ID
    for (users.items) |user| {
        if (user.id == id) {
            const json = try json_utils.stringify(user, req.allocator);
            res.headers.put("Content-Type", "application/json") catch unreachable;
            try res.send(json);
            return;
        }
    }

    res.status = .not_found;
    try res.send("User not found");
}

pub fn createUser(req: zhttp.Request, res: *zhttp.Response) !void {
    const body = try req.body();
    var user = try json_utils.parseJson(User, body, req.allocator);

    // Generate a new ID
    user.id = users.items.len + 1;

    try users.append(user);

    res.status = .created;
    res.headers.put("Content-Type", "application/json") catch unreachable;
    const json = try json_utils.stringify(user, req.allocator);
    try res.send(json);
}
Hepsini Bir Araya Getirme
Şimdi, her şeyi entegre etmek için src/main.zig dosyamızı güncelleyelim:
const std = @import("std");
const Server = @import("server.zig").Server;
const Router = @import("router.zig").Router;
const users = @import("handlers/users.zig");

pub fn main() !void {
    // Create an arena allocator
    var arena = std.heap.ArenaAllocator.init(std.heap.page_allocator);
    defer arena.deinit();
    const allocator = arena.allocator();

    var router = Router.init(allocator);
    defer router.deinit();

    // Register routes
    try router.addRoute("/api/users", users.getUsers);
    try router.addRoute("/api/users/{id}", users.getUserById);
    try router.addRoute("/api/users", users.createUser);

    var server = try Server.init(allocator, 8080);
    defer server.deinit();

    // Set up the request handler
    server.server.setRequestHandler(handler);

    // Start the server
    try server.start();
}

fn handler(req: zhttp.Request, res: *zhttp.Response) !void {
    std.log.info("{s} {s}", .{@tagName(req.method), req.path});
    try router.handleRequest(req, res);
}
Performans Optimizasyonları
Zig, API'mizi ışık hızında yapan çeşitli özellikler sağlar:
- Sıfır maliyetli soyutlamalar: Zig'in yaklaşımı, soyutlamaların ek yük eklemediğinden emin olur.
- Derleme zamanı metaprogramlama: Çalışmayı çalışma zamanı yerine derleme zamanında gerçekleştirebiliriz.
- Manuel bellek yönetimi: Tahsisleri kontrol ederek, çöp toplama duraklamalarından kaçınırız.
- Arena tahsis ediciler: Bir kerede hızlıca serbest bırakılabilen, istek kapsamlı bellek için mükemmeldir.
- Satır içi işlevler: Kritik yollar, işlev çağrısı yükünü ortadan kaldırmak için satır içine alınabilir.
Yönlendiricimizi optimize edelim:
// Add inline attribute to critical functions
pub inline fn handleRequest(self: *Router, req: zhttp.Request, res: *zhttp.Response) !void {
    // Existing code...
}
Ve istek işleyicimizi bir iş parçacığı havuzuyla optimize edin:
const ThreadPool = struct {
    threads: []std.Thread,

    pub fn init(thread_count: usize) !ThreadPool {
        var threads = try std.heap.page_allocator.alloc(std.Thread, thread_count);

        for (threads) |*thread, i| {
            thread.* = try std.Thread.spawn(.{}, workerFn, .{i});
        }

        return ThreadPool{ .threads = threads };
    }

    fn workerFn(id: usize) void {
        // Process incoming requests
        while (true) {
            // Get request from queue and process
        }
    }
};
Sonuç
Bu eğitimde, yüksek performanslı bir REST API oluşturmak için Zig'in performansa odaklı özelliklerinden nasıl yararlanacağımızı inceledik. Zig'in manuel bellek yönetiminden, derleme zamanı özelliklerinden ve sıfır maliyetli soyutlamalarından yararlanarak, hem sağlam hem de ışık hızında bir API sunucusu oluşturduk.
Şunları ele aldık:
- Bir Zig geliştirme ortamı kurma
- Temel bir HTTP sunucusu oluşturma
- API uç noktalarını işlemek için bir yönlendirici oluşturma
- JSON serileştirme ve serileştirme işlemini uygulama
- API uç noktası işleyicileri ekleme
- Performans için optimizasyon
Bu temel, Zig'de diğer birçok dilde yazılanlardan daha iyi performans gösteren, üretime hazır API'ler oluşturmanız için size araçlar sağlar. Zig ile geliştirmeye devam ettikçe, uygulamalarınızı daha da geliştirmek için comptime, hata işleme ve çapraz derleme gibi daha gelişmiş özellikleri keşfedin.


