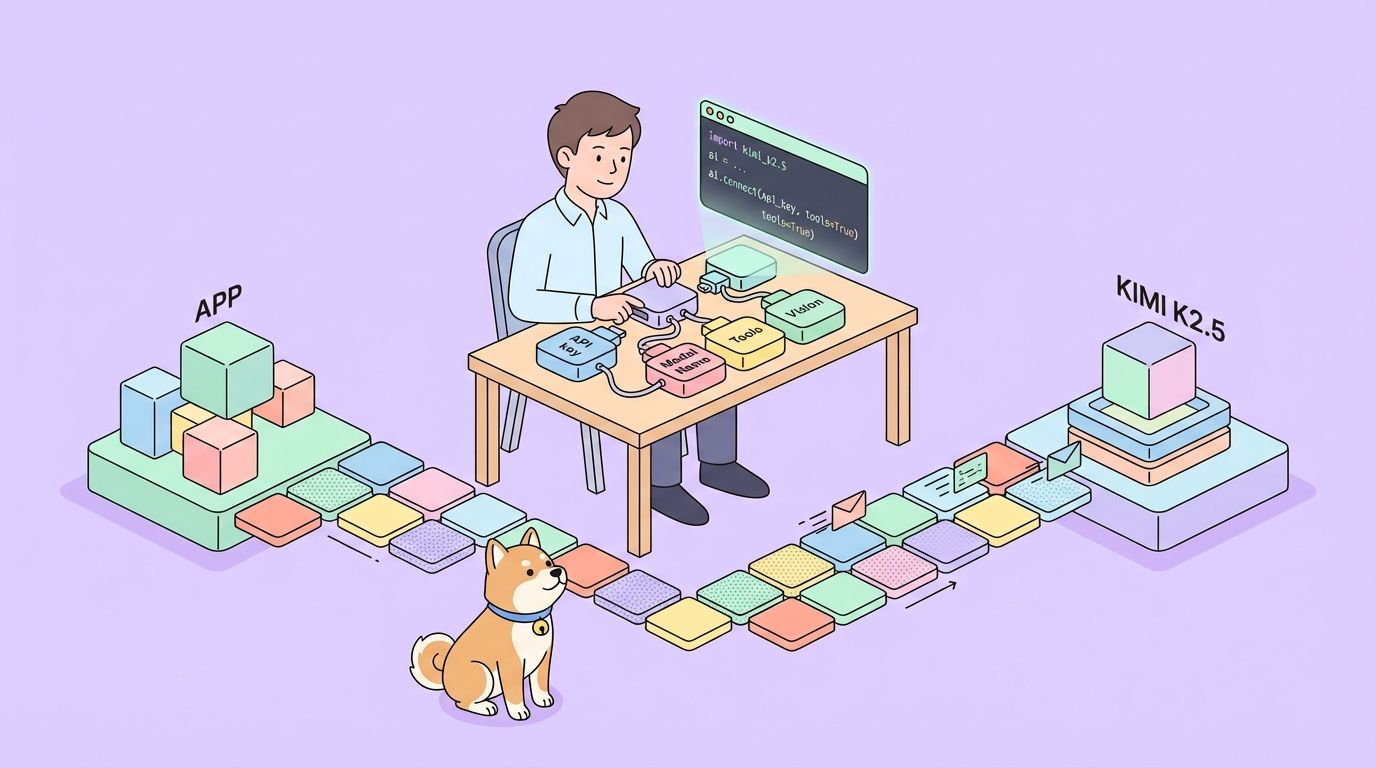
นักพัฒนาซอฟต์แวร์กำลังมองหา API ที่แข็งแกร่งซึ่งสามารถจัดการกับอินพุตหลายรูปแบบที่ซับซ้อนและให้ผลลัพธ์ที่ชาญฉลาดได้มากขึ้นเรื่อยๆ Kimi K2.5 API โดดเด่นในฐานะเครื่องมืออเนกประสงค์จาก Moonshot AI ที่ช่วยให้แอปพลิเคชันสามารถประมวลผลข้อความ รูปภาพ และวิดีโอด้วยความสามารถในการให้เหตุผลขั้นสูง API นี้ช่วยให้คุณสร้างโซลูชันที่ขับเคลื่อนด้วย AI ที่ซับซ้อนได้ ตั้งแต่การดีบักด้วยภาพในโค้ด ไปจนถึงการจัดระเบียบฝูงเอเจนต์สำหรับการดำเนินการงานแบบขนาน
Kimi K2.5 คืออะไร?
Kimi K2.5 เป็นโมเดล multimodal แบบโอเพนซอร์สที่ทันสมัยที่สุดของ Moonshot AI ซึ่งสร้างขึ้นจากการฝึกอบรมล่วงหน้าอย่างต่อเนื่องโดยใช้โทเค็นภาพและข้อความแบบผสมผสานประมาณ 15 ล้านล้านโทเค็นบนสถาปัตยกรรม Kimi-K2-Base ซึ่งแตกต่างจากรุ่นก่อน K2.5 ได้รวมความเข้าใจด้านภาพและภาษาเข้ากับความสามารถเชิงตัวแทนขั้นสูงได้อย่างราบรื่น ทำให้เป็นเครื่องมือที่มีประสิทธิภาพอย่างยิ่งสำหรับนักพัฒนาที่สร้างแอปพลิเคชันที่ขับเคลื่อนด้วย AI
โมเดลนี้แนะนำคุณสมบัติที่ก้าวล้ำหลายประการที่ทำให้แตกต่างจาก API AI อื่นๆ การเป็นโมเดลหลายรูปแบบแบบดั้งเดิมหมายความว่าได้รับการฝึกอบรมล่วงหน้าด้วยโทเค็นภาพ-ภาษาตั้งแต่เริ่มต้น แทนที่จะเพิ่มความสามารถด้านการมองเห็นเข้ามาในภายหลัง แนวทางนี้ส่งผลให้ได้ประสิทธิภาพที่เหนือกว่าในด้านความรู้ด้านภาพ การให้เหตุผลข้ามรูปแบบ และการใช้เครื่องมือเชิงตัวแทนที่อิงตามอินพุตภาพ
ทำไม Kimi K2.5 ถึงสำคัญสำหรับนักพัฒนา:
- ความพร้อมใช้งานแบบโอเพนซอร์ส: แตกต่างจากโมเดลขั้นสูงหลายๆ โมเดล น้ำหนักของ K2.5 เปิดเผยต่อสาธารณะบน Hugging Face
- API ที่เข้ากันได้กับ OpenAI: สามารถใช้แทนกันได้โดยตรงโดยต้องการการเปลี่ยนแปลงโค้ดเพียงเล็กน้อย
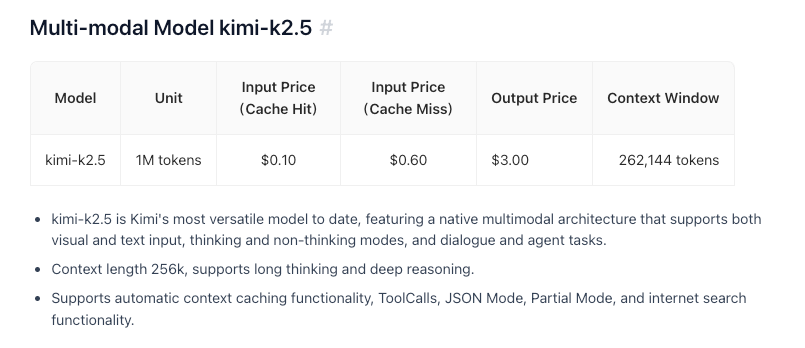
- คุ้มค่า: ราคาที่แข่งขันได้ที่ 0.60 ดอลลาร์/M โทเค็นอินพุต
- หน้าต่างบริบท 256K: จัดการเอกสารและการสนทนาขนาดใหญ่ได้
- ความสามารถของ Agent Swarm: แยกย่อยงานที่ซับซ้อนออกเป็นงานย่อยแบบขนาน
คุณสมบัติและความสามารถหลัก
ความฉลาดแบบหลายรูปแบบโดยกำเนิด
K2.5 เก่งในด้านความรู้ด้านภาพ การให้เหตุผลข้ามรูปแบบ และการใช้เครื่องมือเชิงตัวแทนที่อิงตามอินพุตภาพ นี่ไม่ใช่แค่การจดจำภาพเท่านั้น แต่เป็นการทำความเข้าใจบริบททางภาพอย่างลึกซึ้งที่สามารถใช้เป็นข้อมูลในการตัดสินใจที่ซับซ้อนได้
การเขียนโค้ดด้วยการมองเห็น
หนึ่งในความสามารถที่โดดเด่นของ K2.5 คือการสร้างโค้ดจากข้อกำหนดทางภาพ ชี้ไปที่แบบจำลองการออกแบบ UI แล้วมันสามารถสร้างโค้ดส่วนหน้าที่มีฟังก์ชันการทำงานได้ แสดงเวิร์กโฟลว์วิดีโอ แล้วมันสามารถจัดระเบียบเครื่องมือสำหรับการประมวลผลข้อมูลภาพได้ สิ่งนี้ทำให้มีคุณค่าอย่างยิ่งสำหรับ:
- การแปลงการออกแบบ Figma เป็นคอมโพเนนต์ React
- การสร้าง HTML/CSS จากโครงลวด
- การสร้างไปป์ไลน์การแสดงข้อมูลจากตัวอย่างแผนภูมิ
- การทำงานอัตโนมัติของเวิร์กโฟลว์การประมวลผลภาพ

สถาปัตยกรรม Agent Swarm
K2.5 เปลี่ยนจากการปรับขนาดเอเจนต์เดี่ยวไปสู่รูปแบบการทำงานที่ขับเคลื่อนด้วยตนเองและประสานงานกันแบบฝูง เมื่อเผชิญกับงานที่ซับซ้อน มันสามารถ:
- แยกย่อยปัญหาออกเป็นงานย่อยแบบขนาน
- สร้างอินสแตนซ์เอเจนต์เฉพาะโดเมนแบบไดนามิก
- ประสานงานการทำงานในเอเจนต์หลายตัว
- สังเคราะห์ผลลัพธ์ให้เป็นเอาต์พุตที่สอดคล้องกัน
สถาปัตยกรรมนี้ช่วยให้ K2.5 สามารถจัดการกับงานที่จะท่วมท้นระบบเอเจนต์เดี่ยวได้ เช่น การปรับโครงสร้างโค้ดที่ครอบคลุม การสร้างเอกสารหลายไฟล์ หรือไปป์ไลน์การวิเคราะห์ข้อมูลที่ซับซ้อน
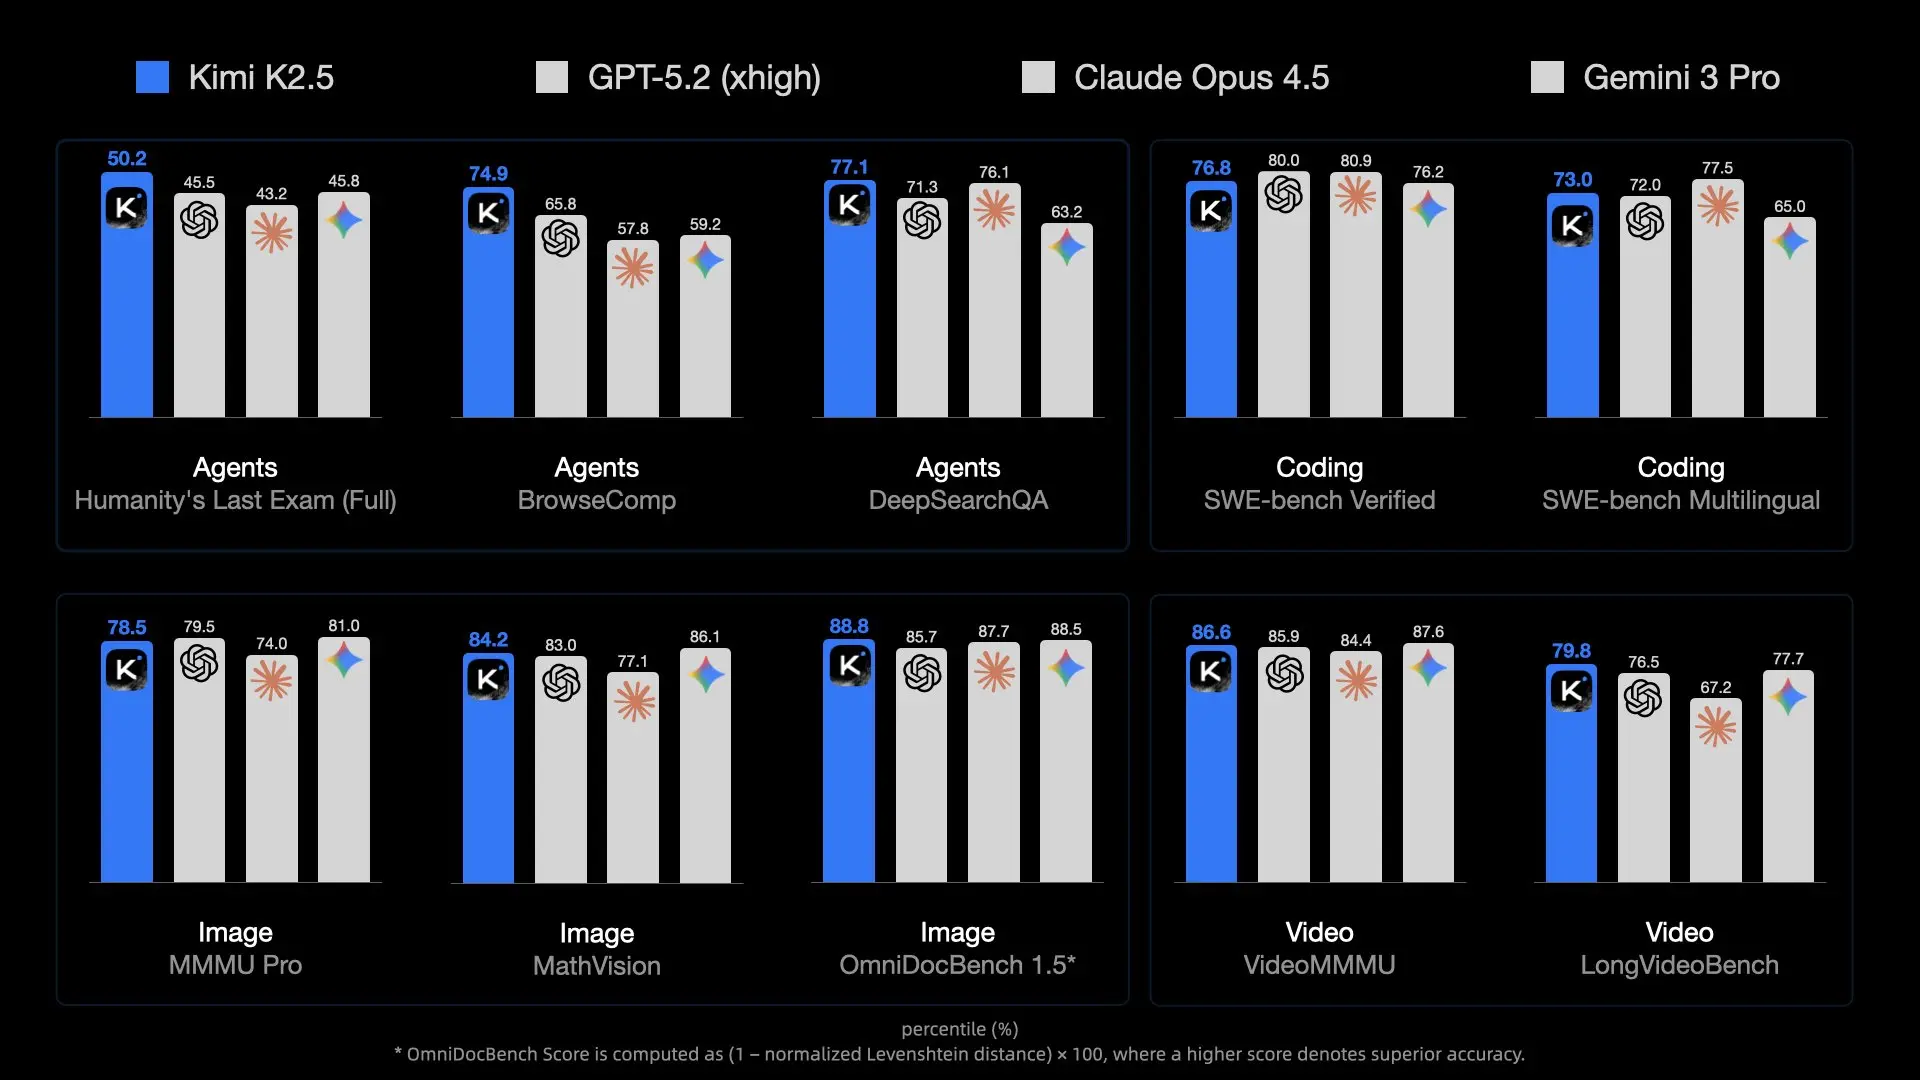
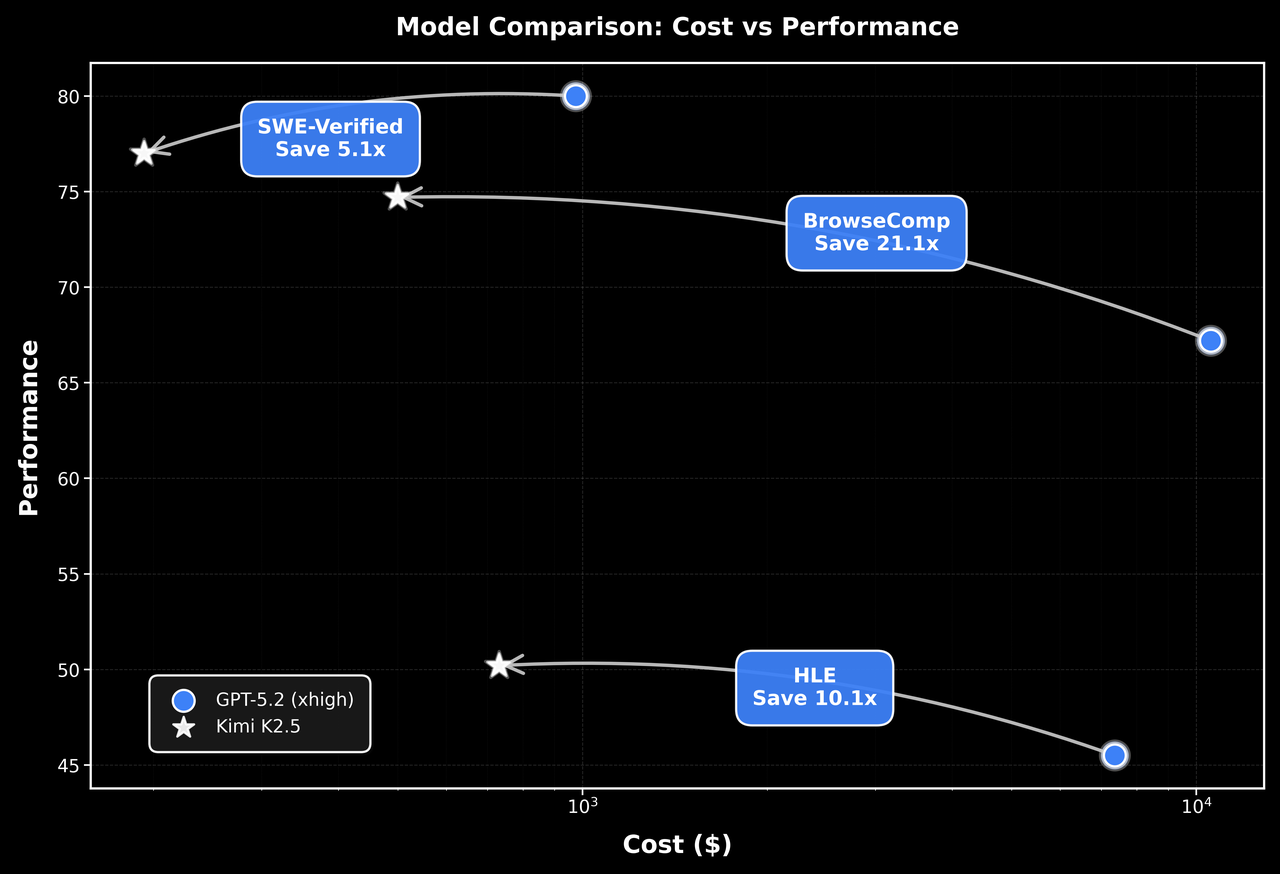
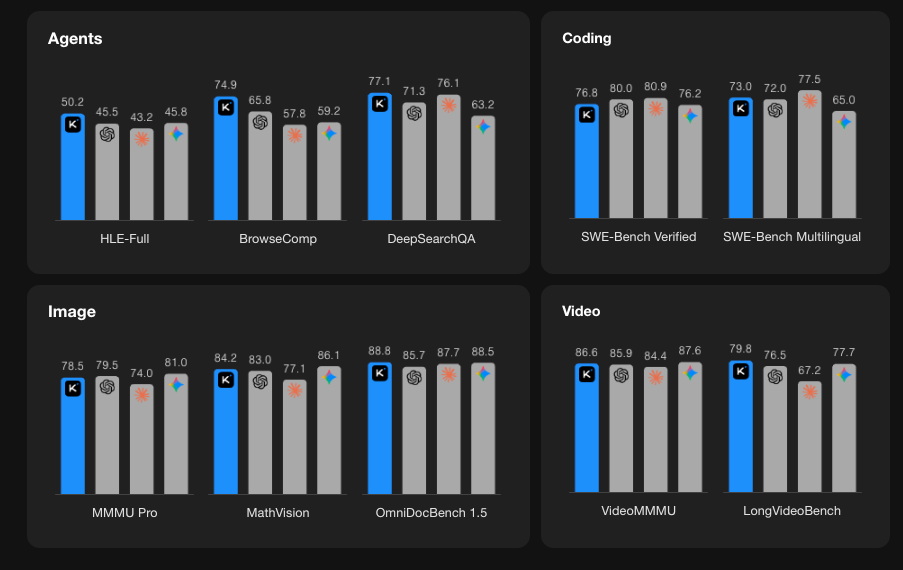
ประสิทธิภาพการทำงานตามเกณฑ์มาตรฐาน
เริ่มต้นใช้งาน Kimi K2.5 API
ขั้นตอนที่ 1: สร้างบัญชี Moonshot AI ของคุณ
เยี่ยมชม platform.moonshot.ai และลงทะเบียนบัญชีของคุณ กระบวนการลงทะเบียนทำได้ง่าย:
- คลิก "Sign Up" หรือ "Register"
- ระบุอีเมลของคุณและสร้างรหัสผ่าน
- ยืนยันที่อยู่อีเมลของคุณ
- กรอกข้อมูลโปรไฟล์ที่จำเป็นให้ครบถ้วน
ขั้นตอนที่ 2: สร้างคีย์ API ของคุณ
เมื่อเข้าสู่ระบบแล้ว:
- ไปที่ส่วน API Keys ในแดชบอร์ดของคุณ
- คลิก "สร้างคีย์ API ใหม่"
- ตั้งชื่อคีย์ของคุณให้สื่อความหมาย (เช่น "kimi-k2-5-development")
- คัดลอกและจัดเก็บคีย์ API ของคุณอย่างปลอดภัย—คุณจะไม่เห็นมันอีก
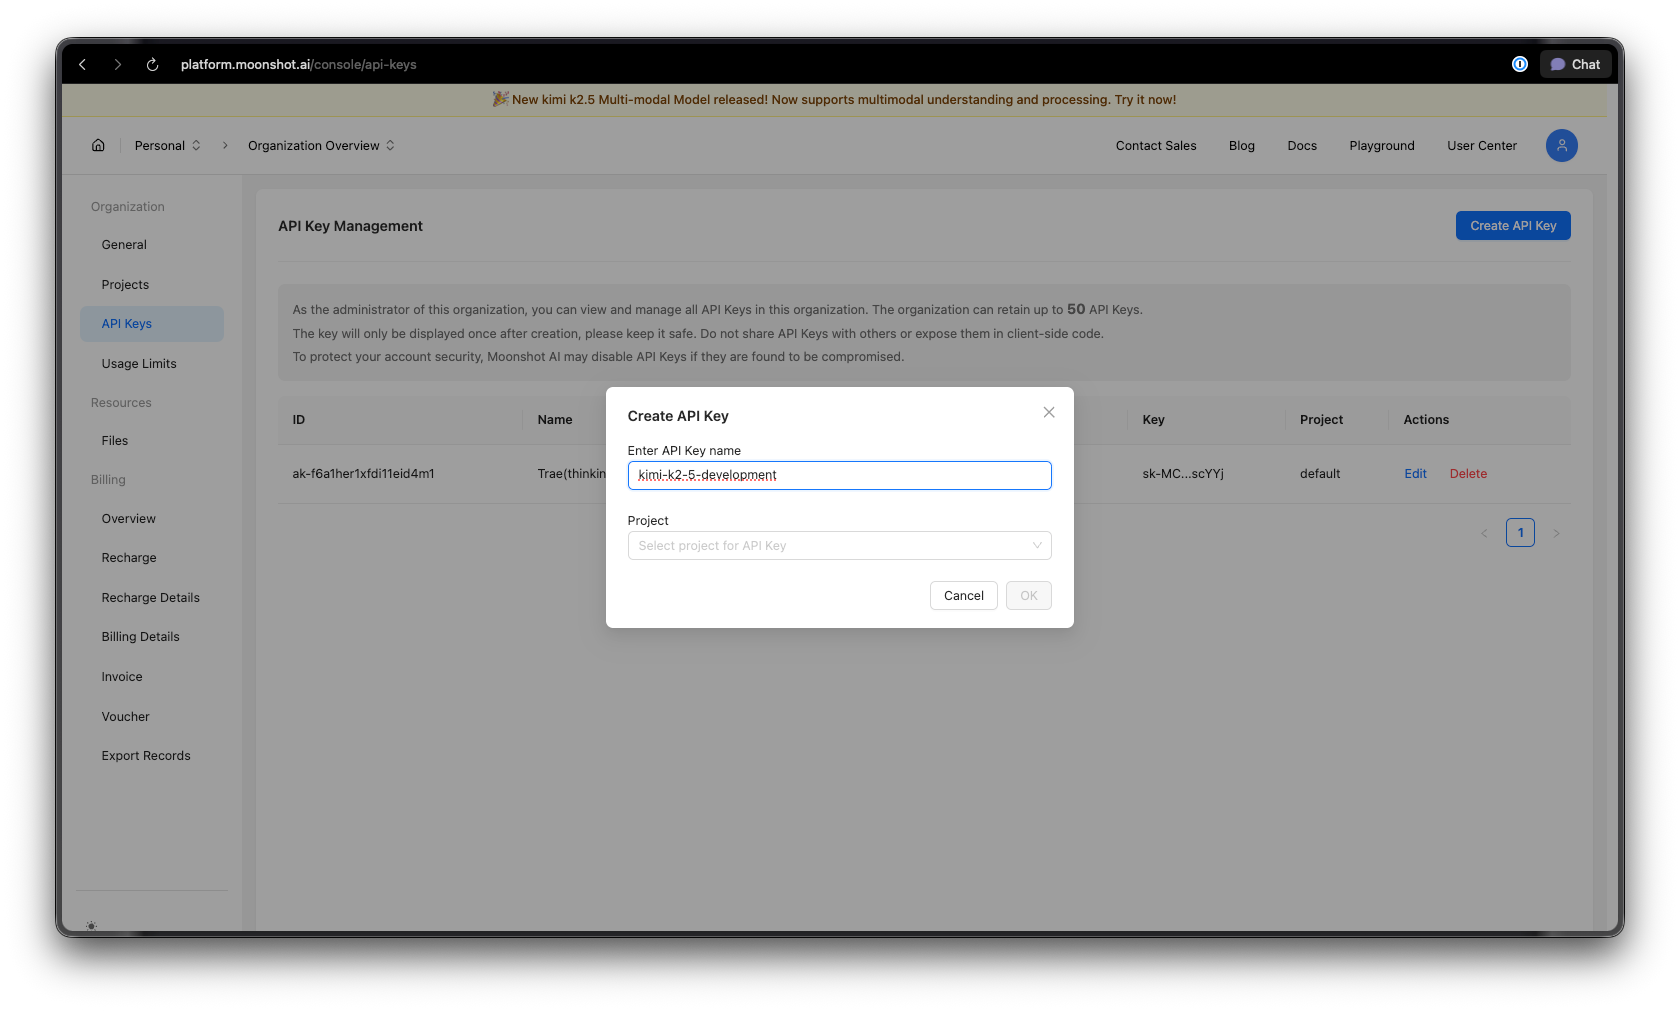
เคล็ดลับความปลอดภัย: อย่าผูกคีย์ API ไว้กับการควบคุมเวอร์ชันเด็ดขาด ให้ใช้ตัวแปรสภาพแวดล้อมหรือผู้จัดการความลับ
ขั้นตอนที่ 3: ตั้งค่าสภาพแวดล้อมของคุณ
สำหรับ Python:
pip install --upgrade 'openai>=1.0'
สำหรับ Node.js:
npm install openai@latest
ขั้นตอนที่ 4: กำหนดค่าคีย์ API ของคุณ
ตั้งค่าคีย์ API ของคุณเป็นตัวแปรสภาพแวดล้อม:
macOS/Linux:
export MOONSHOT_API_KEY="your-api-key-here"
Windows (PowerShell):
[System.Environment]::SetEnvironmentVariable("MOONSHOT_API_KEY", "your-api-key-here", "User")
Windows (Command Prompt):
setx MOONSHOT_API_KEY "your-api-key-here"
ตัวอย่างโค้ด Python
การสนทนาพื้นฐานให้สมบูรณ์
นี่คือตัวอย่างง่ายๆ สำหรับเริ่มต้นใช้งาน Kimi K2.5:
import os
from openai import OpenAI

# Initialize the client with Moonshot AI endpoint
client = OpenAI(
    api_key=os.environ.get("MOONSHOT_API_KEY"),
    base_url="https://api.moonshot.ai/v1",
)

# Create a chat completion
response = client.chat.completions.create(
    model="kimi-k2.5-preview",
    messages=[
        {
            "role": "system",
            "content": "You are Kimi, an AI assistant developed by Moonshot AI. You are helpful, harmless, and honest."
        },
        {
            "role": "user",
            "content": "Explain the concept of mixture-of-experts architecture in neural networks."
        }
    ],
    temperature=0.6,
    max_tokens=2048,
)

print(response.choices[0].message.content)
การสตรีมการตอบกลับ
สำหรับแอปพลิเคชันแบบเรียลไทม์ ให้ใช้การสตรีมเพื่อแสดงการตอบกลับในขณะที่กำลังสร้าง:
import os
from openai import OpenAI

client = OpenAI(
    api_key=os.environ.get("MOONSHOT_API_KEY"),
    base_url="https://api.moonshot.ai/v1",
)

# Stream the response
stream = client.chat.completions.create(
    model="kimi-k2.5-preview",
    messages=[
        {"role": "user", "content": "Write a Python function to implement binary search."}
    ],
    stream=True,
    temperature=0.3,
)

# Process the stream
for chunk in stream:
    if chunk.choices[0].delta.content:
        print(chunk.choices[0].delta.content, end="", flush=True)
การสนทนาหลายรอบ
รักษาบริบทในการแลกเปลี่ยนหลายครั้ง:
import os
from openai import OpenAI

client = OpenAI(
    api_key=os.environ.get("MOONSHOT_API_KEY"),
    base_url="https://api.moonshot.ai/v1",
)

conversation_history = [
    {"role": "system", "content": "You are a helpful coding assistant."}
]

def chat(user_message):
    conversation_history.append({"role": "user", "content": user_message})

    response = client.chat.completions.create(
        model="kimi-k2.5-preview",
        messages=conversation_history,
        temperature=0.6,
    )

    assistant_message = response.choices[0].message.content
    conversation_history.append({"role": "assistant", "content": assistant_message})

    return assistant_message

# Example conversation
print(chat("How do I create a REST API in Python?"))
print(chat("Can you show me how to add authentication to that?"))
print(chat("What about rate limiting?"))
การใช้งานแบบ Async
สำหรับแอปพลิเคชันประสิทธิภาพสูง ให้ใช้ async/await:
import os
import asyncio
from openai import AsyncOpenAI

async def main():
    client = AsyncOpenAI(
        api_key=os.environ.get("MOONSHOT_API_KEY"),
        base_url="https://api.moonshot.ai/v1",
    )

    # Run multiple requests concurrently
    tasks = [
        client.chat.completions.create(
            model="kimi-k2.5-preview",
            messages=[{"role": "user", "content": f"What is {topic}?"}],
        )
        for topic in ["REST API", "GraphQL", "gRPC"]
    ]

    responses = await asyncio.gather(*tasks)

    for response in responses:
        print(response.choices[0].message.content[:200])
        print("-" * 50)

asyncio.run(main())
ตัวอย่าง JavaScript/Node.js
การสนทนาพื้นฐานให้สมบูรณ์
import OpenAI from 'openai';

const client = new OpenAI({
  apiKey: process.env.MOONSHOT_API_KEY,
  baseURL: 'https://api.moonshot.ai/v1',
});

async function chat(userMessage) {
  const response = await client.chat.completions.create({
    model: 'kimi-k2.5-preview',
    messages: [
      {
        role: 'system',
        content: 'You are Kimi, a helpful AI assistant.',
      },
      {
        role: 'user',
        content: userMessage,
      },
    ],
    temperature: 0.6,
  });

  return response.choices[0].message.content;
}

// Usage
const answer = await chat('How do I implement a binary search tree in JavaScript?');
console.log(answer);
การสตรีมด้วย Node.js
import OpenAI from 'openai';

const client = new OpenAI({
  apiKey: process.env.MOONSHOT_API_KEY,
  baseURL: 'https://api.moonshot.ai/v1',
});

async function streamChat(userMessage) {
  const stream = await client.chat.completions.create({
    model: 'kimi-k2.5-preview',
    messages: [{ role: 'user', content: userMessage }],
    stream: true,
  });

  for await (const chunk of stream) {
    const content = chunk.choices[0]?.delta?.content;
    if (content) {
      process.stdout.write(content);
    }
  }
}

await streamChat('Explain microservices architecture');
การใช้ Fetch API (ฟังก์ชัน Browser/Edge)
async function callKimiAPI(prompt) {
  const response = await fetch('https://api.moonshot.ai/v1/chat/completions', {
    method: 'POST',
    headers: {
      'Authorization': `Bearer ${process.env.MOONSHOT_API_KEY}`,
      'Content-Type': 'application/json',
    },
    body: JSON.stringify({
      model: 'kimi-k2.5-preview',
      messages: [{ role: 'user', content: prompt }],
      temperature: 0.6,
    }),
  });

  const data = await response.json();
  return data.choices[0].message.content;
}

// Usage
const result = await callKimiAPI('What are the best practices for API design?');
console.log(result);
การทดสอบ Kimi K2.5 API ด้วย Apidog
การทดสอบ API AI อย่างมีประสิทธิภาพจำเป็นต้องทำความเข้าใจโครงสร้างคำขอ/การตอบกลับ การจัดการการสตรีม การจัดการการตรวจสอบสิทธิ์ และการดีบักปัญหา Apidog มีโซลูชันที่ครอบคลุมสำหรับการพัฒนา API ที่ทำให้การทำงานกับ Kimi K2.5 เป็นเรื่องง่าย
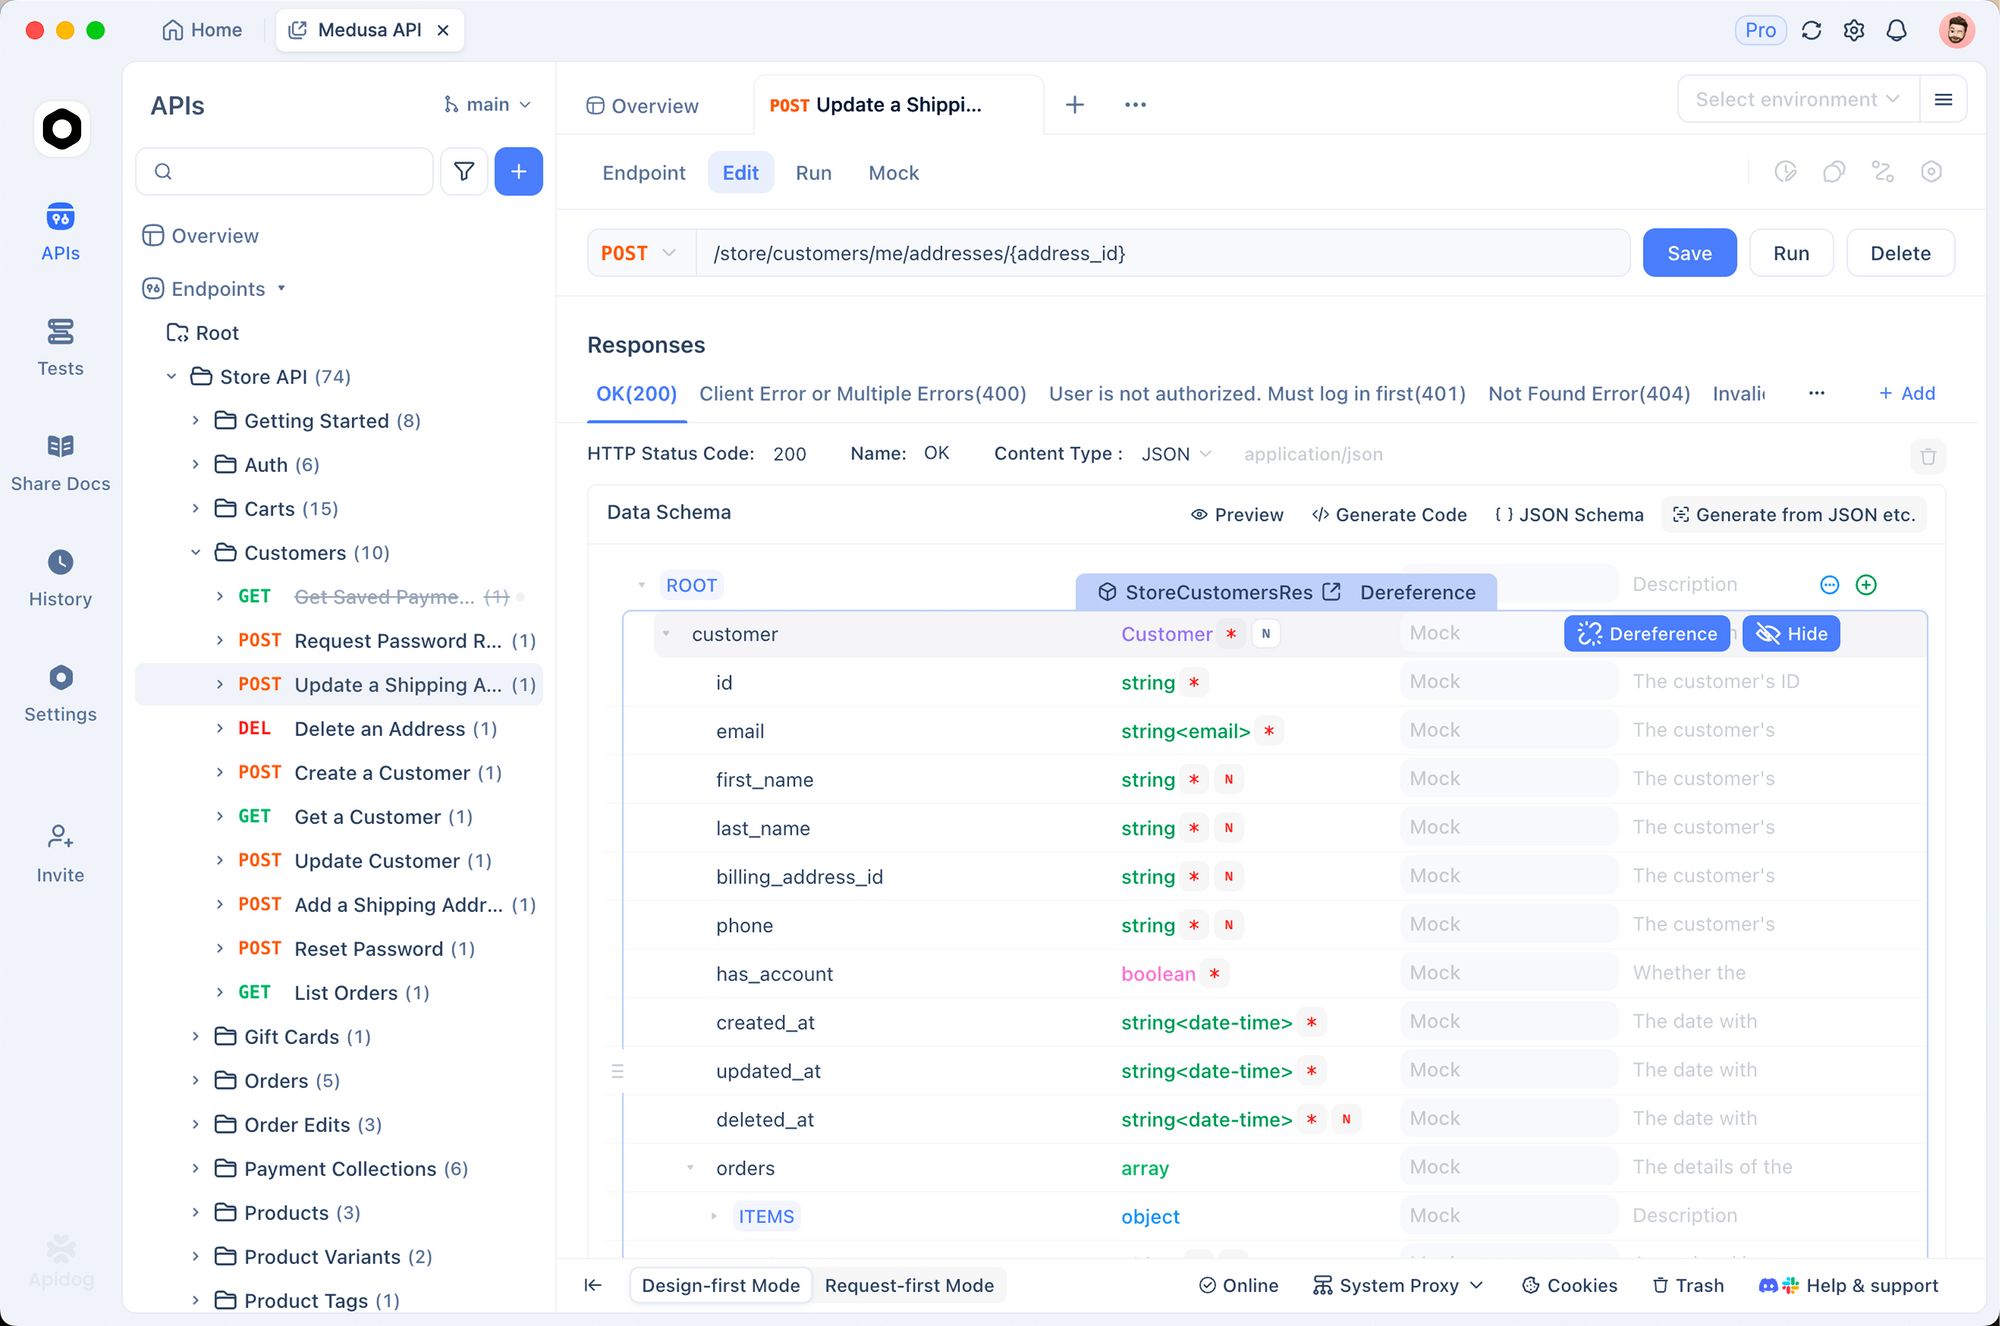
การตั้งค่า Kimi K2.5 ใน Apidog
ขั้นตอนที่ 1: สร้างโปรเจกต์ใหม่
- เปิด Apidog และสร้างโปรเจกต์ใหม่ชื่อ "Kimi K2.5 Integration"
- สิ่งนี้จัดระเบียบเอนด์พอยต์ที่เกี่ยวข้องกับ Kimi ทั้งหมดของคุณไว้ในที่เดียว
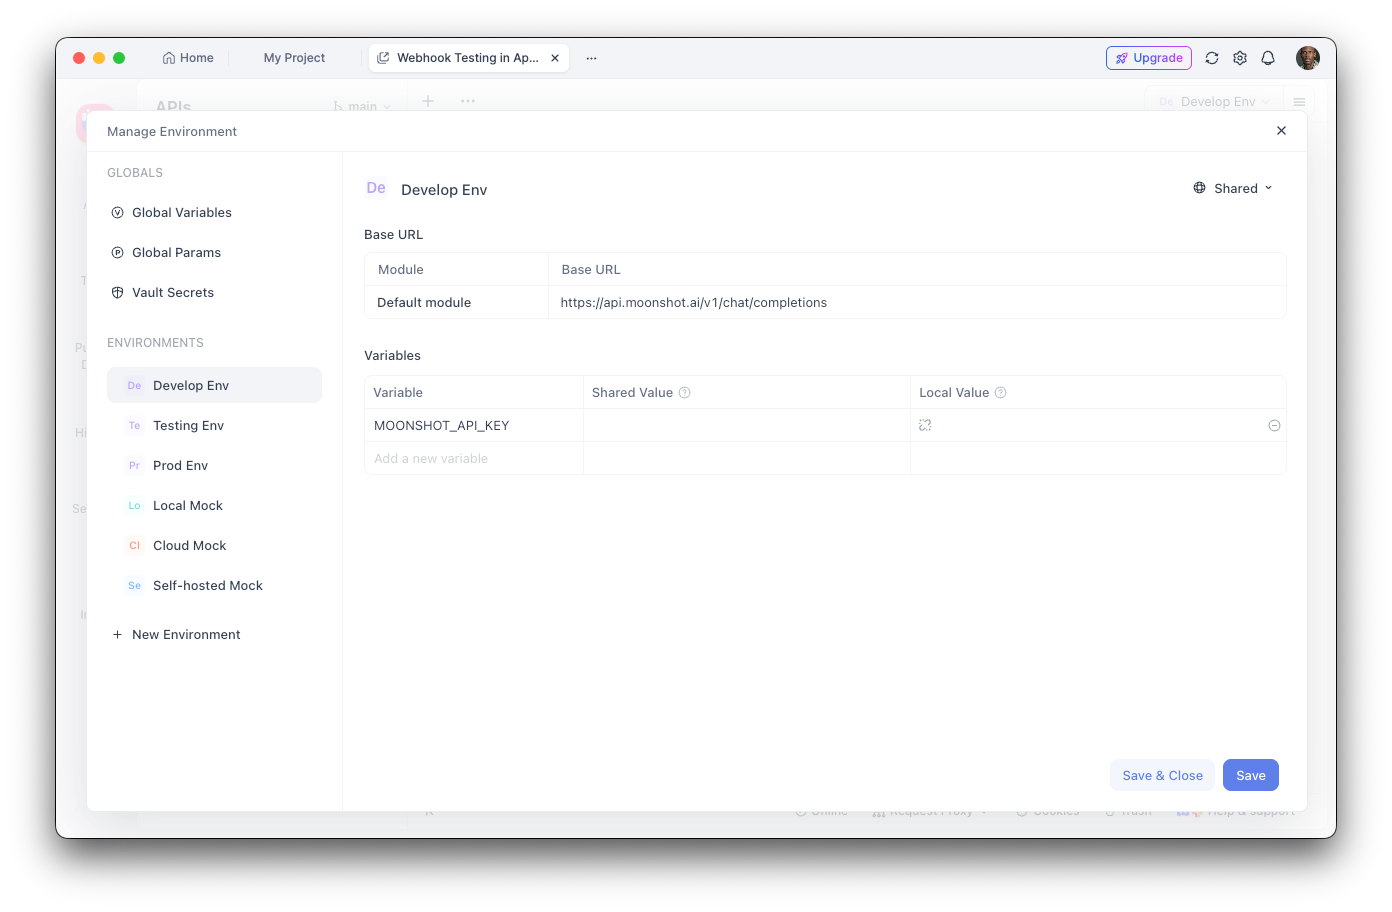
ขั้นตอนที่ 2: กำหนดค่าตัวแปรสภาพแวดล้อม
- ไปที่การตั้งค่าสภาพแวดล้อม
- เพิ่มตัวแปรสภาพแวดล้อมใหม่:
- ชื่อ:
MOONSHOT_API_KEY - ค่า: คีย์ API ของคุณ
- ทำเครื่องหมายเป็น "Sensitive" เพื่อซ่อนค่า
ขั้นตอนที่ 3: สร้างเอนด์พอยต์การสนทนาให้สมบูรณ์
- เพิ่มคำขอ POST ใหม่
- URL:
https://api.moonshot.ai/v1/chat/completions - ส่วนหัว:
Authorization:Bearer {{MOONSHOT_API_KEY}}Content-Type:application/json

ขั้นตอนที่ 4: กำหนดค่าเนื้อหาคำขอ
{
  "model": "kimi-k2.5-preview",
  "messages": [
    {
      "role": "system",
      "content": "You are a helpful AI assistant."
    },
    {
      "role": "user",
      "content": "Hello, how can you help me today?"
    }
  ],
  "temperature": 0.6,
  "max_tokens": 2048,
  "stream": false
}
การดีบักด้วย Apidog
ส่วนต่อประสานผู้ใช้แบบกราฟิกของ Apidog ช่วยให้คุณ:
- ตรวจสอบโครงสร้างการตอบกลับ: ดูการตอบกลับ JSON แบบเต็มพร้อมการไฮไลต์ไวยากรณ์
- วัดความหน่วง: ติดตามเวลาตอบสนองเพื่อเพิ่มประสิทธิภาพการทำงาน
- ดูส่วนหัว: ดีบักปัญหาการตรวจสอบสิทธิ์และข้อจำกัดอัตรา
- บันทึกกรณีทดสอบ: สร้างคอลเลกชันคำขอที่นำกลับมาใช้ใหม่ได้สำหรับการทดสอบการถดถอย
- สร้างโค้ด: ส่งออกโค้ดที่ทำงานได้ใน Python, JavaScript, cURL และอื่นๆ
การสร้างการทดสอบอัตโนมัติ
ด้วยตัวรันการทดสอบของ Apidog คุณสามารถตรวจสอบการรวม Kimi K2.5 ของคุณได้:
// Post-response test script in Apidog
pm.test("Response status is 200", function () {
    pm.response.to.have.status(200);
});

pm.test("Response contains choices", function () {
    const response = pm.response.json();
    pm.expect(response.choices).to.be.an('array');
    pm.expect(response.choices.length).to.be.greaterThan(0);
});

pm.test("Response content is not empty", function () {
    const response = pm.response.json();
    pm.expect(response.choices[0].message.content).to.not.be.empty;
});
การเรียกใช้เครื่องมือและความสามารถของเอเจนต์
การกำหนดเครื่องมือ
import os
from openai import OpenAI

client = OpenAI(
    api_key=os.environ.get("MOONSHOT_API_KEY"),
    base_url="https://api.moonshot.ai/v1",
)

# Define available tools
tools = [
    {
        "type": "function",
        "function": {
            "name": "get_weather",
            "description": "Get the current weather for a location",
            "parameters": {
                "type": "object",
                "properties": {
                    "location": {
                        "type": "string",
                        "description": "City and country, e.g., 'London, UK'"
                    },
                    "unit": {
                        "type": "string",
                        "enum": ["celsius", "fahrenheit"],
                        "description": "Temperature unit"
                    }
                },
                "required": ["location"]
            }
        }
    },
    {
        "type": "function",
        "function": {
            "name": "search_database",
            "description": "Search a database for information",
            "parameters": {
                "type": "object",
                "properties": {
                    "query": {
                        "type": "string",
                        "description": "Search query"
                    },
                    "limit": {
                        "type": "integer",
                        "description": "Maximum number of results"
                    }
                },
                "required": ["query"]
            }
        }
    }
]

# Make a request with tools
response = client.chat.completions.create(
    model="kimi-k2.5-preview",
    messages=[
        {"role": "user", "content": "What's the weather like in Tokyo?"}
    ],
    tools=tools,
    tool_choice="auto",
)

# Handle tool calls
if response.choices[0].message.tool_calls:
    for tool_call in response.choices[0].message.tool_calls:
        print(f"Tool: {tool_call.function.name}")
        print(f"Arguments: {tool_call.function.arguments}")
การดำเนินการเรียกใช้เครื่องมือ
import json

def execute_tool_call(tool_call):
    """Execute a tool call and return the result."""
    name = tool_call.function.name
    args = json.loads(tool_call.function.arguments)

    if name == "get_weather":
        # Simulate weather API call
        return json.dumps({
            "location": args["location"],
            "temperature": 22,
            "unit": args.get("unit", "celsius"),
            "condition": "sunny"
        })
    elif name == "search_database":
        # Simulate database search
        return json.dumps({
            "results": [
                {"id": 1, "title": "Result 1"},
                {"id": 2, "title": "Result 2"}
            ]
        })

    return json.dumps({"error": "Unknown tool"})

# Complete the conversation with tool results
messages = [
    {"role": "user", "content": "What's the weather in Tokyo?"}
]

response = client.chat.completions.create(
    model="kimi-k2.5-preview",
    messages=messages,
    tools=tools,
)

if response.choices[0].message.tool_calls:
    # Add assistant message with tool calls
    messages.append(response.choices[0].message)

    # Execute each tool and add results
    for tool_call in response.choices[0].message.tool_calls:
        result = execute_tool_call(tool_call)
        messages.append({
            "role": "tool",
            "tool_call_id": tool_call.id,
            "content": result
        })

    # Get final response
    final_response = client.chat.completions.create(
        model="kimi-k2.5-preview",
        messages=messages,
        tools=tools,
    )

    print(final_response.choices[0].message.content)
คุณสมบัติการมองเห็นและหลายรูปแบบ
ความสามารถหลายรูปแบบโดยกำเนิดของ K2.5 ช่วยให้สามารถประมวลผลรูปภาพพร้อมกับข้อความได้:
import os
import base64
from openai import OpenAI

client = OpenAI(
    api_key=os.environ.get("MOONSHOT_API_KEY"),
    base_url="https://api.moonshot.ai/v1",
)

def encode_image(image_path):
    """Encode image to base64."""
    with open(image_path, "rb") as image_file:
        return base64.b64encode(image_file.read()).decode("utf-8")

# Analyze an image
image_base64 = encode_image("screenshot.png")

response = client.chat.completions.create(
    model="kimi-k2.5-preview",
    messages=[
        {
            "role": "user",
            "content": [
                {
                    "type": "text",
                    "text": "Analyze this UI design and suggest improvements."
                },
                {
                    "type": "image_url",
                    "image_url": {
                        "url": f"data:image/png;base64,{image_base64}"
                    }
                }
            ]
        }
    ],
    max_tokens=2048,
)

print(response.choices[0].message.content)
การสร้างโค้ดจากอินพุตภาพ
# Generate code from a wireframe
response = client.chat.completions.create(
    model="kimi-k2.5-preview",
    messages=[
        {
            "role": "system",
            "content": "You are an expert frontend developer. Generate clean, production-ready code."
        },
        {
            "role": "user",
            "content": [
                {
                    "type": "text",
                    "text": "Convert this wireframe into a React component with Tailwind CSS styling."
                },
                {
                    "type": "image_url",
                    "image_url": {
                        "url": f"data:image/png;base64,{encode_image('wireframe.png')}"
                    }
                }
            ]
        }
    ],
    temperature=0.3,
)

print(response.choices[0].message.content)
ราคาและข้อจำกัดอัตรา
ประเด็นสำคัญ:
- แพลนฟรีมีโทเค็น 1.5 ล้านโทเค็นต่อวัน
- แพลน Tier 1+ มีโทเค็นรายวันไม่จำกัด
- การแคชโทเค็นเป็นไปโดยอัตโนมัติโดยไม่จำเป็นต้องกำหนดค่า
- การค้นหาเว็บมีค่าใช้จ่ายเพิ่มเติม 0.005 ดอลลาร์ต่อการเรียกใช้
แนวทางปฏิบัติที่ดีที่สุดและเคล็ดลับ
เพิ่มประสิทธิภาพการใช้โทเค็น
# Use system prompts efficiently
system_prompt = """You are a concise technical assistant.
Rules: 1) Be brief 2) Use code blocks 3) Skip pleasantries"""

# Enable caching for repeated contexts
# Moonshot automatically caches similar prompts
การตั้งค่าอุณหภูมิ
- 0.0-0.3: การสร้างโค้ด, การตอบกลับตามข้อเท็จจริง
- 0.4-0.6: ความคิดสร้างสรรค์และความแม่นยำที่สมดุล
- 0.7-1.0: การเขียนเชิงสร้างสรรค์, การระดมสมอง
การจัดการข้อผิดพลาด
from openai import OpenAI, APIError, RateLimitError

client = OpenAI(
    api_key=os.environ.get("MOONSHOT_API_KEY"),
    base_url="https://api.moonshot.ai/v1",
)

def safe_chat(message, retries=3):
    for attempt in range(retries):
        try:
            response = client.chat.completions.create(
                model="kimi-k2.5-preview",
                messages=[{"role": "user", "content": message}],
            )
            return response.choices[0].message.content
        except RateLimitError:
            if attempt < retries - 1:
                time.sleep(2 ** attempt)  # Exponential backoff
            else:
                raise
        except APIError as e:
            print(f"API Error: {e}")
            raise

result = safe_chat("Hello, Kimi!")
การแก้ไขปัญหาทั่วไป
ข้อผิดพลาดในการตรวจสอบสิทธิ์
ปัญหา: ข้อผิดพลาด 401 Unauthorized
วิธีแก้ไข:
- ตรวจสอบว่าคีย์ API ของคุณถูกต้อง
- ตรวจสอบว่าคีย์ยังไม่หมดอายุ
- ตรวจสอบให้แน่ใจว่ารูปแบบส่วนหัว
Authorizationถูกต้อง:Bearer YOUR_KEY
การจำกัดอัตรา
ปัญหา: 429 Too Many Requests
วิธีแก้ไข:
- ใช้ Exponential Backoff
- อัปเกรดระดับของคุณโดยการเพิ่มเงินทุน
- ตรวจสอบส่วนหัว
X-RateLimit-Remaining
ความยาวของบริบทเกินขีดจำกัด
ปัญหา: คำขอเกินขีดจำกัดโทเค็น 256K
วิธีแก้ไข:
- สรุปการสนทนาที่ยาวนาน
- ใช้วิธีการแบบหน้าต่างเลื่อน (Sliding Window)
- แบ่งออกเป็นหลายคำขอ
ปัญหาการหมดเวลา
ปัญหา: คำขอหมดเวลา
วิธีแก้ไข:
- ใช้การสตรีมสำหรับการตอบกลับที่ยาวนาน
- เพิ่มการตั้งค่าการหมดเวลาของไคลเอนต์
- แบ่งคำสั่งที่ซับซ้อนออกเป็นงานย่อยๆ
พร้อมที่จะสร้างด้วย Kimi K2.5 แล้วหรือยัง? ดาวน์โหลด Apidog เพื่อปรับปรุงเวิร์กโฟลว์การพัฒนา API ของคุณให้มีประสิทธิภาพยิ่งขึ้นด้วยการทดสอบด้วยภาพ เอกสารประกอบอัตโนมัติ และคุณสมบัติการทำงานร่วมกันของทีม ที่ทำให้การรวม API AI ทำได้เร็วขึ้นและน่าเชื่อถือยิ่งขึ้น