
ในยุคของแอปพลิเคชันที่ขับเคลื่อนด้วย AI การผสานรวมโมเดลภาษาขั้นสูงเข้ากับซอฟต์แวร์ของคุณสามารถปลดล็อกความสามารถที่ไม่เคยมีมาก่อน ตั้งแต่แชทบอทอัจฉริยะไปจนถึงเครื่องมือวิเคราะห์ข้อมูล API ของ DeepSeek นำเสนอฟังก์ชันการทำงานของ AI ที่ล้ำสมัย แต่ความท้าทายที่แท้จริงอยู่ที่การผสานรวมเข้ากับแอปของคุณได้อย่างราบรื่น โดยที่ ไม่ต้องเสียเวลาไปกับการแก้ไขข้อบกพร่องหรือโค้ด boilerplate
คู่มือนี้จะแนะนำคุณตลอดกระบวนการทั้งหมดของการผสานรวม API ของ DeepSeek เข้ากับแอปพลิเคชันของคุณ โดยใช้ประโยชน์จากแพลตฟอร์ม API ที่ใช้งานง่าย — Apidog เพื่อทดสอบ แก้ไขข้อบกพร่อง และสร้างโค้ดสนิปเพ็ตพร้อมใช้งานในไม่กี่นาที ไม่ว่าคุณจะสร้างแบ็กเอนด์ Python หรือฟรอนต์เอนด์ JavaScript เมื่อสิ้นสุดบทความนี้ คุณจะมีการผสานรวม API ที่ใช้งานได้อย่างสมบูรณ์โดยใช้ความพยายามเพียงเล็กน้อย
ข้อกำหนดเบื้องต้น
- บัญชี DeepSeek (ลงทะเบียนที่นี่)
- ความรู้พื้นฐานเกี่ยวกับ REST API และการเขียนโปรแกรม (ใช้ Python/JavaScript ที่นี่)
- เครื่องมือเช่น Apidog เพื่อทดสอบ API
ขั้นตอนที่ 1: รับ DeepSeek API Key
คำขอ API ทุกรายการต้องมีการตรวจสอบสิทธิ์ นี่คือวิธีรับคีย์ของคุณ:
- เข้าสู่ระบบบัญชี DeepSeek ของคุณ
- ไปที่
API Keysภายใต้การตั้งค่าบัญชีของคุณ - คลิก
Create new APl keyแล้วคัดลอก
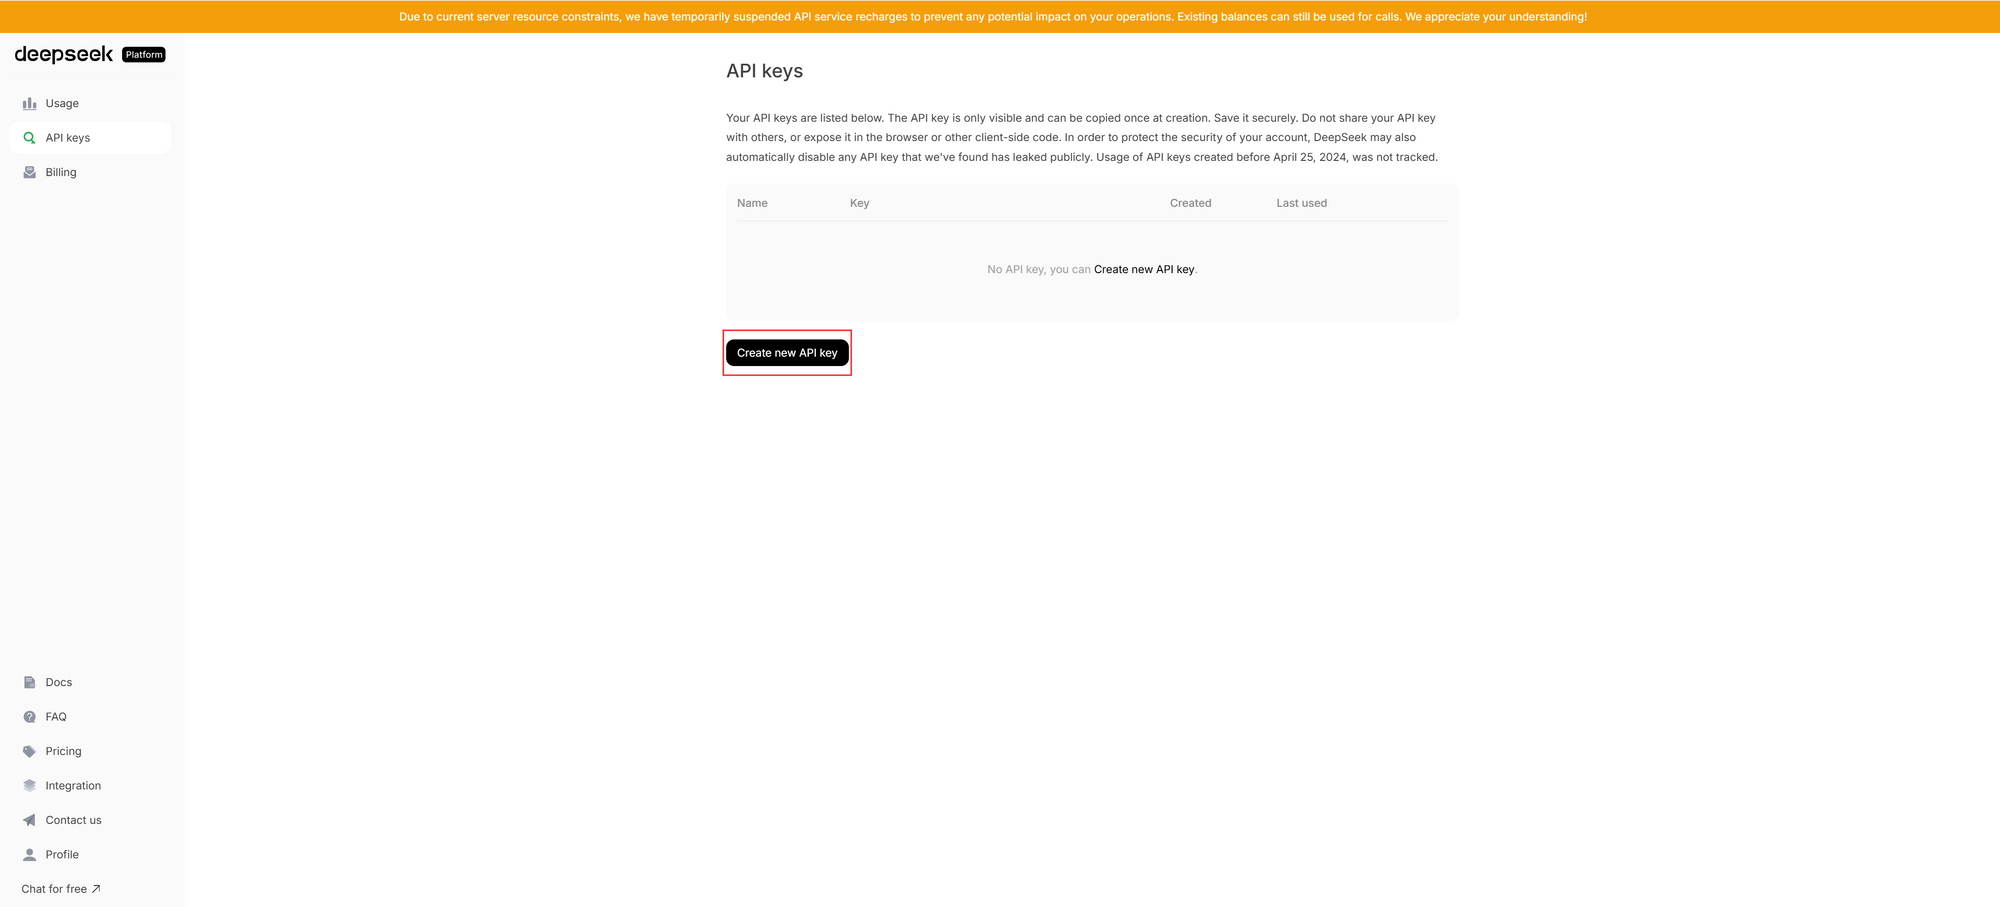
⚠️ สำคัญ: ปฏิบัติต่อคีย์นี้เหมือนรหัสผ่าน อย่าเปิดเผยในโค้ดฝั่งไคลเอ็นต์หรือที่เก็บข้อมูลสาธารณะ
ขั้นตอนที่ 2: ทดสอบ DeepSeek API
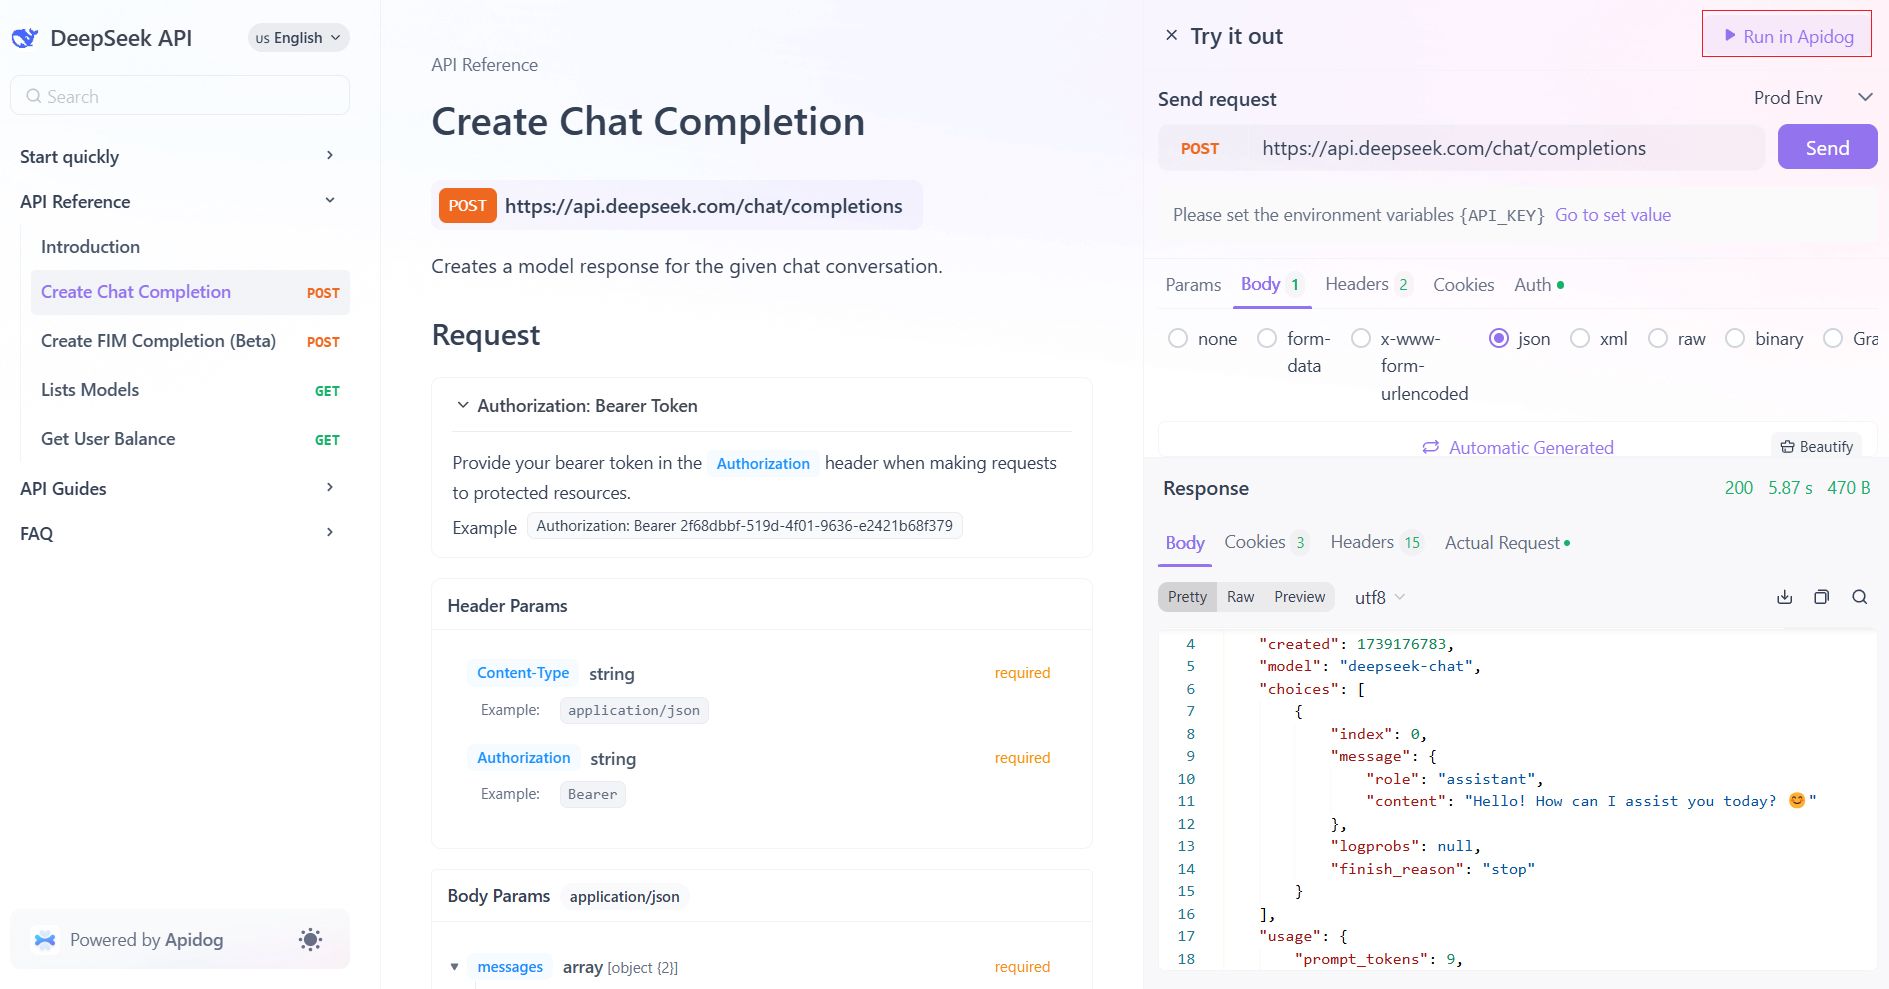
เอกสารประกอบ API ของ DeepSeek ที่สร้างโดย Apidog มีพื้นที่ทดลองแบบโต้ตอบเพื่อทดสอบจุดสิ้นสุดโดยตรงในเอกสารประกอบโดยไม่ต้องเขียนโค้ดแม้แต่บรรทัดเดียว นี่คือวิธีการ:
1. เปิดเอกสารประกอบ: ไปที่จุดสิ้นสุด Create Chat Completion

2. ตรวจสอบสิทธิ์:
- คลิกที่
Try it outหรือRun in Apidog - ในแผงคำขอแบบป๊อปอัป ให้ไปที่ส่วน Headers หรือ Auth แล้วเพิ่ม API key ของคุณ:
Authorization: Bearer YOUR_API_KEY 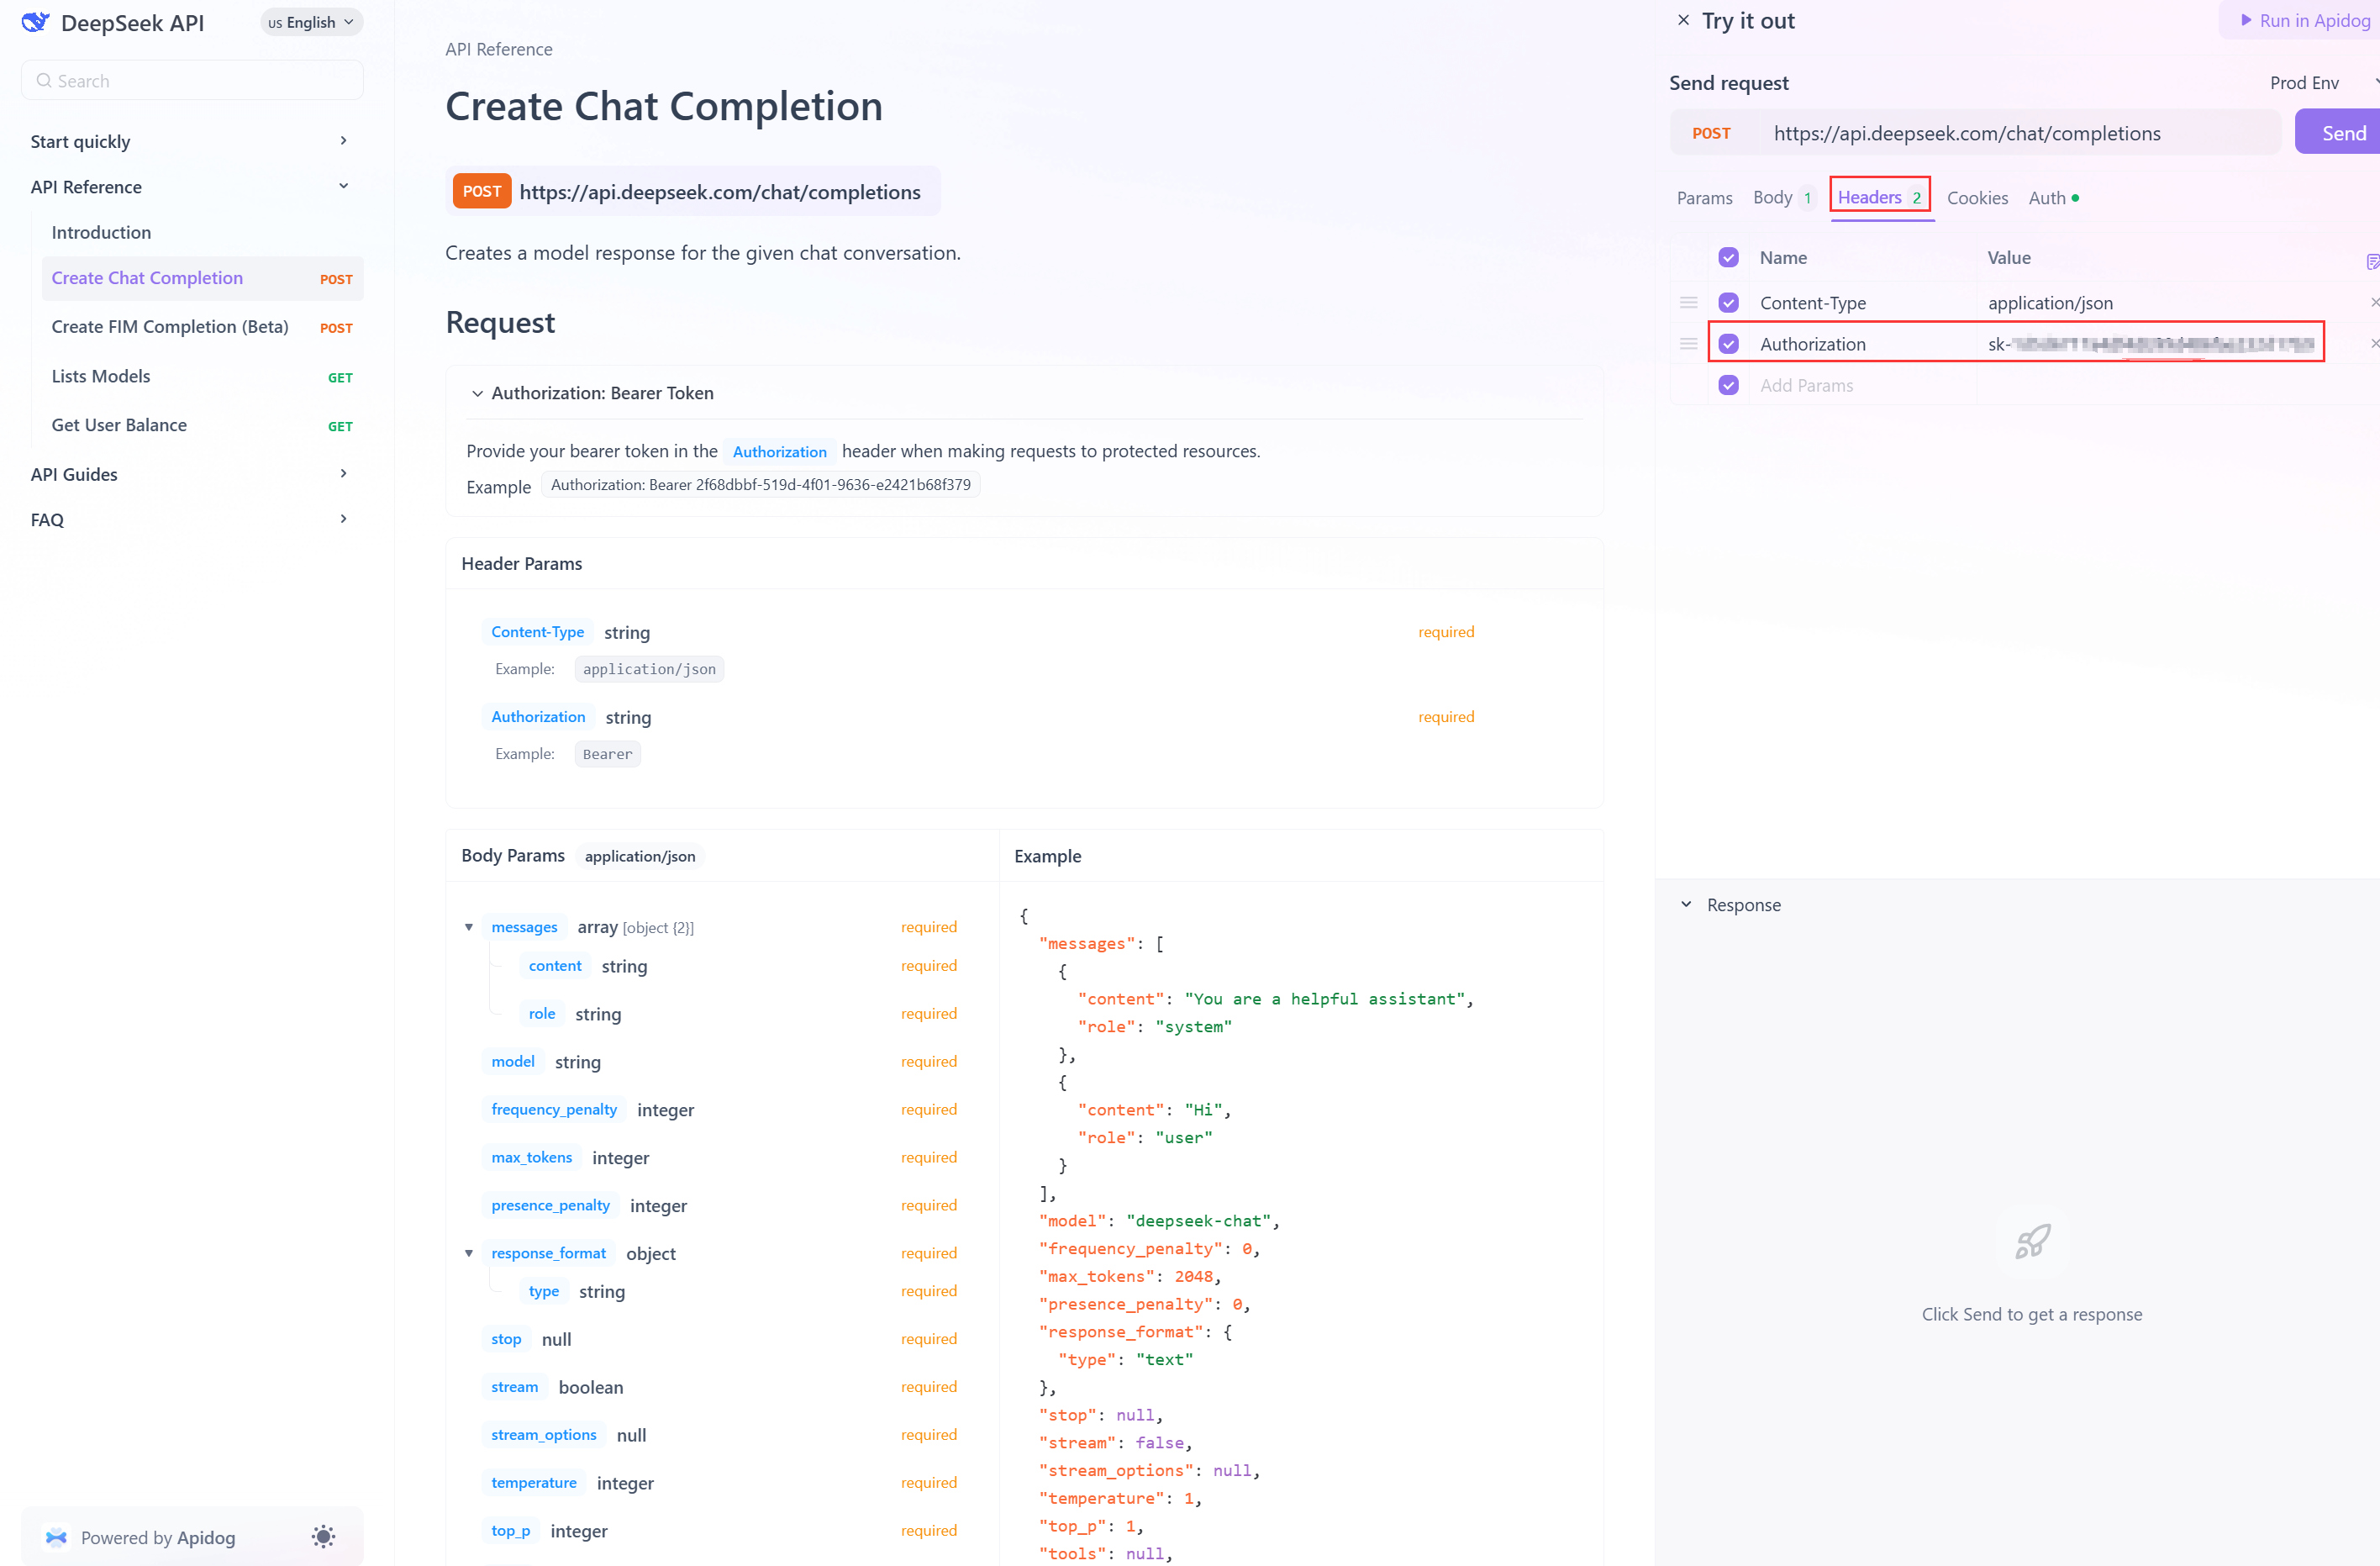
3. สร้างคำขอของคุณ:
ในเนื้อหาคำขอ ให้ระบุโมเดล (เช่น deepseek-chat) และเพิ่มข้อความ:
{
  "model": "deepseek-chat",
  "messages": [
    {"role": "user", "content": "Explain quantum computing in 3 sentences."}
  ]
}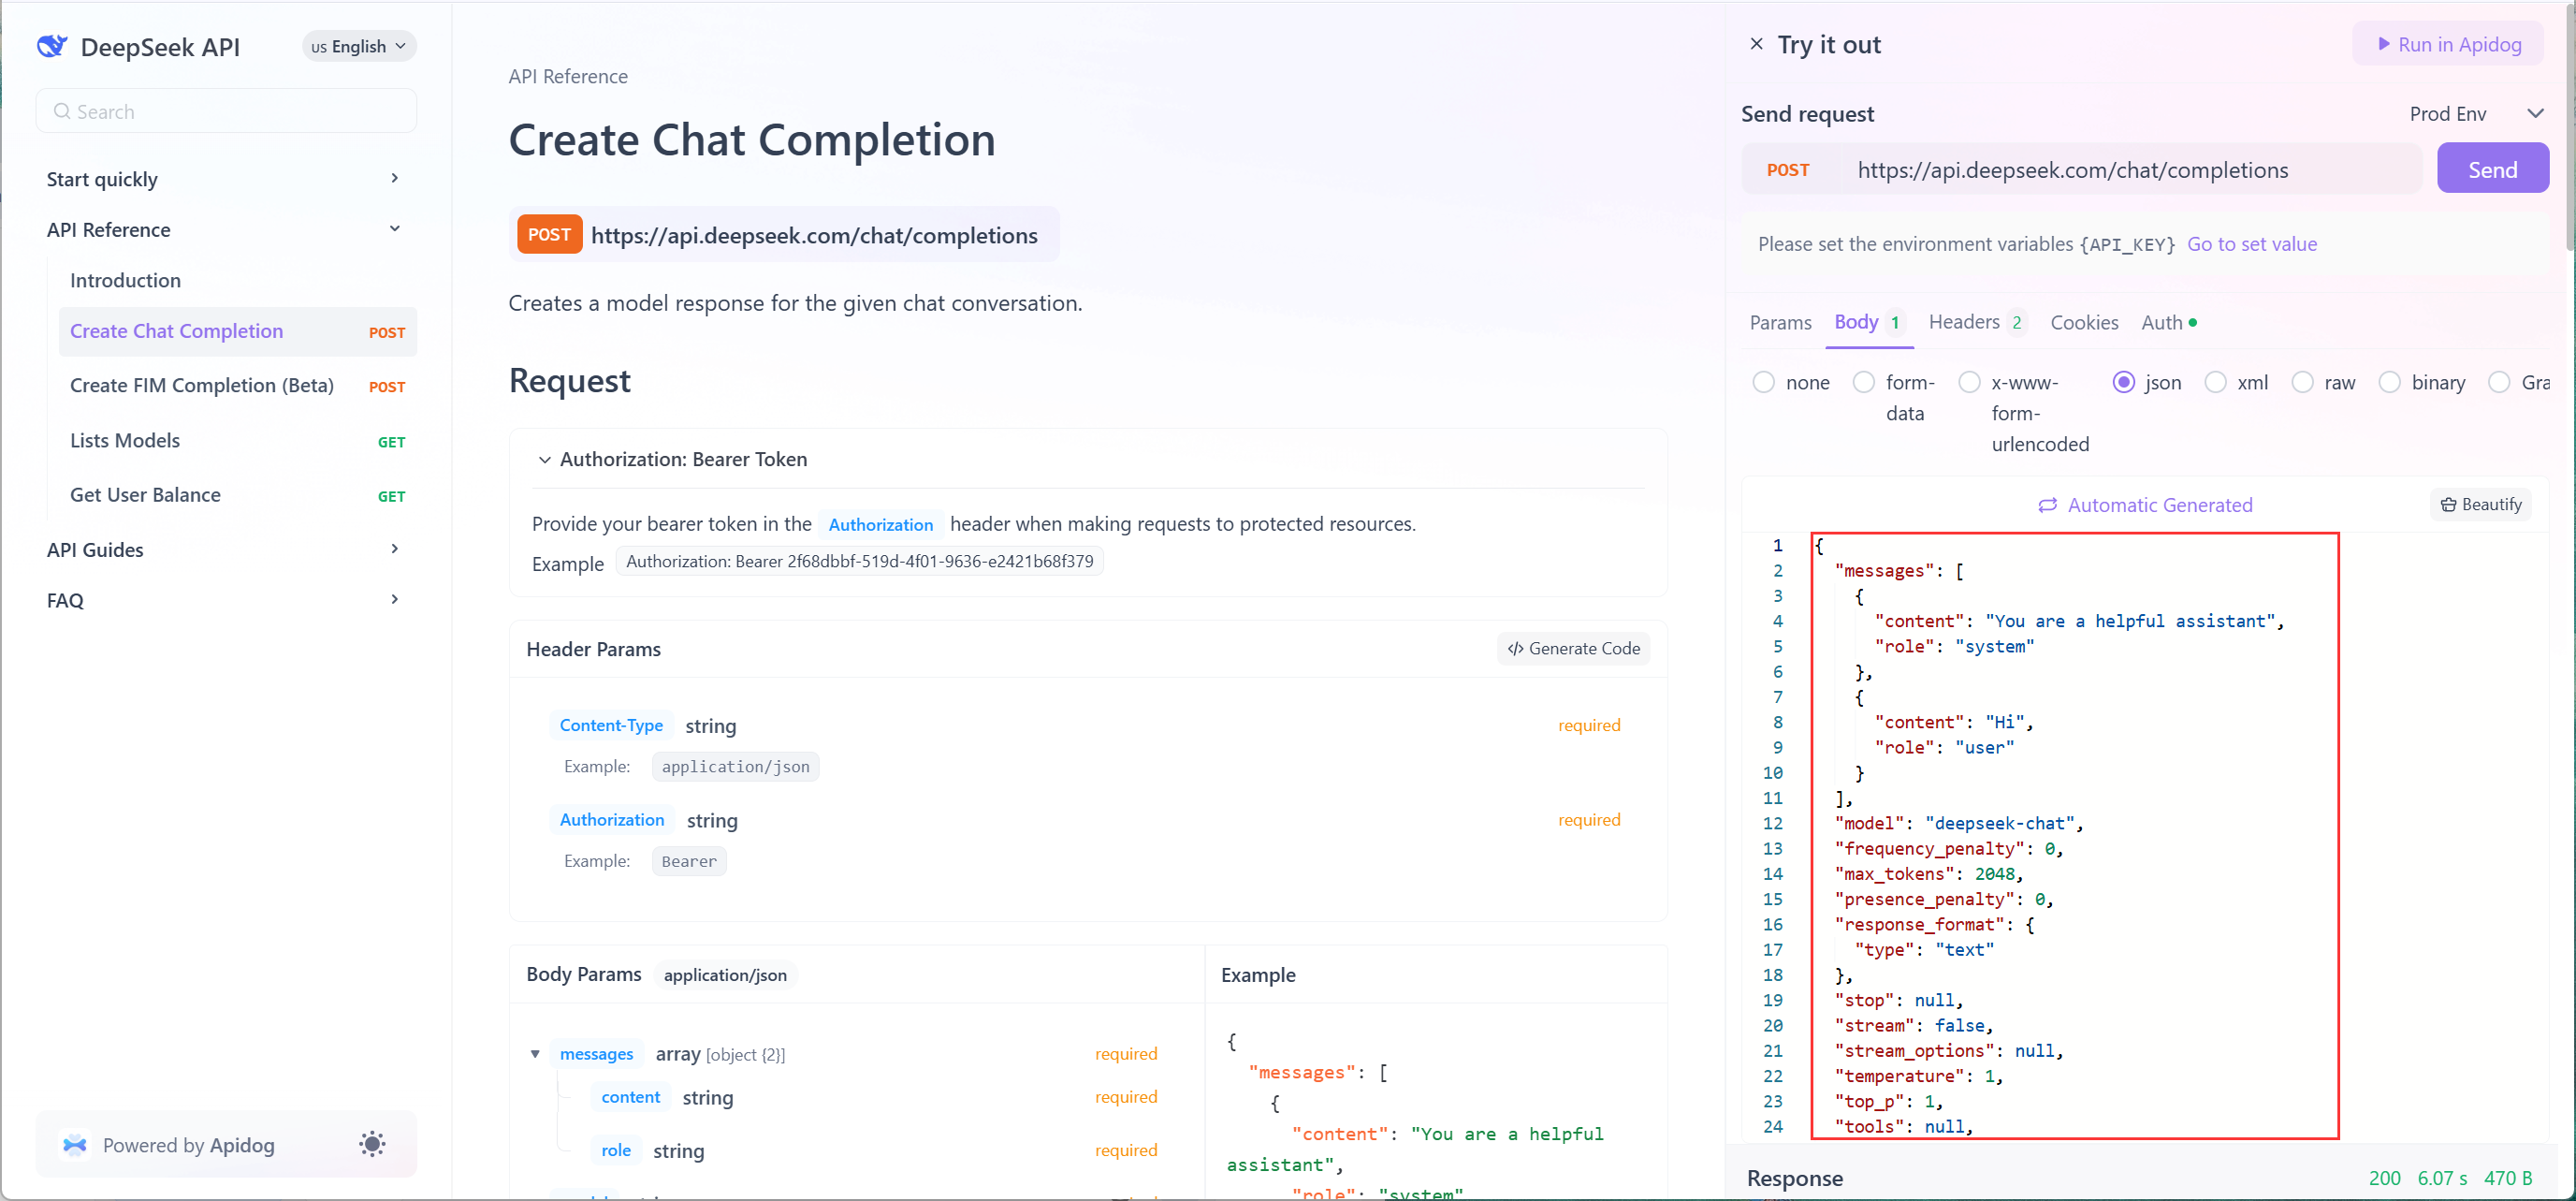
4. ส่งคำขอ: คลิก Send และดูการตอบสนองแบบเรียลไทม์
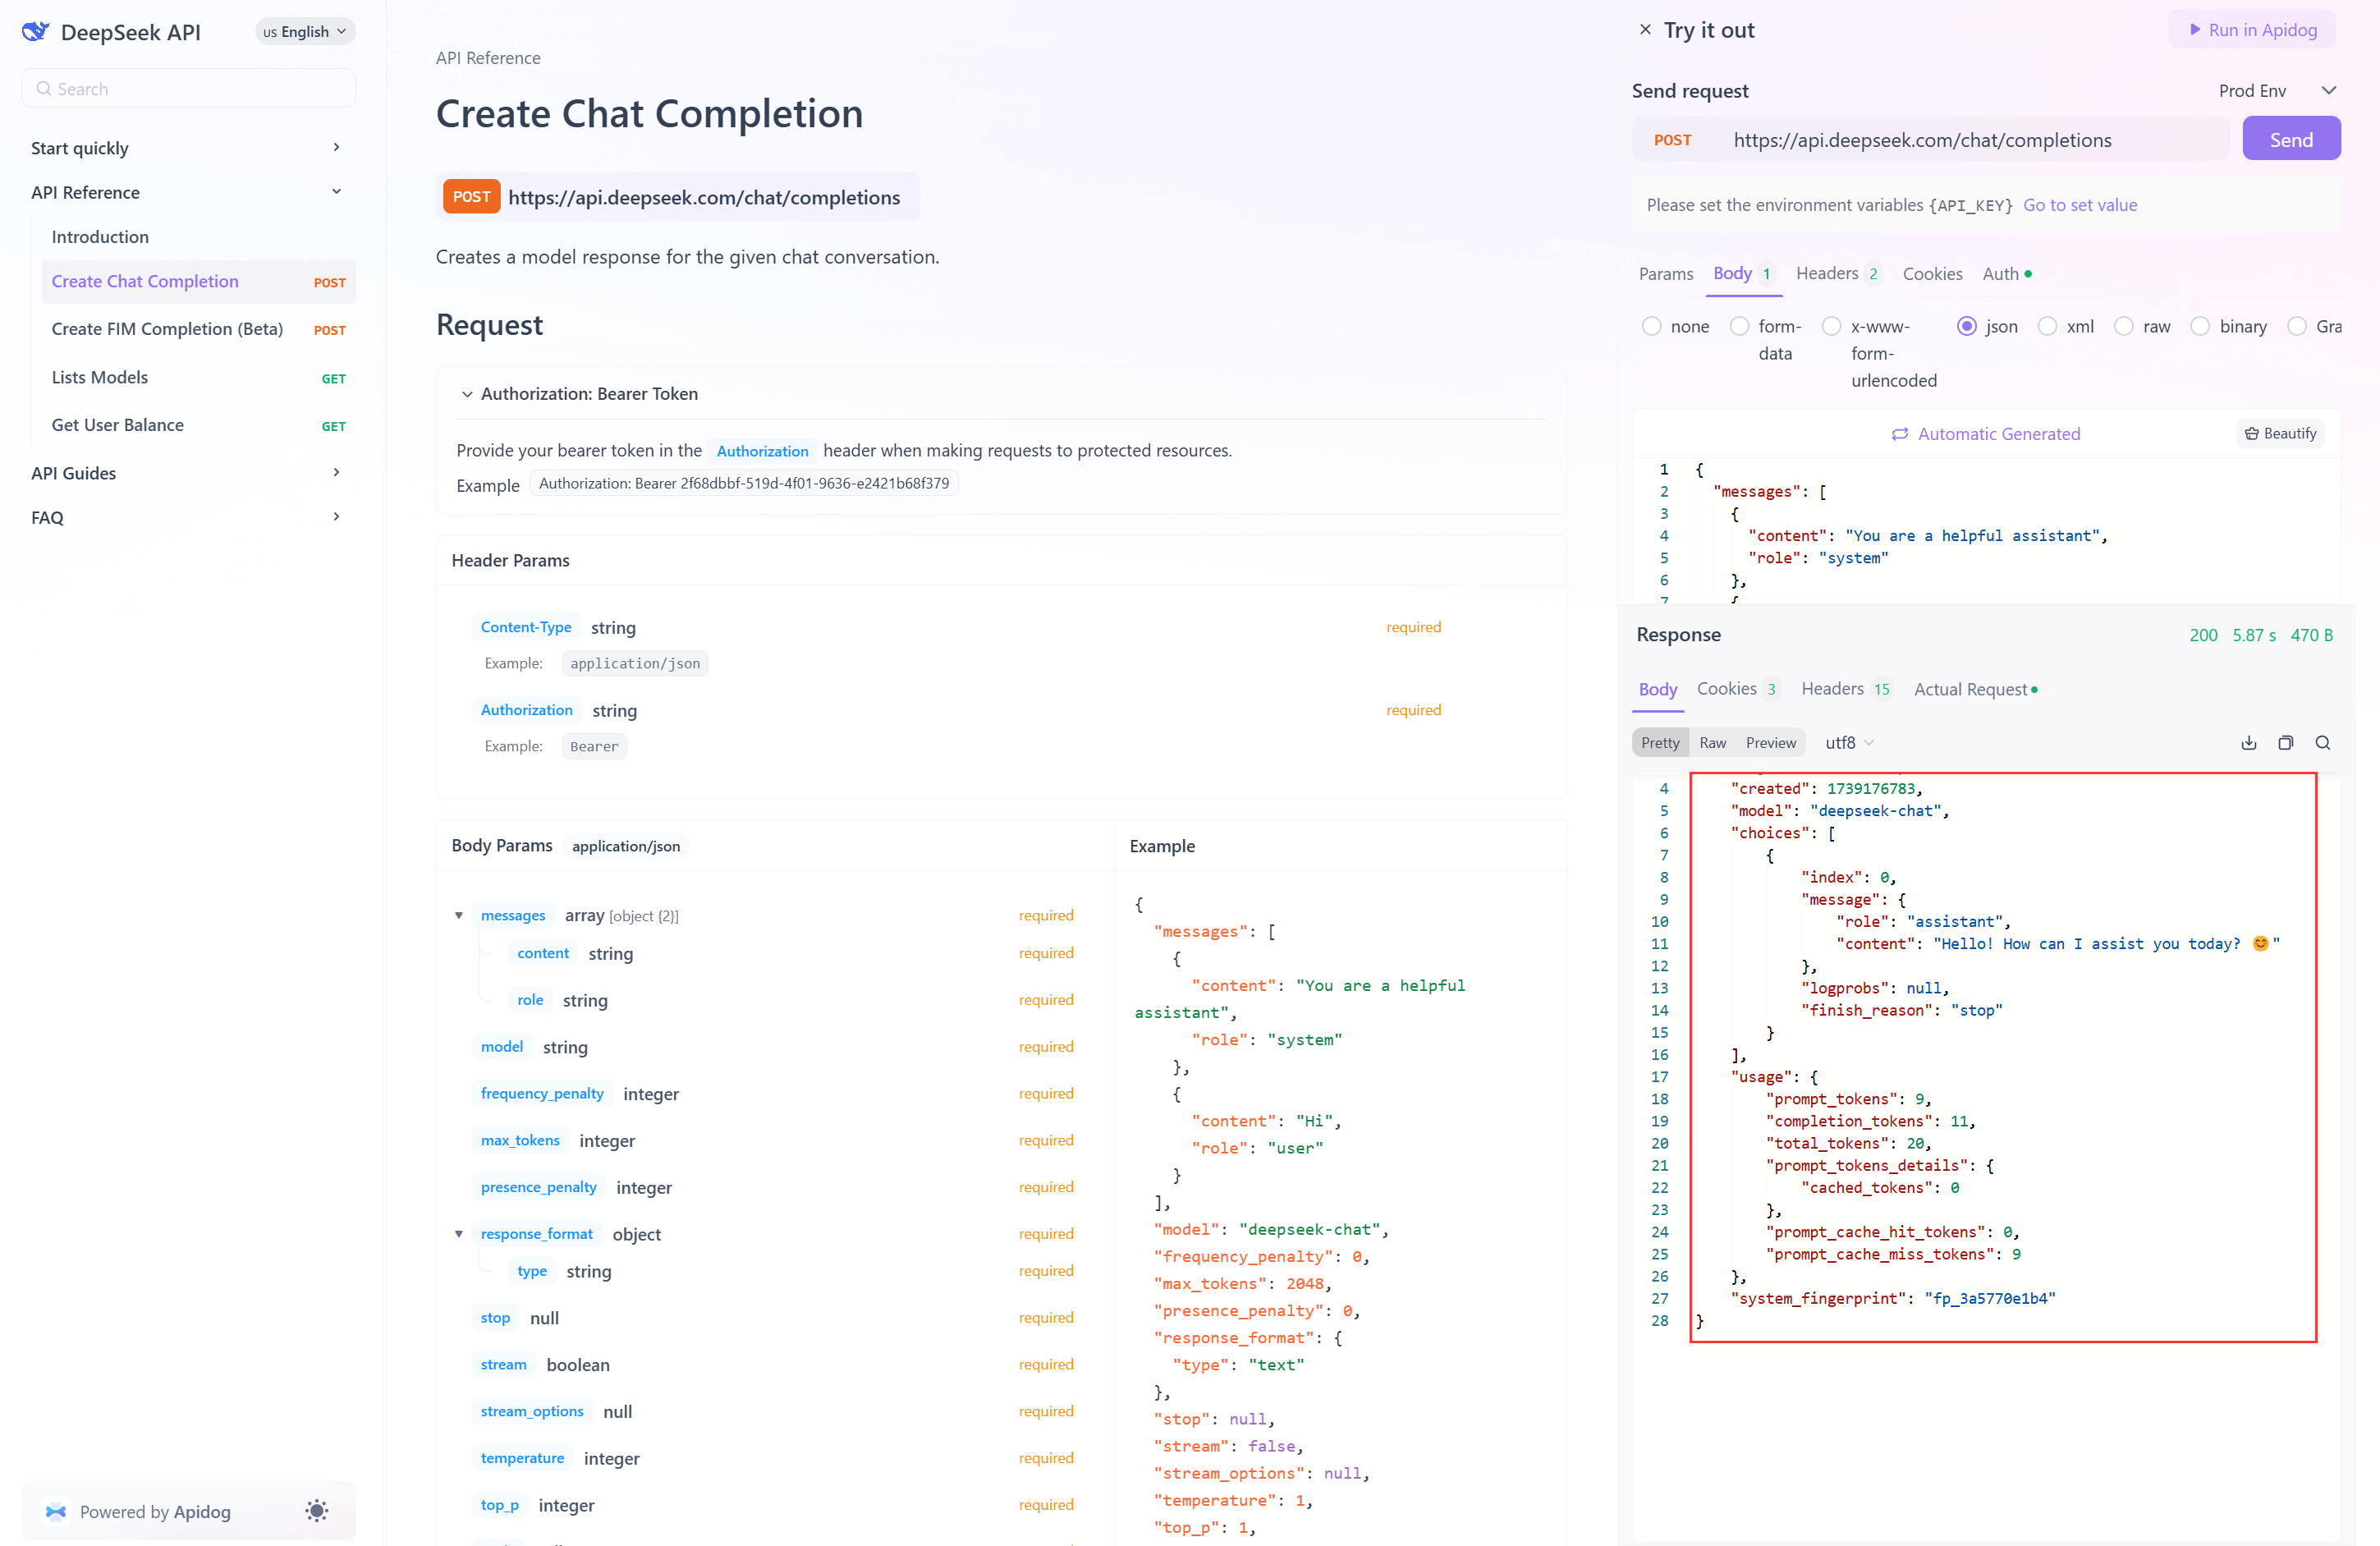
เหตุใดสิ่งนี้จึงสำคัญ: การทดสอบ API ด้วยตนเองช่วยให้คุณตรวจสอบโครงสร้างเพย์โหลดและการจัดการข้อผิดพลาด ก่อน เขียนโค้ดการผสานรวม
ขั้นตอนที่ 3: สร้างโค้ดสนิปเพ็ตสำหรับ Stack ของคุณ
Apidog ช่วยให้คุณสามารถ สร้างโค้ดธุรกิจสำเร็จรูปสำหรับภาษาและเฟรมเวิร์กต่างๆ ตามเอกสารประกอบ API ที่สามารถใช้ได้โดยตรงใน Stack ของคุณ นี่คือวิธีการ:
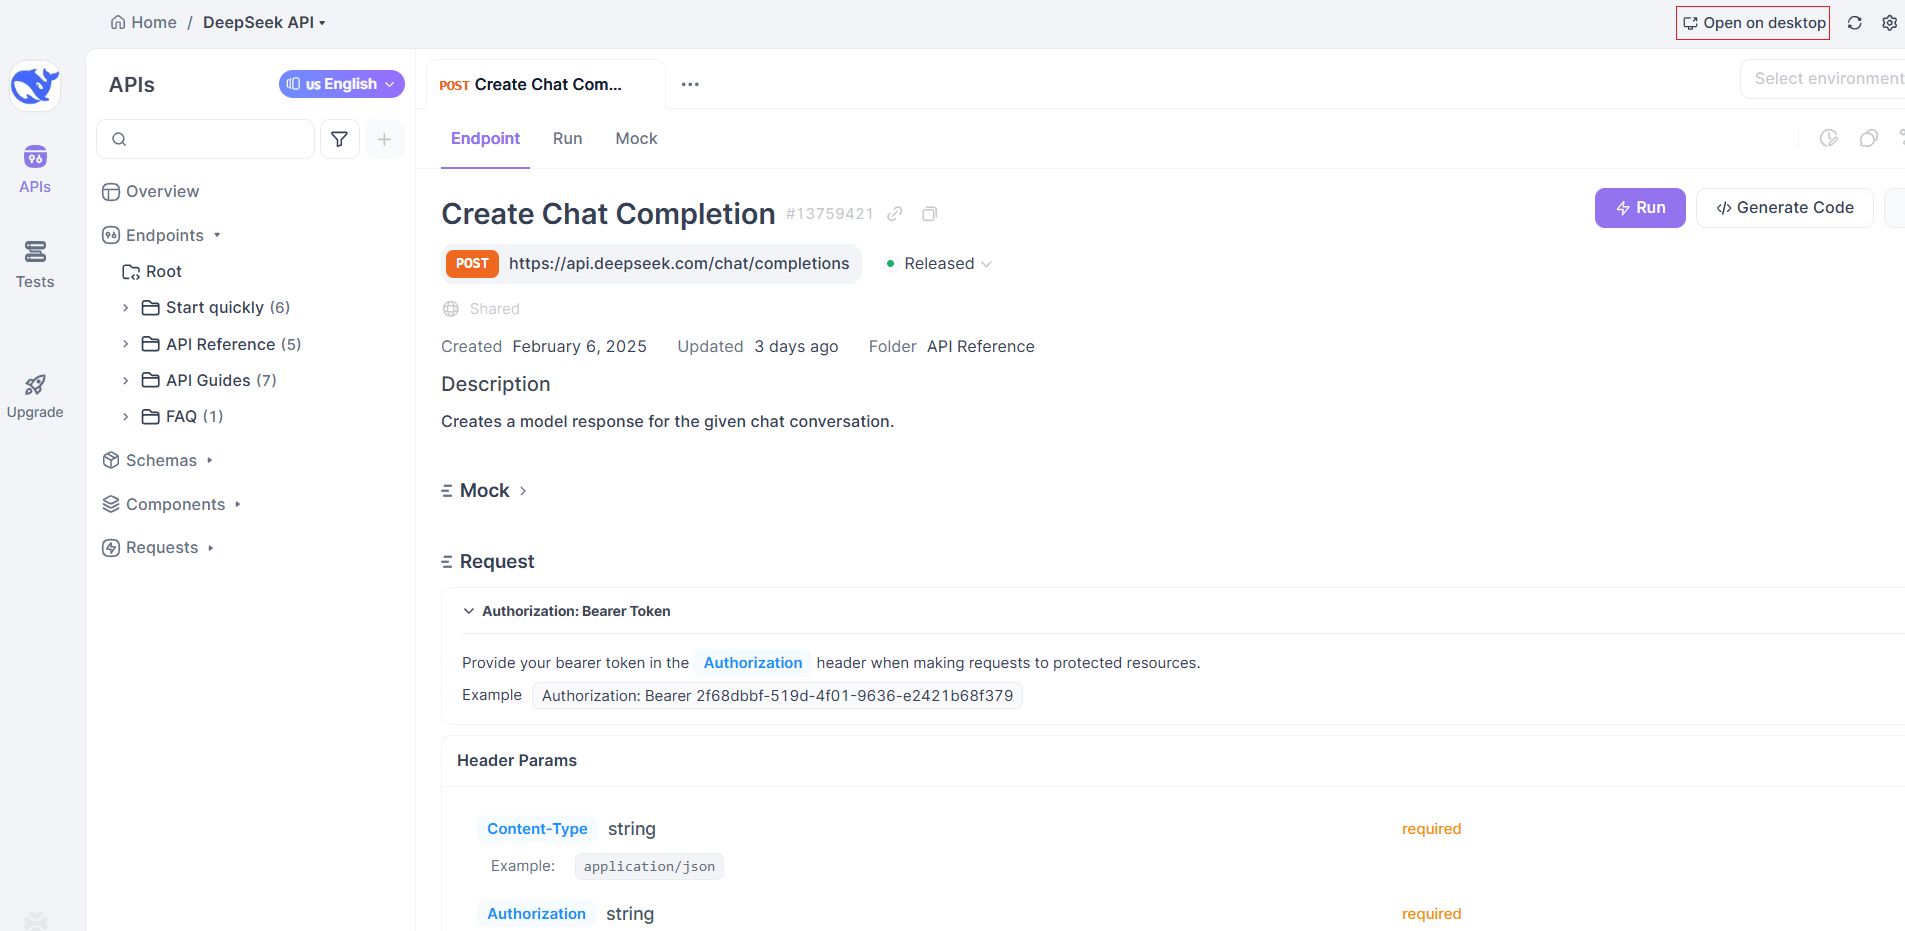
1. เปิดโปรเจกต์ DeekSeek บนแอป Apidog:
- หากต้องการเปิดโปรเจกต์ DeepSeek API ในเว็บแอป Apidog เพียงคลิก "Run in Apidog" ที่ด้านบนขวาของเอกสารประกอบ
- เคล็ดลับ PRO: หากต้องการเปิดโปรเจกต์ในแอปเดสก์ท็อป Apidog ให้คลิก "Open on desktop" ที่ด้านบนขวาหลังจากนั้น
2. เลือกภาษาของคุณ:
- บนหน้าเอกสารประกอบ DeepSeek API ให้คลิกปุ่ม
</> Generate Code
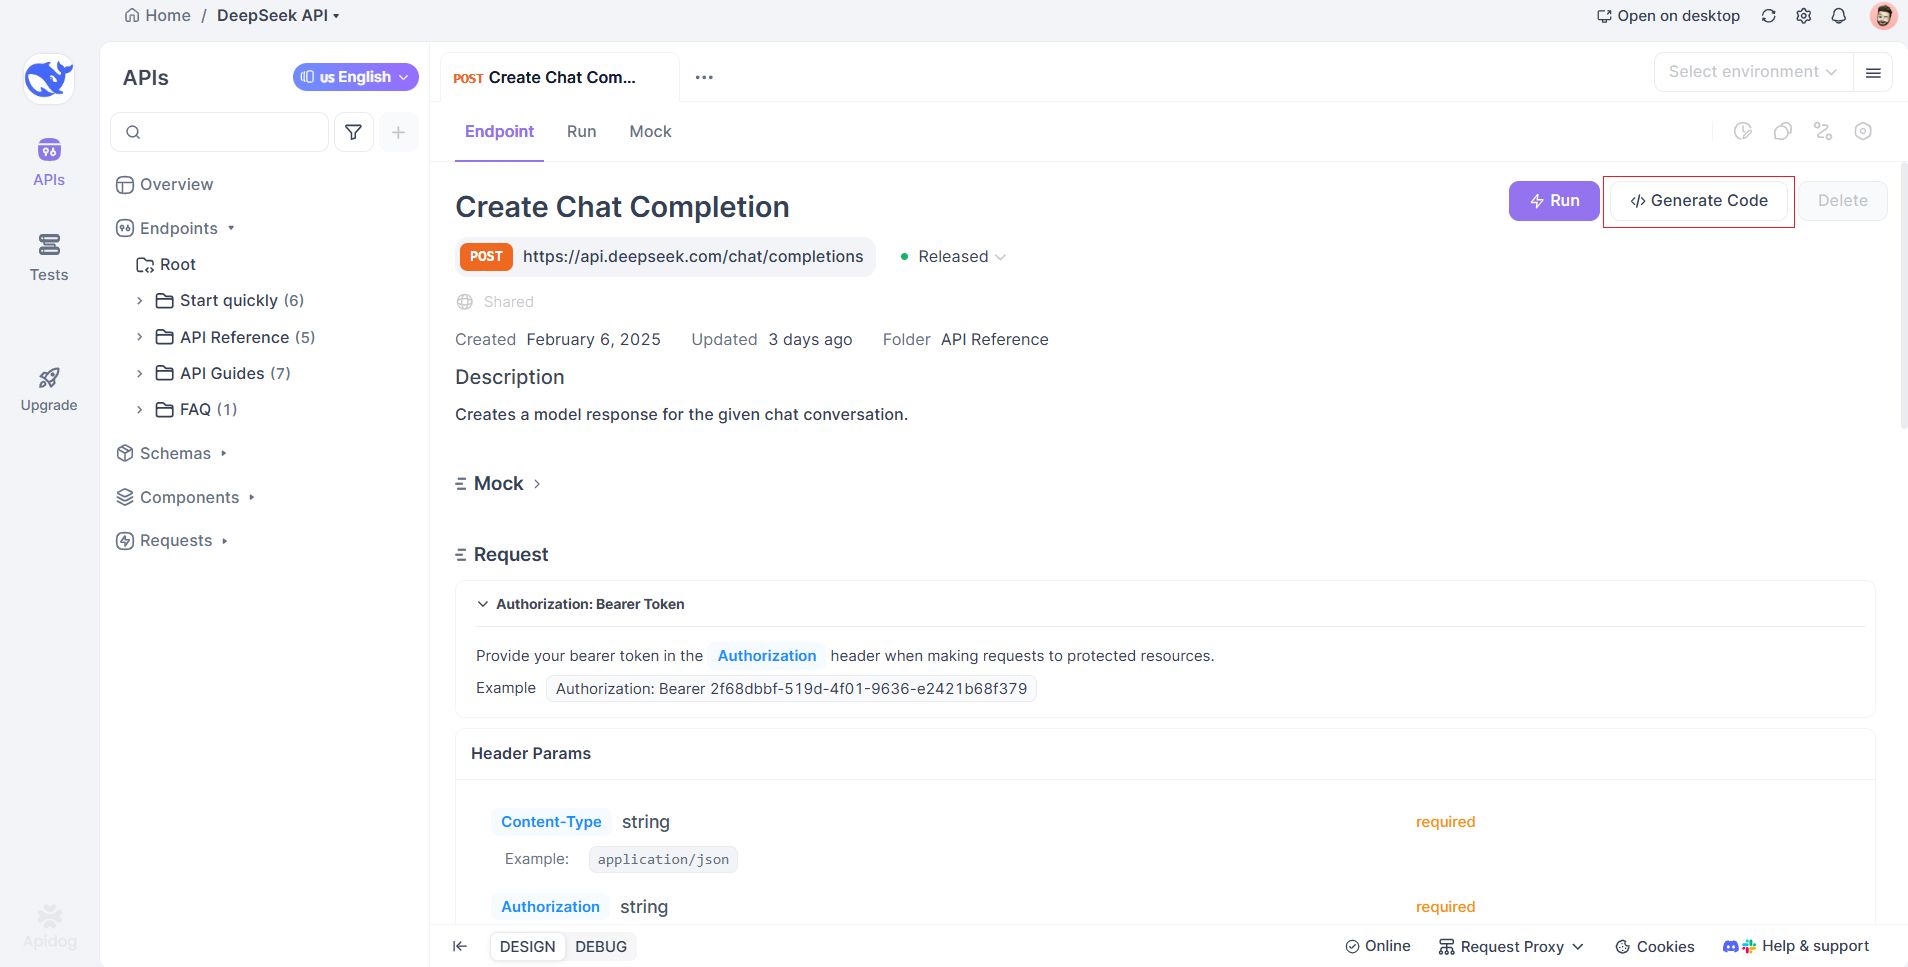
- เลือกภาษาของคุณ (เช่น Python, JavaScript, Go และอื่นๆ)
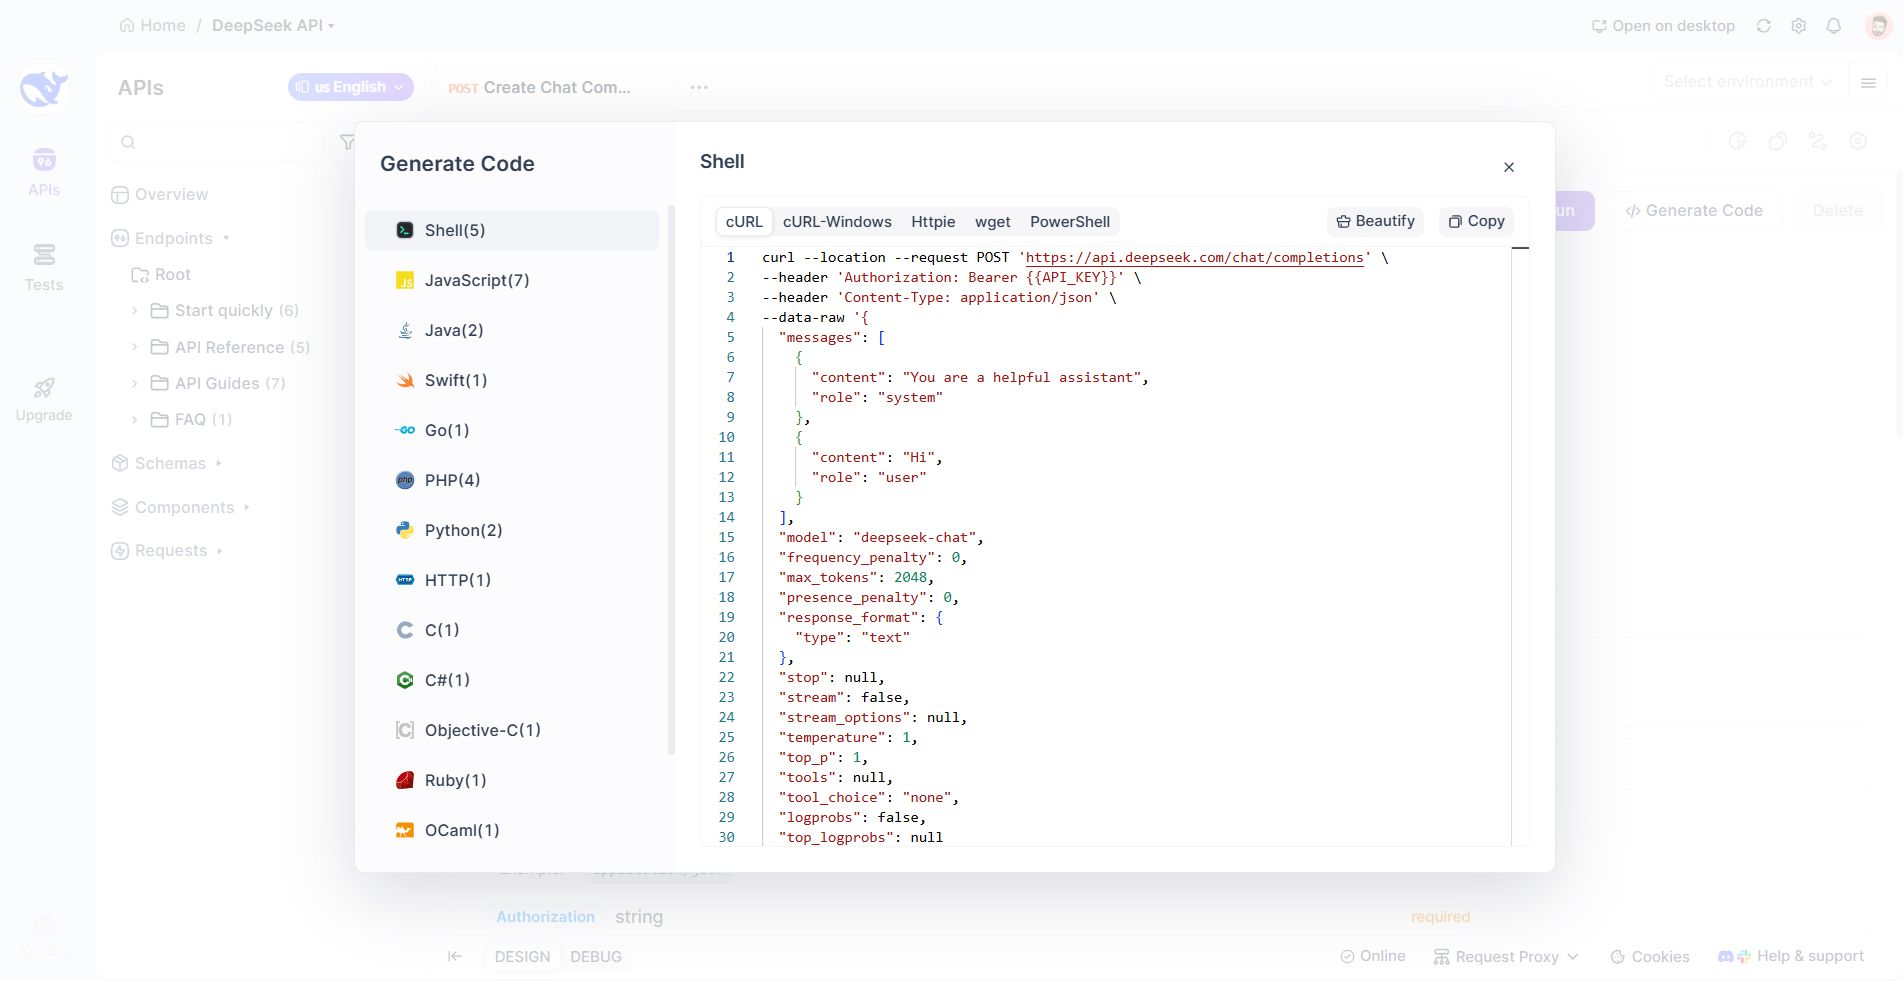
3. คัดลอกและวางโค้ด:
- สำหรับ Python (ใช้
requests):
import requests
import json

url = "https://api.deepseek.com/chat/completions"

payload = json.dumps({
   "messages": [
      {
         "content": "You are a helpful assistant",
         "role": "system"
      },
      {
         "content": "Hi",
         "role": "user"
      }
   ],
   "model": "deepseek-chat",
   "frequency_penalty": 0,
   "max_tokens": 2048,
   "presence_penalty": 0,
   "response_format": {
      "type": "text"
   },
   "stop": None,
   "stream": False,
   "stream_options": None,
   "temperature": 1,
   "top_p": 1,
   "tools": None,
   "tool_choice": "none",
   "logprobs": False,
   "top_logprobs": None
})
headers = {
   'Authorization': 'Bearer {{API_KEY}}',
   'Content-Type': 'application/json'
}

response = requests.request("POST", url, headers=headers, data=payload)

print(response.text)- สำหรับ JavaScript (ใช้
fetch):
var myHeaders = new Headers();
myHeaders.append("Authorization", "Bearer {{API_KEY}}");
myHeaders.append("Content-Type", "application/json");

var raw = JSON.stringify({
   "messages": [
      {
         "content": "You are a helpful assistant",
         "role": "system"
      },
      {
         "content": "Hi",
         "role": "user"
      }
   ],
   "model": "deepseek-chat",
   "frequency_penalty": 0,
   "max_tokens": 2048,
   "presence_penalty": 0,
   "response_format": {
      "type": "text"
   },
   "stop": null,
   "stream": false,
   "stream_options": null,
   "temperature": 1,
   "top_p": 1,
   "tools": null,
   "tool_choice": "none",
   "logprobs": false,
   "top_logprobs": null
});

var requestOptions = {
   method: 'POST',
   headers: myHeaders,
   body: raw,
   redirect: 'follow'
};

fetch("https://api.deepseek.com/chat/completions", requestOptions)
   .then(response => response.text())
   .then(result => console.log(result))
   .catch(error => console.log('error', error));
4. ปรับแต่งโค้ด: แทนที่ YOUR_API_KEY และแก้ไขเนื้อหาข้อความ
ขั้นตอนที่ 4: ผสานรวมเข้ากับแอปพลิเคชันของคุณ
มาสร้างแอป CLI Python อย่างง่ายที่ใช้ API ของ DeepSeek เพื่อตอบคำถามของผู้ใช้
การตั้งค่าโปรเจกต์
1. สร้างไดเรกทอรีและติดตั้งการพึ่งพา:
mkdir deepseek-cli && cd deepseek-cli
pip install requests python-dotenv
2. จัดเก็บ API key ของคุณอย่างปลอดภัยโดยใช้ .env:
echo "DEEPSEEK_API_KEY=your_api_key_here" > .env การใช้งานโค้ด
import argparse
import asyncio
import json
import os
import sys
from typing import AsyncGenerator, Generator

import httpx
import requests


async def async_deepseek(
    api_key: str,
    model: str,
    messages: list,
    temperature: float
) -> AsyncGenerator[str, None]:
    """
    Asynchronous generator for streaming DeepSeek responses
    """
    headers = {
        "Content-Type": "application/json",
        "Authorization": f"Bearer {api_key}",
    }
    data = {
        "model": model,
        "messages": messages,
        "temperature": temperature,
        "stream": True,
    }

    async with httpx.AsyncClient() as client:
        async with client.stream(
            "POST",
            "https://api.deepseek.com/v1/chat/completions",
            headers=headers,
            json=data,
        ) as response:
            response.raise_for_status()
            async for line in response.aiter_lines():
                if line.startswith("data: "):
                    try:
                        json_data = json.loads(line[6:])
                        if chunk := json_data["choices"][0]["delta"].get("content", ""):
                            yield chunk
                    except json.JSONDecodeError:
                        pass


def sync_deepseek(
    api_key: str,
    model: str,
    messages: list,
    temperature: float
) -> Generator[str, None, None]:
    """
    Synchronous generator for streaming DeepSeek responses
    """
    headers = {
        "Content-Type": "application/json",
        "Authorization": f"Bearer {api_key}",
    }
    data = {
        "model": model,
        "messages": messages,
        "temperature": temperature,
        "stream": True,
    }

    with requests.post(
        "https://api.deepseek.com/v1/chat/completions",
        headers=headers,
        json=data,
        stream=True,
    ) as response:
        response.raise_for_status()
        for line in response.iter_lines():
            if line:
                decoded_line = line.decode("utf-8")
                if decoded_line.startswith("data: "):
                    try:
                        json_data = json.loads(decoded_line[6:])
                        if chunk := json_data["choices"][0]["delta"].get("content", ""):
                            yield chunk
                    except json.JSONDecodeError:
                        pass


def main():
    parser = argparse.ArgumentParser(
        description="DeepSeek CLI Client - Chat with DeepSeek models"
    )
    parser.add_argument(
        "prompt",
        type=str,
        help="Your message to send to DeepSeek"
    )
    parser.add_argument(
        "--model",
        type=str,
        default="deepseek-chat",
        help="Model to use (default: deepseek-chat)"
    )
    parser.add_argument(
        "--temperature",
        type=float,
        default=0.7,
        help="Temperature parameter (default: 0.7)"
    )
    parser.add_argument(
        "--async-mode",
        action="store_true",
        help="Use asynchronous mode (requires Python 3.7+)"
    )
    args = parser.parse_args()

    api_key = os.getenv("DEEPSEEK_API_KEY")
    if not api_key:
        print("Error: Set your API key in DEEPSEEK_API_KEY environment variable")
        sys.exit(1)

    messages = [{"role": "user", "content": args.prompt}]

    try:
        if args.async_mode:
            async def run_async():
                try:
                    async for chunk in async_deepseek(
                        api_key=api_key,
                        model=args.model,
                        messages=messages,
                        temperature=args.temperature
                    ):
                        print(chunk, end="", flush=True)
                    print()
                except httpx.HTTPStatusError as e:
                    print(f"\nHTTP error occurred: {e.response.status_code} {e.response.reason_phrase}")
                except Exception as e:
                    print(f"\nAn error occurred: {str(e)}")

            asyncio.run(run_async())
        else:
            try:
                for chunk in sync_deepseek(
                    api_key=api_key,
                    model=args.model,
                    messages=messages,
                    temperature=args.temperature
                ):
                    print(chunk, end="", flush=True)
                print()
            except requests.exceptions.HTTPError as e:
                print(f"\nHTTP error occurred: {e.response.status_code} {e.response.reason_phrase}")
            except Exception as e:
                print(f"\nAn error occurred: {str(e)}")

    except KeyboardInterrupt:
        print("\n\nOperation interrupted by user")
        sys.exit(0)


if __name__ == "__main__":
    main()
เรียกใช้แอป
พิมพ์คำถาม (เช่น “เมืองหลวงของฝรั่งเศสคืออะไร”) และดูการตอบสนอง!
ขั้นตอนที่ 5: จัดการข้อผิดพลาดและกรณีขอบเขต
API อาจล้มเหลวเนื่องจากขีดจำกัดอัตรา คีย์ที่ไม่ถูกต้อง หรือปัญหาเครือข่าย ใช้การจัดการข้อผิดพลาดที่แข็งแกร่ง:
1. ตรวจสอบรหัสสถานะ HTTP:
401 Unauthorized: API key ไม่ถูกต้อง429 Too Many Requests: เกินขีดจำกัดอัตรา500 Internal Server Error: ปัญหาฝั่งเซิร์ฟเวอร์
2. กลไกการลองใหม่:
from time import sleep

def get_deepseek_response(prompt, retries=3):
    # ... existing code ...
    except requests.exceptions.RequestException as e:
        if retries > 0:
            sleep(2)
            return get_deepseek_response(prompt, retries - 1)
        else:
            return f"Error: {str(e)}"
3. ตรวจสอบความถูกต้องของอินพุต:
ตรวจสอบให้แน่ใจว่าพรอมต์อยู่ในขีดจำกัดโทเค็นและจัดรูปแบบอย่างถูกต้อง
ขั้นตอนที่ 6: ปรับให้เหมาะสมสำหรับการผลิต
- แคชการตอบสนอง: ใช้ Redis หรือ Memcached เพื่อจัดเก็บแบบสอบถามบ่อยครั้ง
- ตรวจสอบการใช้งาน: ติดตามการเรียก API เพื่อหลีกเลี่ยงการเกินโควตา
- การประมวลผลแบบอะซิงโครนัส: สำหรับแอปพลิเคชันที่มีปริมาณงานสูง ให้ใช้ไลบรารีแบบอะซิงโครนัส เช่น
aiohttp(Python) หรือaxios(JavaScript)
บทสรุป
การผสานรวม API ของ DeepSeek เข้ากับแอปของคุณไม่จำเป็นต้องใช้เวลามาก ด้วยการใช้เอกสารประกอบแบบโต้ตอบเพื่อทดสอบจุดสิ้นสุด สร้างโค้ด และแก้ไขข้อบกพร่องได้ทันที คุณสามารถนำเสนอคุณสมบัติที่ขับเคลื่อนด้วย AI ได้ภายในไม่กี่ชั่วโมง ไม่ใช่วัน
ตัวอย่างข้างต้นเป็นเพียงจุดเริ่มต้น ด้วยโมเดลของ DeepSeek คุณสามารถสร้างทุกอย่างตั้งแต่เครื่องสร้างเนื้อหาอัตโนมัติไปจนถึงติวเตอร์ AI ตอนนี้คุณมีพิมพ์เขียวแล้ว ไปข้างหน้าและ เปลี่ยนแอปของคุณให้เป็นโรงไฟฟ้า AI!