개발자들은 복잡한 다중 모달 입력을 처리하고 지능적인 출력을 제공하는 강력한 API를 점점 더 많이 찾고 있습니다. Kimi K2.5 API는 Moonshot AI의 다재다능한 도구로 돋보이며, 고급 추론 기능을 통해 애플리케이션이 텍스트, 이미지, 비디오를 처리할 수 있도록 합니다. 이 API를 사용하면 코드의 시각적 디버깅부터 병렬 작업 실행을 위한 에이전트 스웜 조정에 이르기까지 정교한 AI 기반 솔루션을 구축할 수 있습니다.
Kimi K2.5란?
Kimi K2.5는 Kimi-K2-Base 아키텍처 위에 약 15조 개의 혼합 시각 및 텍스트 토큰에 대한 지속적인 사전 학습을 통해 구축된 Moonshot AI의 가장 진보된 오픈 소스 다중 모달 모델입니다. 이전 버전과 달리 K2.5는 비전 및 언어 이해를 고급 에이전트 기능과 완벽하게 통합하여 AI 기반 애플리케이션을 구축하는 개발자에게 특히 강력합니다.
이 모델은 다른 AI API와 차별화되는 몇 가지 혁신적인 기능을 도입했습니다. 기본 다중 모달리티는 시각 기능이 나중에 추가된 것이 아니라 처음부터 비전-언어 토큰으로 사전 학습되었음을 의미합니다. 이 접근 방식은 시각적 지식, 교차 모달 추론 및 시각적 입력에 기반한 에이전트 도구 사용에서 뛰어난 성능을 제공합니다.
Kimi K2.5가 개발자에게 중요한 이유:
- 오픈 소스 가용성: 많은 최첨단 모델과 달리 K2.5의 가중치는 Hugging Face에서 공개적으로 사용할 수 있습니다.
- OpenAI 호환 API: 최소한의 코드 변경만으로 즉시 교체 가능
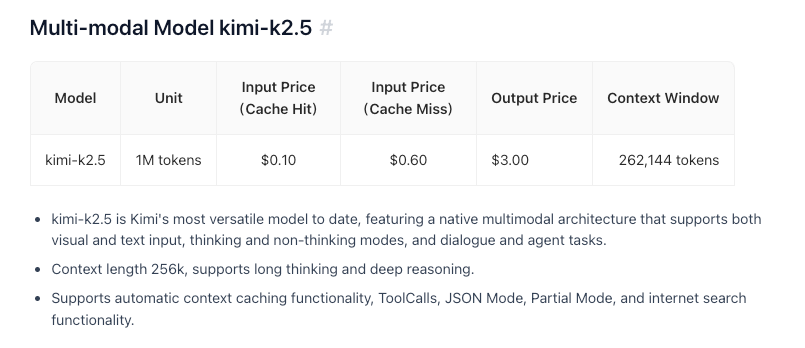
- 비용 효율적: M 입력 토큰당 $0.60의 경쟁력 있는 가격
- 256K 컨텍스트 창: 방대한 문서 및 대화 처리
- 에이전트 스웜 기능: 복잡한 작업을 병렬 하위 작업으로 분해
주요 기능 및 능력
기본 다중 모달 인텔리전스
K2.5는 시각적 지식, 교차 모달 추론 및 시각적 입력에 기반한 에이전트 도구 사용에 뛰어납니다. 이는 단순한 이미지 인식이 아니라 복잡한 의사 결정을 알릴 수 있는 시각적 컨텍스트에 대한 깊은 이해를 의미합니다.
비전을 통한 코딩
K2.5의 뛰어난 기능 중 하나는 시각적 사양에서 코드를 생성하는 것입니다. UI 디자인 목업을 가리키면 기능적인 프런트엔드 코드를 생성할 수 있습니다. 비디오 워크플로우를 보여주면 시각적 데이터 처리를 위한 도구를 조정할 수 있습니다. 이는 특히 다음을 위해 가치가 있습니다.
- Figma 디자인을 React 구성 요소로 변환
- 와이어프레임에서 HTML/CSS 생성
- 차트 예시에서 데이터 시각화 파이프라인 구축
- 이미지 처리 워크플로우 자동화

에이전트 스웜 아키텍처
K2.5는 단일 에이전트 확장 방식에서 자체 지시 및 조정되는 스웜과 유사한 실행 방식으로 전환합니다. 복잡한 작업에 직면했을 때 다음을 수행할 수 있습니다.
- 문제를 병렬 하위 작업으로 분해
- 도메인별 에이전트 동적 인스턴스화
- 여러 에이전트 간 실행 조정
- 결과를 일관된 출력으로 통합
이 아키텍처를 통해 K2.5는 포괄적인 코드 리팩토링, 다중 파일 문서 생성 또는 복잡한 데이터 분석 파이프라인과 같이 단일 에이전트 시스템을 압도할 수 있는 작업을 처리할 수 있습니다.
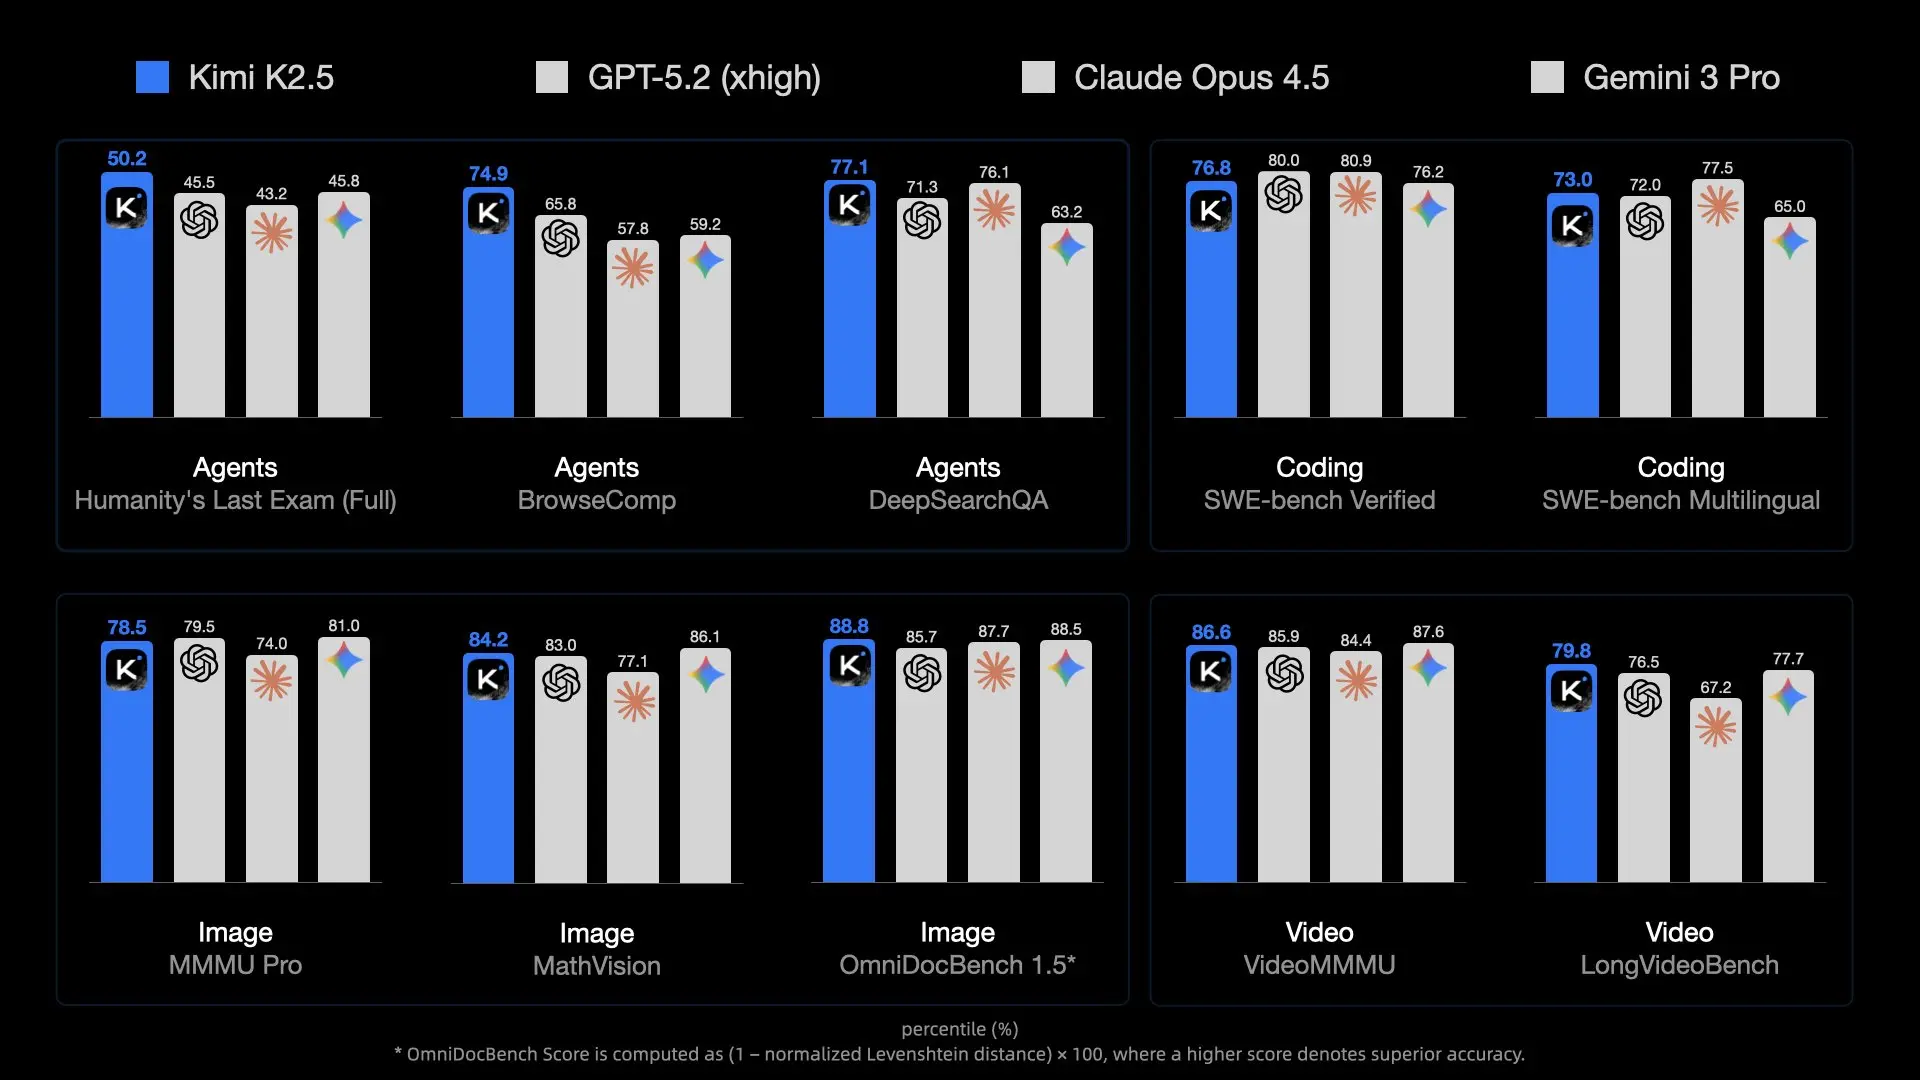
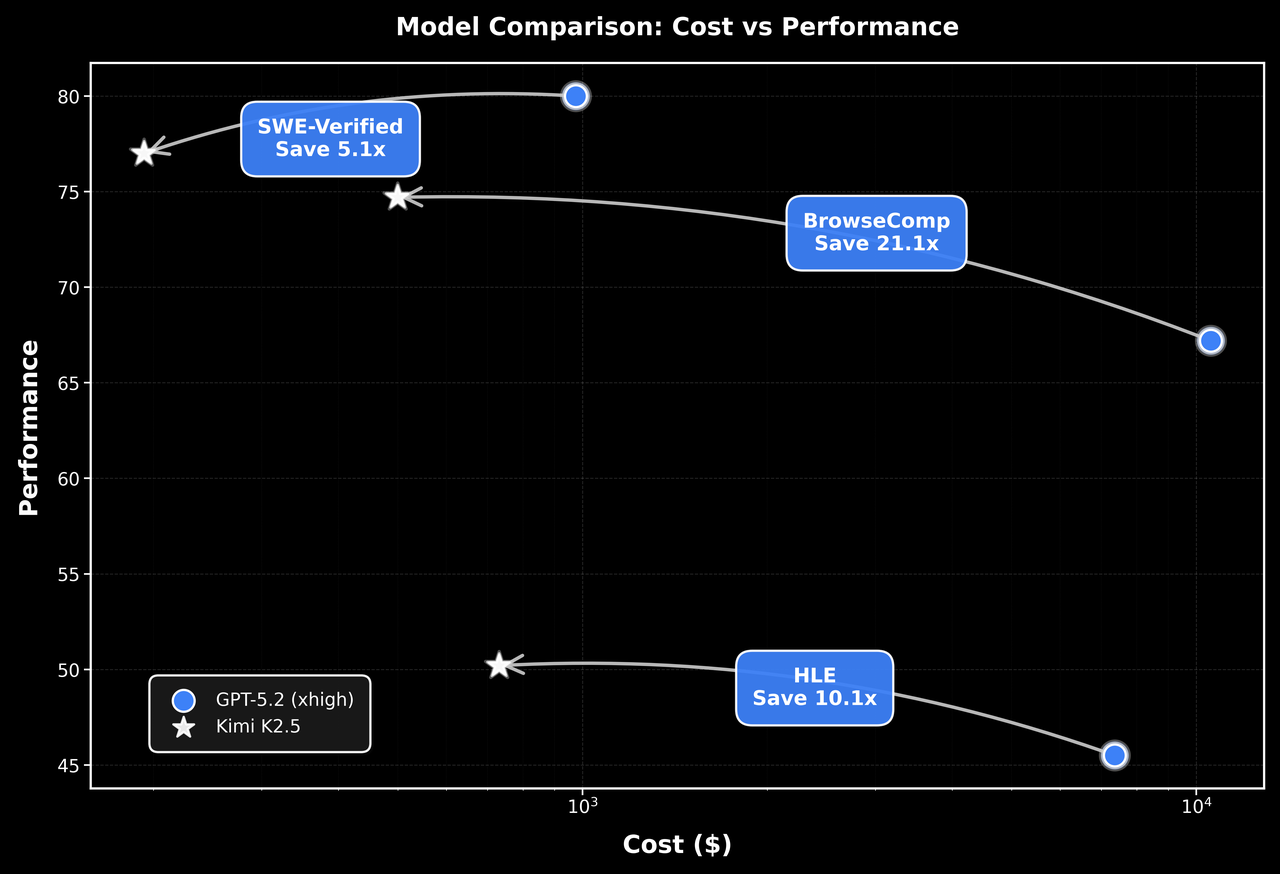
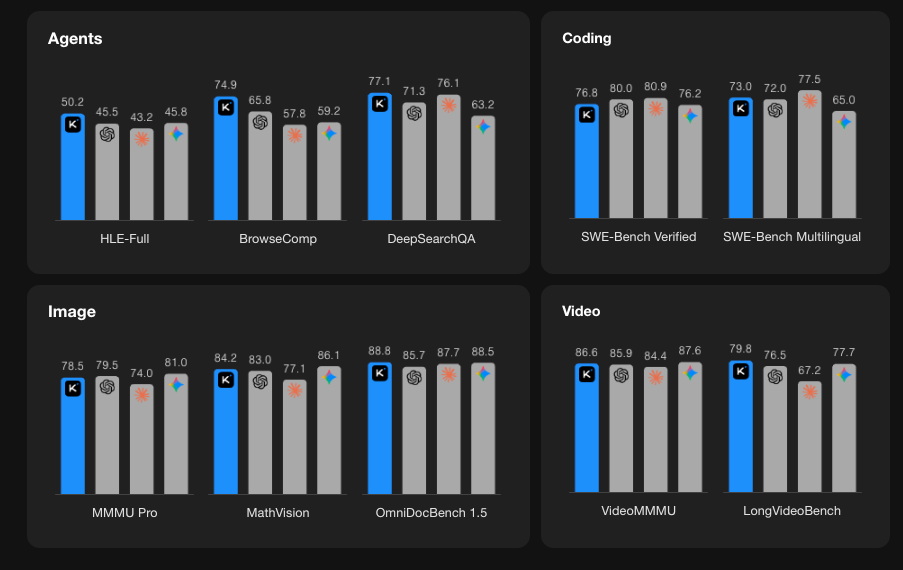
벤치마크 성능
Kimi K2.5 API 시작하기
1단계: Moonshot AI 계정 생성
platform.moonshot.ai를 방문하여 계정을 만드세요. 등록 절차는 간단합니다.
- "회원가입" 또는 "등록" 클릭
- 이메일을 제공하고 비밀번호 생성
- 이메일 주소 확인
- 필수 프로필 정보 완료
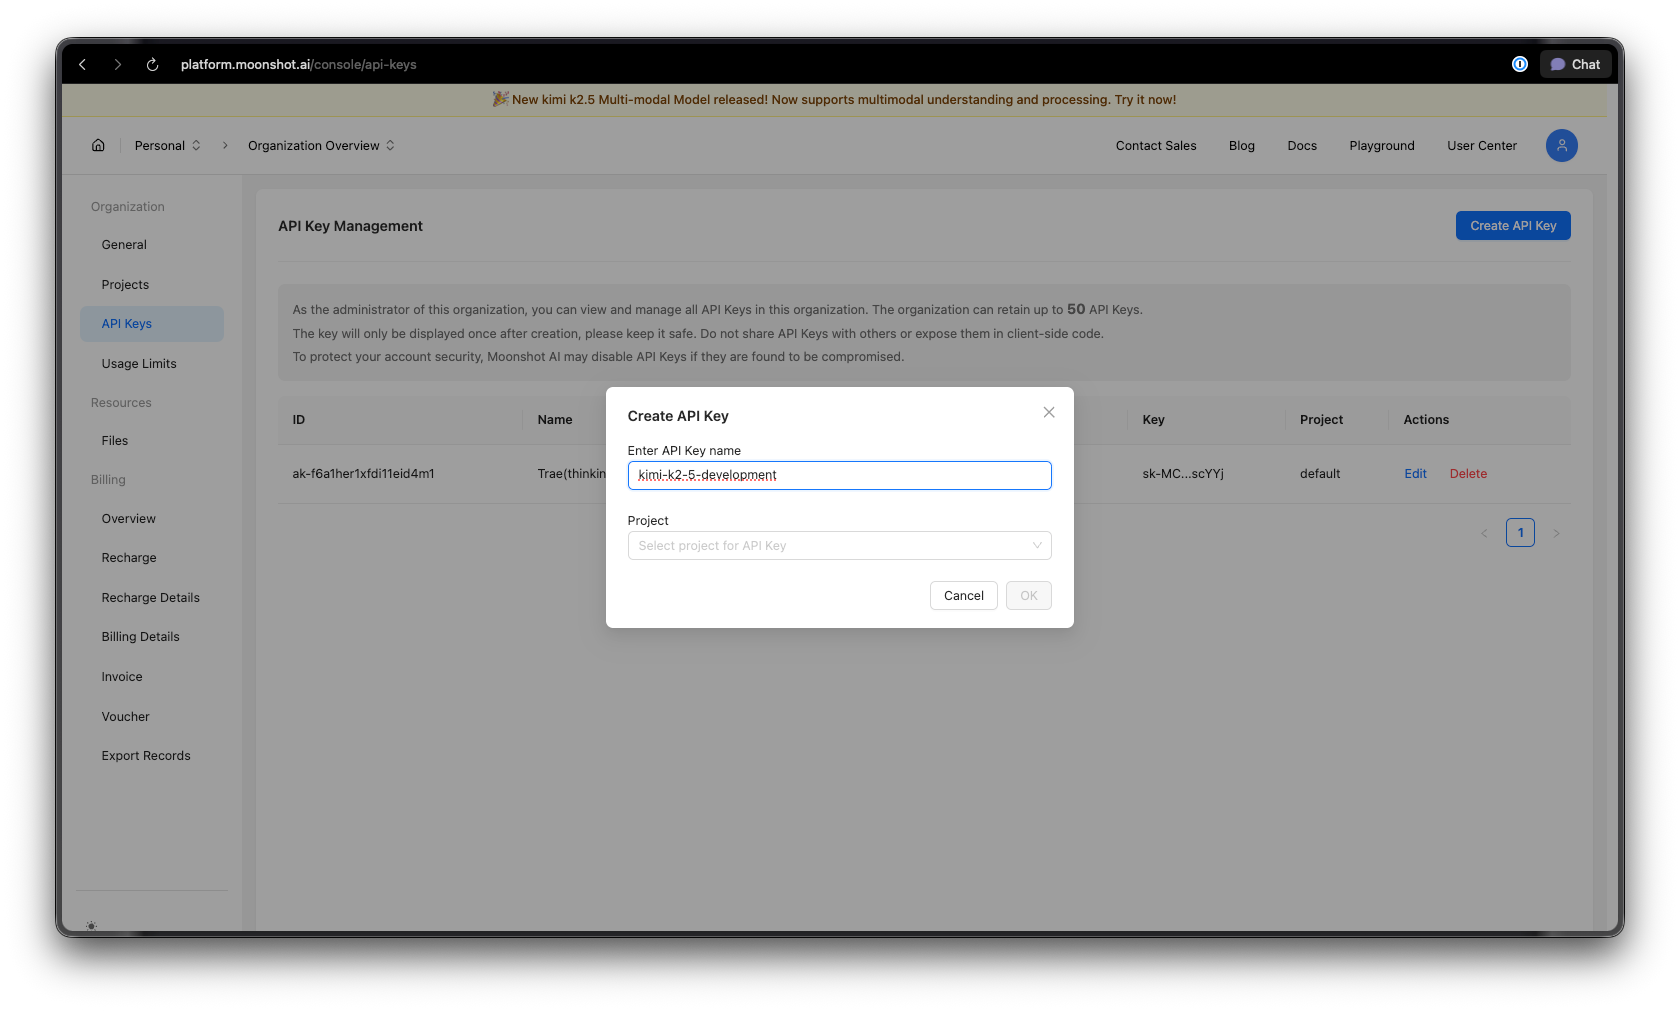
2단계: API 키 생성
로그인 후:
- 대시보드의 API 키 섹션으로 이동합니다.
- "새 API 키 생성" 클릭
- 키에 설명적인 이름 지정 (예: "kimi-k2-5-development")
- API 키를 복사하여 안전하게 보관하세요—다시는 볼 수 없습니다.
보안 팁: API 키를 버전 제어에 커밋하지 마세요. 환경 변수 또는 비밀 관리자를 사용하세요.
3단계: 환경 설정
Python의 경우:
pip install --upgrade 'openai>=1.0'
Node.js의 경우:
npm install openai@latest
4단계: API 키 구성
API 키를 환경 변수로 설정합니다.
macOS/Linux:
export MOONSHOT_API_KEY="your-api-key-here"
Windows (PowerShell):
[System.Environment]::SetEnvironmentVariable("MOONSHOT_API_KEY", "your-api-key-here", "User")
Windows (명령 프롬프트):
setx MOONSHOT_API_KEY "your-api-key-here"
Python 코드 예시
기본 채팅 완료
다음은 Kimi K2.5를 시작하기 위한 간단한 예시입니다.
import os
from openai import OpenAI

# Initialize the client with Moonshot AI endpoint
client = OpenAI(
    api_key=os.environ.get("MOONSHOT_API_KEY"),
    base_url="https://api.moonshot.ai/v1",
)

# Create a chat completion
response = client.chat.completions.create(
    model="kimi-k2.5-preview",
    messages=[
        {
            "role": "system",
            "content": "You are Kimi, an AI assistant developed by Moonshot AI. You are helpful, harmless, and honest."
        },
        {
            "role": "user",
            "content": "Explain the concept of mixture-of-experts architecture in neural networks."
        }
    ],
    temperature=0.6,
    max_tokens=2048,
)

print(response.choices[0].message.content)
스트리밍 응답
실시간 애플리케이션의 경우, 응답이 생성되는 동안 표시하기 위해 스트리밍을 사용하세요.
import os
from openai import OpenAI

client = OpenAI(
    api_key=os.environ.get("MOONSHOT_API_KEY"),
    base_url="https://api.moonshot.ai/v1",
)

# Stream the response
stream = client.chat.completions.create(
    model="kimi-k2.5-preview",
    messages=[
        {"role": "user", "content": "Write a Python function to implement binary search."}
    ],
    stream=True,
    temperature=0.3,
)

# Process the stream
for chunk in stream:
    if chunk.choices[0].delta.content:
        print(chunk.choices[0].delta.content, end="", flush=True)
다중 턴 대화
여러 교환에 걸쳐 컨텍스트를 유지하세요.
import os
from openai import OpenAI

client = OpenAI(
    api_key=os.environ.get("MOONSHOT_API_KEY"),
    base_url="https://api.moonshot.ai/v1",
)

conversation_history = [
    {"role": "system", "content": "You are a helpful coding assistant."}
]

def chat(user_message):
    conversation_history.append({"role": "user", "content": user_message})

    response = client.chat.completions.create(
        model="kimi-k2.5-preview",
        messages=conversation_history,
        temperature=0.6,
    )

    assistant_message = response.choices[0].message.content
    conversation_history.append({"role": "assistant", "content": assistant_message})

    return assistant_message

# Example conversation
print(chat("How do I create a REST API in Python?"))
print(chat("Can you show me how to add authentication to that?"))
print(chat("What about rate limiting?"))
비동기 구현
고성능 애플리케이션의 경우 async/await를 사용하세요.
import os
import asyncio
from openai import AsyncOpenAI

async def main():
    client = AsyncOpenAI(
        api_key=os.environ.get("MOONSHOT_API_KEY"),
        base_url="https://api.moonshot.ai/v1",
    )

    # Run multiple requests concurrently
    tasks = [
        client.chat.completions.create(
            model="kimi-k2.5-preview",
            messages=[{"role": "user", "content": f"What is {topic}?"}],
        )
        for topic in ["REST API", "GraphQL", "gRPC"]
    ]

    responses = await asyncio.gather(*tasks)

    for response in responses:
        print(response.choices[0].message.content[:200])
        print("-" * 50)

asyncio.run(main())
JavaScript/Node.js 예시
기본 채팅 완료
import OpenAI from 'openai';

const client = new OpenAI({
  apiKey: process.env.MOONSHOT_API_KEY,
  baseURL: 'https://api.moonshot.ai/v1',
});

async function chat(userMessage) {
  const response = await client.chat.completions.create({
    model: 'kimi-k2.5-preview',
    messages: [
      {
        role: 'system',
        content: 'You are Kimi, a helpful AI assistant.',
      },
      {
        role: 'user',
        content: userMessage,
      },
    ],
    temperature: 0.6,
  });

  return response.choices[0].message.content;
}

// Usage
const answer = await chat('How do I implement a binary search tree in JavaScript?');
console.log(answer);
Node.js로 스트리밍하기
import OpenAI from 'openai';

const client = new OpenAI({
  apiKey: process.env.MOONSHOT_API_KEY,
  baseURL: 'https://api.moonshot.ai/v1',
});

async function streamChat(userMessage) {
  const stream = await client.chat.completions.create({
    model: 'kimi-k2.5-preview',
    messages: [{ role: 'user', content: userMessage }],
    stream: true,
  });

  for await (const chunk of stream) {
    const content = chunk.choices[0]?.delta?.content;
    if (content) {
      process.stdout.write(content);
    }
  }
}

await streamChat('Explain microservices architecture');
Fetch API 사용 (브라우저/Edge 함수)
async function callKimiAPI(prompt) {
  const response = await fetch('https://api.moonshot.ai/v1/chat/completions', {
    method: 'POST',
    headers: {
      'Authorization': `Bearer ${process.env.MOONSHOT_API_KEY}`,
      'Content-Type': 'application/json',
    },
    body: JSON.stringify({
      model: 'kimi-k2.5-preview',
      messages: [{ role: 'user', content: prompt }],
      temperature: 0.6,
    }),
  });

  const data = await response.json();
  return data.choices[0].message.content;
}

// Usage
const result = await callKimiAPI('What are the best practices for API design?');
console.log(result);
Apidog로 Kimi K2.5 API 테스트
AI API를 효과적으로 테스트하려면 요청/응답 구조 이해, 스트리밍 처리, 인증 관리 및 문제 디버깅이 필요합니다. Apidog는 Kimi K2.5 작업을 간편하게 만들어주는 포괄적인 API 개발 솔루션을 제공합니다.
Apidog에서 Kimi K2.5 설정
1단계: 새 프로젝트 생성
- Apidog를 열고 "Kimi K2.5 통합"이라는 새 프로젝트를 생성합니다.
- 이는 Kimi 관련 모든 엔드포인트를 한 곳에 정리합니다.
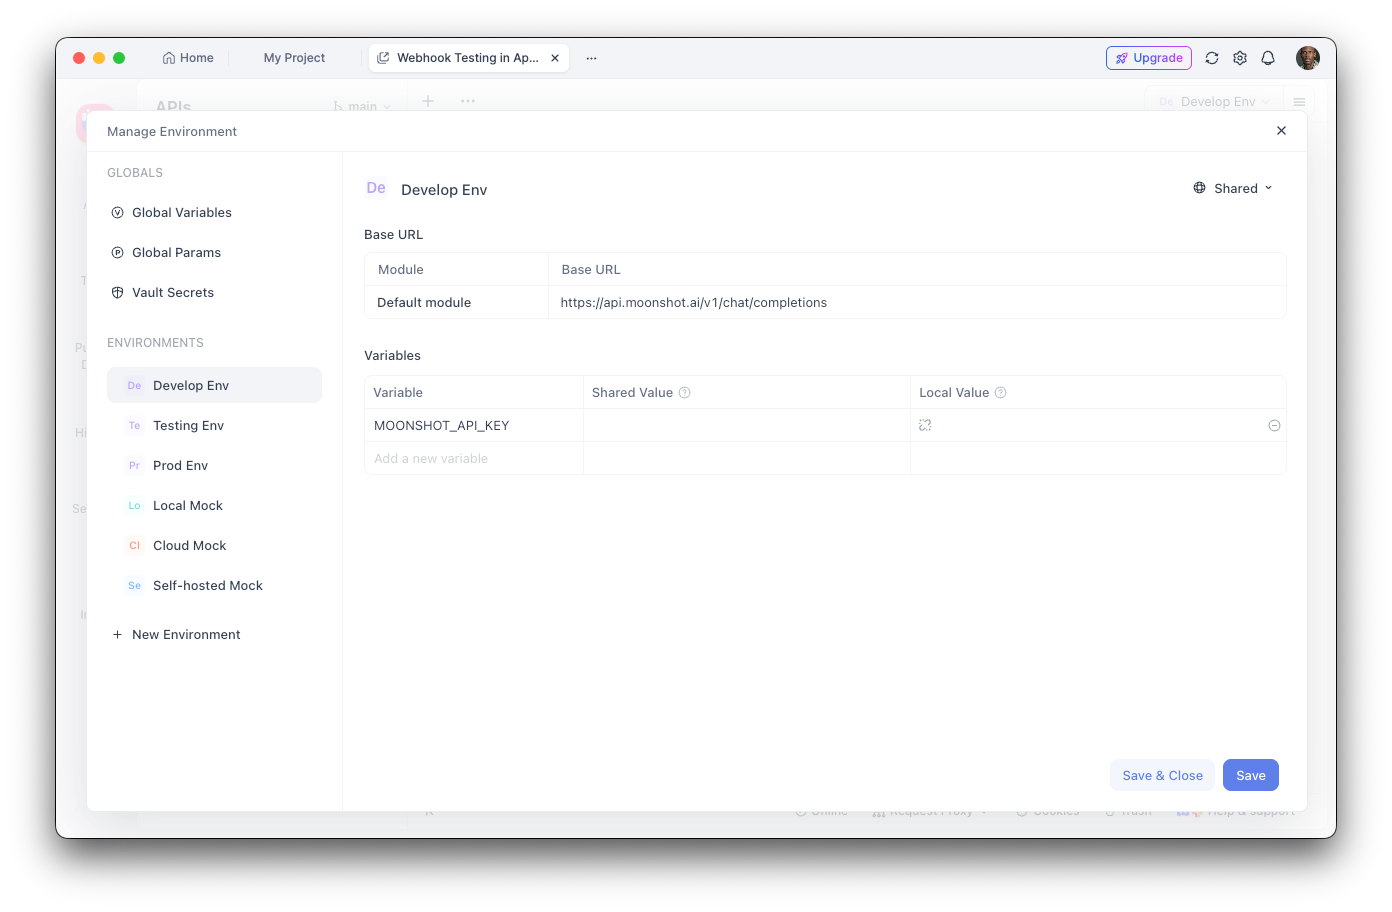
2단계: 환경 변수 구성
- 환경 설정으로 이동합니다.
- 새 환경 변수를 추가합니다.
- 이름:
MOONSHOT_API_KEY - 값: API 키
- 값을 숨기려면 "민감"으로 표시
3단계: 채팅 완료 엔드포인트 생성
- 새 POST 요청을 추가합니다.
- URL:
https://api.moonshot.ai/v1/chat/completions - 헤더:
Authorization:Bearer {{MOONSHOT_API_KEY}}Content-Type:application/json

4단계: 요청 본문 구성
{
  "model": "kimi-k2.5-preview",
  "messages": [
    {
      "role": "system",
      "content": "You are a helpful AI assistant."
    },
    {
      "role": "user",
      "content": "Hello, how can you help me today?"
    }
  ],
  "temperature": 0.6,
  "max_tokens": 2048,
  "stream": false
}
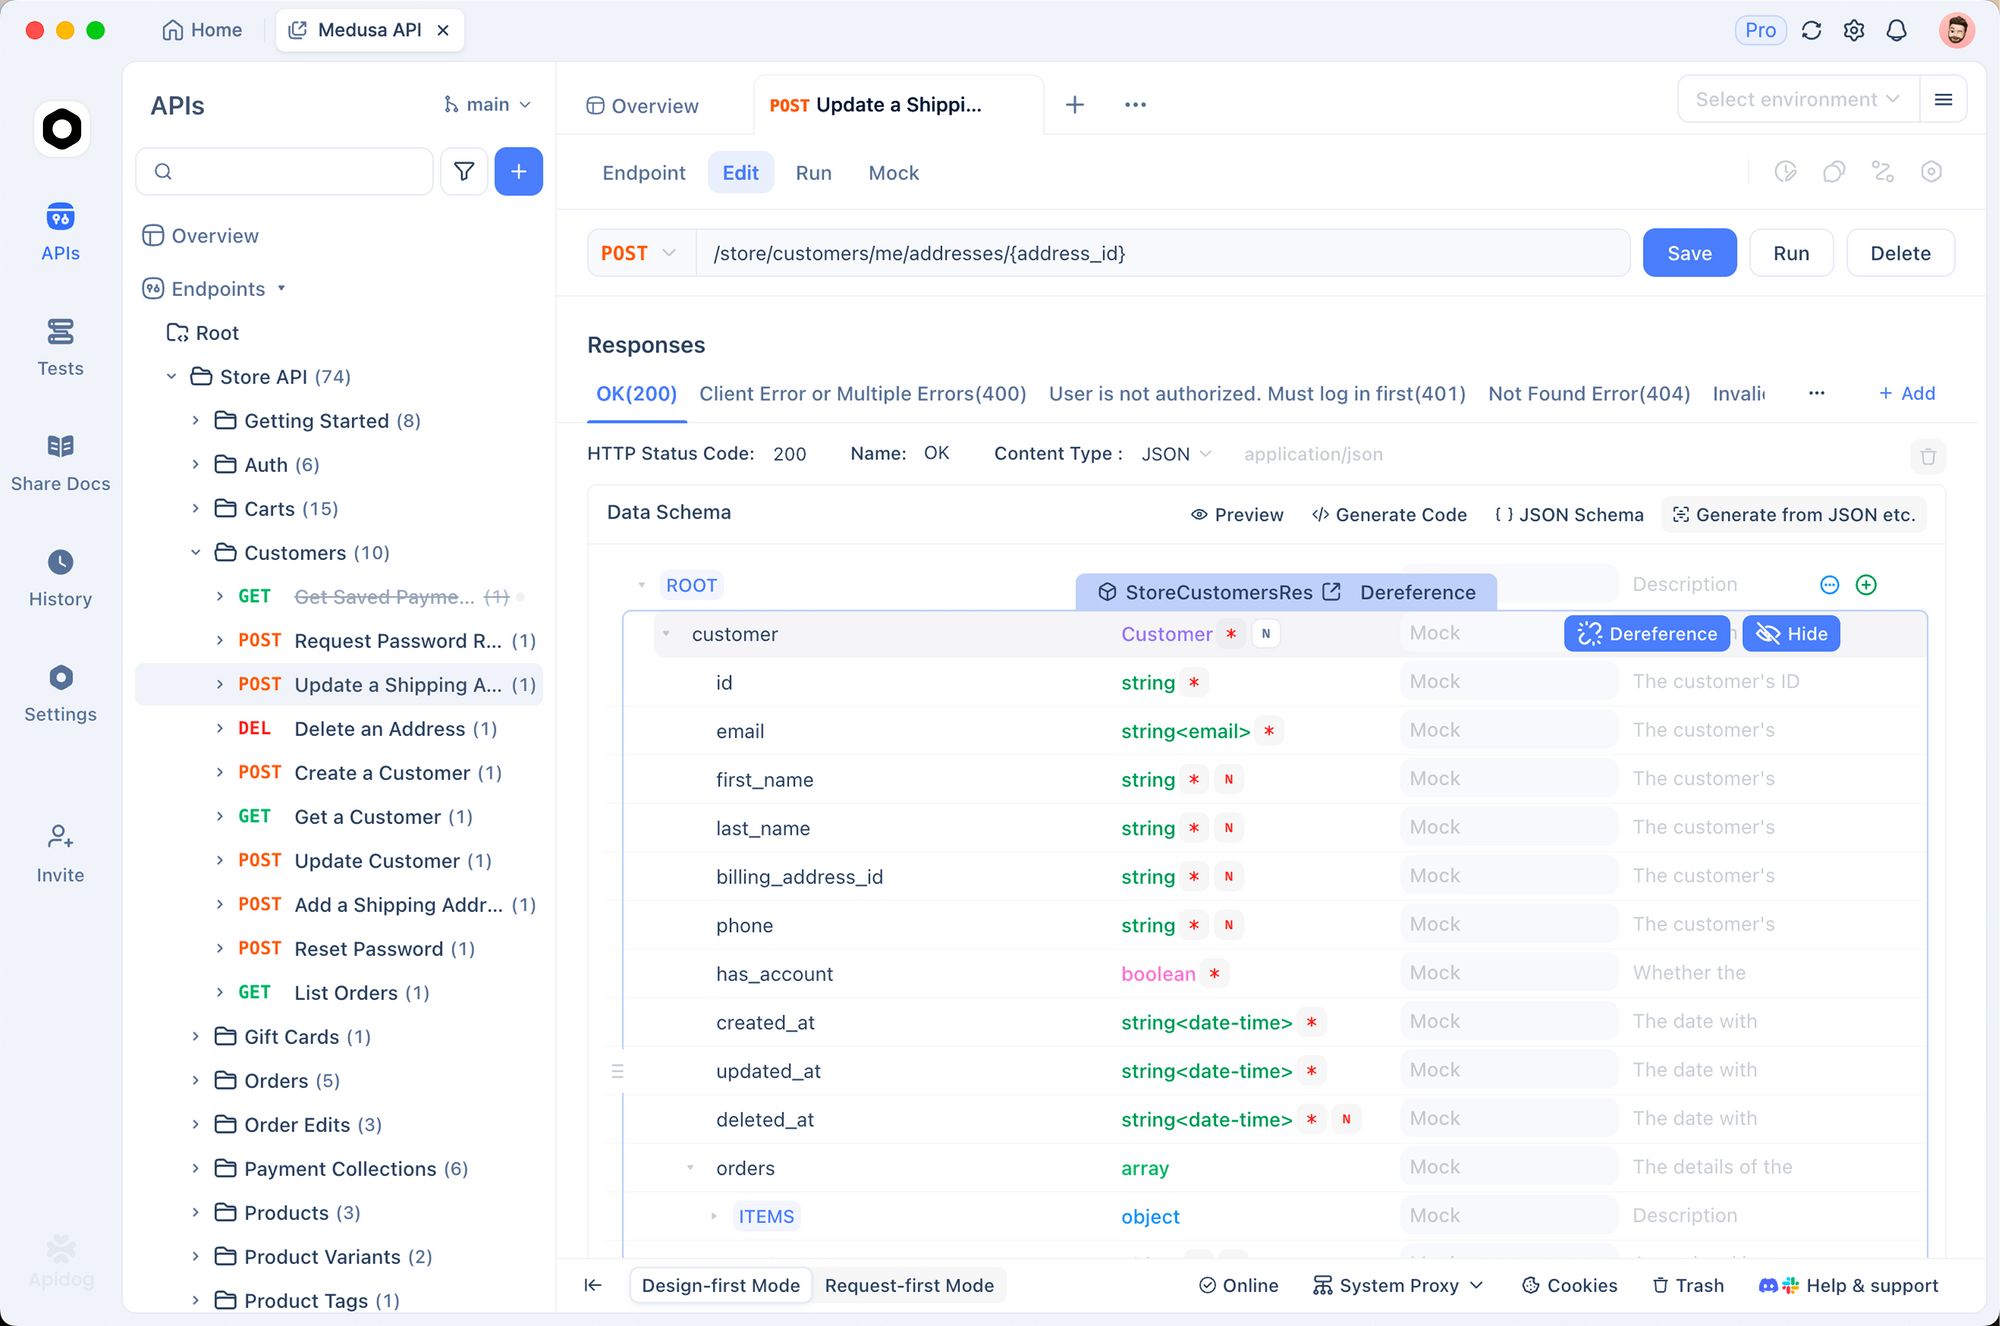
Apidog로 디버깅
Apidog의 시각적 인터페이스는 다음을 돕습니다.
- 응답 구조 검사: 구문 강조가 적용된 전체 JSON 응답 확인
- 지연 시간 측정: 성능 최적화를 위한 응답 시간 추적
- 헤더 보기: 인증 및 속도 제한 문제 디버깅
- 테스트 케이스 저장: 회귀 테스트를 위한 재사용 가능한 요청 컬렉션 생성
- 코드 생성: Python, JavaScript, cURL 등으로 작동하는 코드 내보내기
자동화된 테스트 생성
Apidog의 테스트 러너를 사용하면 Kimi K2.5 통합을 확인할 수 있습니다.
// Post-response test script in Apidog
pm.test("Response status is 200", function () {
    pm.response.to.have.status(200);
});

pm.test("Response contains choices", function () {
    const response = pm.response.json();
    pm.expect(response.choices).to.be.an('array');
    pm.expect(response.choices.length).to.be.greaterThan(0);
});

pm.test("Response content is not empty", function () {
    const response = pm.response.json();
    pm.expect(response.choices[0].message.content).to.not.be.empty;
});
도구 호출 및 에이전트 기능
Kimi K2.5의 가장 강력한 기능 중 하나는 외부 도구를 호출하는 능력입니다. 이를 통해 외부 시스템과 상호 작용할 수 있는 정교한 AI 에이전트를 구축할 수 있습니다.
도구 정의
import os
from openai import OpenAI

client = OpenAI(
    api_key=os.environ.get("MOONSHOT_API_KEY"),
    base_url="https://api.moonshot.ai/v1",
)

# Define available tools
tools = [
    {
        "type": "function",
        "function": {
            "name": "get_weather",
            "description": "Get the current weather for a location",
            "parameters": {
                "type": "object",
                "properties": {
                    "location": {
                        "type": "string",
                        "description": "City and country, e.g., 'London, UK'"
                    },
                    "unit": {
                        "type": "string",
                        "enum": ["celsius", "fahrenheit"],
                        "description": "Temperature unit"
                    }
                },
                "required": ["location"]
            }
        }
    },
    {
        "type": "function",
        "function": {
            "name": "search_database",
            "description": "Search a database for information",
            "parameters": {
                "type": "object",
                "properties": {
                    "query": {
                        "type": "string",
                        "description": "Search query"
                    },
                    "limit": {
                        "type": "integer",
                        "description": "Maximum number of results"
                    }
                },
                "required": ["query"]
            }
        }
    }
]

# Make a request with tools
response = client.chat.completions.create(
    model="kimi-k2.5-preview",
    messages=[
        {"role": "user", "content": "What's the weather like in Tokyo?"}
    ],
    tools=tools,
    tool_choice="auto",
)

# Handle tool calls
if response.choices[0].message.tool_calls:
    for tool_call in response.choices[0].message.tool_calls:
        print(f"Tool: {tool_call.function.name}")
        print(f"Arguments: {tool_call.function.arguments}")
도구 호출 실행
import json

def execute_tool_call(tool_call):
    """Execute a tool call and return the result."""
    name = tool_call.function.name
    args = json.loads(tool_call.function.arguments)

    if name == "get_weather":
        # Simulate weather API call
        return json.dumps({
            "location": args["location"],
            "temperature": 22,
            "unit": args.get("unit", "celsius"),
            "condition": "sunny"
        })
    elif name == "search_database":
        # Simulate database search
        return json.dumps({
            "results": [
                {"id": 1, "title": "Result 1"},
                {"id": 2, "title": "Result 2"}
            ]
        })

    return json.dumps({"error": "Unknown tool"})

# Complete the conversation with tool results
messages = [
    {"role": "user", "content": "What's the weather in Tokyo?"}
]

response = client.chat.completions.create(
    model="kimi-k2.5-preview",
    messages=messages,
    tools=tools,
)

if response.choices[0].message.tool_calls:
    # Add assistant message with tool calls
    messages.append(response.choices[0].message)

    # Execute each tool and add results
    for tool_call in response.choices[0].message.tool_calls:
        result = execute_tool_call(tool_call)
        messages.append({
            "role": "tool",
            "tool_call_id": tool_call.id,
            "content": result
        })

    # Get final response
    final_response = client.chat.completions.create(
        model="kimi-k2.5-preview",
        messages=messages,
        tools=tools,
    )

    print(final_response.choices[0].message.content)
비전 및 다중 모달 기능
K2.5의 기본 다중 모달 기능은 텍스트와 함께 이미지를 처리할 수 있습니다.
import os
import base64
from openai import OpenAI

client = OpenAI(
    api_key=os.environ.get("MOONSHOT_API_KEY"),
    base_url="https://api.moonshot.ai/v1",
)

def encode_image(image_path):
    """Encode image to base64."""
    with open(image_path, "rb") as image_file:
        return base64.b64encode(image_file.read()).decode("utf-8")

# Analyze an image
image_base64 = encode_image("screenshot.png")

response = client.chat.completions.create(
    model="kimi-k2.5-preview",
    messages=[
        {
            "role": "user",
            "content": [
                {
                    "type": "text",
                    "text": "Analyze this UI design and suggest improvements."
                },
                {
                    "type": "image_url",
                    "image_url": {
                        "url": f"data:image/png;base64,{image_base64}"
                    }
                }
            ]
        }
    ],
    max_tokens=2048,
)

print(response.choices[0].message.content)
시각적 입력에서 코드 생성
# Generate code from a wireframe
response = client.chat.completions.create(
    model="kimi-k2.5-preview",
    messages=[
        {
            "role": "system",
            "content": "You are an expert frontend developer. Generate clean, production-ready code."
        },
        {
            "role": "user",
            "content": [
                {
                    "type": "text",
                    "text": "Convert this wireframe into a React component with Tailwind CSS styling."
                },
                {
                    "type": "image_url",
                    "image_url": {
                        "url": f"data:image/png;base64,{encode_image('wireframe.png')}"
                    }
                }
            ]
        }
    ],
    temperature=0.3,
)

print(response.choices[0].message.content)
가격 및 속도 제한
주요 사항:
- 무료 티어는 하루 150만 토큰 포함
- 티어 1+는 일일 토큰 무제한
- 토큰 캐싱은 구성 필요 없이 자동
- 웹 검색은 호출당 $0.005 추가 비용 발생
모범 사례 및 팁
토큰 사용 최적화
# Use system prompts efficiently
system_prompt = """You are a concise technical assistant.
Rules: 1) Be brief 2) Use code blocks 3) Skip pleasantries"""

# Enable caching for repeated contexts
# Moonshot automatically caches similar prompts
온도 설정
- 0.0-0.3: 코드 생성, 사실적 응답
- 0.4-0.6: 균형 잡힌 창의성 및 정확성
- 0.7-1.0: 창의적 글쓰기, 브레인스토밍
오류 처리
from openai import OpenAI, APIError, RateLimitError

client = OpenAI(
    api_key=os.environ.get("MOONSHOT_API_KEY"),
    base_url="https://api.moonshot.ai/v1",
)

def safe_chat(message, retries=3):
    for attempt in range(retries):
        try:
            response = client.chat.completions.create(
                model="kimi-k2.5-preview",
                messages=[{"role": "user", "content": message}],
            )
            return response.choices[0].message.content
        except RateLimitError:
            if attempt < retries - 1:
                time.sleep(2 ** attempt)  # Exponential backoff
            else:
                raise
        except APIError as e:
            print(f"API Error: {e}")
            raise

result = safe_chat("Hello, Kimi!")
일반적인 문제 해결
인증 오류
문제: 401 Unauthorized 오류
해결책:
- API 키가 올바른지 확인합니다.
- 키가 만료되지 않았는지 확인합니다.
Authorization헤더 형식이 올바른지 확인합니다:Bearer YOUR_KEY
속도 제한
문제: 429 Too Many Requests
해결책:
- 지수 백오프 구현
- 자금을 추가하여 티어 업그레이드
X-RateLimit-Remaining헤더 모니터링
컨텍스트 길이 초과
문제: 요청이 256K 토큰 제한을 초과합니다.
해결책:
- 긴 대화 요약
- 슬라이딩 윈도우 방식 사용
- 여러 요청으로 분할
타임아웃 문제
문제: 요청 시간 초과
해결책:
- 긴 응답에 스트리밍 사용
- 클라이언트 타임아웃 설정 증가
- 복잡한 프롬프트를 작은 작업으로 분할
Kimi K2.5로 개발할 준비가 되셨습니까? Apidog를 다운로드하여 시각적 테스트, 자동 문서화 및 팀 협업 기능을 통해 AI API 통합을 더 빠르고 안정적으로 만들 수 있는 API 개발 워크플로우를 간소화하세요.