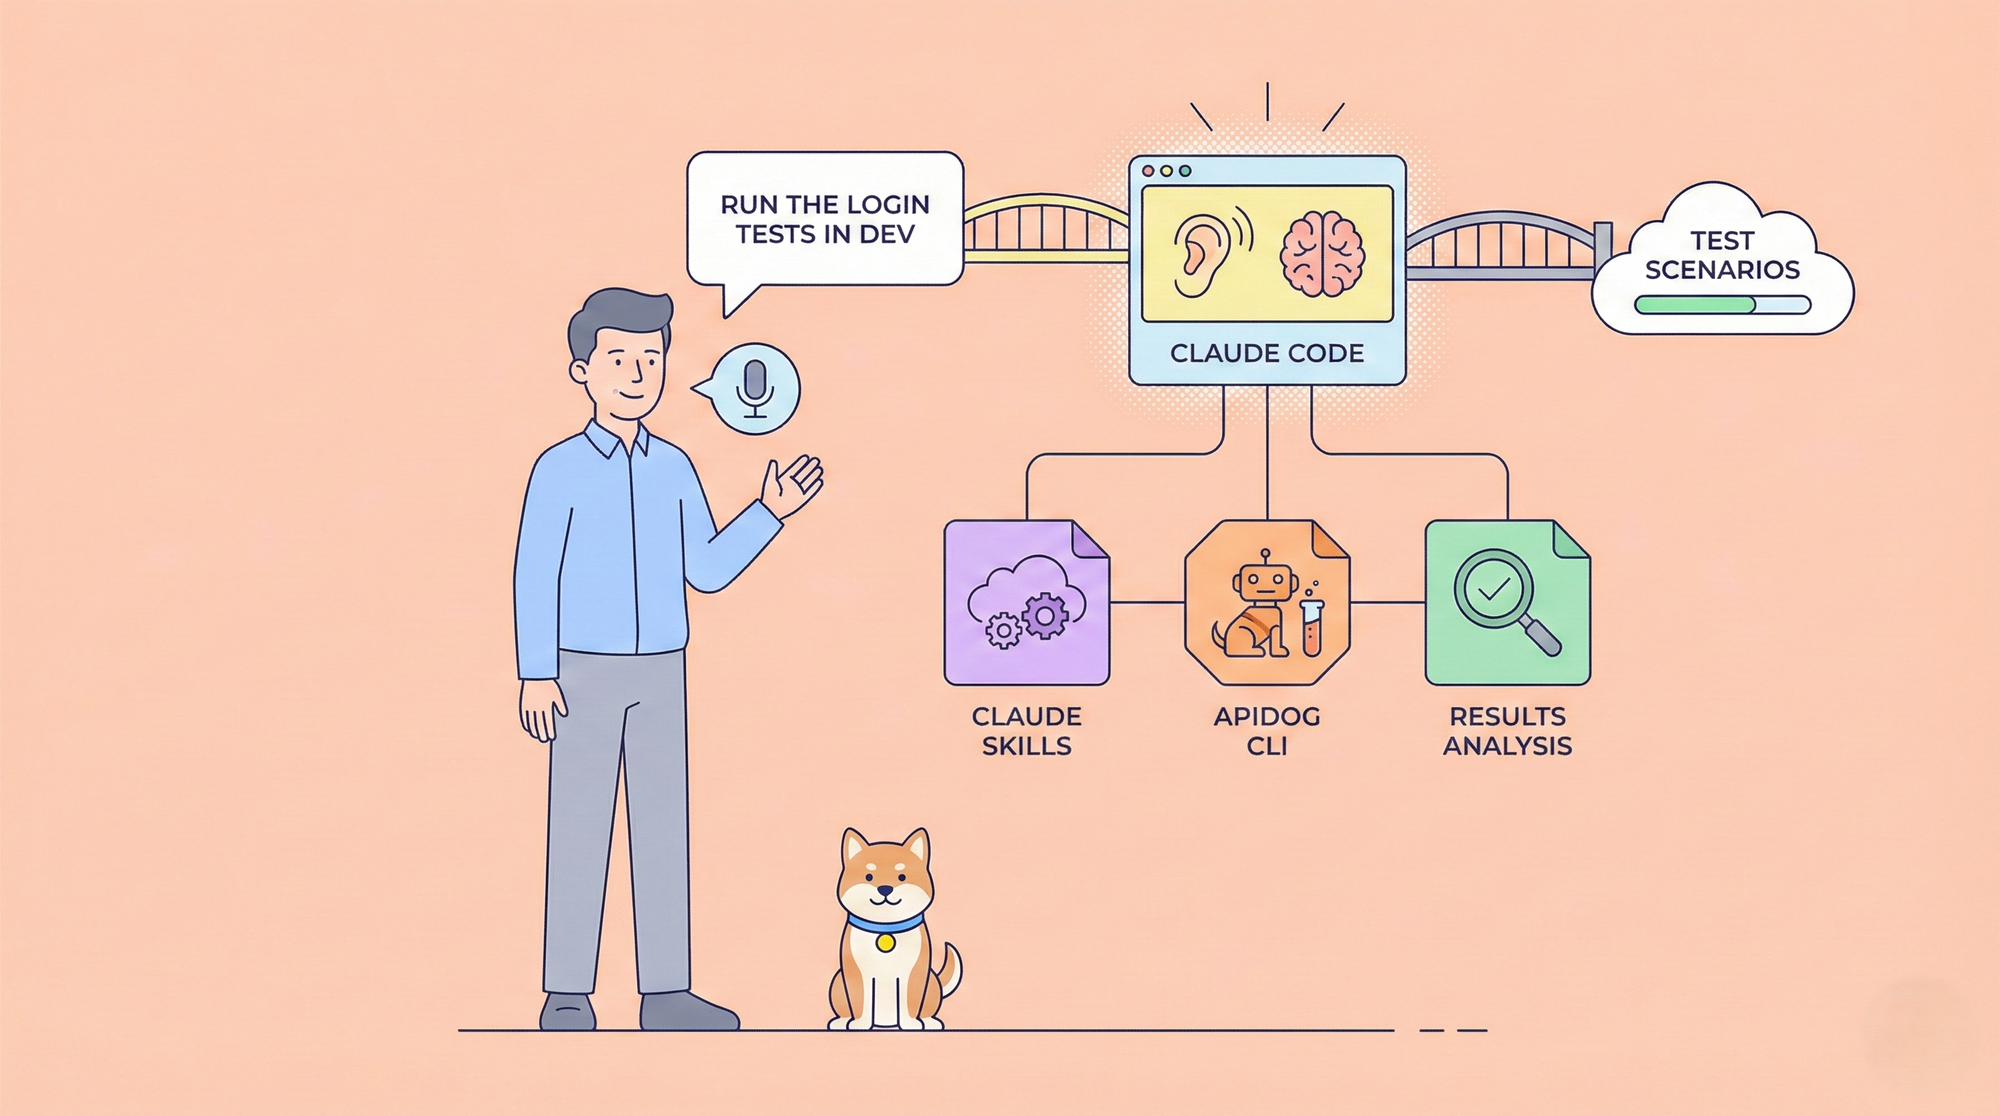
이 문서는 Apidog CLI와 Claude Skills를 결합하여 자연어 기반 API 자동화 테스트를 위한 효율적인 워크플로우를 구축하는 방법을 소개합니다.
이 워크플로우에서는 터미널에서 Claude Code에 단 한 문장만 말하면 됩니다. 예를 들어:
"개발 환경에서 사용자 주문 흐름 테스트를 실행해줘."
Claude Code는 당신의 의도를 자동으로 이해하고, 해당 테스트 시나리오 또는 테스트 스위트를 찾아 테스트를 실행한 다음, 결과를 요약하고 해석해줍니다.

도구 개요
이 워크플로우는 세 가지 도구로 구성됩니다:
1. Apidog CLI
Apidog에서 제공하는 명령줄 인터페이스입니다. 터미널에서 API 자동화 테스트를 실행하고 테스트 보고서를 생성하는 데 사용됩니다.
2. Claude Code
Anthropic에서 출시한 명령줄 AI 어시스턴트입니다. 파일을 조작하고, 명령을 실행하고, 스크립트를 실행하고, 로컬 개발 환경과 상호 작용할 수 있습니다.
3. Claude Skills
Agent Skills라고도 하며, Claude Code의 확장 메커니즘입니다. Skill은 Claude가 특정 작업을 완료하는 방법을 정의하며, 본질적으로 실행 가능한 일련의 작업 지침 역할을 합니다.
이 워크플로우에서 Claude Code는 자연어 지침을 이해하는 역할을 합니다. 사용자 요청이 사전 정의된 Claude Skill과 일치하면, Claude는 해당 Apidog CLI 명령을 자동으로 실행하고 결과를 분석합니다.
이 워크플로우로 할 수 있는 일
다음은 이 워크플로우가 실제로 어떻게 사용될 수 있는지 보여주는 몇 가지 실제 시나리오입니다.
단일 테스트 실행
특정 테스트 시나리오를 실행하려면 명시적으로 이름을 지정할 수 있습니다. 예를 들어:
"개발 환경에서 로그인 테스트를 실행해줘."
테스트가 완료되면 Claude는 결과를 분석하고 요약을 제공합니다.

사용 가능한 모든 테스트 나열
어떤 테스트 시나리오 또는 테스트 스위트를 사용할 수 있는지 보려면 다음과 같이 말할 수 있습니다:
"사용 가능한 테스트를 보여줘."
Claude는 관련 스크립트를 실행하고 모든 테스트를 나열합니다.

비즈니스 모듈의 모든 테스트 실행
결제 관련 테스트와 같이 특정 비즈니스 도메인의 모든 테스트를 실행하려면 다음과 같이 말할 수 있습니다:
"테스트 환경에서 모든 결제 테스트를 실행해줘."
Claude는 모든 관련 테스트 파일을 자동으로 찾아 순차적으로 또는 병렬로 실행합니다.

환경별 테스트 결과 비교
환경별로 결과를 비교하려면 다음과 같이 말할 수 있습니다:
"개발 및 테스트 환경에서 로그인 테스트를 실행해줘."
Claude는 두 환경에서 테스트를 실행하고 결과의 차이점을 분석합니다.

코드 변경 사항을 기반으로 테스트 실행
코드 변경 후, Claude에게 영향을 받는 테스트만 실행하도록 요청할 수 있습니다:
"최근 코드 변경 사항을 기반으로, 개발 환경에서 영향을 받는 API 테스트를 실행해줘."
Claude는 Git 변경 사항을 분석하고, 영향을 받는 테스트 시나리오 또는 스위트를 결정하며, 해당 테스트만 실행하여 시간과 리소스를 절약합니다.
더 많은 시나리오가 여러분의 탐색을 기다리고 있습니다.
다음으로, Apidog CLI, Claude Code, Claude Skills를 설치하고 구성하는 방법과 이들을 결합하여 완전한 워크플로우를 만드는 방법을 설명합니다.
준비
환경 요구 사항
머신에 Node.js가 설치되어 있는지 확인합니다. 터미널에서 확인하세요:
node -v
npm -v
Apidog CLI 설치(npm을 통해 설치):
npm install -g apidog-cli
설치를 확인합니다:
apidog --version버전 번호가 표시되면 설치가 성공한 것입니다.
Apidog → 테스트 → CI/CD에서 테스트 시나리오 또는 테스트 스위트에 대한 CLI 명령을 복사하고, 액세스 토큰을 추가한 다음 터미널에서 실행할 수 있습니다.

테스트 출력이 나타나면 Apidog CLI가 올바르게 작동하는 것입니다.
Claude 설치
Code 설치(npm을 통해 설치):
npm install -g @anthropic-ai/claude-code확인:
claude --version처음 실행할 때는 로그인해야 합니다:
claude
승인 단계를 따르세요. Claude 계정이 필요합니다. 로그인 후 대화형 인터페이스에 들어가 기본적인 질문을 할 수 있습니다.
이 시점에서 Claude는 아직 Apidog 테스트를 실행하는 방법을 모릅니다. 다음으로, Claude Skills를 사용하여 가르쳐줄 것입니다.
Claude Skills 구축
Skills 작동 방식 이해
Claude Code를 사용할 때는 Skill을 수동으로 선택하지 않습니다. 자연어로 원하는 작업을 설명하기만 하면 됩니다.
요청이 Skill의 설명과 일치하면 Claude는 해당 Skill을 자동으로 로드하고 정의된 워크플로우를 실행합니다.
1단계: Skill 폴더 생성
모든 Skill 구성은 .claude/skills/ 폴더 아래에 있습니다. 각 Skill은 자체 하위 폴더를 가집니다.
프로젝트 루트에 Apidog 자동화 테스트를 위한 최소 Skill 폴더를 생성합니다:
mkdir -p .claude/skills/apidog-tests
결과 구조:
.claude/skills/apidog-tests/여기에 진입 파일과 스크립트를 점차 추가할 것입니다.
2단계: SKILL.md 생성
각 Skill은 Skill이 트리거될 때 Claude가 작업을 실행하는 방법을 정의하는 SKILL.md 파일이 필요합니다.
파일은 ---로 묶인 YAML 메타데이터로 시작합니다. name과 description 필드는 필수입니다.
description은 특히 중요합니다. 언제 Claude가 이 Skill을 활성화해야 하는지를 결정하기 때문입니다.
YAML 블록 아래의 Markdown 콘텐츠는 실행 로직, 결정 규칙, 호출할 스크립트 및 제약 조건을 정의합니다.
Apidog 자동화 테스트를 위한 SKILL.md 예시
---
name: apidog-tests
description: Executes and interprets Apidog automated API tests via Apidog CLI. Trigger this Skill whenever the user explicitly asks to run tests, test cases, test scenarios, or test suites, including requests to execute tests in a specific environment such as dev, test, or prod, to verify API behavior after code changes, to perform regression or pre-release testing, or to run API checks before git commit, push, or merge. Even if the user does not explicitly mention "Apidog" or "API", assume these requests refer to Apidog automated tests when test execution is implied. The Skill should select the appropriate test scenario or test suite, execute the tests, and explain the results without modifying test definitions or commands themselves.
---

# Apidog Tests

Executes Apidog automated tests and interprets the results.

## Workflow

1. **Select Test**:

- If the user explicitly provides:
  - Test file path
  - Test file name
  - Or a clear, uniquely matching test name
- Use that test directly without automatic selection.
- If information is unclear, prioritize running the `node ./.claude/skills/apidog-tests/scripts/list-tests.js` script to quickly retrieve all test file paths and descriptions.
- Avoid blind global searches in large project directories; instead, locate the test file directory `./.claude/skills/apidog-tests/tests/` dedicated to this skill.

2. **Multiple Test Execution Rules**

- By default, execute only one test, but offer the option for batch execution.
- If the user explicitly states:
  - "Run these few"
  - "Run them all"
- Enter **Batch Execution Mode**.

In Batch Execution Mode:
- Clearly list the tests to be executed.
- **Ask for execution method**: Let the user choose between "Sequential Execution" (better readability) or "Parallel Execution" (faster).
  - **Sequential Execution**: Run tests one by one and analyze immediately, suitable for debugging.
  - **Parallel Execution**: Start multiple tests simultaneously (using `&` or concurrent scripts), suitable for quick regression, though logs may interleave.
- Request user confirmation for the execution method and test list (Yes / No).
- Execute tests according to the chosen method.
- Finally, summarize or individually explain the results of each test.

3. **Confirm Environment**:
- Supported environments include:
  - `dev`
  - `test`
  - `prod`
- If the user has not specified an environment:
  - List the environment names above.
  - Have the user confirm which one to use.

4. **Execute Test**:
- Execute the test once the following information is clear:
  - Test file path
  - Environment name (dev / test / prod)
```bash
node ./.claude/skills/apidog-tests/scripts/run-cli.js <test_file_path> <env_name>
```

5. **Interpret Results**: Analyze Apidog CLI output and explain causes of failure.

## Failure Handling

- Do not modify test files.
- Do not modify execution commands.
- Explain failure reasons based on test names, API semantics, and CLI output.
3단계: 지원 파일
이전 단계에서는 SKILL.md 파일을 생성했습니다. 이 파일은 이 Skill의 트리거 조건과 전체 실행 워크플로우를 정의합니다.
이 기반을 바탕으로, 나머지 모든 파일은 SKILL.md의 보조 구성 요소 역할만 합니다. 추가 파일은 워크플로우에 런타임 환경, 실행 명령 또는 테스트 정의와 같은 추가 정보가 필요할 때만 필요에 따라 도입됩니다.
최종 폴더 구조:
.claude/skills/apidog-tests/
├── SKILL.md
├── env/
│   ├── dev.env
│   ├── test.env
│   └── prod.env
├── scripts/
│   ├── list-tests.js
│   └── run-cli.js
└── tests/
    ├── payment-flow.md
    └── refund-flow.md
아래에서는 각 지원 파일의 목적과 예시를 설명합니다.
환경 구성 (env)
env/ 폴더는 Apidog 액세스 토큰 및 환경 ID와 같은 환경 변수 구성을 저장하는 데 사용됩니다.
환경 ID를 변수로 추출함으로써, 명령이나 스크립트를 수정하지 않고 테스트 실행 환경(예: 개발, 테스트, 프로덕션)을 빠르게 전환할 수 있습니다.
예를 들어, env/ 폴더 아래에 dev.env 파일을 생성합니다:
APIDOG_ACCESS_TOKEN=APS-your-access-token
APIDOG_ENV_ID=your-environment-id
여러 환경이 필요한 경우, 같은 방식으로 추가 파일을 생성할 수 있습니다:
test.envprod.env- …
각 파일은 해당 환경에 대한 변수만 유지하면 됩니다.

환경 ID는 Apidog CLI 명령에서 -e 매개변수에 전달되는 숫자 값에 해당합니다. 각 런타임 환경(예: 개발, 테스트 또는 프로덕션)은 Apidog에서 고유한 환경 ID를 가집니다.

env/ 폴더 아래의 .env 파일에는 액세스 토큰이 포함되어 있으며, 이는 민감한 정보이므로 Git에 커밋해서는 안 됩니다.실행 스크립트 (scripts)
scripts/ 폴더에는 테스트 정의를 실제 실행 가능한 Apidog CLI 명령으로 변환하고, 환경 변수를 주입하고, 테스트를 실행하는 역할을 하는 실행 스크립트가 포함되어 있습니다.
이 Skill에서는 두 가지 주요 이유로 Node.js가 선택되었습니다:
- Apidog CLI 자체는 Node.js에 의존합니다.동일한 런타임을 재사용하면 Python과 같은 추가 런타임을 설치할 필요가 없습니다.
- 컨텍스트 오버헤드 및 토큰 소비 감소스크립트 내에서 명령 구문 분석, 변수 주입 및 실행 로직을 처리함으로써 Claude는 대화 중에 전체 CLI 명령을 반복적으로 구성할 필요가 없으므로 컨텍스트 사용량이 크게 줄어듭니다.
스크립팅에 익숙하지 않다면 스크립트를 전혀 사용하지 않을 수도 있습니다. 대신, Claude가 SKILL.md에서 CLI 명령을 직접 조립하고 실행하도록 할 수 있습니다.
하지만 이 접근 방식은 더 높은 컨텍스트 및 토큰 비용을 수반합니다.scripts/ 폴더 아래에 run-cli.js를 생성합니다. 주요 책임은 다음과 같습니다:
- 지정된 Markdown 테스트 파일에서 Apidog CLI 명령 추출
- 선택한 환경(예:
dev/test)에 따라 해당.env파일 로드 - 환경 변수 주입 및 테스트 실행
바로 사용할 수 있는 스크립트 예시는 다음과 같습니다:
import fs from "fs";
import path from "path";
import { execSync } from "child_process";
import dotenv from "dotenv";
import { fileURLToPath } from "url";

const __filename = fileURLToPath(import.meta.url);
const __dirname = path.dirname(__filename);

// args
const mdPath = process.argv[2];
const envName = process.argv[3] || "local";

if (!mdPath) {
    console.error("❌ Missing test .md file path");
    process.exit(1);
}

// env path: always relative to the skill folder
const envPath = path.join(__dirname, "..", "env", `${envName}.env`);

if (!fs.existsSync(envPath)) {
    console.error(`❌ Environment configuration not found: ${envPath}`);
    process.exit(1);
}

dotenv.config({ path: envPath });

// Read markdown file
const content = fs.readFileSync(mdPath, "utf-8");
const match = content.match(/```bash([\s\S]*?)```/);

if (!match) {
    console.error("❌ Bash command block not found");
    process.exit(1);
}

let command = match[1].trim();

// Variable replacement
command = command
    .replaceAll("$APIDOG_ACCESS_TOKEN", process.env.APIDOG_ACCESS_TOKEN)
    .replaceAll("$APIDOG_ENV_ID", process.env.APIDOG_ENV_ID);

console.log(`▶ Running (${envName})`);
console.log(command);

// Execute
try {
    execSync(command, { stdio: "inherit" });
} catch (e) {
    // Apidog CLI returns exit code 1 when tests fail
    process.exit(1);
}
또한 scripts/ 폴더 아래에 list-tests.js를 생성합니다. 이 스크립트는 다음 용도로 사용됩니다:
tests/폴더 재귀적으로 스캔- 모든 Markdown 테스트 파일 찾기
- 첫 번째 줄에서 설명 추출
- 사용 가능한 모든 Apidog 자동화 테스트 목록 출력
바로 사용할 수 있는 스크립트 예시는 다음과 같습니다:
import fs from "fs";
import path from "path";
import { fileURLToPath } from "url";

const __filename = fileURLToPath(import.meta.url);
const __dirname = path.dirname(__filename);
const testsDir = path.join(__dirname, "..", "tests");

function scan(dir, relativePath = "") {
    const items = fs.readdirSync(dir, { withFileTypes: true });

    for (const item of items) {
        const fullPath = path.join(dir, item.name);
        const relPath = path.join(relativePath, item.name);

        if (item.isDirectory()) { // Changed from isfolder() to isDirectory()
            scan(fullPath, relPath);
        } else if (item.name.endsWith(".md")) {
            try {
                const content = fs.readFileSync(fullPath, "utf-8");
                const firstLine = content.split("\n")[0].trim();
                const description = firstLine.startsWith(">")
                    ? firstLine.replace(/^>\s*/, "").trim()
                    : "No description";
                const displayPath = path.join(
                    "./.claude/skills/apidog-tests/tests",
                    relPath
                );
                console.log(`[${displayPath}] - ${description}`);
            } catch (err) {
                console.log(`[${relPath}] - (Unable to read file)`);
            }
        }
    }
}

console.log("🔍 Available Apidog automated tests:");
if (fs.existsSync(testsDir)) {
    scan(testsDir);
} else {
    console.log("❌ tests folder not found");
}
테스트 정의 (tests)
tests/ 폴더는 Markdown으로 작성된 테스트 정의를 저장합니다.
설계 원칙: 각 Markdown 파일은 하나의 Apidog 테스트 시나리오 또는 테스트 스위트에 해당합니다. Apidog 자동화 테스트에서 기존 폴더 구조, 테스트 시나리오 이름, 테스트 스위트 이름 및 설명을 직접 재사용할 수 있습니다.
각 Markdown 파일은 두 부분만 포함하면 됩니다:
- 짧은 테스트 설명
- 직접 실행할 수 있는 단일 Apidog CLI 명령
Apidog CLI 명령에서:
- 액세스 토큰은
$APIDOG_ACCESS_TOKEN으로 대체됩니다. -e에 전달되는 환경 ID는$APIDOG_ENV_ID로 대체됩니다.
두 변수는 모두 .env 파일에 중앙에서 구성됩니다. 이 접근 방식은 토큰 유출을 방지하고 유연한 환경 전환을 허용합니다.
예시: login-auth-flow.md
> 로그인, 토큰 새로 고침, 로그아웃과 같은 핵심 API를 확인합니다.

```bash
apidog run --access-token $APIDOG_ACCESS_TOKEN -t 5564xxx -e $APIDOG_ENV_ID -n 1 -r html,cli
```
이 시점에서 Skill은 완전히 구축되었습니다. 폴더 구조를 검토하고 자신의 구현과 비교하여 차이점을 확인할 수 있습니다.

Claude Code에서 워크플로우 사용
프로젝트 폴더에서 claude를 실행합니다. Claude는 .claude/skills/를 자동으로 스캔하고 apidog-tests Skill을 로드합니다.
/skills를 사용하여 로드된 Skill을 나열할 수 있습니다.

그 다음 자연어 명령을 시도합니다:
"개발 환경에서 로그인 테스트를 실행해줘."

Claude는 테스트를 찾아 Apidog CLI를 통해 실행하고, 출력을 분석하고, 결과를 요약합니다.
요약
이 문서는 Claude Code, Apidog CLI, Claude Skills를 사용하여 자동화된 API 테스트 워크플로우를 구축하는 방법을 시연했습니다.
핵심 아이디어는 Claude를 인간과 도구 사이의 다리로 만드는 것입니다:
- 당신은 자연어로 의도를 설명합니다.
- Claude는 스크립트를 이해하고 호출합니다.
- 스크립트는 Apidog CLI를 실행합니다.
- Claude는 결과를 분석하고 사람이 읽기 쉬운 방식으로 제시합니다.
이 워크플로우를 진정으로 효과적으로 만들려면 프로젝트에 맞게 조정해야 합니다. 테스트 구성, 환경 전략, 결과 분석 로직 모두 사용자 정의할 수 있습니다.
팀에서 API 테스트를 자주 실행하고 더 자동화되고 지능적인 경험을 원한다면 이 접근 방식은 시도해 볼 가치가 있습니다. 초기 설정이 필요하지만, 일단 구축되면 효율성을 크게 향상시킬 수 있으며, 개선함에 따라 계속해서 더 좋아질 것입니다.