ドキュメント処理は長らくAIの最も実用的なアプリケーションの一つでしたが、ほとんどのOCRソリューションは精度と効率の間で不快なトレードオフを強いられています。Tesseractのような従来のシステムは、広範な前処理を必要とします。クラウドAPIはページごとに課金され、レイテンシが追加されます。現代の視覚言語モデルでさえ、高解像度のドキュメント画像から生じるトークン爆発に苦戦しています。
DeepSeek-OCR 2は、この状況を完全に変えます。バージョン1の「Contexts Optical Compression」アプローチを基盤とし、新リリースでは「Visual Causal Flow」を導入しています。これは、単に文字を認識するのではなく、視覚的な関係とコンテキストを理解することで、人間が実際にドキュメントを読む方法で処理するアーキテクチャです。その結果、画像をわずか64トークンに圧縮しながら97%の精度を達成し、単一GPUで1日あたり20万ページ以上のスループットを可能にするモデルが誕生しました。
このガイドでは、基本的な設定から本番環境へのデプロイまで、すべてを網羅しています。すぐにコピー&ペーストして実行できるコードも含まれています。
DeepSeek-OCR 2とは?
DeepSeek-OCR 2は、ドキュメントの理解とテキスト抽出のために特別に設計されたオープンソースの視覚言語モデルです。2026年1月にDeepSeek AIによってリリースされたこのモデルは、元のDeepSeek-OCRを基盤とし、新しい「Visual Causal Flow」アーキテクチャを採用しています。このアーキテクチャは、ドキュメント内の視覚要素がどのように因果的に関連し合っているかをモデル化します。例えば、テーブルのヘッダーがその下のセルをどのように解釈すべきかを決定したり、図のキャプションがその上のグラフを説明したりすることを理解します。

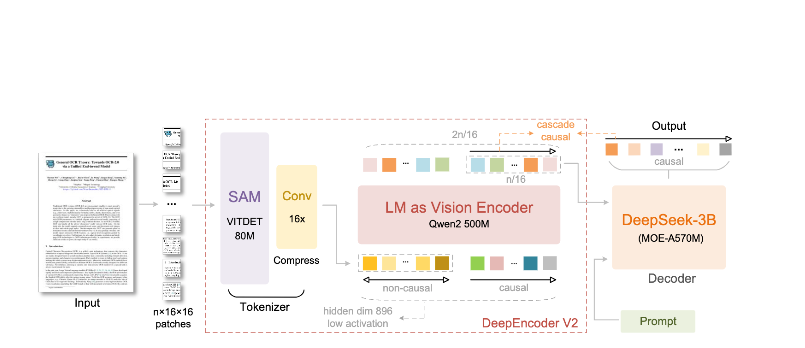
モデルは主に2つのコンポーネントで構成されています。
- DeepEncoder: ローカルの詳細抽出(SAMベース、80Mパラメータ)とグローバルなレイアウト理解(CLIPベース、300Mパラメータ)を組み合わせたデュアルビジョントランスフォーマー。
- DeepSeek3B-MoE デコーダー: 圧縮された視覚表現から構造化された出力(Markdown、LaTeX、JSON)を生成する、専門家混合(mixture-of-experts)言語モデル。
DeepSeek-OCR 2の特長:
- 極限の圧縮: 1024×1024の画像を4,096パッチからわずか256トークンに削減—16倍の削減。
- 構造化された出力: 適切なテーブル、ヘッダー、フォーマットを備えたクリーンなMarkdownを生成。
- マルチフォーマット対応: PDF、スキャンされたドキュメント、スクリーンショット、手書きメモなどに対応。
- 100以上の言語: 約100言語をカバーする3千万ページで学習済み。
- オープンウェイト: MITライセンスで、Hugging Faceで利用可能。
主要機能とアーキテクチャ
Visual Causal Flow
バージョン2の目玉機能は「Visual Causal Flow」です。これは、単なるOCRを超えてドキュメントを理解するための新しいアプローチです。ページを文字の平坦なグリッドとして扱うのではなく、モデルは視覚要素間の因果関係を学習します。
- 読み取り順序の推論: マルチカラムレイアウトの正しいシーケンスを自動的に決定します。
- テーブル構造の理解: ヘッダー、結合セル、ネストされたテーブルを認識します。
- 図とキャプションのリンク: 画像と説明を関連付けます。
- 数式解析: インラインおよびブロックのLaTeXを正確に処理します。
DeepEncoderアーキテクチャ
DeepEncoderは魔法が起こる場所です。これは、管理可能なトークン数を維持しながら高解像度画像を処理します。
Input Image (1024×1024)
    ↓
SAM-base Block (80M params)
    - Windowed attention for local detail
    - Extracts fine-grained features
    ↓
CLIP-large Block (300M params)
    - Global attention for layout
    - Understands document structure
    ↓
Convolution Block
    - 16× token reduction
    - 4,096 patches → 256 tokens
    ↓
Output: Compressed Vision Tokens
圧縮と精度のトレードオフ
| 圧縮率 | ビジョントークン | 精度 |
|---|---|---|
| 4× | 1,024 | 99%+ |
| 10× | 256 | 97% |
| 16× | 160 | 92% |
| 20× | 128 | 約60% |
ほとんどのアプリケーションにとって最適なのは10倍の圧縮率であり、これにより97%の精度を維持しつつ、本番環境でのデプロイを実用的にする高いスループットが可能になります。
インストールとセットアップ
前提条件
- Python 3.10以降(3.12.9を推奨)
- CUDA 11.8以降と互換性のあるNVIDIA GPU
- 少なくとも16GBのGPUメモリ(本番環境ではA100-40Gを推奨)
方法1:vLLMのインストール(推奨)
vLLMは、本番環境のデプロイメントで最高のパフォーマンスを提供します。
# Create virtual environment
python -m venv deepseek-ocr-env
source deepseek-ocr-env/bin/activate

# Install vLLM with CUDA support
pip install vllm>=0.8.5

# Install flash attention for optimal performance
pip install flash-attn==2.7.3 --no-build-isolation
方法2:Transformersのインストール
開発および実験用:
pip install transformers>=4.40.0
pip install torch>=2.6.0 torchvision>=0.21.0
pip install accelerate
pip install flash-attn==2.7.3 --no-build-isolation
方法3:Docker(本番環境)
FROM nvidia/cuda:11.8-devel-ubuntu22.04

RUN pip install vllm>=0.8.5 flash-attn==2.7.3

# Pre-download model
RUN python -c "from vllm import LLM; LLM(model='deepseek-ai/DeepSeek-OCR-2')"

EXPOSE 8000
CMD ["vllm", "serve", "deepseek-ai/DeepSeek-OCR-2", "--port", "8000"]
インストールの検証
import torch
print(f"PyTorch version: {torch.__version__}")
print(f"CUDA available: {torch.cuda.is_available()}")
print(f"GPU: {torch.cuda.get_device_name(0)}")

import vllm
print(f"vLLM version: {vllm.__version__}")
Pythonコードの例
vLLMを使った基本的なOCR
ドキュメント画像からテキストを抽出する最も簡単な方法を以下に示します。
from vllm import LLM, SamplingParams
from vllm.model_executor.models.deepseek_ocr import NGramPerReqLogitsProcessor
from PIL import Image

# Initialize the model
llm = LLM(
    model="deepseek-ai/DeepSeek-OCR-2",
    enable_prefix_caching=False,
    mm_processor_cache_gb=0,
    logits_processors=[NGramPerReqLogitsProcessor],
    trust_remote_code=True,
)

# Load your document image
image = Image.open("document.png").convert("RGB")

# Prepare the prompt - "Free OCR." triggers standard extraction
prompt = "<image>\nFree OCR."

model_input = [{
    "prompt": prompt,
    "multi_modal_data": {"image": image}
}]

# Configure sampling parameters
sampling_params = SamplingParams(
    temperature=0.0,  # Deterministic for OCR
    max_tokens=8192,
    extra_args={
        "ngram_size": 30,
        "window_size": 90,
        "whitelist_token_ids": {128821, 128822},  # <td>, </td> for tables
    },
    skip_special_tokens=False,
)

# Generate output
outputs = llm.generate(model_input, sampling_params)

# Extract the markdown text
markdown_text = outputs[0].outputs[0].text
print(markdown_text)
複数のドキュメントの一括処理
複数のドキュメントを単一のバッチで効率的に処理します。
from vllm import LLM, SamplingParams
from vllm.model_executor.models.deepseek_ocr import NGramPerReqLogitsProcessor
from PIL import Image
from pathlib import Path

def batch_ocr(image_paths: list[str], llm: LLM) -> list[str]:
    """Process multiple images in a single batch."""

    # Load all images
    images = [Image.open(p).convert("RGB") for p in image_paths]

    # Prepare batch input
    prompt = "<image>\nFree OCR."
    model_inputs = [
        {"prompt": prompt, "multi_modal_data": {"image": img}}
        for img in images
    ]

    sampling_params = SamplingParams(
        temperature=0.0,
        max_tokens=8192,
        extra_args={
            "ngram_size": 30,
            "window_size": 90,
            "whitelist_token_ids": {128821, 128822},
        },
        skip_special_tokens=False,
    )

    # Generate all outputs in one call
    outputs = llm.generate(model_inputs, sampling_params)

    return [out.outputs[0].text for out in outputs]


# Usage
llm = LLM(
    model="deepseek-ai/DeepSeek-OCR-2",
    enable_prefix_caching=False,
    mm_processor_cache_gb=0,
    logits_processors=[NGramPerReqLogitsProcessor],
)

image_files = list(Path("documents/").glob("*.png"))
results = batch_ocr([str(f) for f in image_files], llm)

for path, text in zip(image_files, results):
    print(f"--- {path.name} ---")
    print(text[:500])  # First 500 chars
    print()
Transformersを直接使用する
推論プロセスをより細かく制御するには:
import torch
from transformers import AutoModel, AutoTokenizer
from PIL import Image

# Set GPU
device = "cuda:0"

# Load model and tokenizer
model_name = "deepseek-ai/DeepSeek-OCR-2"
tokenizer = AutoTokenizer.from_pretrained(model_name, trust_remote_code=True)
model = AutoModel.from_pretrained(
    model_name,
    _attn_implementation="flash_attention_2",
    trust_remote_code=True,
    use_safetensors=True,
)
model = model.eval().to(device).to(torch.bfloat16)

# Load and preprocess image
image = Image.open("document.png").convert("RGB")

# Different prompts for different tasks
prompts = {
    "ocr": "<image>\nFree OCR.",
    "markdown": "<image>\n<|grounding|>Convert the document to markdown.",
    "table": "<image>\nExtract all tables as markdown.",
    "math": "<image>\nExtract mathematical expressions as LaTeX.",
}

# Process with your chosen prompt
prompt = prompts["markdown"]
inputs = tokenizer(prompt, return_tensors="pt").to(device)

# Add image to inputs (model-specific preprocessing)
with torch.no_grad():
    outputs = model.generate(
        **inputs,
        images=[image],
        max_new_tokens=4096,
        do_sample=False,
    )

result = tokenizer.decode(outputs[0], skip_special_tokens=True)
print(result)
高スループットのための非同期処理
import asyncio
from vllm import AsyncLLMEngine, AsyncEngineArgs, SamplingParams
from vllm.model_executor.models.deepseek_ocr import NGramPerReqLogitsProcessor
from PIL import Image

async def process_document(engine, image_path: str, request_id: str):
    """Process a single document asynchronously."""
    image = Image.open(image_path).convert("RGB")

    prompt = "<image>\nFree OCR."
    sampling_params = SamplingParams(
        temperature=0.0,
        max_tokens=8192,
        extra_args={
            "ngram_size": 30,
            "window_size": 90,
            "whitelist_token_ids": {128821, 128822},
        },
    )

    results = []
    async for output in engine.generate(prompt, sampling_params, request_id):
        results.append(output)

    return results[-1].outputs[0].text

async def main():
    # Initialize async engine
    engine_args = AsyncEngineArgs(
        model="deepseek-ai/DeepSeek-OCR-2",
        enable_prefix_caching=False,
        mm_processor_cache_gb=0,
    )
    engine = AsyncLLMEngine.from_engine_args(engine_args)

    # Process multiple documents concurrently
    image_paths = ["doc1.png", "doc2.png", "doc3.png"]
    tasks = [
        process_document(engine, path, f"req_{i}")
        for i, path in enumerate(image_paths)
    ]

    results = await asyncio.gather(*tasks)

    for path, text in zip(image_paths, results):
        print(f"{path}: {len(text)} characters extracted")

asyncio.run(main())
本番環境でのvLLMの使用
OpenAI互換サーバーの起動
DeepSeek-OCR 2をAPIサーバーとしてデプロイします。
vllm serve deepseek-ai/DeepSeek-OCR-2 \
    --host 0.0.0.0 \
    --port 8000 \
    --logits_processors vllm.model_executor.models.deepseek_ocr:NGramPerReqLogitsProcessor \
    --no-enable-prefix-caching \
    --mm-processor-cache-gb 0 \
    --max-model-len 16384 \
    --gpu-memory-utilization 0.9
OpenAI SDKを使用したサーバー呼び出し
from openai import OpenAI
import base64

# Initialize client pointing to local server
client = OpenAI(
    api_key="EMPTY",  # Not required for local server
    base_url="http://localhost:8000/v1",
    timeout=3600,
)

def encode_image(image_path: str) -> str:
    """Encode image to base64."""
    with open(image_path, "rb") as f:
        return base64.b64encode(f.read()).decode("utf-8")

def ocr_document(image_path: str) -> str:
    """Extract text from document using OCR API."""
    base64_image = encode_image(image_path)

    response = client.chat.completions.create(
        model="deepseek-ai/DeepSeek-OCR-2",
        messages=[
            {
                "role": "user",
                "content": [
                    {
                        "type": "image_url",
                        "image_url": {
                            "url": f"data:image/png;base64,{base64_image}"
                        }
                    },
                    {
                        "type": "text",
                        "text": "Free OCR."
                    }
                ]
            }
        ],
        max_tokens=8192,
        temperature=0.0,
        extra_body={
            "skip_special_tokens": False,
            "vllm_xargs": {
                "ngram_size": 30,
                "window_size": 90,
                "whitelist_token_ids": [128821, 128822],
            },
        },
    )

    return response.choices[0].message.content

# Usage
result = ocr_document("invoice.png")
print(result)
URLでの使用
response = client.chat.completions.create(
    model="deepseek-ai/DeepSeek-OCR-2",
    messages=[
        {
            "role": "user",
            "content": [
                {
                    "type": "image_url",
                    "image_url": {
                        "url": "https://example.com/document.png"
                    }
                },
                {
                    "type": "text",
                    "text": "Free OCR."
                }
            ]
        }
    ],
    max_tokens=8192,
    temperature=0.0,
)
Apidogでのテスト
OCR APIを効果的にテストするには、入力ドキュメントと抽出された出力の両方を視覚化する必要があります。Apidogは、DeepSeek-OCR 2を試すための直感的なインターフェースを提供します。

OCRエンドポイントのセットアップ
ステップ1:新しいリクエストの作成
- Apidogを開き、新しいプロジェクトを作成します。
http://localhost:8000/v1/chat/completionsにPOSTリクエストを追加します。
ステップ2:ヘッダーの設定
Content-Type: application/json
ステップ3:リクエストボディの設定
{
  "model": "deepseek-ai/DeepSeek-OCR-2",
  "messages": [
    {
      "role": "user",
      "content": [
        {
          "type": "image_url",
          "image_url": {
            "url": "data:image/png;base64,{{base64_image}}"
          }
        },
        {
          "type": "text",
          "text": "Free OCR."
        }
      ]
    }
  ],
  "max_tokens": 8192,
  "temperature": 0,
  "extra_body": {
    "skip_special_tokens": false,
    "vllm_xargs": {
      "ngram_size": 30,
      "window_size": 90,
      "whitelist_token_ids": [128821, 128822]
    }
  }
}
異なるドキュメントタイプのテスト
一般的なドキュメントタイプ用に保存されたリクエストを作成します。
- 請求書抽出 - 構造化データ抽出をテストします。
- 学術論文 - LaTeX数式の処理をテストします。
- 手書きメモ - 手書き認識をテストします。
- 多段組レイアウト - 読み取り順序の推論をテストします。
解像度モードの比較
環境変数を設定して、異なるモードを迅速にテストします。
| モード | 解像度 | トークン | ユースケース |
|---|---|---|---|
tiny | 512×512 | 64 | クイックプレビュー |
small | 640×640 | 100 | シンプルなドキュメント |
base | 1024×1024 | 256 | 標準的なドキュメント |
large | 1280×1280 | 400 | 密なテキスト |
gundam | 動的 | 可変 | 複雑なレイアウト |

解像度モードと圧縮
DeepSeek-OCR 2は5つの解像度モードをサポートしており、それぞれ異なるユースケースに最適化されています。
Tinyモード(64トークン)
最適な用途:高速なテキスト検出、シンプルなフォーム、低解像度入力
# Configure for tiny mode
os.environ["DEEPSEEK_OCR_MODE"] = "tiny"  # 512×512
Smallモード(100トークン)
最適な用途:クリーンなデジタルドキュメント、単段組テキスト
Baseモード(256トークン)- デフォルト
最適な用途:ほとんどの標準的なドキュメント、請求書、手紙
Largeモード(400トークン)
最適な用途:密な学術論文、法的文書
Gundamモード(動的)
最適な用途:複雑な複数ページドキュメントで様々なレイアウトを持つもの
# Gundam mode combines multiple views
# - n × 640×640 local tiles for detail
# - 1 × 1024×1024 global view for structure
適切なモードの選択
def select_mode(document_type: str, page_count: int) -> str:
    """Select optimal resolution mode based on document characteristics."""

    if document_type == "simple_form":
        return "tiny"
    elif document_type == "digital_document" and page_count == 1:
        return "small"
    elif document_type == "academic_paper":
        return "large"
    elif document_type == "mixed_layout" or page_count > 1:
        return "gundam"
    else:
        return "base"  # Default
PDFおよびドキュメントの処理
PDFから画像への変換
import fitz  # PyMuPDF
from PIL import Image
import io

def pdf_to_images(pdf_path: str, dpi: int = 150) -> list[Image.Image]:
    """Convert PDF pages to PIL Images."""
    doc = fitz.open(pdf_path)
    images = []

    for page_num in range(len(doc)):
        page = doc[page_num]
        # Render at specified DPI
        mat = fitz.Matrix(dpi / 72, dpi / 72)
        pix = page.get_pixmap(matrix=mat)

        # Convert to PIL Image
        img_data = pix.tobytes("png")
        img = Image.open(io.BytesIO(img_data))
        images.append(img)

    doc.close()
    return images

# Usage
images = pdf_to_images("report.pdf", dpi=200)
print(f"Extracted {len(images)} pages")
完全なPDF処理パイプライン
from vllm import LLM, SamplingParams
from vllm.model_executor.models.deepseek_ocr import NGramPerReqLogitsProcessor
from pathlib import Path
import fitz
from PIL import Image
import io

class PDFProcessor:
    def __init__(self, model_name: str = "deepseek-ai/DeepSeek-OCR-2"):
        self.llm = LLM(
            model=model_name,
            enable_prefix_caching=False,
            mm_processor_cache_gb=0,
            logits_processors=[NGramPerReqLogitsProcessor],
        )
        self.sampling_params = SamplingParams(
            temperature=0.0,
            max_tokens=8192,
            extra_args={
                "ngram_size": 30,
                "window_size": 90,
                "whitelist_token_ids": {128821, 128822},
            },
            skip_special_tokens=False,
        )

    def process_pdf(self, pdf_path: str, dpi: int = 150) -> str:
        """Process entire PDF and return combined markdown."""
        doc = fitz.open(pdf_path)
        all_text = []

        for page_num in range(len(doc)):
            # Convert page to image
            page = doc[page_num]
            mat = fitz.Matrix(dpi / 72, dpi / 72)
            pix = page.get_pixmap(matrix=mat)
            img = Image.open(io.BytesIO(pix.tobytes("png")))

            # OCR the page
            prompt = "<image>\nFree OCR."
            model_input = [{
                "prompt": prompt,
                "multi_modal_data": {"image": img}
            }]

            output = self.llm.generate(model_input, self.sampling_params)
            page_text = output[0].outputs[0].text

            all_text.append(f"## Page {page_num + 1}\n\n{page_text}")

        doc.close()
        return "\n\n---\n\n".join(all_text)

# Usage
processor = PDFProcessor()
markdown = processor.process_pdf("annual_report.pdf")

# Save to file
Path("output.md").write_text(markdown)
ベンチマーク性能
精度ベンチマーク
| ベンチマーク | DeepSeek-OCR 2 | GOT-OCR2.0 | MinerU2.0 |
|---|---|---|---|
| OmniDocBench | 94.2% | 91.8% | 89.5% |
| 1ページあたりのトークン数 | 100-256 | 256 | 6,000+ |
| Fox(10倍圧縮) | 97% | – | – |
| Fox(20倍圧縮) | 60% | – | – |
スループット性能
| ハードウェア | 1日あたりのページ数 | 1時間あたりのページ数 |
|---|---|---|
| A100-40G(シングル) | 200,000+ | 約8,300 |
| A100-40G × 20 | 33M+ | 約1.4M |
| RTX 4090 | 約80,000 | 約3,300 |
| RTX 3090 | 約50,000 | 約2,100 |
ドキュメントタイプ別の実測精度
| ドキュメントタイプ | 精度 | 注記 |
|---|---|---|
| デジタルPDF | 98%+ | 最高の性能 |
| スキャンされたドキュメント | 95%+ | 良質なスキャン |
| 財務報告書 | 92% | 複雑なテーブル |
| 手書きメモ | 85% | 判読性による |
| 歴史的文書 | 80% | 品質劣化 |
ベストプラクティスと最適化
画像の前処理
from PIL import Image, ImageEnhance, ImageFilter

def preprocess_document(image: Image.Image) -> Image.Image:
    """Preprocess document image for optimal OCR."""

    # Convert to RGB if necessary
    if image.mode != "RGB":
        image = image.convert("RGB")

    # Resize if too small (minimum 512px on shortest side)
    min_dim = min(image.size)
    if min_dim < 512:
        scale = 512 / min_dim
        new_size = (int(image.width * scale), int(image.height * scale))
        image = image.resize(new_size, Image.Resampling.LANCZOS)

    # Enhance contrast for scanned documents
    enhancer = ImageEnhance.Contrast(image)
    image = enhancer.enhance(1.2)

    # Sharpen slightly
    image = image.filter(ImageFilter.SHARPEN)

    return image
プロンプトエンジニアリング
# Different prompts for different tasks
PROMPTS = {
    # Standard OCR - fastest, good for most cases
    "ocr": "<image>\nFree OCR.",

    # Markdown conversion - better structure preservation
    "markdown": "<image>\n<|grounding|>Convert the document to markdown.",

    # Table extraction - optimized for tabular data
    "table": "<image>\nExtract all tables in markdown format.",

    # Math extraction - for academic/scientific documents
    "math": "<image>\nExtract all text and mathematical expressions. Use LaTeX for math.",

    # Specific fields - for form extraction
    "fields": "<image>\nExtract the following fields: name, date, amount, signature.",
}
メモリの最適化
# For limited GPU memory
llm = LLM(
    model="deepseek-ai/DeepSeek-OCR-2",
    gpu_memory_utilization=0.8,  # Leave headroom
    max_model_len=8192,  # Reduce max context
    enable_chunked_prefill=True,  # Better memory efficiency
)
バッチ処理戦略
def optimal_batch_size(gpu_memory_gb: int, avg_image_size: tuple) -> int:
    """Calculate optimal batch size based on GPU memory."""

    # Approximate memory per image (in GB)
    pixels = avg_image_size[0] * avg_image_size[1]
    mem_per_image = (pixels * 4) / (1024**3)  # 4 bytes per pixel

    # Reserve 60% of GPU memory for model
    available = gpu_memory_gb * 0.4

    return max(1, int(available / mem_per_image))

# Example: A100-40G with 1024x1024 images
batch_size = optimal_batch_size(40, (1024, 1024))
print(f"Recommended batch size: {batch_size}")  # ~10
一般的な問題のトラブルシューティング
メモリ不足エラー
問題: CUDA out of memory
解決策:
# 1. Reduce batch size
sampling_params = SamplingParams(max_tokens=4096)  # Reduce from 8192

# 2. Use smaller resolution mode
os.environ["DEEPSEEK_OCR_MODE"] = "small"

# 3. Enable memory optimization
llm = LLM(
    model="deepseek-ai/DeepSeek-OCR-2",
    gpu_memory_utilization=0.7,
    enforce_eager=True,  # Disable CUDA graphs
)
不十分なテーブル抽出
問題: テーブルのずれやセルの欠落
解決策:
# Ensure whitelist tokens are set
sampling_params = SamplingParams(
    extra_args={
        "whitelist_token_ids": {128821, 128822},  # Critical for tables
    },
)

# Use higher resolution
os.environ["DEEPSEEK_OCR_MODE"] = "large"
推論速度の低下
問題: 処理に時間がかかりすぎる
解決策:
- Transformersの代わりにvLLMを使用する(2~3倍高速)
- Flash Attention 2を有効にする
- シーケンシャルではなくバッチ処理を使用する
- テンソルコアを備えたGPU(A100、H100)にデプロイする
判読不能な出力
問題: 出力に意味不明な文字や繰り返し文字が含まれている
解決策:
# Ensure logits processor is enabled
from vllm.model_executor.models.deepseek_ocr import NGramPerReqLogitsProcessor

llm = LLM(
    model="deepseek-ai/DeepSeek-OCR-2",
    logits_processors=[NGramPerReqLogitsProcessor],  # Required!
)

# Use temperature=0 for deterministic output
sampling_params = SamplingParams(temperature=0.0)
ドキュメントからテキストを抽出する準備はできましたか?Apidogをダウンロードして、視覚的なインターフェースでDeepSeek-OCR 2 APIコールをテストし、このガイドの本番環境パターンを使用して自信を持ってデプロイしてください。