
Most API tests run in a straight line. Call login, call checkout, call the receipt endpoint, assert along the way. That works right up until a step can fail in a way the next step depends on. If login returns a 401, running the checkout request is pointless. Worse, it hides the real failure behind a second, misleading one. What you want is a test that reads the login response, decides whether to keep going, and reports the truth about where things broke.
That decision is conditional logic, and you build it with flow control. This guide shows you how to add if/else branching to an API test scenario in Apidog so a run can branch on a prior response. You will build a real scenario: log in, check the status code, and only proceed to checkout when login actually worked. If you are new to Apidog scenarios, the walkthrough on how to write a test scenario with Apidog covers the linear basics this article builds on. For a definition of the branching pattern itself, the MDN guide to conditional statements is a good primer. You can download Apidog and follow along for free.
What flow control is, and what it is not
In Apidog, automated tests live in the Tests module. The unit you work in is a Test Scenario, which the docs describe as analogous to a Collection in Postman. Inside a scenario you arrange Test Steps: each step is either an individual request or a control-flow element like a branch, a loop, or a delay.
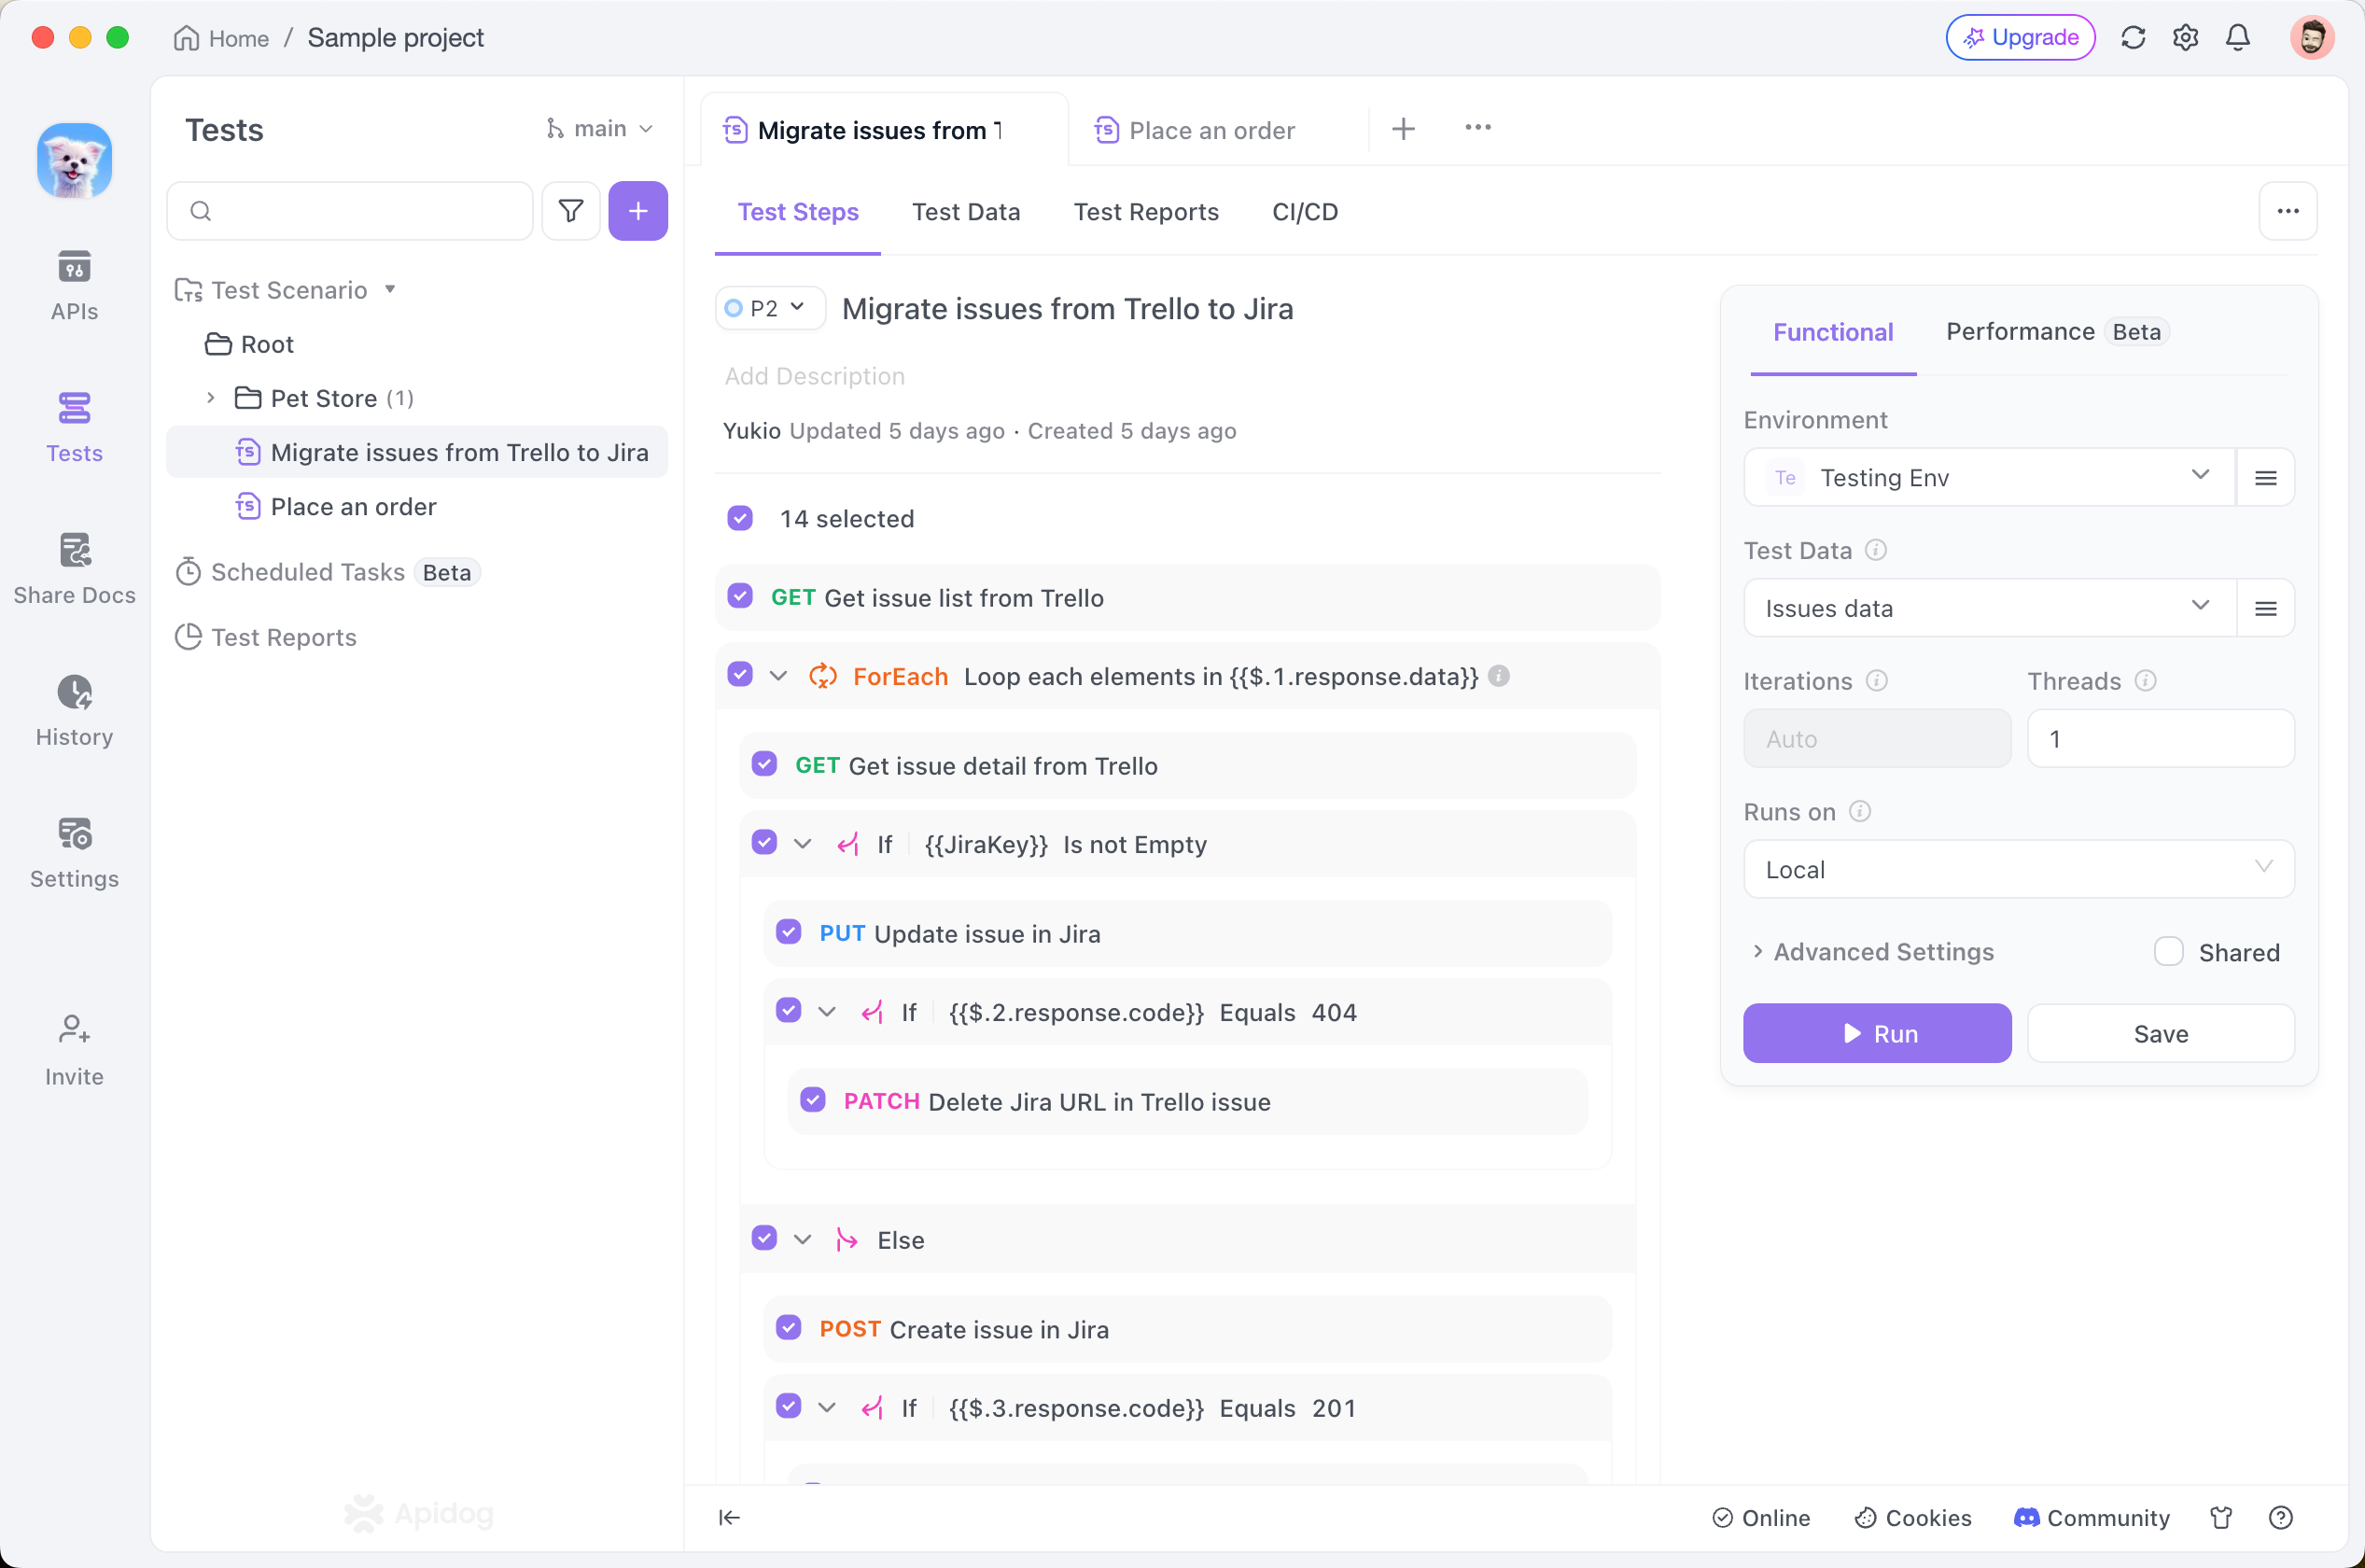
Flow control is the set of control-flow elements. It lets a scenario do more than march through requests in order. The Apidog documentation on flow control and conditional branching is the reference behind every label used here. The one this article focuses on is Conditional Branching, which is Apidog’s name for if/else. A branch reads a value you give it, tests that value against a condition, and runs one set of steps when the condition holds and another set when it does not.
One clarification up front, because the two get confused. Branching is not looping. A branch decides once whether a block of steps runs. A loop runs a block many times. Apidog has separate features for iteration, called For Loops and ForEach Loops, and they belong to a different problem: repeating the same request across a range or across the items in an array. If you need to walk an array of order IDs, that is a ForEach loop, covered in the ForEach loop tutorial, not a branch. This guide stays on if/else.
The Apidog docs list no free-versus-paid restriction on flow control, conditional branching, loops, or passing data between steps. There is also no cloud-versus-self-hosted distinction noted for these features. If you can build a scenario, you can add a branch to it.
Build a scenario that branches on the login response
Here is the goal. A user logs in. If the login endpoint returns a 200, the scenario proceeds to create a checkout. If it returns anything else, the scenario stops and reports the failure instead of pretending checkout ran.
Step 1: create the test scenario
Open Apidog and go to the Tests module. Click the + next to the search bar to create a new Test Scenario, pick the directory it should live in, and set a priority to finish creation. You now have an empty scenario ready for steps.
Step 2: add the login request as the first step
Add your first Test Step. Apidog gives you a few ways to bring a request in: import it from an existing endpoint spec, import from a saved endpoint case, add a custom request directly, or add one from a cURL string. For a quick start, add a custom request. Set it to POST and point it at your auth endpoint with a JSON body:
POST https://api.your-store.com/v1/login
Content-Type: application/json

{
  "email": "dana@example.com",
  "password": "correct-horse-battery-staple"
}
Run this step once on its own to confirm it returns what you expect. A good login returns a 200 and a token in the body, something like:
{
  "token": "eyJhbGciOiJIUzI1NiIsInR5cCI6IkpXVCJ9...",
  "userId": "usr_10482"
}
Step 3: enter orchestrate mode
Click any step to enter orchestrate mode. The left panel shows the overall flow of the scenario; the right panel shows the details of whichever step you selected. This split view is where you arrange the branch. If you ever need to reorder steps, drag the ≡ icon on a step to move it.
Step 4: add the conditional branch
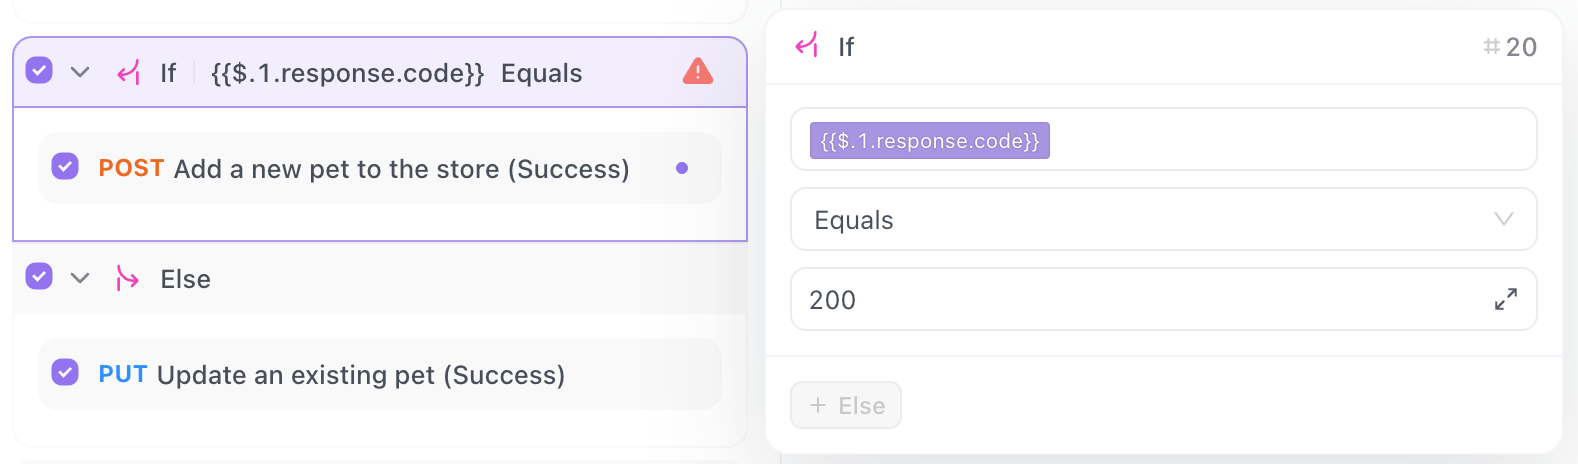
Click the Add Step button. This is the primary way to insert any flow control element. From the menu, choose Conditional Branching. That creates an If statement, an empty branch waiting for a condition and some steps to run.
Now build the condition. You need to feed the login response’s status code into the branch. Apidog builds conditions from a fixed set of judgment operators. The full list is: Equals, Does not equal, Exists, Does not exist, Less than, Less than or equal, Greater than, Greater than or equal, Matches with Regex, Contains, Does not contain, Is empty, Is not Empty, In List, and Not in List.
For this branch, you want the login status code to equal 200. So the condition reads: the login response status Equals 200.
Step 5: reference the prior response in the condition
To get the login result into the condition field, you have two methods.
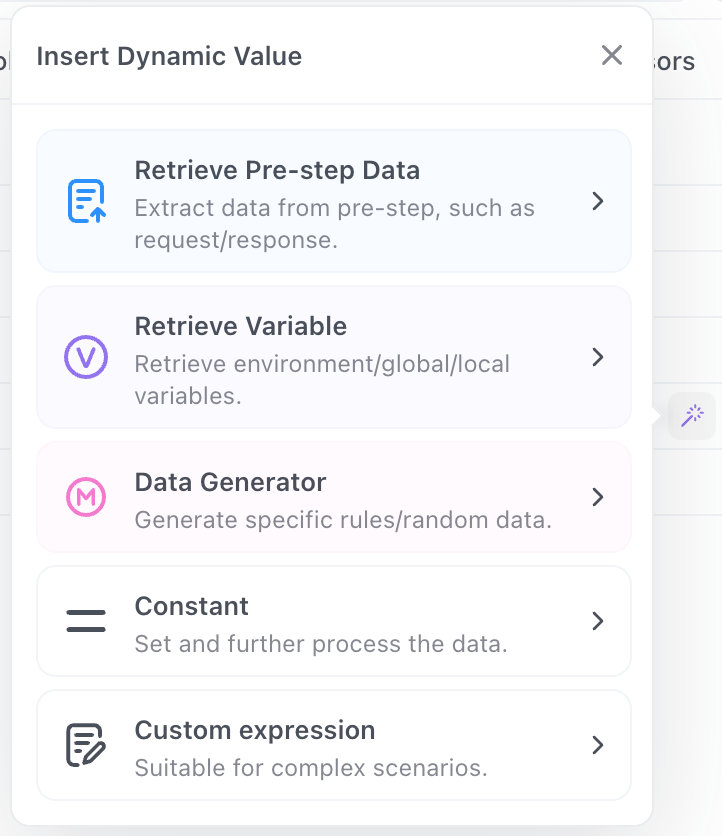
The first method needs no setup. Click into the condition’s value field and click the magic wand icon, then select Retrieve pre-step data. Apidog lets you point directly at the earlier login step and pull a value out of its response. Under the hood this uses a pre-step reference with the syntax {{$.<step id>.response.body.<field path>}}. If you wanted the token from the login body instead of the status, for example, you would reference {{$.1.response.body.token}}, where 1 is the login step’s id.
Two things to know about Retrieve pre-step data. It works only in the Tests module, not in the APIs module. And it resolves only when you run the whole scenario, not when you run a single step in isolation. If a pre-step reference looks empty during a solo run, that is expected; run the full scenario and it fills in.
The second method uses a named variable and works in both the Tests and APIs modules. In the login request, open its post-processors and add an Extract Variable action. Extract the field you care about with a JSONPath expression, say $.token, and Apidog stores it under a name. You then reference it anywhere later as {{token}}. This is the more portable approach when you want the same value available across modules or in several branches. The deeper mechanics of moving values between steps are covered in the guide on how to pass data between test steps.
For the status-code branch, Retrieve pre-step data on the login step’s status is the shortest path.
Step 6: add the else branch
Hover over the If block and click + Else. That gives you the alternate path that runs when the condition is false, meaning login did not return 200.
Now fill both sides:
- Inside the If block, add the checkout request as a Test Step. This is the happy path. It runs only when login returned 200. If checkout needs the login token, reference it here with
{{token}}(if you extracted it) or with a pre-step reference to the login body. A real checkout call often carries a bearer token in theAuthorizationheader, the same pattern the Stripe API docs use for authenticated requests. - Inside the Else block, add a step that makes the failure loud. A common choice is a request to a logging or notification endpoint, or a custom request with an assertion that always fails so the scenario report flags this run clearly.
Your scenario now reads like plain logic: if login equals 200, run checkout; else, report and stop.
Step 7: save
Click Save All to persist the scenario. Unsaved changes show a dot indicator, so if you see that dot, you still have work to write. Run the full scenario and watch the branch resolve. Point the login at valid credentials and the If block fires. Point it at bad credentials and the Else block fires instead.
Variations and advanced flow control
Once the basic branch works, the same building blocks cover a lot of ground.
Branch on a body field, not just the status. Status codes are the common case, but conditions read any value you can reference. Suppose your login returns 200 even for a locked account, with the real state in a status field. Retrieve {{$.1.response.body.status}} and use the Equals operator against "active", or use Contains against a message string. The operator list gives you range checks too: Greater than on a returned balance, In List to test whether a returned role is one of several allowed values.
Combine branching with loops. Branching and iteration compose. Inside a ForEach loop over an array of product IDs, a Conditional Branching step can skip products that are out of stock and process the rest. The loop index reference {{$.<loop step id>.index}} starts at 0, and a ForEach element is {{$.<loop step id>.element.<field path>}}. Loops are their own topic; the ForEach loop tutorial goes into them properly.
Stop a loop early with Break If. When you are iterating, the Break If condition element ends the loop as soon as a condition is met. You can drag it to reposition it and add it more than once in a loop.
Handle errors with On Error. Loops carry an On Error element fixed at the loop start, which you cannot move. Its options decide what happens when a request inside the loop errors: Ignore continues with the next request, Continue skips the rest of the current cycle’s requests, Break execution stops the loop and proceeds after it, and End execution halts the entire scenario.
Add a Wait between steps. Sometimes a downstream service needs a beat before it reflects a write. The Wait element adds a delay measured in milliseconds, useful between a create call and the read that checks it.
Reference values inside scripts. If a branch needs logic too complex for the operator list, a pre-processor or post-processor script can compute it. Inside a script you cannot use the {{variable}} syntax directly. Use pm.variables.get("$.2.response.body.token") instead, matching the step id and field path. For the broader pattern of chaining requests so one feeds the next, see the guide on request chaining and the deeper piece on API test orchestration and passing data.
A note on self-reference: a scenario cannot reference the original test scenario itself. That guard prevents accidental infinite loops when you nest scenarios.
Automate the workflow with the Apidog CLI
The scenario you just built does not have to run only inside the app. Apidog ships a command-line runner that executes saved scenarios headlessly, which is exactly what you want in CI. Install it and sign in:
npm install -g apidog-cli
apidog login --with-token <YOUR_ACCESS_TOKEN>
Then run your branching scenario by id, pointing it at an environment and choosing a reporter:
apidog run --access-token $APIDOG_ACCESS_TOKEN -t <scenario_id> -e <env_id> -r cli
Here -t is the test scenario id, -e is the environment id, and -r is the reporter. Use cli for console output, or html and junit for artifacts your pipeline can publish; comma-separate them like -r html,cli to emit several at once. The branch resolves the same way it does in the app: the runner reads the login response, takes the If or Else path, and the exit code reflects the outcome so a failed login fails the build. Full setup lives in the Apidog CLI installation guide, and wiring it into a pipeline is covered in the Apidog CLI GitHub Actions guide. If you would rather run the same scenario on a timer than on every commit, see how to schedule API tests in Apidog.
FAQ
What is the difference between Conditional Branching and a loop in Apidog?
Conditional Branching decides once whether a block of steps runs, based on a condition. A loop runs a block repeatedly. Use a branch when you have an either/or decision, like proceed to checkout only if login succeeded. Use a For or ForEach loop when you need to repeat a request across a count or an array. The ForEach loop tutorial covers iteration in full.
Why is my Retrieve pre-step data reference coming back empty?
Two common causes. First, Retrieve pre-step data works only in the Tests module, not the APIs module. Second, it resolves only when you run the entire test scenario. If you run a single step in isolation, the reference has nothing to point at yet. Run the whole scenario and the value fills in.
Can I branch on a field inside the response body, not just the status code?
Yes. Reference the field with a pre-step expression like {{$.1.response.body.status}} or extract it into a named variable, then pick an operator such as Equals, Contains, or In List. Any value you can reference can drive a condition. Moving those values around is covered in how to pass data between test steps.
How do I use a variable inside a script instead of a condition builder?
Scripts do not accept the {{variable}} syntax. Use pm.variables.get("$.2.response.body.token") in a pre- or post-processor script, matching the step id and the field path you want.
Does branching cost extra, or require the self-hosted version?
The Apidog docs list no plan restriction for flow control, conditional branching, loops, or data passing, and no cloud-versus-self-hosted distinction for these features. If you can build a scenario, you can add branches to it.
Wrapping up
A linear test tells you something broke. A branching test tells you where, and stops wasting steps on a path that can no longer succeed. Add a Conditional Branching step, feed it a prior response with Retrieve pre-step data or an extracted variable, wire up the If and the + Else, and your scenario now makes decisions the way your real API does. When it works in the app, one apidog run command carries the same logic into CI. Try Apidog free, no credit card required, and turn your straight-line tests into scenarios that think.