

Gemini Decisions APIを使うには、Google AI Studioでキーを取得し、google-genai 3.2以降をインストールして、モデルgemini-decision-1、共通のinput、型付きquestions(noul、choice、score)のマップを指定してclient.decisions.create()を呼び出します。すべての質問に対して較正済みの確率とconfidenceが返され、出力トークンはゼロです。
以下では、最初のyes/no質問からconfidenceによるルーティング、CIテストスイートまで、Python・JavaScript・RESTでの各ステップを解説します。
Gemini Decisions APIとは?
Gemini Decisions APIは、Gemini Developer API(v1beta)のエンドポイントで、テキストを生成する代わりに選択肢が閉じた質問に答えます。1つのマルチモーダル入力と、最大1,000個の独立した質問を送信できます。モデルgemini-decision-1は1回のフォワードパスですべての選択肢をスコアリングし、コードが直接分岐処理に使える較正済みの確率を返します。
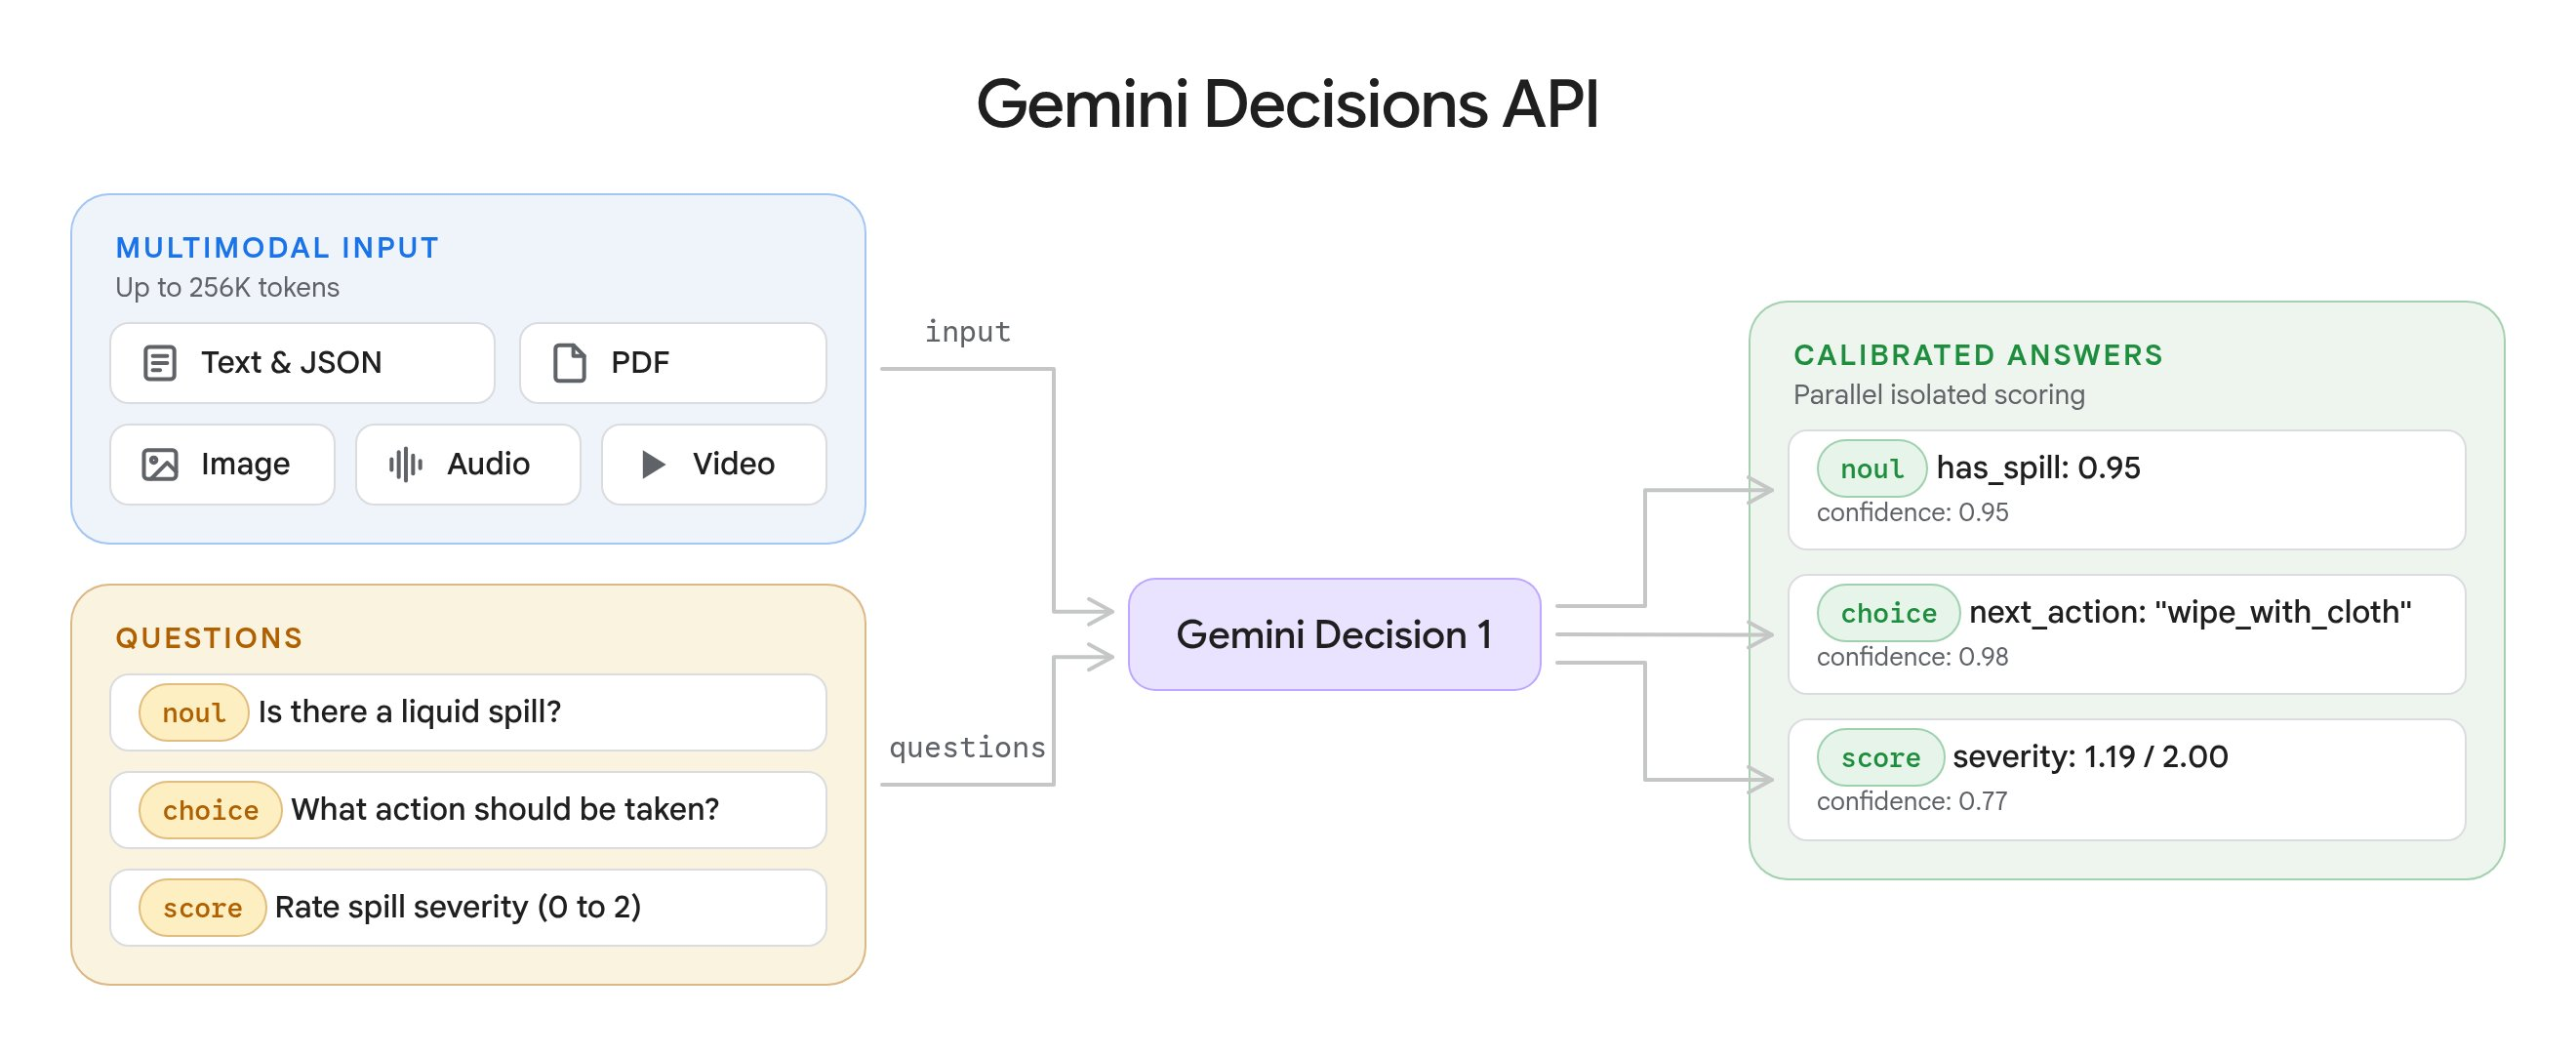
Googleは2026年11月11日にこれを発表しました。公式ドキュメントでは3つの質問タイプが定義されています:
| 質問タイプ | 用途 | 戻り値 |
|---|---|---|
noul |
ステートメントが成立するかを確認(yes/no) | noul(0.01〜0.99)、confidence |
choice |
2〜255個の選択肢から1つを選ぶ | choice、probabilities、confidence |
score |
2〜255段階の順序付きレベルで評価する | score、probabilities、legend、confidence |
価格はGemini APIの料金ページによると、入力トークンが100万トークンあたり$0.10、出力は無料です。共有入力は、質問の数に関係なくリクエストごとに1回だけ課金されます。すでにOpenAI Decisions APIの使い方ガイドを読んだことがあれば、構成は似ていると感じるでしょうが、以下のフィールドはGemini独自のものです。
ステップ1:APIキーの取得とSDKのインストール
- Google AI Studioを開き、APIキーを作成します。
- エクスポートします:
export GEMINI_API_KEY="your-key"。 - SDK 3.2以降をインストールします:
pip install -U google-genaiまたはnpm install @google/genai@latest。
コードを書く前に、実行可能なコードをエクスポートできるDecisions Playgroundで質問を試すこともできます。
無料枠(2026年11月12日時点の確認):レート制限ページによると、無料枠では毎分200リクエスト、毎分50,000トークン、1日10,000リクエストです。入力は無料ですが、料金ページでは無料枠のデータが「当社製品の改善に使用されます:はい」と記載されているため、実際の顧客データは有料枠で処理してください。Googleの無料枠の詳細については、Gemini API無料枠ガイドを参照してください。
| ティア | RPM | TPM | RPD |
|---|---|---|---|
| Free | 200 | 50,000 | 10,000 |
| Tier 1 | 1,500 | 1,000,000 | 50,000 |
| Tier 2 | 5,000 | 4,000,000 | 無制限 |
| Tier 3 | 15,000 | 10,000,000 | 無制限 |
ステップ2:最初のnoul(yes/no)質問を送る
noul質問は、答えがyesである確率を返します。v1betaというAPIバージョンに注意してください。このエンドポイントはv1にはありません。
Python:
from google import genai

client = genai.Client(http_options={"api_version": "v1beta"})

result = client.decisions.create(
    model="gemini-decision-1",
    input="The blue mug I ordered on Monday arrived cracked on Wednesday.",
    questions={
        "is_damaged": {
            "type": "noul",
            "instructions": "Did the item arrive damaged?",
        },
    },
)

answer = result.answers["is_damaged"]
print(f"P(yes)={answer.noul:.2f} confidence={answer.confidence:.2f}")
JavaScript:
import { GoogleGenAI } from "@google/genai";

const ai = new GoogleGenAI({ apiVersion: "v1beta" });

const result = await ai.decisions.create({
  model: "gemini-decision-1",
  input: "The blue mug I ordered on Monday arrived cracked on Wednesday.",
  questions: {
    is_damaged: { type: "noul", instructions: "Did the item arrive damaged?" },
  },
});

const answer = result.answers?.is_damaged;
if (answer?.type === "noul") console.log(answer.noul, answer.confidence);
REST:
curl -X POST "https://generativelanguage.googleapis.com/v1beta/decisions" \
  -H "x-goog-api-key: $GEMINI_API_KEY" \
  -H "Content-Type: application/json" \
  -d '{
    "model": "gemini-decision-1",
    "input": "The blue mug I ordered on Monday arrived cracked on Wednesday.",
    "questions": {
      "is_damaged": { "type": "noul", "instructions": "Did the item arrive damaged?" }
    }
  }'
Googleのドキュメントに掲載されているレスポンス例はこちらです(当社の実行結果ではなく、ドキュメントからのサンプルです):
{
  "answers": { "is_damaged": { "type": "noul", "noul": 0.99, "confidence": 0.99 } },
  "usage": { "total_input_tokens": 100, "total_output_tokens": 0, "total_tokens": 100 }
}
「yes」の意味が曖昧な場合は、true_descriptionとfalse_descriptionを含むcriteriaを追加します。覚えておくべきルールが1つあります:noulの値は常に0.01〜0.99の範囲に収まるため、0.99を超える閾値は決して一致しません。
ステップ3:choice質問とscore質問を追加する
同じ入力に関する独立した質問は、1つのリクエストにまとめられます。入力は1回だけ課金され、各質問は自分自身のトークンのみを消費します。
result = client.decisions.create(
    model="gemini-decision-1",
    input="I was charged twice for my order and the export page crashes in Safari.",
    questions={
        "department": {
            "type": "choice",
            "instructions": "Which department should handle this request?",
            "criteria": {
                "billing": "Payments, invoices, and refunds.",
                "technical": "Problems using the product.",
                "shipping": "Delivery and tracking.",
                "other": "Anything outside these categories.",
            },
        },
        "severity": {
            "type": "score",
            "instructions": "How severe is this issue for the user?",
            "criteria": [
                "Cosmetic: appearance only, no lost functionality.",
                "Workaround available: a task fails, but another way works.",
                "Fully blocked: a task fails with no workaround.",
            ],
        },
    },
)
ドキュメントで人々を混乱させる3つの詳細があります:
- 選択肢のキーはアルファベット順にソートされてからスコアリングされます。キャッチオールには
none_of_the_aboveではなくotherを使ってください。実際の選択肢より先にソートされてしまいます。 - scoreのcriteriaはリストです。最小から最大の順に並べ、インデックスは0から始まります。返される
scoreは確率加重平均なので、レベルの間の値になることもあります(ドキュメントでは1.12が示されています)。 - モデルは質問のキーを一切見ません。完全な質問を
instructionsに書いてください。
scoreから離散的なレベルを取得するには、最も確率の高いエントリを取ります:
sev = result.answers["severity"]
level = max(sev.probabilities, key=sev.probabilities.get)
print(sev.legend[level])
ステップ4:画像・PDF・音声を送る
inputには、文字列、1つのコンテンツブロック、またはブロックのリストを渡せます。形式はInteractions APIと同じブロック形式です。対応するブロックはtext、image、audio、video、document(PDFのみ)です。
import base64

with open("earcup.jpg", "rb") as f:
    image_b64 = base64.b64encode(f.read()).decode("utf-8")
with open("return-form.pdf", "rb") as f:
    pdf_b64 = base64.b64encode(f.read()).decode("utf-8")

result = client.decisions.create(
    model="gemini-decision-1",
    input=[
        {"type": "text", "text": "Customer photo and form for return #8821.\n"},
        {"type": "image", "data": image_b64, "mime_type": "image/jpeg", "resolution": "low"},
        {"type": "document", "data": pdf_b64, "mime_type": "application/pdf"},
    ],
    questions={
        "visible_damage": {
            "type": "noul",
            "instructions": "Does the photo show physical damage to the device? Ignore the packaging.",
        },
        "form_signed": {
            "type": "noul",
            "instructions": "Is the return form in the PDF signed by the customer?",
        },
    },
)
音声の場合は、{"type": "audio", "uri": "<https-url>", "mime_type": "audio/mp3"}のようなブロックを渡します。知っておくべき制限:
- インラインbase64データは1リクエストあたり100MB(PDFは50MB)まで。外部URLは1つあたり15MBまでです。
- 実際のMIMEタイプを指定してください。APIは
application/octet-streamを拒否します。 - YouTube URLや
gs://URIはサポートされていません。Files API、公開または署名付きHTTPS URL、インラインバイトを使ってください。 resolution(low、medium、high、ultra_high)は、視覚的な詳細とトークン数をトレードオフします。ultra_highは画像のみです。
ステップ5:確率とconfidenceを読み取る
すべての回答には0から1の範囲のconfidence、つまりトップの回答が正しいと推定される確率が含まれています。choiceとscoreでは、トップの結果の確率と等しくなります。noulでは、max(noul, 1 - noul)になります。
つまり、0.03のnoulは0.97のconfidenceを持ちます。モデルは答えがnoであると確信しているのです。
ステップ6:confidenceの低い回答をフォールバックに振り分ける
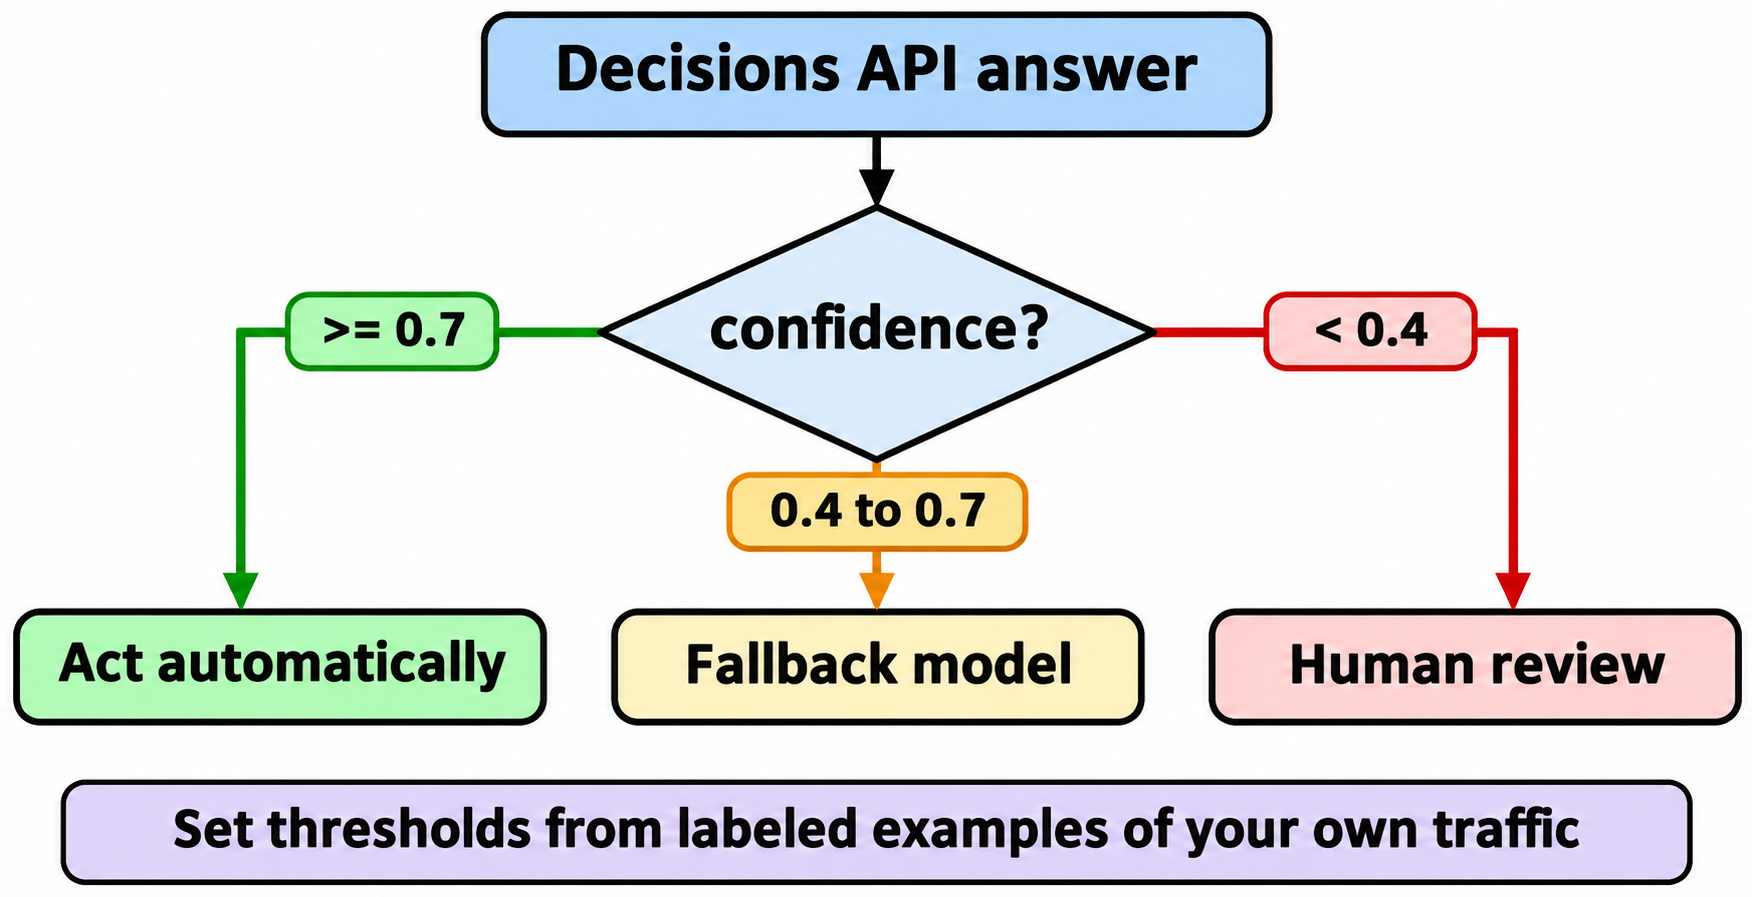
値を使ってアクションを選び、confidenceを使って自動的に実行するかどうかを決めます:
a = result.answers
dept = a["department"]

if dept.confidence >= 0.7 and dept.choice != "other":
    route_to(dept.choice)
elif dept.confidence >= 0.4:
    route_to_fallback_model(ticket)   # a bigger model reasons it out
else:
    route_to("human_review")
0.7と0.4という閾値はプレースホルダーです。Googleは、自分のトラフィックのラベル付きサンプルから閾値を設定することを推奨しています。ドキュメントからの2つの追加ルール:
- choice質問は、どの選択肢も当てはまらない場合でも、確率を提供した選択肢に分割します。「このメッセージは注文に関するものですか?」のようなスコープチェックを組み合わせてください。
- 入力は信頼できないものとして扱ってください。ユーザーのメッセージは、自分自身の分類について主張することがあります。支払いなどの高リスクなアクションには、人間のレビューか二次チェックを維持してください。
ステップ7:Apidog CLIでコーディングエージェントにテストさせる
ルーティング層は静かに壊れます。誰かが基準を書き換え、チケットの半分でbillingがtechnicalになっても、何もエラーを出しません。解決策は、期待される判断を固定する回帰テストスイートです。コーディングエージェントがApidog CLIを使ってそれを構築し、あなたはレビューするだけです。
npm install -g apidog-cli@latest
apidog auth login --with-token <YOUR_TOKEN>
npx -y skills add https://apidog.com   # pick your agent when prompted
そして、エージェントに1つのプロンプトを与えます:
In Apidog project <id>, build a test suite for POST
https://generativelanguage.googleapis.com/v1beta/decisions (header x-goog-api-key
from env var GEMINI_API_KEY). Add one request per question type (noul, choice,
score) asserting status 200, confidence between 0 and 1 and zero output tokens.
Add a test data set of 20 tickets with expected departments and assert each
choice matches with confidence >= 0.7. Run it and summarize failures.
エージェントは各ペイロードスキーマを読み取り、検証し、リソースを書き込み、スイートを実行します:
apidog cli-schema get test-scenario-create
apidog cli-schema validate test-scenario-create --file scenario.json
apidog test-scenario create --project <id> --file scenario.json
apidog test-data create --project <id> --file tickets.json
apidog test-suite create --project <id> --file suite.json
apidog run --test-suite <suiteId> --project <id> -e <envId> -d <testDataId> -r cli,junit --out-dir reports
上記のすべてのフラグは、CLI 2.2.12のapidog run --helpから取得しています。これで、フィクスチャの判断を変えてしまうプロンプトや基準の変更は、実行を失敗させます。同じapidog run ... -r cli,junitをGitHub Actionsに組み込めば、JUnitファイルがどのチケットが変化したかを表示します。Apidog CLI CI/CDガイドにワークフローファイルがあり、Claude CodeでのApidog CLIがエージェントのセットアップをカバーしています。ApidogのFreeプランは最大4ユーザーまで利用できます。
制限事項と未対応の機能
Decisions APIの制限(2026年11月12日時点の確認)より:
- 1リクエストあたり1〜1,000個の質問、262,144トークンのコンテキストウィンドウ内。
- コンテキストキャッシュ、Batch API、Flex/Priority推論には非対応。リクエストをまたぐ同一入力は全額課金されます。
- 安全性によるブロックは、回答ではなく
safetyやprohibited_contentのようなerror.codeを伴うHTTP 400を返します。 - Gemini Developer API(
v1beta)のみ。GoogleはVertex AI対応を「近日公開」としていますが、日付は明示されていません。
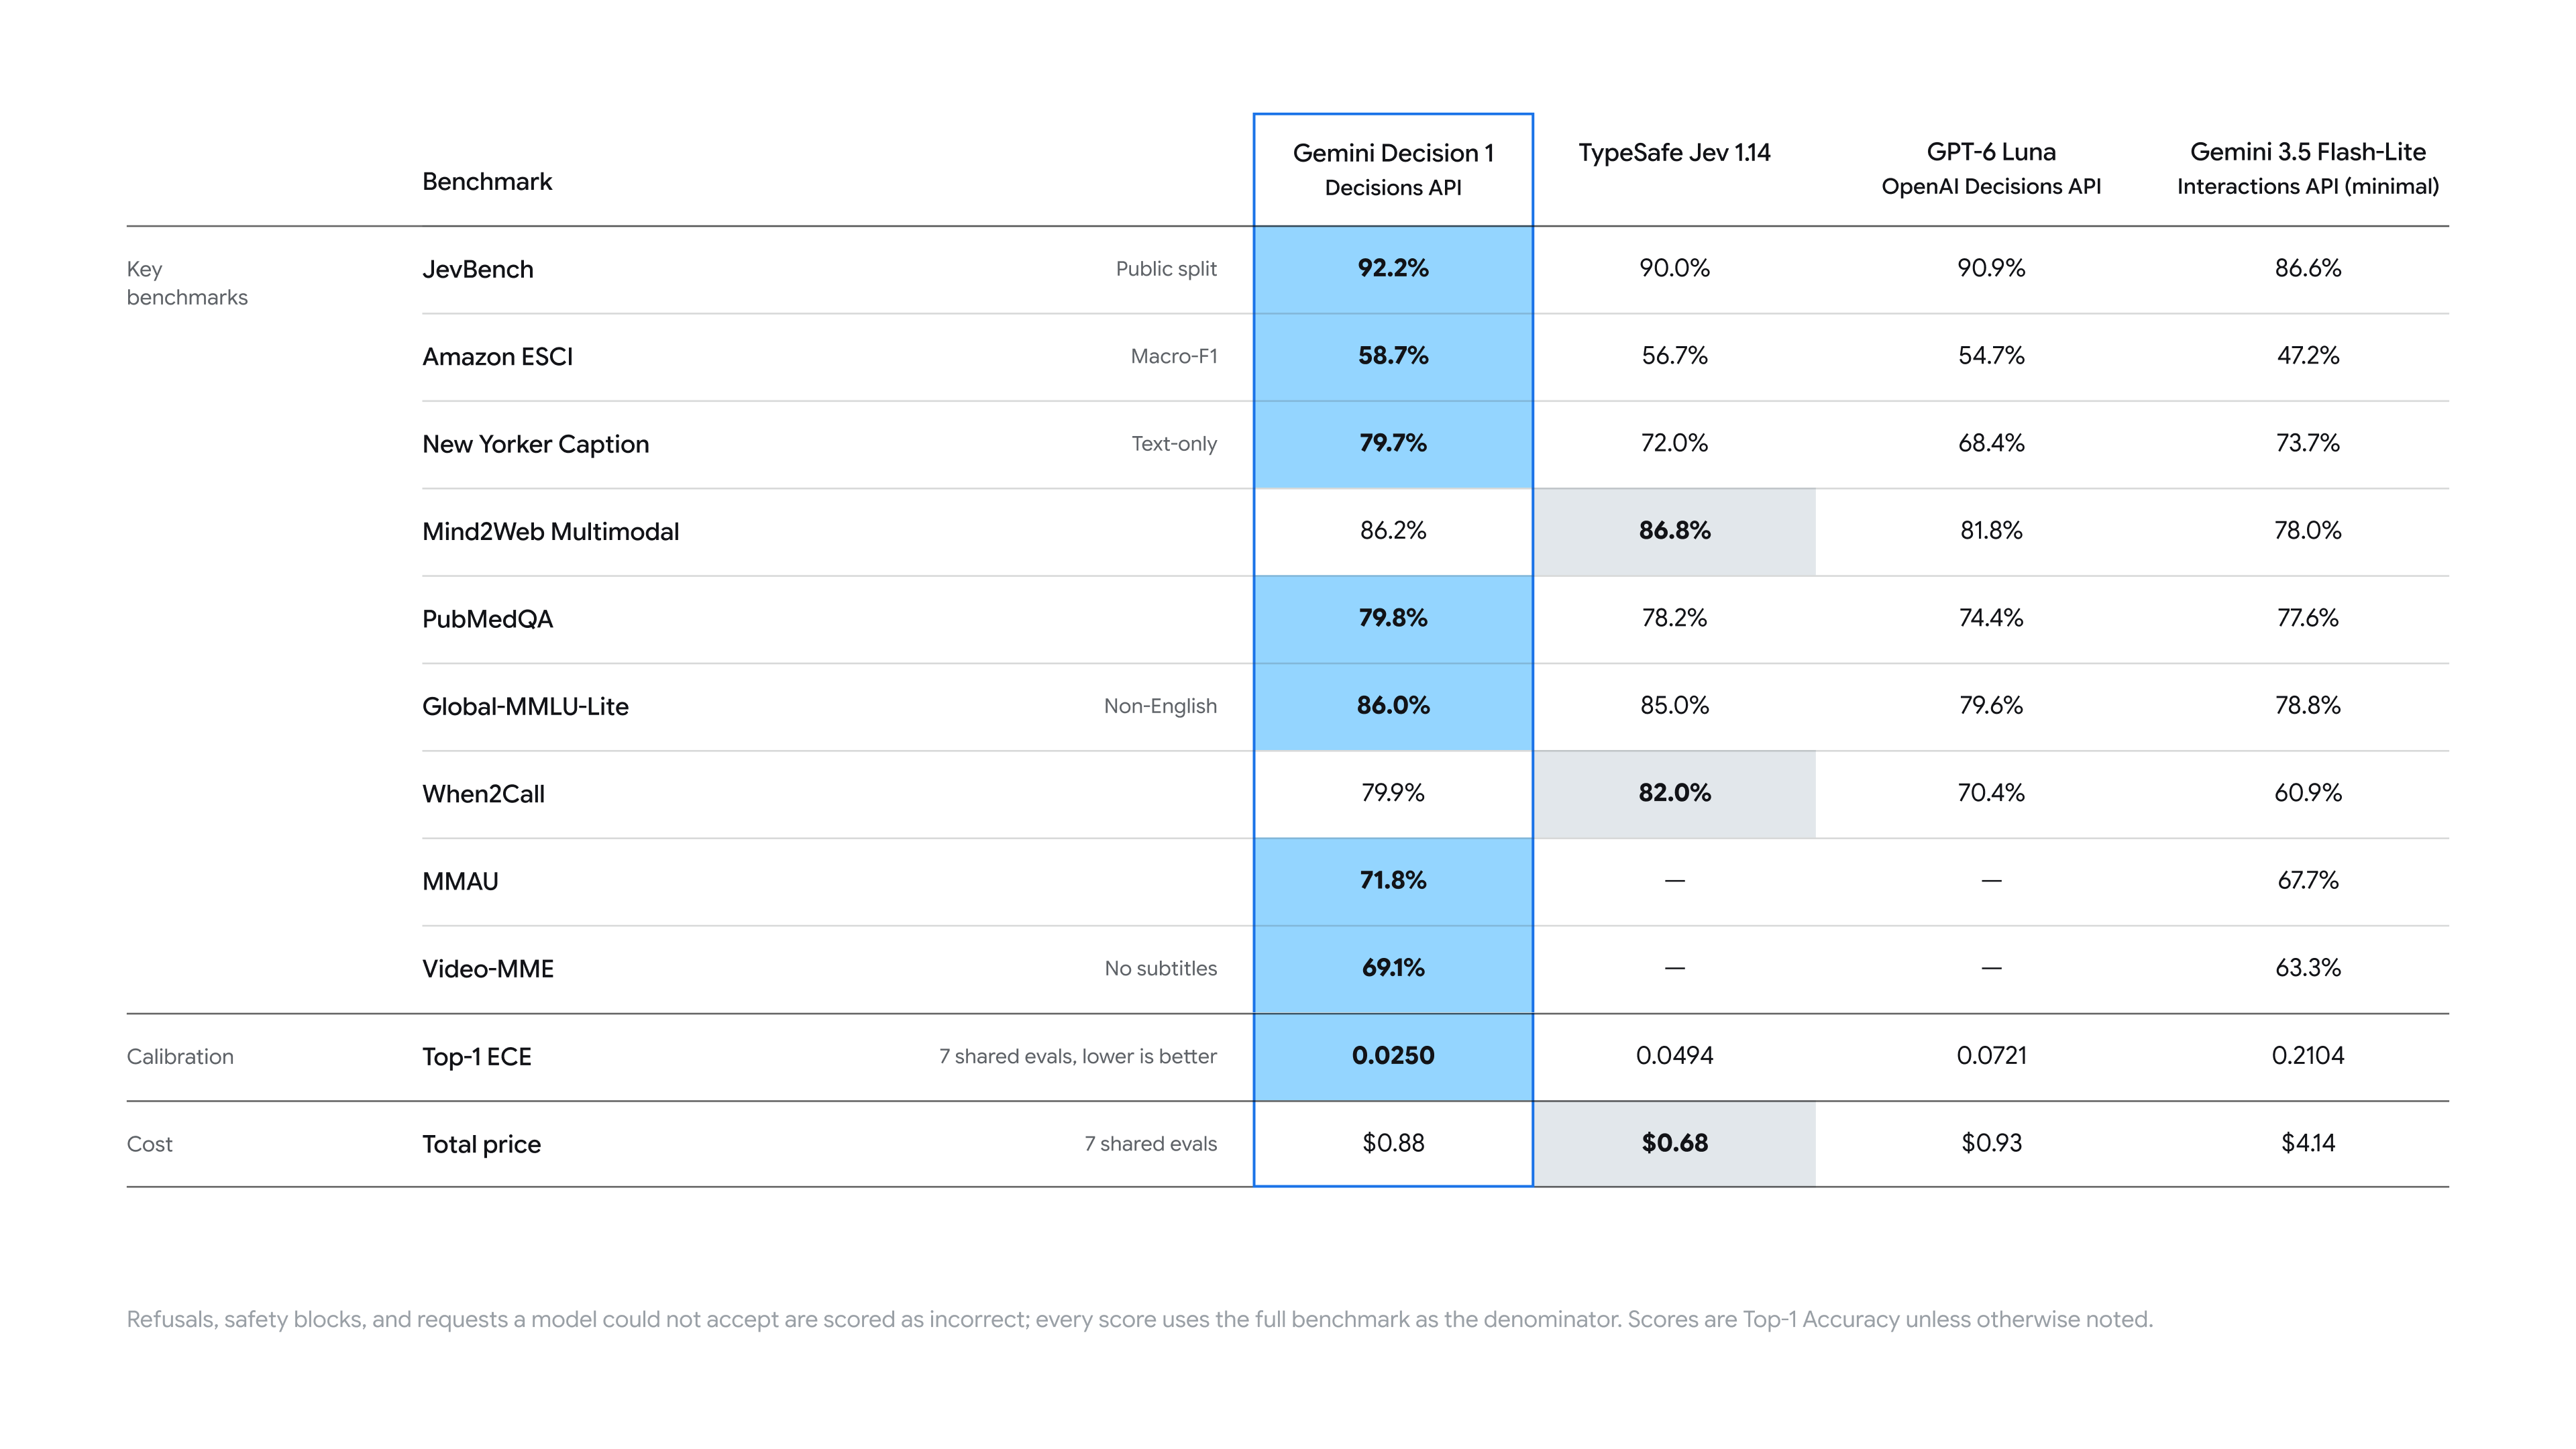
Googleによると、エンドツーエンドのレイテンシは150〜250msで、16Kトークンまでの入力では1〜100個の質問でもほぼ一定です。また、Gemini Decision 1はGoogle自身のベンチマークスイートで最低の較正誤差を記録しているとされています。これらはGoogleの数値です。設計に組み込む前に、自分の入力でレイテンシを計測してください。
FAQ
Gemini Decisions APIは無料ですか? 無料枠があり、入力は無料です。毎分200リクエスト、毎分50,000トークン、1日10,000リクエストまで(2026年11月12日時点の確認)。無料枠のデータはGoogleの製品改善に使用される場合があります。有料枠は入力トークン100万トークンあたり$0.10です。
noulとは何ですか? yes/no質問のタイプです。noulフィールドは答えがyesである確率で、0.01〜0.99の範囲です。
どのAPIバージョンが必要ですか? v1betaです。Pythonではhttp_options={"api_version": "v1beta"}、JavaScriptではapiVersion: "v1beta"を設定するか、RESTでは/v1beta/decisionsを呼び出します。
Vertex AIで使えますか? まだ使えません。Gemini Developer APIのみです。GoogleはGemini in Google Cloudを近日公開としています。
confidenceの閾値はどう選べばいいですか? 数百件の実際の入力にラベルを付け、APIに通して実行し、自動アクションの誤りのコストと人間のレビューのコストが等しくなるカットオフを選んでください。