Gemini 2.5 Pro represents Google's latest advancement in artificial intelligence, showcasing significant improvements in reasoning and coding capabilities. This cutting-edge model offers developers enhanced productivity and streamlined coding workflows directly within their IDE environment. By integrating Gemini 2.5 Pro into Cursor, you'll gain access to more efficient code generation, intelligent suggestions, and improved problem-solving capabilities without any subscription costs.
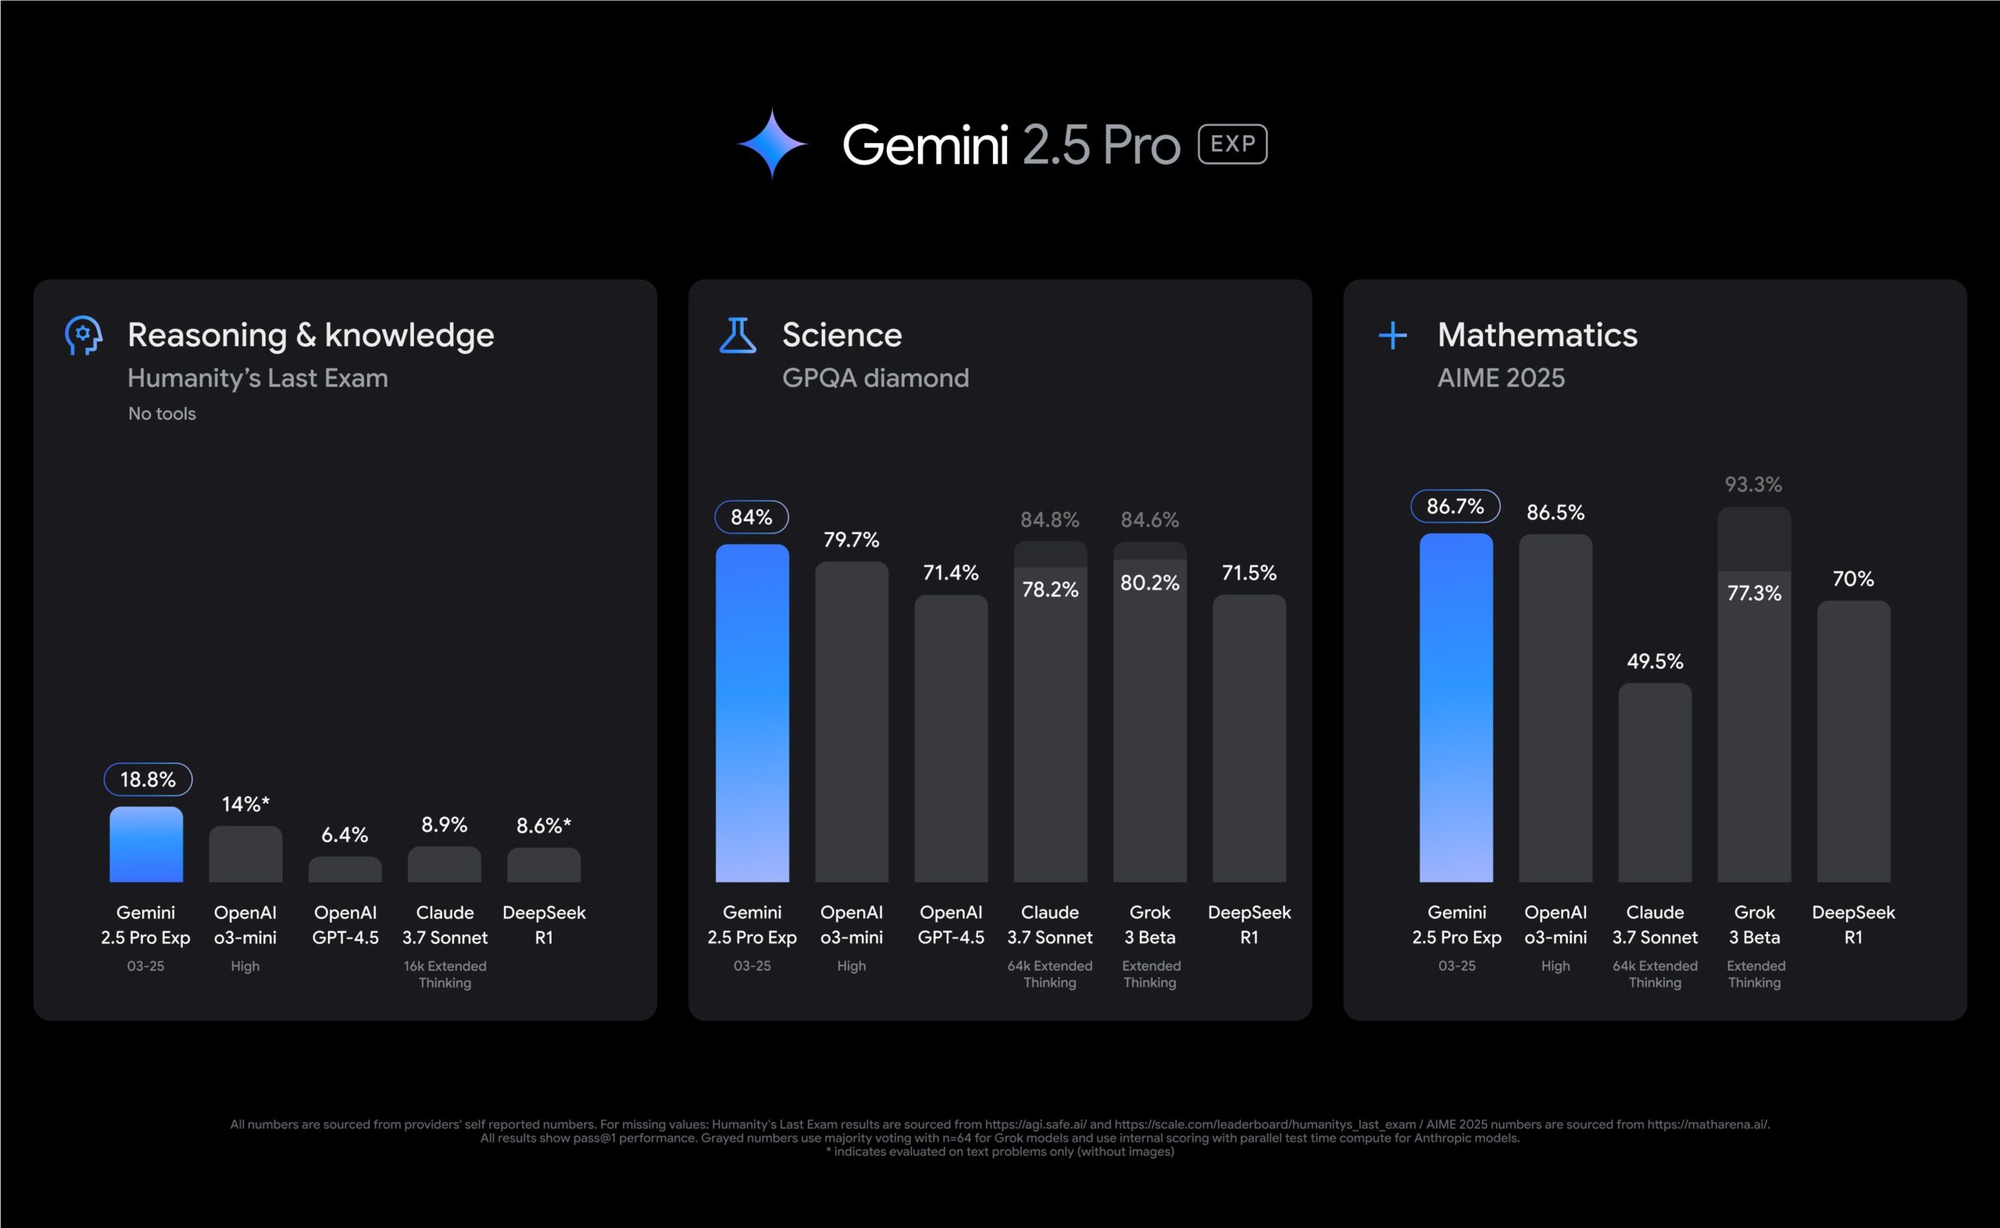
The model excels at understanding complex coding patterns, debugging issues, and providing comprehensive explanations for technical concepts. Unlike previous versions, Gemini 2.5 Pro demonstrates remarkable contextual awareness, allowing it to maintain coherence throughout extended programming sessions. Its ability to parse and generate code across numerous programming languages makes it an invaluable tool for developers working on diverse projects.
While Cursor offers a premium subscription that includes access to various AI models, this tutorial focuses specifically on adding Gemini 2.5 Pro to your Cursor installation without incurring any additional costs. By leveraging Google's free tier API access, you can experience the full capabilities of this advanced model within your preferred development environment.
As a Cursor AI IDE user already leveraging cutting-edge development tools, you'll appreciate Apidog's powerful approach to API development.

This comprehensive Postman alternative unifies API design, testing, documentation, and collaboration in one sleek interface that complements your Cursor workflow.

While Cursor enhances your coding experience with AI-powered assistance, Apidog streamlines your API lifecycle management with features like automated mock servers, intuitive request building, and seamless environment switching.
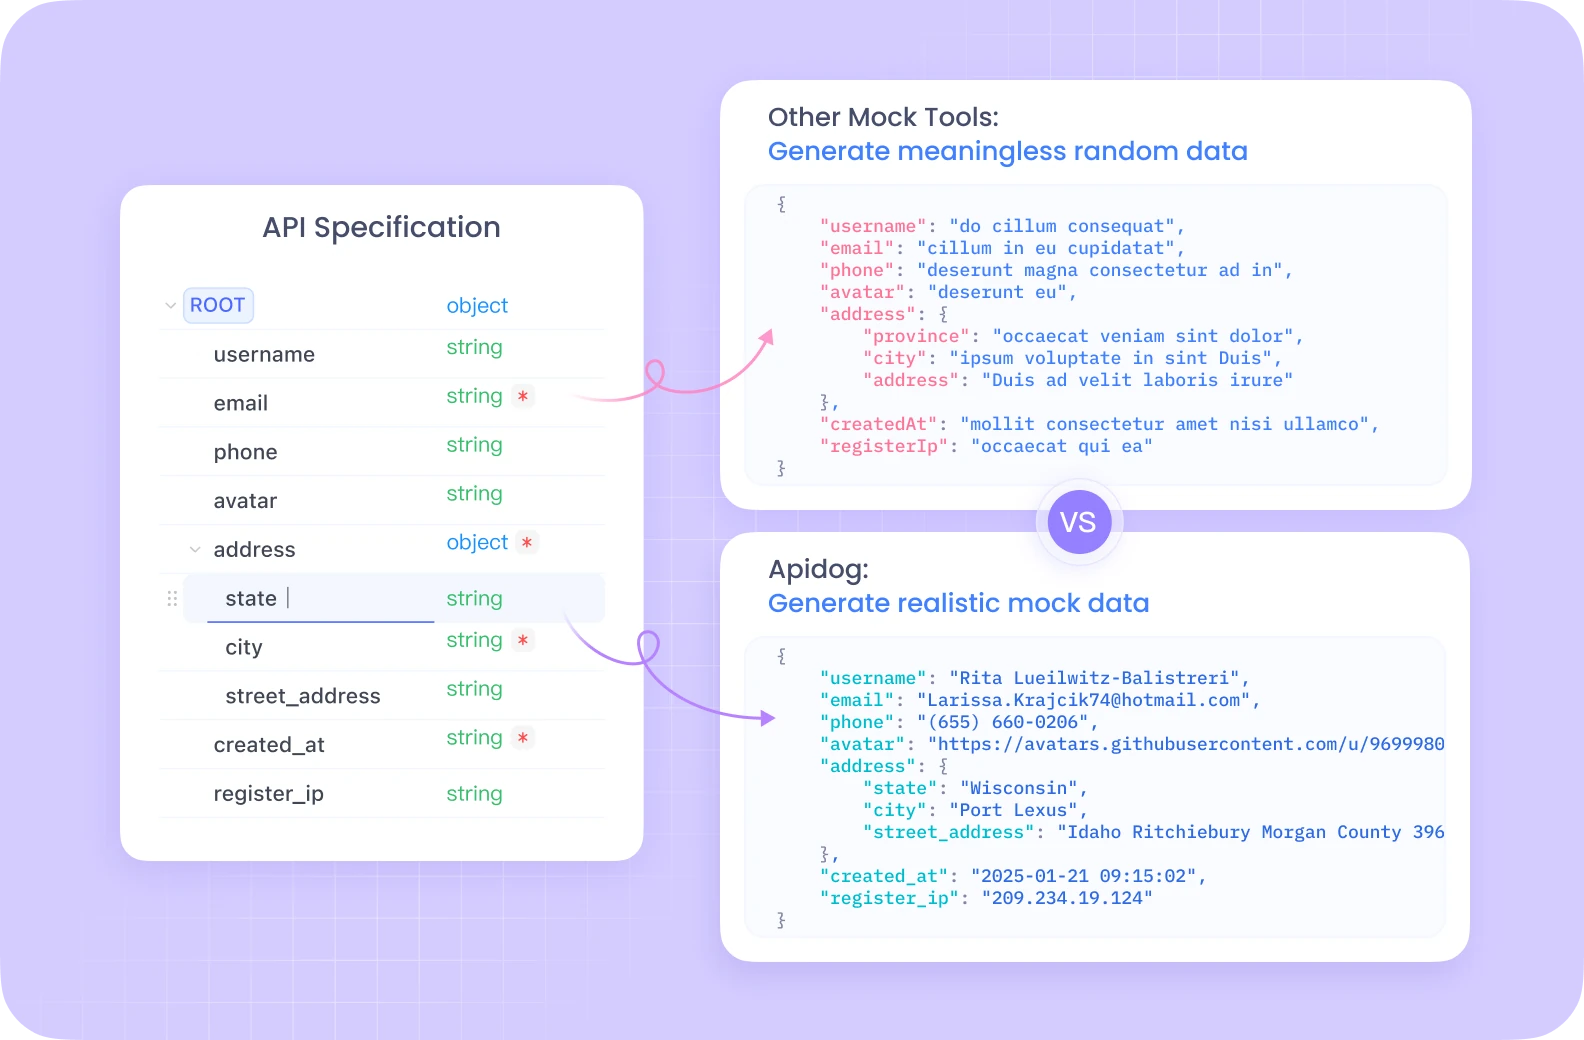
The platform supports REST, GraphQL, WebSocket, and SOAP protocols, making it the perfect companion to Cursor when building API-dependent applications. Together, these modern tools create a development ecosystem that maximizes productivity while minimizing context switching across your projects.
Step-by-Step Guide to Adding Gemini 2.5 Pro to Cursor
Step 1: Accessing Cursor Settings
The first step in the integration process is accessing Cursor's settings panel where all configuration options are managed. The method varies slightly depending on your operating system:
For macOS:
- Launch the Cursor application from your Applications folder or dock
- Click on the "Cursor" menu in the application bar located at the top of your screen
- Select "Settings" from the dropdown menu
- Choose "Cursor Settings" from the subsequent options
For Windows/Linux:
- Open Cursor from your Start menu, desktop shortcut, or application launcher
- Click on the "File" menu in the top-left corner of the application window
- Select "Preferences" from the dropdown menu
- Click on "Settings" from the submenu that appears
This will open the settings panel where you can configure various aspects of the Cursor IDE. The panel typically appears as a new tab within the editor interface, allowing you to maintain your workspace while making adjustments.
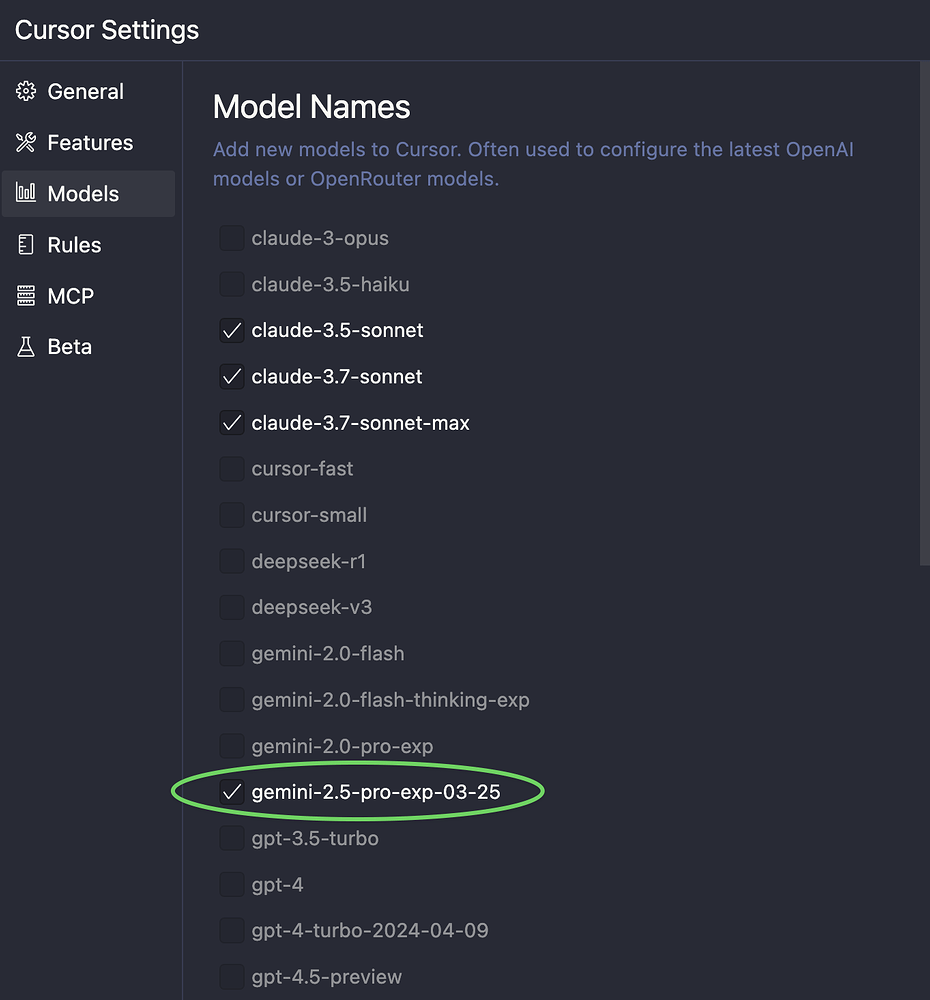
Step 2: Navigating to Model or Extensions Section
Once in the settings panel, you'll need to locate the specific section that manages AI model configurations:
- Look for a navigation menu on the left side of the settings panel
- Scroll through the available categories to find one related to AI functionality
- This section might be labeled as "Models," "AI Providers," "Extensions," or "AI Configuration"
- In newer versions of Cursor, you may find it under "AI Settings" or "Language Models"
- Click on this section to access the model management interface
The exact labeling may vary depending on your Cursor version, but the AI-related settings are typically grouped together for easier access. If you're having trouble finding the correct section, you can use the search functionality at the top of the settings panel by typing keywords like "model" or "AI" to filter relevant options.
Step 3: Understanding the Correct Model Name

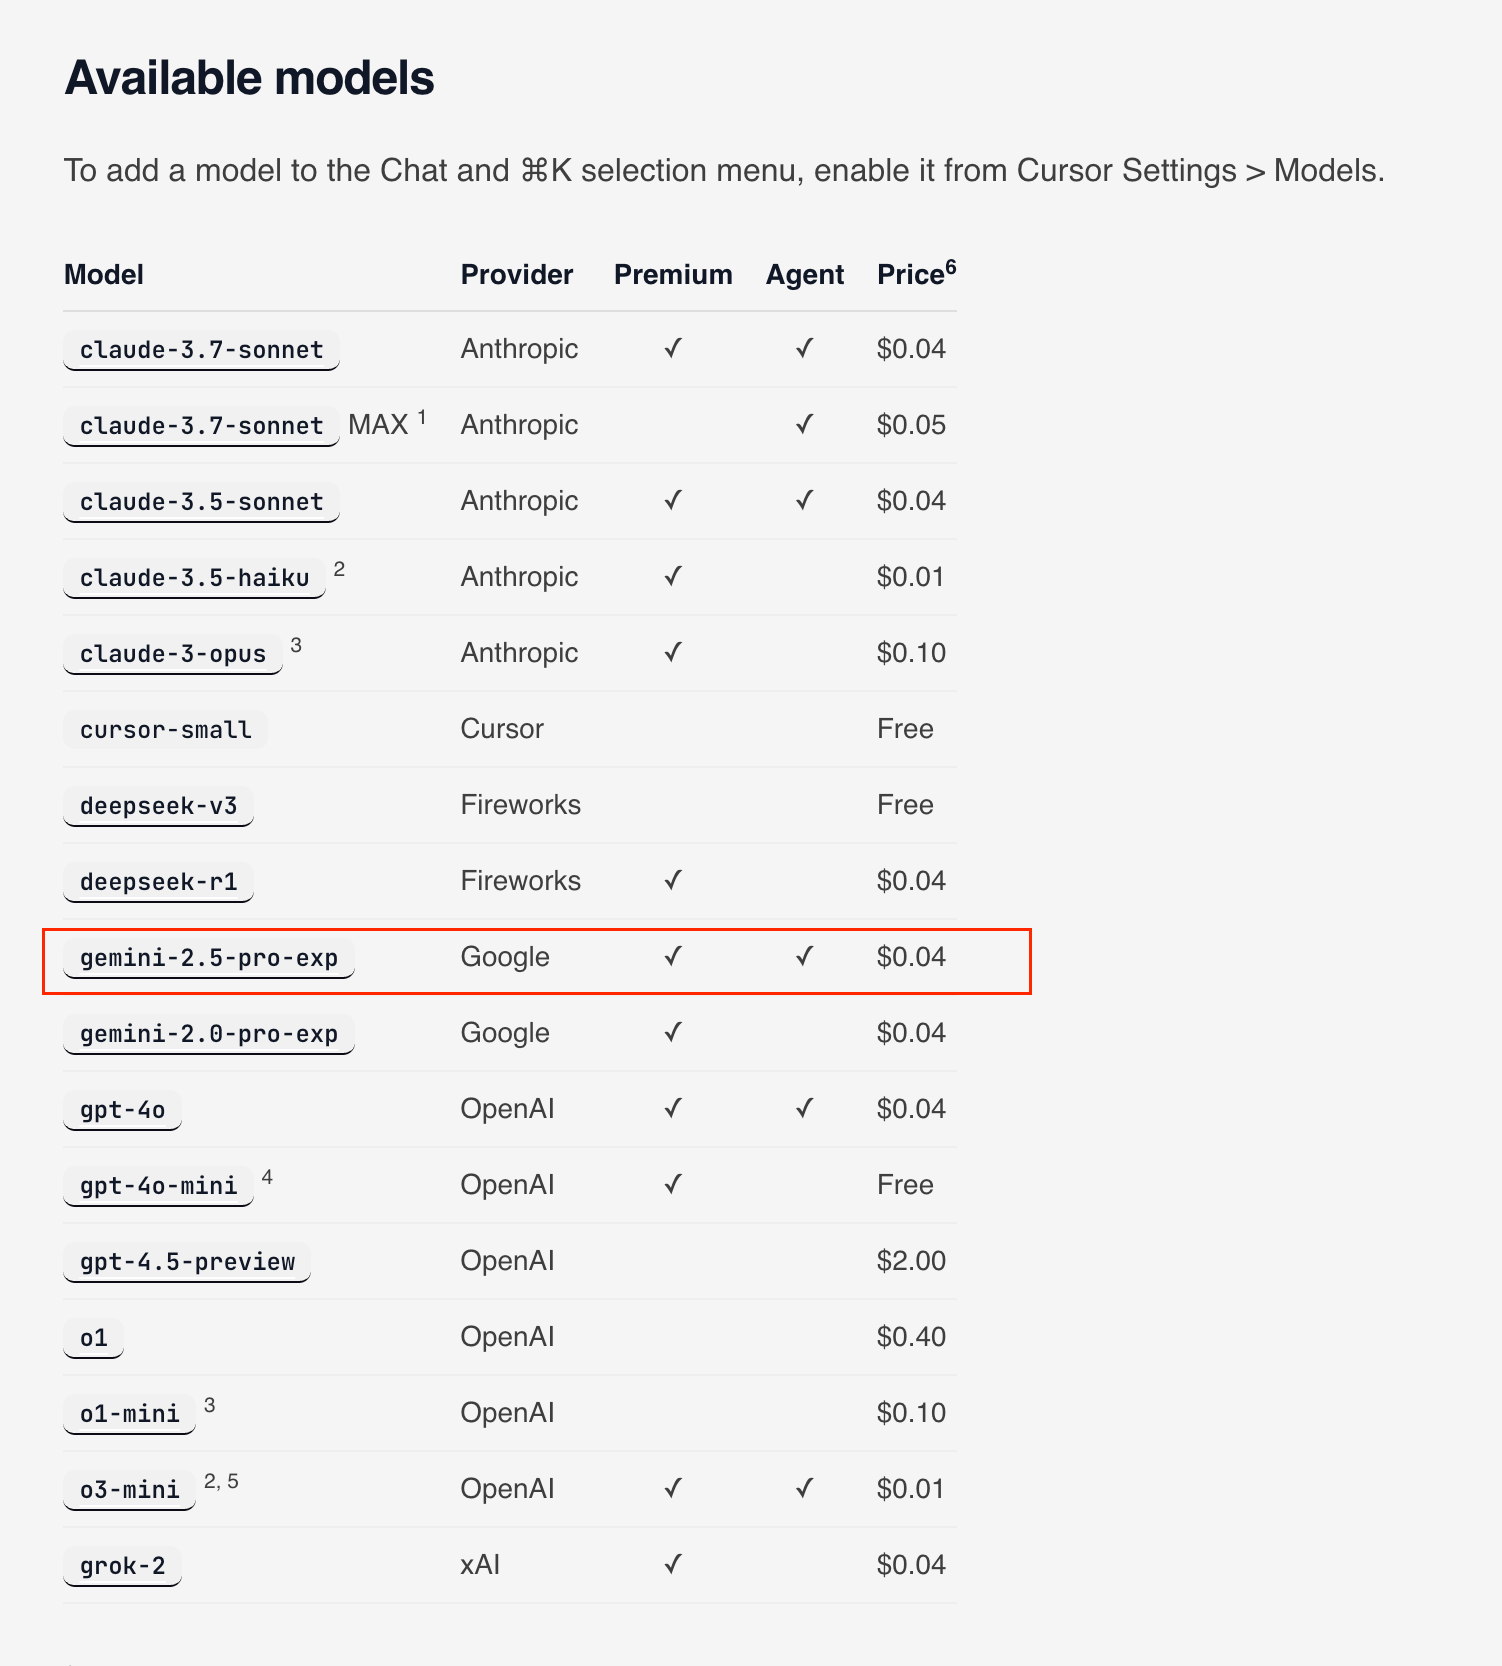
When configuring Gemini 2.5 Pro in Cursor, using the precise model identifier is crucial for successful integration. The exact model identifier for Gemini 2.5 Pro Experimental is:
gemini-2.5-pro-exp-03-25
This string needs to be entered exactly as shown, including all hyphens and numbers. Any deviation, even minor spelling differences or capitalization changes, can prevent the connection from working properly. The model identifier serves as the unique reference that allows Cursor to communicate with the specific version of Gemini you want to use.
Google occasionally updates their model versions, so if you encounter connection issues, verify the most current model identifier on the Google AI Studio documentation page. However, as of the time of writing, the identifier provided above is correct for accessing Gemini 2.5 Pro's experimental capabilities.
Step 4: Obtaining a Google API Key (Direct Method)
To connect Cursor with Gemini 2.5 Pro, you'll need an API key from Google. This key authenticates your requests to the Google AI services. Follow these detailed steps to obtain your key:
- Open your web browser and navigate to Google AI Studio:
- Primary URL: https://aistudio.google.com/
- Alternative URL if the above doesn't work: https://ai.google.dev/
2. Sign in with your Google account
- If you don't have a Google account, you'll need to create one first
- Any standard Google account will work, including Gmail accounts
3. Once signed in, look for the "Get API key" option
- This is typically located in the top-left corner of the interface
- It may also appear as "API Keys" in a side menu or under account settings
4. Click "Get API key" and select "Create API key" from the options presented
- You might need to select "Create in new project" if prompted, especially if this is your first time using Google AI Studio
- Some users might be asked to verify their identity with a phone number for security purposes.
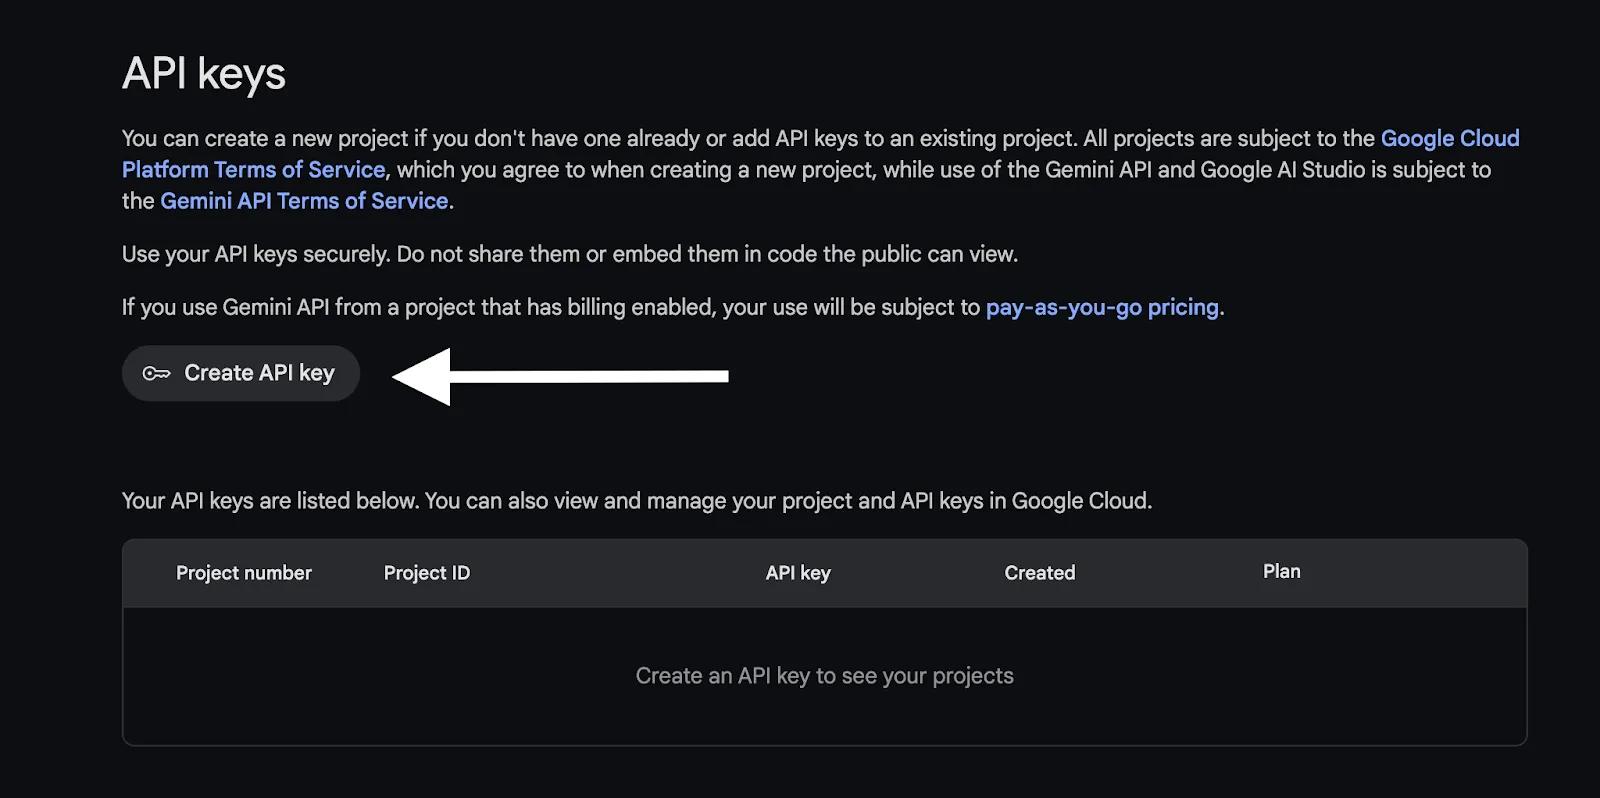
- The system will generate a unique API key for your account. This may take a few seconds to complete
5. Copy your newly generated API key and store it securely
- Consider saving it temporarily in a password manager or secure note app
- You'll need to paste this key into Cursor shortly
IMPORTANT SECURITY NOTE:
- Never share this key or commit it to version control systems like GitHub
- This key grants access to your Google Cloud resources and may have usage limits
- If your key is compromised, immediately revoke it and generate a new one
- Google provides a free tier for API access, but excessive usage may incur charges
Google's API key format typically looks like a long string of letters, numbers, and symbols. Once you've secured your key, you're ready to proceed with configuring Cursor.
Step 5: Adding a Custom Model in Cursor
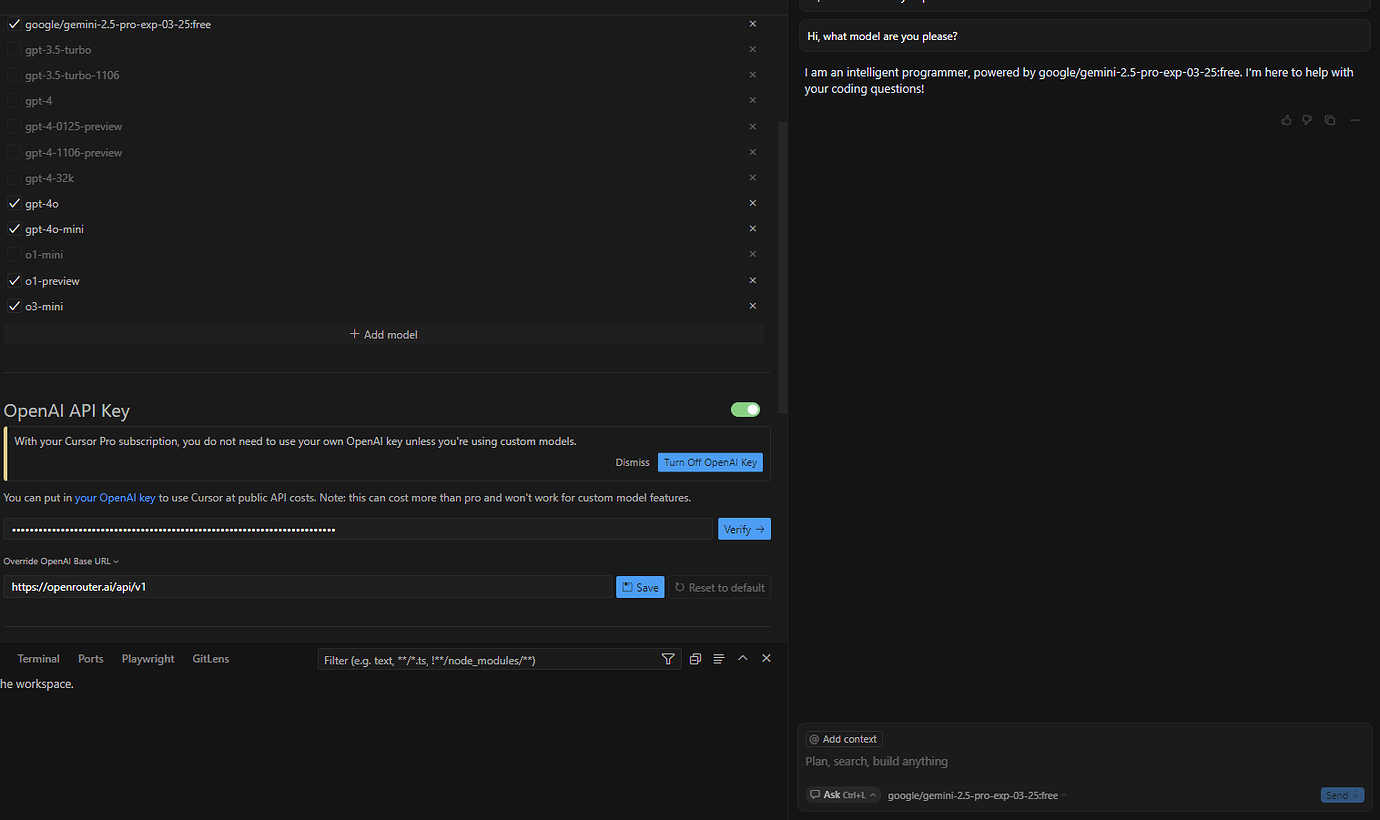
With your API key in hand, return to the Cursor settings panel to configure the custom model:
- Within the AI-related settings section identified in Step 2, examine the interface for options related to adding or customizing models
- Look specifically for options such as:
- "Custom Provider"
- "Add Model"
- "Custom Model Configuration"
- "Override OpenAI Base URL"
3. If you see a button labeled "Add" or "+" near any list of models, click it to begin adding a new model configuration
4. If you see "Override OpenAI Base URL," this is particularly important
- This suggests Cursor primarily works with OpenAI-compatible APIs
- You'll need to adjust this setting to work with Google's Gemini API
- Not all versions of Cursor explicitly label this functionality the same way
The interface for adding custom models varies slightly between Cursor versions, but the core functionality remains the same: you need to provide connection details for the Gemini model.
Step 6: Entering the Model Name
Once you've located the appropriate section for adding a custom model:
- Look for a field labeled "Model Name," "Model ID," or something similar
- Click on this field to activate it for text entry
- Enter exactly:
gemini-2.5-pro-exp-03-25 - Double-check your entry for:
- Correct spelling of "gemini"
- All hyphens in the correct positions
- The correct numeric sequence "2.5" and "03-25"
- No additional spaces before or after the identifier
This precise identifier ensures that Cursor requests the correct model version from Google's API service. Any errors in this string will result in failed connections or unexpected behavior.
Step 7: Overriding the OpenAI Base URL
Many AI code editors, including Cursor, were initially designed to work primarily with OpenAI's models. To use Google's Gemini models, you need to redirect these requests to Google's API endpoint:
Find the setting to override the default OpenAI base URL
- This might be labeled as "API Base URL," "Endpoint," or "OpenAI Compatible URL"
- It could appear as a text field near where you entered the model name
Enter the following URL for the Gemini API in an OpenAI-compatible context:
<https://generativelanguage.googleapis.com/v1beta/openai/>
Ensure the URL is entered exactly as shown, including the trailing slash
- This endpoint allows Cursor to communicate with Google's API service using formats it already understands
Some versions of Cursor might have a dropdown to select "Google" as a provider instead
- If this option is available, select it rather than entering the URL manually
- This indicates your version of Cursor has native support for Google's services
This URL redirection is crucial because it tells Cursor where to send its API requests. Without this change, Cursor would attempt to request the Gemini model from OpenAI's servers, which would fail.
Step 8: Entering the Google API Key
Next, you'll need to provide your Google API key to authenticate your requests:
- Look for a field labeled "API Key," "Google API Key," or "Authentication Token"
- This field might be in the same section as the model name and base URL
- In some versions, it could be under a separate "API Keys" section
- Click on this field to activate it for text entry
- Carefully paste the API key you obtained from Google AI Studio in Step 4
- Use Ctrl+V (Windows/Linux) or Cmd+V (Mac) to paste the key
- Alternatively, right-click and select "Paste" if keyboard shortcuts are disabled
- Verify that the entire key has been pasted correctly
- Ensure there are no extra spaces at the beginning or end
- Check that no characters have been cut off or duplicated
- The key should match exactly what Google provided
- Some versions of Cursor may offer to "Test Connection" after entering the key
- If available, use this feature to verify your configuration works
- A successful test will confirm that all details are correct
This API key serves as your authentication credential and is required for every request Cursor makes to the Gemini service. Without a valid key, the integration will fail even if all other settings are correct.
Step 9: Saving the Settings
After entering all required information, you need to save your configuration:
- Look for a "Save," "Apply," or "OK" button at the bottom of the settings panel
- In some versions, changes may be saved automatically as you make them
- If automatic saving is enabled, you might see an indicator showing "Saving..." or "Changes saved"
2. Click the save button to commit your changes
- The settings panel may briefly show a loading indicator while applying changes
- Some versions might require a restart of Cursor to fully apply the new configuration
3. If prompted to restart Cursor for the changes to take effect, select "Restart Now"
- This ensures all components of Cursor recognize the new configuration
- Your work should be automatically saved before the restart
4. After saving (and restarting if required), Cursor will load with your new configuration
- The Gemini 2.5 Pro model should now be available for use within the editor
Proper saving of settings is essential for persistent configuration. Without this step, your changes might be lost when you close and reopen Cursor.
Step 10: Testing the Integration
The final step is to verify that your Gemini 2.5 Pro integration is working correctly:
- Open or create a code file in the Cursor IDE
- Any programming language will work for testing, but Python or JavaScript are good choices due to their popularity
2. Look for the AI assistant interface in Cursor
- This is typically available as a chat panel on the right side
- Or as a command palette that can be activated with keyboard shortcuts
3. Try using the AI-powered features:
- Code completion: Start typing a function or variable declaration and see if Gemini offers suggestions
- Chat interaction: Open the chat panel and ask a coding question
- Command invocation: Use Ctrl/Cmd + K to invoke AI functionalities directly
4. If Cursor provides an option to select which AI model to use, ensure "gemini-2.5-pro-exp-03-25" is available and select it
- This selection might be available as a dropdown in the chat interface
- Or as an option in the command palette
5. Send a test prompt such as "Write a function to calculate the Fibonacci sequence in Python"
- Observe the response quality, code correctness, and explanation clarity
- A properly functioning Gemini 2.5 Pro should provide well-structured code with detailed explanations
If the model responds appropriately to your prompts, congratulations! You've successfully integrated Gemini 2.5 Pro with Cursor for free.
Alternative Method: Using OpenRouter (Potentially Free)
If you encounter difficulties with the direct API key method, you can leverage OpenRouter as an intermediary platform that simplifies connecting to various AI models, including Gemini 2.5 Pro.
Step 1: Setting Up OpenRouter
- Visit the OpenRouter website: https://openrouter.ai/
- Create an account and sign in
- You can typically sign up using Google, GitHub, or email authentication
- Complete any verification steps required during account creation
3. Navigate to your dashboard after signing in
- Look for "API Keys" or "Credentials" section
- Click on "Create API Key" or a similar option
4. Name your API key something memorable like "Cursor Integration"
- This helps you identify the purpose of this key in the future
5. Set any usage limits if desired
- OpenRouter allows you to limit how much each key can spend
- For personal projects, a low limit is recommended to avoid unexpected charges
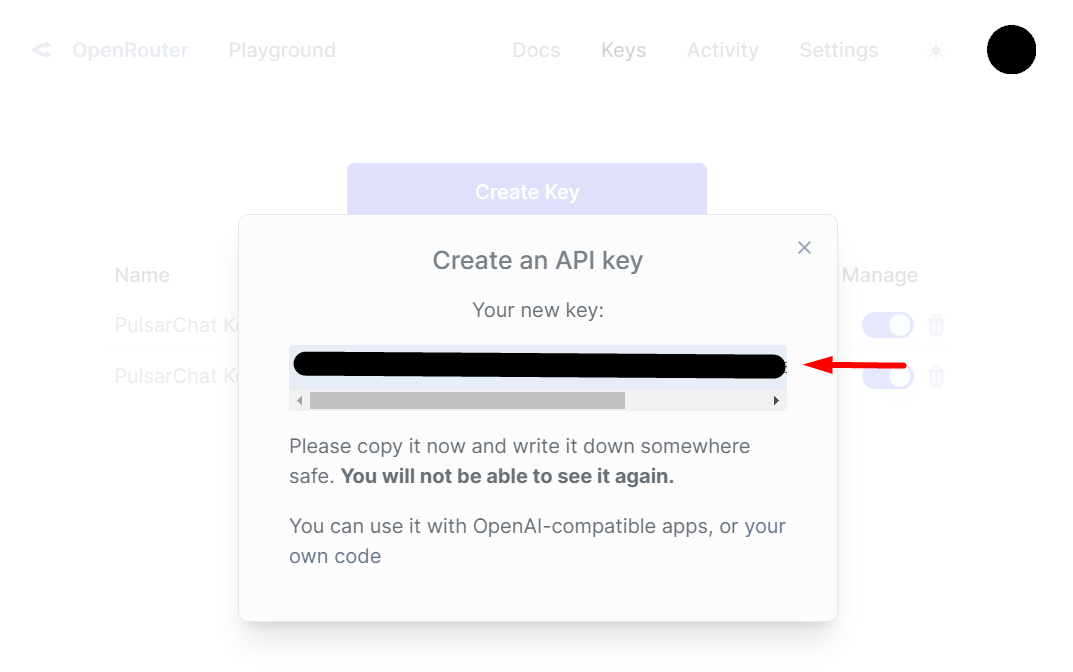
6. Generate and copy your OpenRouter API key
- Store this securely just as you would with the direct Google API key
Step 2: Configuring Cursor with OpenRouter
Access Cursor settings as described in Step 1 of the direct method
Navigate to the section for custom models or API keys
- This is the same section you would use for the direct Google API method
Enable the option to "Override OpenAI Base URL"
- This is crucial for redirecting requests through OpenRouter
Enter your OpenRouter API key in the appropriate field
- This replaces the Google API key used in the direct method
Set the custom API endpoint/base URL to:
<https://openrouter.ai/api/v1>
When adding the custom model, enter:
google/gemini-2.5-pro-exp-03-25:free
(Note: Verify this exact model identifier on the OpenRouter website as it may change)
Save the settings as described in Step 9 of the direct method
Test the integration as described in Step 10
- Send a test prompt to verify the connection works
- Check that responses match the expected quality of Gemini 2.5 Pro
The OpenRouter method has some advantages over the direct approach:
- Simplified API management
- Potential for lower costs through OpenRouter's agreements with providers
- Easy switching between different AI models without reconfiguring Cursor
- Monthly free tier credits that may cover casual usage
However, it adds an additional service between you and Google, which could introduce latency or become a point of failure if OpenRouter experiences issues.
Conclusion
By following this comprehensive tutorial, you've successfully added Google's powerful Gemini 2.5 Pro model to your Cursor IDE without paying for a premium subscription. This integration enhances your development workflow with advanced AI capabilities, from intelligent code completion to complex problem-solving assistance.
Remember that while the basic integration is free, API usage is subject to Google's quotas and pricing. The free tier is typically sufficient for individual developers working on personal projects, but monitor your usage to avoid unexpected charges if you exceed the free limits.
As both Cursor and Google's AI services evolve, some steps in this process may change. If you encounter any difficulties, check the official documentation for both platforms or community forums for the most up-to-date information.
With Gemini 2.5 Pro now at your fingertips within Cursor, you're equipped with one of the most advanced AI coding assistants available today, ready to boost your productivity and tackle complex development challenges.