
Do you want to learn how to make POST requests in Node.js? If yes, then you are in the right place. In this blog post, I will show you how to use the built-in http module and the popular axios library to make POST requests in Node.js. Then, use Apidog to test POST requests with visual interface and share them with your team.
What is an HTTP POST Request in NodeJS?
An HTTP POST request in Node.js is used to send data to a server to create or update a resource. POST requests are commonly used when submitting form data, uploading files, or sending data to be stored in a database.
In Node.js, you can make a POST request using the built-in http module or a third-party library like Axios. The data to be sent with the request is included in the request body. The server can then access and process this data to perform the desired action.
Node.js provides an event-driven, non-blocking I/O model that makes it efficient for handling data-intensive and real-time applications. Its ability to handle POST requests and process data makes it a popular choice for building web APIs, real-time chat applications, and other types of server-side applications.
How to Send POST Request in Node.js?
Now, we will show you several methods to send and make POST requests in Node.js, including the HTTP Module, and Axios library. You can choose the approach that best fits your project requirements and preferences.
1. Send POST Request in Node.js Using the http Module
Node.js is often used to create web servers, web applications, and web APIs. Node.js also provides a built-in http module that allows you to make HTTP requests and responses.
To make a POST request in Node.js using the http module, you need to follow these steps:
- Import the
httpmodule using therequirefunction. - Create a
optionsobject that contains the information about the POST request, such as the hostname, port, path, method, headers, and data. - Use the
http.requestmethod to create a request object, passing theoptionsobject as the first argument and a callback function as the second argument. The callback function will be executed when the response is received, and it will have aresponseobject as its parameter. - Use the
requestobject to send the data and end the request. Therequestobject is an instance of thehttp.ClientRequestclass, which implements theWritableStreaminterface. This means that you can use therequestobject as a stream of data, and write data to it using therequest.writemethod. You can also use therequest.endmethod to signal the end of the data and the request. You can also listen to events likeerrorandtimeouton therequestobject, and handle them accordingly. - Use the
responseobject to handle the response data and headers. Theresponseobject is an instance of thehttp.IncomingMessageclass, which implements theReadableStreaminterface. This means that you can use theresponseobject as a stream of data, and listen to events likedata,end, anderror. You can also use theresponse.statusCodeproperty to get the status code of the response, and theresponse.headersproperty to get the headers of the response. - Use the
response.onmethod to register event listeners for theresponseobject. For example, you can use theresponse.on('data', callback)method to listen to thedataevent, which will be emitted when a chunk of data is received. The callback function will have achunkobject as its parameter, which is a buffer of data. You can use thechunk.toString()method to convert the buffer to a string, and append it to a variable to store the whole response data. You can also use theresponse.on('end', callback)method to listen to theendevent, which will be emitted when the response is complete. The callback function will not have any parameters, and you can use it to perform any final actions, such as logging or parsing the response data. You can also use theresponse.on('error', callback)method to listen to theerrorevent, which will be emitted when an error occurs during the response. The callback function will have anerrorobject as its parameter, and you can use it to handle the error, such as logging or throwing it.
Here is an example of how to make a POST request in Node.js using the http module:
// Import the http module
const http = require('http');

// Create an options object
const options = {
  hostname: 'jsonplaceholder.typicode.com',
  port: 80,
  path: '/posts',
  method: 'POST',
  headers: {
    'Content-Type': 'application/json',
    'User-Agent': 'Node.js'
  }
};

// Create a data object
const data = {
  title: 'Hello, world!',
  body: 'This is a test post',
  userId: 1
};

// Stringify the data object
const dataString = JSON.stringify(data);

// Update the options object with the data length
options.headers['Content-Length'] = dataString.length;

// Create a request object
const request = http.request(options, (response) => {
  // Initialize a variable to store the response data
  let data = '';

  // Listen to the data event
  response.on('data', (chunk) => {
    // Append the chunk to the data variable
    data += chunk.toString();
  });

  // Listen to the end event
  response.on('end', () => {
    // Log the status code and the headers
    console.log(`Status code: ${response.statusCode}`);
    console.log(`Headers: ${JSON.stringify(response.headers)}`);

    // Parse the data as JSON
    const post = JSON.parse(data);

    // Log the post information
    console.log(`Post ID: ${post.id}`);
    console.log(`Post Title: ${post.title}`);
    console.log(`Post Body: ${post.body}`);
    console.log(`Post User ID: ${post.userId}`);
  });

  // Listen to the error event
  response.on('error', (error) => {
    // Throw the error
    throw error;
  });
});

// Write the data to the request object
request.write(dataString);

// End the request object
request.end();
2. Make POST Requests in Node.js Using the axios Library
The http module is a low-level module that provides basic functionality for making HTTP requests and responses. However, if you want to use a higher-level and more user-friendly module, you can use the axios library. Axios is a popular and powerful library that allows you to make HTTP requests and handle responses using promises and async/await syntax. Axios also supports features like interceptors, transformers, timeouts, cancel tokens, and more.
To make a POST request in Node.js using the axios library, you need to follow these steps:
- Install the
axioslibrary using thenpmcommand:npm install axios. - Import the
axioslibrary using therequirefunction. - Use the
axios.postmethod to make the POST request, passing the URL of the resource as the first argument and the data object as the second argument. You can also pass an optionalconfigobject as the third argument, which can contain information about the POST request, such as the headers, parameters, timeout, and more. Theaxios.postmethod will return a promise, which will resolve to aresponseobject or reject to anerrorobject. - Use the
catchmethod to handle the rejected promise, passing a callback function as the first argument. The callback function will have anerrorobject as its parameter, which contains the error message, code, request, and response. You can use theerror.responseproperty to access the response object, and theerror.requestproperty to access the request object. - Alternatively, you can use the
async/awaitsyntax to make the POST request and handle the response. To do this, you need to use theasynckeyword before the function that contains the POST request, and theawaitkeyword before theaxios.postmethod. This will allow you to write asynchronous code in a synchronous manner, and assign theresponseobject to a variable. You can then use thetry/catchblock to handle any errors that may occur during the POST request.
Here is an example of how to make a POST request in Node.js using the axios library:
// Import the axios library
const axios = require('axios');

// Create a data object
const data = {
  title: 'Hello, world!',
  body: 'This is a test post',
  userId: 1
};

// Make the POST request using the then method
axios.post('http://jsonplaceholder.typicode.com/posts', data, {
  headers: {
    'Content-Type': 'application/json',
    'User-Agent': 'Node.js'
  }
}).then((response) => {
  // Log the status code and the headers
  console.log(`Status code: ${response.status}`);
  console.log(`Headers: ${JSON.stringify(response.headers)}`);

  // Log the post information
  console.log(`Post ID: ${response.data.id}`);
  console.log(`Post Title: ${response.data.title}`);
  console.log(`Post Body: ${response.data.body}`);
  console.log(`Post User ID: ${response.data.userId}`);
}).catch((error) => {
  // Log the error message and code
  console.log(`Error message: ${error.message}`);
  console.log(`Error code: ${error.code}`);

  // Log the response status and data if available
  if (error.response) {
    console.log(`Response status: ${error.response.status}`);
    console.log(`Response data: ${JSON.stringify(error.response.data)}`);
  }

  // Log the request method and path if available
  if (error.request) {
    console.log(`Request method: ${error.request.method}`);
    console.log(`Request path: ${error.request.path}`);
  }
});

// Make the POST request using the async/await syntax
async function createPost() {
  try {
    // Await the POST request and assign the response object to a variable
    const response = await axios.post('http://jsonplaceholder.typicode.com/posts', data, {
      headers: {
        'Content-Type': 'application/json',
        'User-Agent': 'Node.js'
      }
    });

    // Log the status code and the headers
    console.log(`Status code: ${response.status}`);
    console.log(`Headers: ${JSON.stringify(response.headers)}`);

    // Log the post information
    console.log(`Post ID: ${response.data.id}`);
    console.log(`Post Title: ${response.data.title}`);
    console.log(`Post Body: ${response.data.body}`);
    console.log(`Post User ID: ${response.data.userId}`);
  } catch (error) {
    // Log the error message and code
    console.log(`Error message: ${error.message}`);
    console.log(`Error code: ${error.code}`);

    // Log the response status and data if available
    if (error.response) {
      console.log(`Response status: ${error.response.status}`);
      console.log(`Response data: ${JSON.stringify(error.response.data)}`);
    }

    // Log the request method and path if available
    if (error.request) {
      console.log(`Request method: ${error.request.method}`);
      console.log(`Request path: ${error.request.path}`);
    }
  }
}

// Call the createPost function
createPost();
3. Send and Receive Data in Node.js
Sending and receiving data in Node.js involves a few key steps. When you send a POST request in Node.js, you typically want to send some data to the web server and receive a response. For instance, you might want to send user information to create a new account and receive a confirmation message or token. Or, you might send file data to upload a file and get back a file URL or status message.
To handle different types of data, you'll need different methods and modules:
- JSON Data: If your data is a simple object or array, you can convert it to a JSON string using
JSON.stringify(). This method creates a string with key-value pairs and arrays, making it easy to send and receive data. To work with JSON responses, you can useJSON.parse()to convert the response back into a JavaScript object or array. - File Data: When dealing with files, you can use the
form-datalibrary to create a form data object and append the file to it. This library mimics HTML form behavior, allowing you to send text and file data. You'll need to install theform-datalibrary with npm and then use it to create and send the form data object. - Streams: For streaming data, you can use the built-in
streammodule. Streams allow you to handle large or continuous data without loading it all into memory.
You can create readable, writable, or transform streams depending on your needs. Streams are useful for handling audio, video, or network data, and you can pipe data from one stream to another for processing or sending to the server.
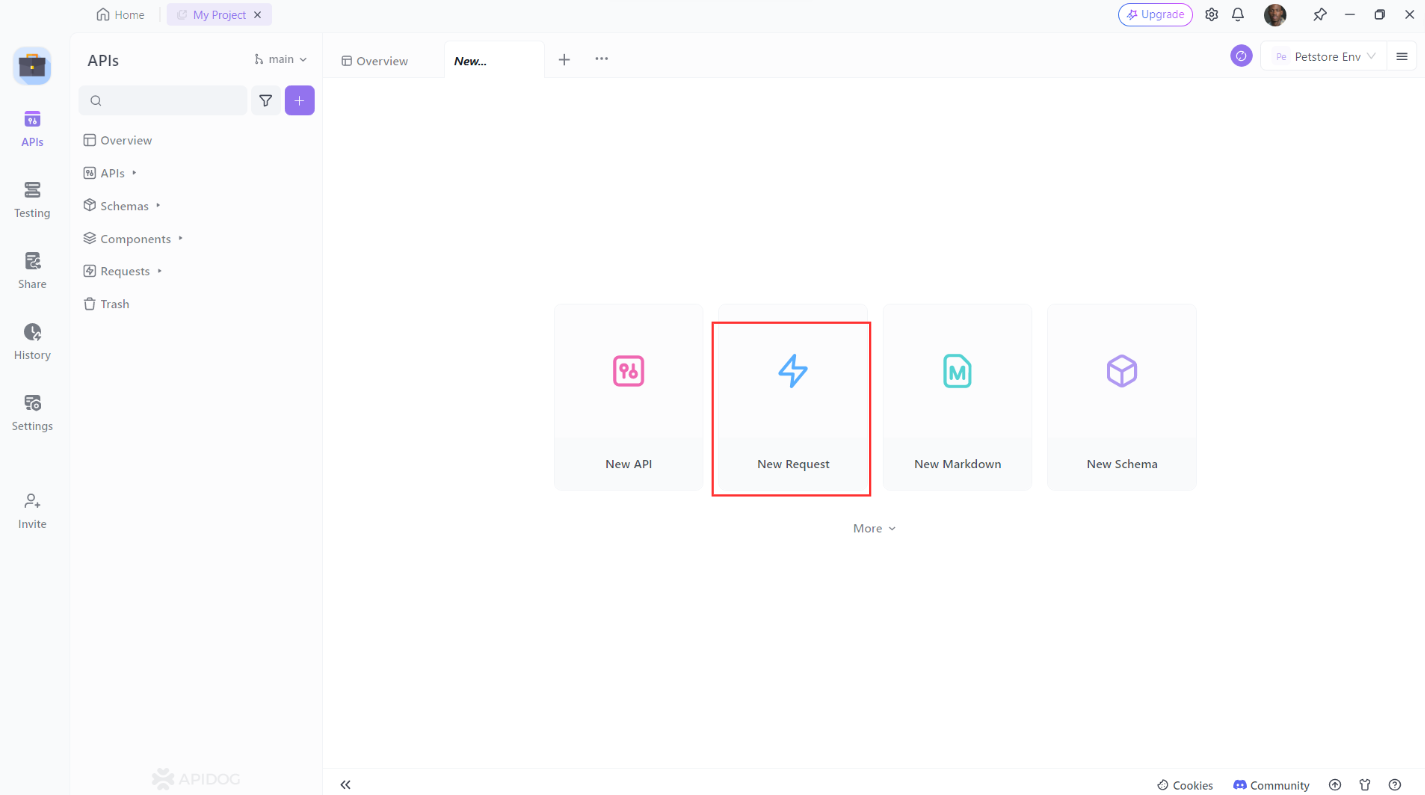
4. Using Apidog to Test Your NodeJs POST Request
Apidog is a powerful tool for testing APIs. It allows you to create and save API requests, organize them into collections, and share them with your team.
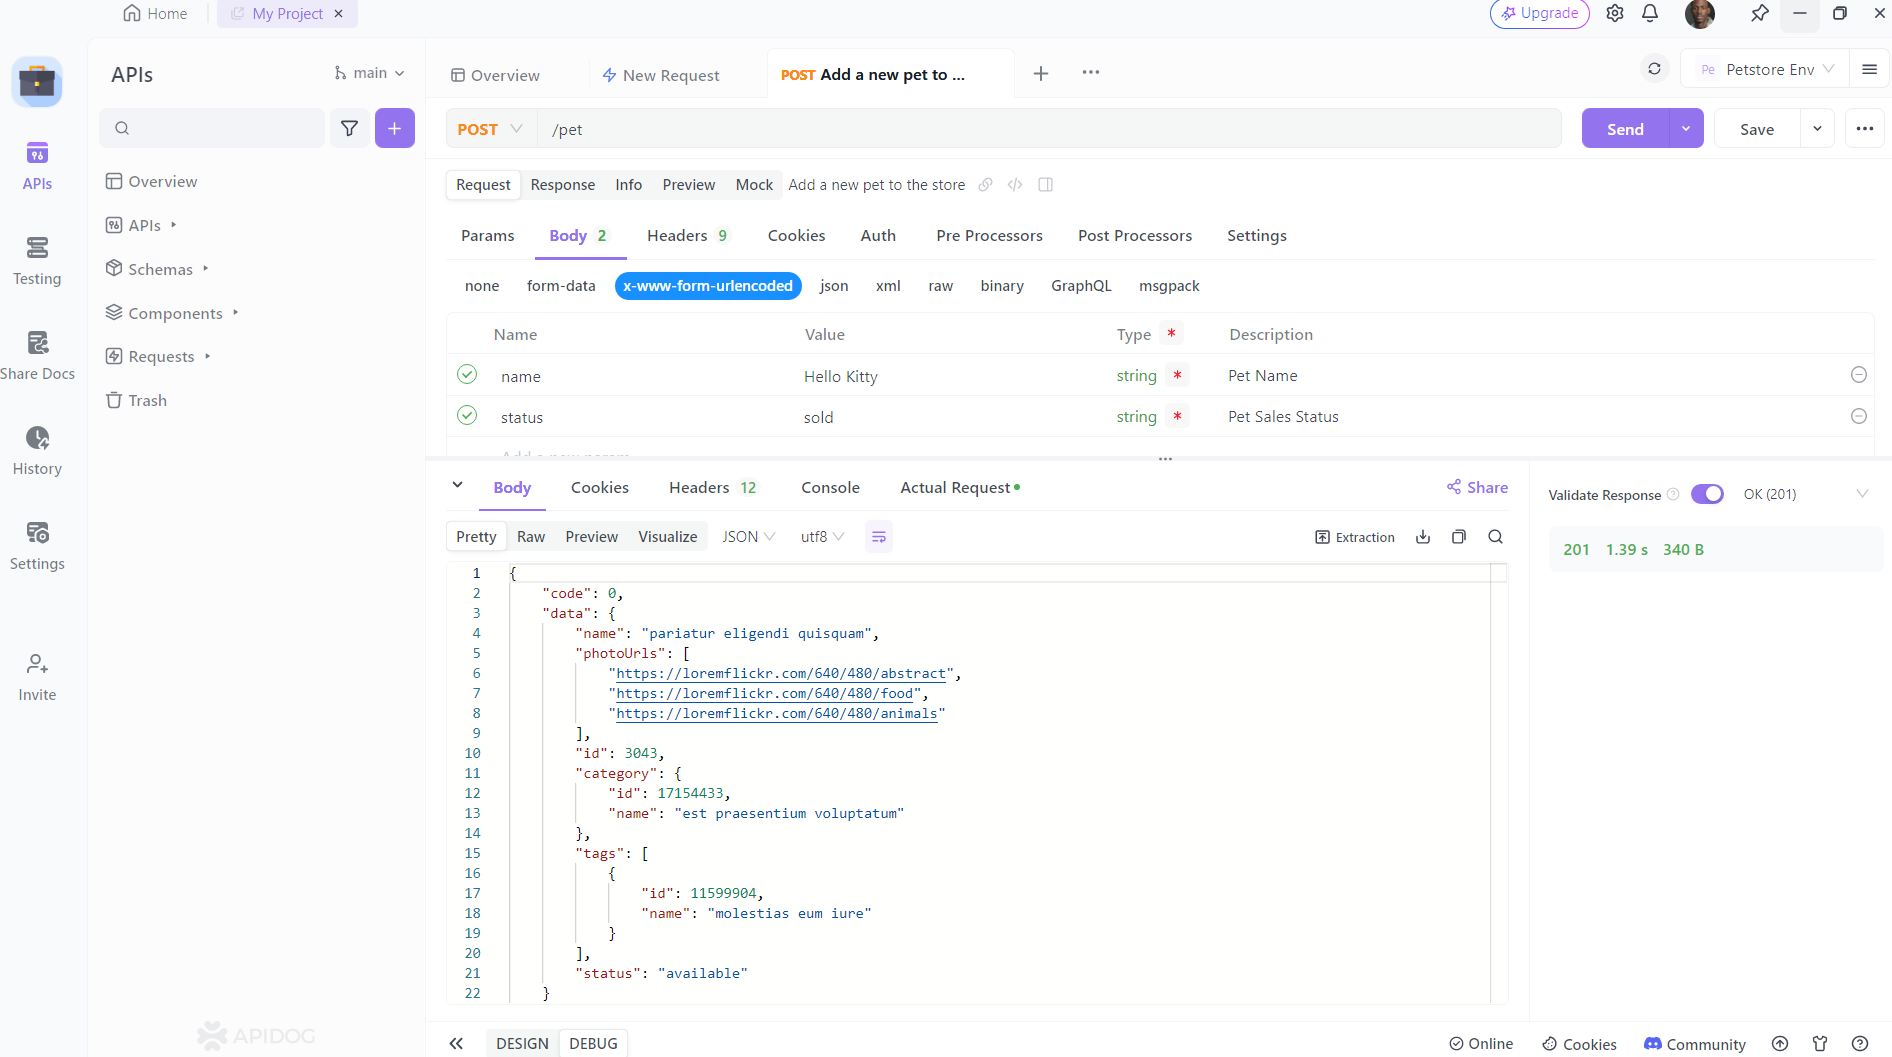
Here is how you can use Apidog to test your POST request:
- Open Apidog and create a new request.
2. Set the request method to POST.

3. Enter the URL of the resource you want to update. Add any additional headers or parameters you want to include then click the “Send” button to send the request.
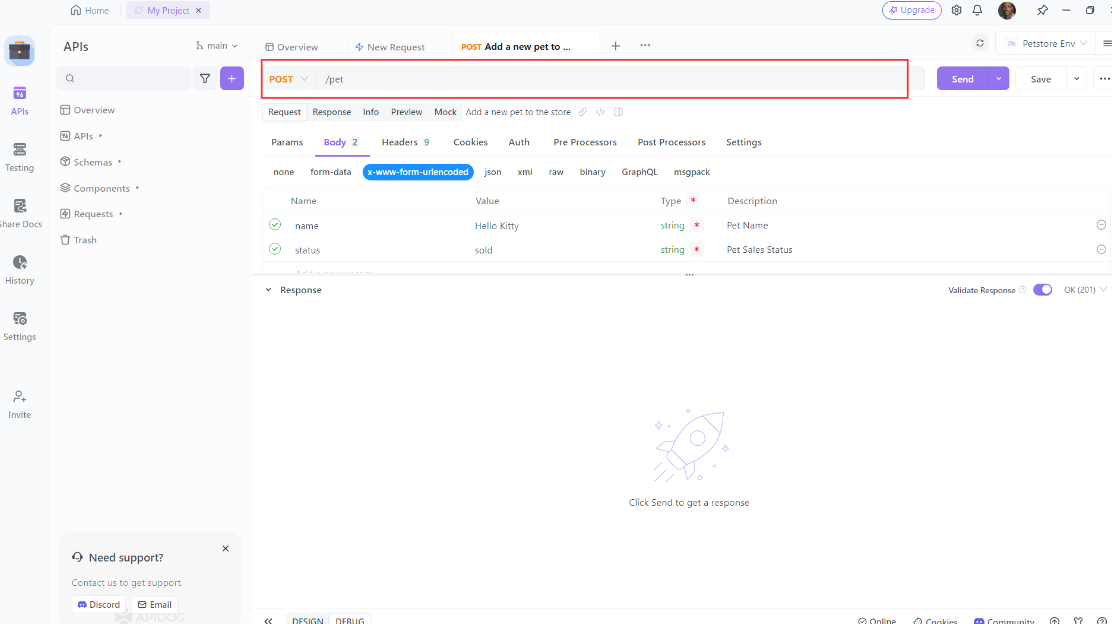
4. Verify that the response is what you expected.
Conclusion
In this blog post, I have shown you how to make POST requests in Node.js using the http module and the axios library. I have also shown you how to send and receive data in different formats and scenarios. I hope you have learned something useful and enjoyed reading this post.


